Chevrolet Cruze is a large-scale project of the automaker General Motors. The car that replaced the Chevrolet Lachetti. In this article we will talk about replacing the backlight bulbs on a Chevrolet Cruze car with a sedan, hatchback and station wagon body type.
If your car's license plate lights do not light up, the bulbs will most likely need to be replaced. The procedure for replacing the license plate light on a Chevrolet Cruze sedan does not take much time, and even a novice car owner can cope with this task. What you will need for this:
- Phillips screwdriver for unscrewing screws
- Flat-head screwdriver - in those places where there is a need to pry off the lamp housing, usually secured with clips on the inside
- Car cosmetics such as silicone grease and sealant may come in handy
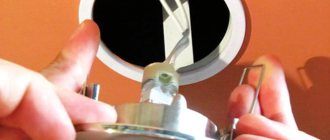
In a Chevrolet Cruze with a sedan body type, the lighting lights are located in the license plate opening, under the trunk lid.
- In order to replace the used light bulb in the license plate illumination, use a Phillips screwdriver to unscrew the two screws that secure the lampshade to the body.
- After this, we take out the lantern from the niche in which it is located.
- We take out the socket with the light bulb from the housing in which it is located, turning it counterclockwise.
Next, you need to remove the lamp from the socket and replace it with a new one. If necessary, wipe the diffuser inside and out with a soft, damp cloth. After which it will need to be lubricated with a sealant for better protection from external undesirable factors such as dust and moisture.
After all the actions taken, all you have to do is do everything in the reverse order.
Expert opinion
It-Technology, Electrical power and electronics specialist
Ask questions to the “Specialist for modernization of energy generation systems”
Chevrolet Cruze low beam lamp: what does it cost and how to change it If you want LEDs or xenon in the headlights, change the headlights to ones specialized for them, if your car was produced with the appropriate optics, of course. Ask, I'm in touch!
Replacing license plate lights on a Chevrolet Cruze hatchback and station wagon
Unlike the Chevrolet Cruze with a sedan body type, on the hatchback and station wagon the license plate lights are mounted in the rear bumper. The replacement and installation procedure itself differs slightly:
What kind of lighting do you prefer?
Built-in Chandelier
It is necessary to unscrew the screws with which the lamp is attached to the niche. If necessary, you can pry off the flashlight housing with a flat screwdriver.
Next, you need to remove the lamp socket from the backlight housing. To do this, you need to turn it counterclockwise.
Unscrew the non-working W5W lamp from the socket and replace it with a new one. If you find dirt or dust on the diffuser and mounts, it is also very advisable to wipe them with a slightly damp cloth. Then lubricate these parts with sealant.
Next, we carry out all the steps in the reverse order - we put the lamp back into the housing, then we insert the entire structure into the niche, first with one side, then with the other. In this case, a characteristic click of the clamps should be heard.
By analogy, we perform the same actions with another lamp, in the event that it has failed and also needs to be updated.
Expert opinion
It-Technology, Electrical power and electronics specialist
Ask questions to the “Specialist for modernization of energy generation systems”
Chevrolet Cruze lampshade ru My affiliate Link to the site with music You can help the project financially exclusively for the development and purchase of new interesting products Qiwi 79150317989, Yandex. Ask, I'm in touch!
Replacing the interior light bulb of Lada Priora (VAZ Priora)
Interior lighting plays an important role in the dark: it creates comfortable conditions for the driver, makes it possible to better see the instruments, gear shift knob, etc. The interior lighting of the Priora does not always satisfy car enthusiasts. The article discusses types of lighting and provides instructions on how to install lampshades.
Features of interior lighting on VAZ cars
In the simplest configuration of the Lada Priora, there is only one interior lighting fixture. It is located on the ceiling at the front. They are equipped with C10W bulbs, which emit a soft but faint yellow light. Priora owners are not satisfied with such light, so they install an improved unit from the “Lux” version model.
Two lighting fixtures are fully equipped in Priora and Kalina. One is located near the driver. The second is located in the ceiling above the rear seats. Although an LED lamp is used, it shines no worse than light sources installed near the driver.
Instructions for installing new lampshades
To replace lighting fixtures in both the Priora and Kalina interiors, no special knowledge is required, since the procedure is simple.
Photo gallery “Step-by-step installation of lighting shades”
To replace the light bulb, follow these steps:
- First you need to remove the protective cover. This can be done by prying it with a screwdriver from the mounting side and lightly pressing the clip. Now the cover can be easily removed from the ceiling.
- Next you need to disconnect the power wires.
- Having disconnected the old lamp, a new element is installed in its place.
- Assembly is carried out in reverse order.
Installing an additional “Lux” lighting fixture will require care and time. First of all, you need to purchase a new block, which will be placed above the rear sofa.
The installation procedure consists of the following steps:
- First, you need to apply markings to the ceiling, deciding on the place where the rear lamp will be located.
- Then, according to the markings, a hole is cut in the ceiling covering.
- Next, you need to stretch the power wire from the front light between the roof and the ceiling covering.
- At the next stage, the unit to be installed is connected.
- To ensure that the lid fits tightly to the ceiling, you can cut a frame from some kind of rubber seal.
In the Priora “Norma” configuration, it is recommended to change the front unit installed from the factory. Replacing it is easy, since the characteristics of the devices are the same.
The replacement scheme is similar to replacing a light bulb: a new element will be installed instead of the old light source. When installing LEDs, keep in mind that they differ in brightness color. For the rear light, it is better to make the LED backlight brighter, and put medium-brightness LEDs in front (the author of the video is Repair and Tuning).
After replacing the lighting unit of the Priora Norma configuration with a higher-quality luxury one, the driver becomes more comfortable in the cabin.
Simplicity of installation and low time costs make it possible to replace the standard lighting unit with a more powerful one, or equip the cabin with an additional light source. At the same time, you do not need to have in-depth knowledge of electrical engineering; even a novice driver can perform the replacement.
Price issue
The block (diode) costs 460 rubles. The front Lux package costs 535 rubles.
There are two options to improve lighting by replacing it with LED:
- Replacing a conventional lamp with an LED one. Price 50 rub.
- Replacing a lighting lamp with an LED module - 350 rubles.
- To replace the unit you do not need to remove it, just remove the glass.
- This video demonstrates how to install a rear light in the interior of a Lada Kalina with your own hands (the author of the video is NBI12345).
- The reasons why you sometimes have to remove the interior lamp on a Lada Priora car may be the following:
- Failure of its backlight lamp
- Failure of the interior air temperature sensor
- Mechanical damage to the lamp housing (for further replacement)
In order to remove the lampshade with your own hands, you will need a minimum of tools, namely:
- Torx bit t 20
- Holder
- Flat blade screwdriver
Removing and installing the lampshade
First of all, we open the upper compartment, the so-called eyeglass case, and under it you need to unscrew the two fastening screws:
After that, using a flat-head screwdriver, pry off the cover - a decorative trim, under which there is a rear-view mirror mount.
And also unscrew the two fastening screws, as shown in the photo below:
Next, carefully move the lampshade to the side, but without sudden movements, since there are several more wires going to it.
And now you can disconnect the power wires by squeezing or pressing the clamps, depending on the type of their fastening:
Replacing the lampshade or temperature sensor, as well as backlight bulbs, occurs without any problems. After all the manipulations, you can install the lampshade in its place. The entire repair will not take more than 10 minutes. The price of a new lamp is about 1,500 rubles for the whole assembly with sensors, etc. For one element no more than 500 rubles.
Removing the interior lamp of a Lada Priora car is carried out to replace a burnt-out lamp or switch, as well as when carrying out other work in which its presence will interfere with the progress of their work. Prepare a standard set of tools, de-energize the car by disconnecting the minus terminal from the battery and perform the following sequence of actions:
- First of all, you need to remove the lamp diffuser. To do this, pry it up with a small flat screwdriver and, overcoming the force of the spring clips, remove it.
- We release the lock of the interior lighting lamp and disconnect the block with the power wires.
- Replace the lampshade or make any other repairs, then perform the installation in the reverse order.
Source: https://avtozam.ru/vaz/zamena-lampochki-podsvetki-salona-lada-priora-v.html
Number plate light on a Chevrolet Cruze: how to replace
Additional recommendations for installing lighting elements
By following the tips given here, you will extend the life of the light elements in your car and improve its overall performance.
- If, when examining the lamp, you find a darkening on the bulb, but the element is in working condition, it is still better to replace it immediately, since it will not work for a long time
- A common situation is when the screws on the body become covered with rust and are difficult to unscrew when trying to unscrew them. In this case, an anti-corrosion spray or silicone grease will come to the rescue.
- When installing new light bulbs, you should carefully turn on the backlight, then you will immediately see when it lights up. If this does not happen, then it is quite possible that the fuse has failed.
Replacing a Chevrolet Cruze license plate light bulb
WARNING! A very common method for reducing fuel consumption has been found! Don't you believe it? An auto mechanic with 15 years of experience also didn’t believe it until he tried it. Then he saves 35,000 rubles a year on gasoline! More "
Expert opinion
It-Technology, Electrical power and electronics specialist
Ask questions to the “Specialist for modernization of energy generation systems”
How to remove the interior light of a Chevrolet Cruze | An online magazine for car enthusiasts If, when examining a lamp, you find a darkening on the bulb, but the element is in working condition, it is still better to replace it immediately, since it will not work for a long time. Ask, I'm in touch!
How to disassemble the lampshade and replace the lamp
In this section we will find out how to remove the lampshade of the Lada Priora “Norma” and replace the lamp. To work, we will need a small flat-head screwdriver and, of course, a new C5W lamp.
We insert a screwdriver under the passenger side glass and push it down, overcoming the force of the spring latch. We fold the glass down and remove the latches on the driver's side from engagement with the lamp.
Removing glass from the interior lighting of the Lada Priora “Norma”
In front of us is a light bulb, clamped with spring contacts. We simply pull it out and install a new one in place of the burnt one.
Important! The spring lock is located only on one side of the glass - closer to the passenger. If you try to press the glass on the driver's side, the plastic clips will be broken and the lamp can be thrown away.
As for repairing lamps on the Lada Priora “Lux”, we will not do this, since replacing LEDs will require not only knowledge of radio engineering, but also the ability to hold a soldering iron.
If you have such knowledge, then you can watch a video about replacing LEDs in the Lux rear light.
Possible malfunctions - if the lamp still does not light up
The burnout of the Priora interior lighting bulb, unfortunately, is not the only malfunction. It happens that even though the lamp is working, the lamp does not light up or does not behave as it should. The main reasons for this problem are as follows:
The fuse has blown . We open the interior mounting block - it is located under the dashboard to the left of the driver and is closed with a decorative cover with rotary latches.
Lada Priora mounting block and numbering of fuses in it
Fuse F10 with a rating of 7.5 A (Normal) or 10 A (Lux) is responsible for interior lighting in “Norma” and “Lux”.
Healthy! The same fuse also powers the brake light bulbs. If they are lit, then the fuse is definitely good, and you don’t have to go into the mounting block.
The switch built into the lamp has oxidized . We remove the glass (see previous section), turn it over, and clean the contacts.
As an option, we buy a new switch, but here we will have to unsolder the rivets (the switch is designed to be non-removable).
The limit switch in the door pillar is faulty . We remove the limit switch, unscrew one self-tapping screw, and use a multimeter set to resistance measurement mode. We replace the faulty limit switch with a new one.
Break or short circuit to the body of the supply wire . In the second case, the fuse constantly blows. We inspect the wiring, look for damage, and fix it. If the problem cannot be found, disconnect the damaged conductor and replace it with a new one using a special automotive wire.
Replacing the lampshade “Norma” with “Lux”
And finally, we will find out how to change the standard interior lamp of the Lada Priora “Norma” to “Lux”, since compared to the “Lux” it looks, to put it mildly, not a fountain both in appearance and in functionality.
Lighting lantern “Norma” (left) and “Lux” - the difference, as they say, is obvious
First of all, you need to find the mating part for the Lux flashlight socket, since it is not the same as on the Norma, although the pinout is the same.
The sockets of the “Norma” and “Lux” flashlights are slightly different in size
Healthy! The industry produces “Lux” lampshades with “Norma” sockets specifically for tuning. They are quite difficult to find, but they exist.
The computer cable used to internally connect the front jack of telephones fits perfectly into the new socket.
Cable for internal connection to PC
In order for the cord to be used, it needs to be slightly modified - the contact must be moved from the fourth socket to the third. This is easy to do with a needle.
We press the side lock of the contact and pull it out of the socket along with the wire. We move it to the third one - it will latch itself. We cut off the extra fourth nest with a regular knife.
We bite off the second connector on the cable and strip the wires. So, we have in our hands a lamp from Priora “Lux” with a power cable. You can start replacing. We open the box for storing glasses - it is located immediately above the lampshade. Using a Phillips screwdriver, unscrew the two screws.
There were screws here
- Under the lantern we unscrew two more that secure the mirror.
- Self-tapping screws for mounting mirrors in the cabin
- Disconnect the connectors of the flashlight and temperature sensor and remove the cover together with the flashlight.
Removed trim with interior light
We connect the new connector in place of the old one, focusing on the pinout given below. In principle, it is the same as on the old one.
Pinout of contacts for the Lada Priora “Lux” flashlight socket
The author of the modification did not cut off the old connector, but simply connected a new one in parallel, stripping the wires feeding the old one.
The new connector is connected parallel to the old one
We remove the “Normal” interior lighting lamp and insert the “Lux” one in its place. There is no need to modify anything here - the shape, dimensions, and fasteners are the same.
Selection and replacement of low beam lamps for Chevrolet Cruze
- In order to replace the used light bulb in the license plate illumination, use a Phillips screwdriver to unscrew the two screws that secure the lampshade to the body.
- After this, we take out the lantern from the niche in which it is located.
- We take out the socket with the light bulb from the housing in which it is located, turning it counterclockwise.
Replacing the Chevrolet Cruze (sedan) license plate lamp
Chevrolet Cruze is a large-scale project of the automaker General Motors. The car that replaced the Chevrolet Lachetti. In this article we will talk about replacing the backlight bulbs on a Chevrolet Cruze car with a sedan, hatchback and station wagon body type.
If your car's license plate lights do not light up, the bulbs will most likely need to be replaced. The procedure for replacing the license plate light on a Chevrolet Cruze sedan does not take much time, and even a novice car owner can cope with this task. What you will need for this:
- Phillips screwdriver for unscrewing screws
- Flat-head screwdriver - in those places where there is a need to pry off the lamp housing, usually secured with clips on the inside
- Car cosmetics such as silicone grease and sealant may come in handy
In a Chevrolet Cruze with a sedan body type, the lighting lights are located in the license plate opening, under the trunk lid.
Required Tools
Considering the fact that on some car models the ceiling lamps are secured with spring clips, removal will require a thin slotted screwdriver.
If you have regular plastic clips, just grab the lampshade with your fingers and pull it down.
Dismantling the interior lamps of a Ford Focus 2 is simple and only takes a few minutes. It is worth recalling that the fastening grooves are quite fragile, so the operation should be carried out carefully.
Replacing the light bulbs installed in the fog light
In order to change the fog light bulb, you must use the instructions below.
Expert opinion
It-Technology, Electrical power and electronics specialist
Ask questions to the “Specialist for modernization of energy generation systems”
Restoration of the Chevrolet emblem. How to remove a Chevrolet emblem! By analogy, we perform the same actions with another lamp, in the event that it has failed and also needs to be updated. Ask, I'm in touch!
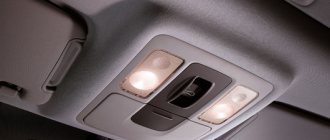
What kind of lamps are installed in the interior lamp?
The lamp itself consists of 3 sections - a central one and two side ones for the driver and passenger. C5W lamp (AC12-5-1) is installed in the center . On the sides there is a T4W lamp (A12-4-1) with a power of 4V.
Instead of conventional incandescent lamps, you can install LED lamps with exactly the same bases. In addition to the usual lamp, you can install universal interior lighting in the center; we will talk about it below.
There should be no problems with the c5w lamp; there are a lot of LED analogues, which one you choose depends only on you. If you suddenly find yourself in a professional car lighting store, it is better to buy lamps with 5730 diodes, they will shine brighter than others.
In addition to a regular lamp, you can install universal interior lighting in the central lamp. It comes in different sizes, so you can choose it according to the size of the lampshade. The kit includes 3 different adapters for lamps: c5w, w5w and t4w.
or simple lamps with c5w socket
LED lamps have polarity, so when installing, pay attention to the + contact. If the lamp does not work during installation, simply turn it over.
The side lighting lamps have a different polarity. When installing LED lamps, they will not work and you will not be able to turn the lamp over. Therefore, you will have to remove the lampshade and rearrange the wires directly on the lampshade itself. Swap + and - places. Everything should work.
When choosing t4w LED lamps, pay attention to their size; the width of the lamp may not fit into some lampshades.
How to change a lamp
What is needed to replace the low and high beam lamp on a Chevrolet Cruze? Actually, almost nothing:
Change lamps in pairs. During operation, their brightness changes, and it may happen that although the bulbs are from the same manufacturer, the new one will shine brighter than the one already installed.
Now I will tell you how to replace the low beam lamp on a Chevrolet Cruze. The manufacturer took care of car enthusiasts and designed the engine compartment so that replacing light bulbs is not difficult.
The lamp in the right headlight is easy to change as the car moves. First, remove the terminal block. Here it is important to pull not by the wires, but by its plastic body; you may need to apply some force. If it doesn’t work, hold the lamp by the base through the boot and pull the terminal block, shaking it slightly.
When the block gives in to your pressure, remove the boot. If it is positioned correctly, then you will see a tongue at the bottom of it. You just need to grab it with your fingers and pull it towards you.
To replace the light bulb in the left headlight while the car is moving, you need to do everything as described above, but there is one caveat. Access is limited by the windshield washer filler neck. It can be removed by pulling it up, as shown in the picture below.
How to remove the windshield washer neck to replace the bulb in the right headlight
Expert opinion
It-Technology, Electrical power and electronics specialist
Ask questions to the “Specialist for modernization of energy generation systems”
Lamps with increased brightness Send a private message to dmi Find more messages from dmi Send a private message to Pasha Find more messages from Pasha Send a private message to daster. Ask, I'm in touch!
How to change the polarity on the interior lamp of a Lada Kalina
You can do this in two ways:
Swapping the + and wires is the easiest way. But the light will not work when the doors are opened.
The second option is more complex and involves replacing everything + that fits the lampshade. We need to replace the + with - on the base lamps, and ! we remake the “-”, which is taken from the body to the central lamp to “+”. Without this manipulation, nothing worked for me personally.
The pinout of the switch remains almost unchanged, with the exception of replacing “-” with “+”
Changing the lamp in a ceiling light yourself is easy. This does not require special knowledge and tools, but only care and accuracy when carrying out the work. It won’t be too difficult to replace the entire lamp.
Features of interior lighting on VAZ cars
In the simplest configuration of the Lada Priora, there is only one interior lighting fixture. It is located on the ceiling at the front. They are equipped with C10W bulbs, which emit a soft but faint yellow light. Priora owners are not satisfied with such light, so they install an improved unit from the “Lux” version model.
Two lighting fixtures are fully equipped in Priora and Kalina. One is located near the driver. The second is located in the ceiling above the rear seats. Although an LED lamp is used, it shines no worse than light sources installed near the driver.
Additional cabin lighting
Step-by-step instructions for dismantling the lampshade
To do this, consider upgrading your interior lighting. The following example shows the replacement of a conventional incandescent light bulb in a lampshade with a more modern and efficient NIGHTON ML-6 LED board. This replacement will be relevant for the interior of Chevrolet Aveo, Daewoo Matiz, ZAZ VIDA with the same type of lampshades. This technology for dismantling the ceiling lamp will be relevant for other brands of cars. Carefully study the external design of the lamp.
Rice. 3. Lamp for dismantling
As you can see, near the switch there is a small groove, highlighted in the figure with a red circle. In order to remove the diffuser, it must be pryed off with any flat object. In this example, you pry up the lampshade with a knife and apply a little force towards the inside of the cabin.
Rice. 4. Pry off the glass with a knife
Please note that the knife should fit easily into the hole, but you will also need enough width. Since the thin fabric creates a large load at the pressure point. Also, you should not apply force only from the edge, since if it slides, the plastic may chip and you will damage the lampshade. Gently press down and remove the diffuser.
Rice. 5. Remove the glass
As you can see in the picture, you will see the lamp itself without glass. In this example, the housing is fastened with bolts on both sides of the ceiling lamp. To remove them, you will need a Phillips screwdriver of the appropriate size.
Rice. 6. Unscrew the mounting screws
To remove the fastening screws, jerking movements are not allowed, which could damage the bolt or cause the screwdriver to slip off. If excessive force occurs, you should first remove the lamp so as not to break it with a screwdriver or damage your hands or eyes from fragments.
Rice. 7. Unscrew the second screw
When unscrewing the second screw, it is better to hold the case with your fingers to prevent it from uncontrolled falling out. Since this can also break the light bulb or damage the housing.
Rice. 8. Take out the light
After unscrewing the bolt, carefully separate the lamp from the casing. At the same time, it should come off easily without any effort. If this does not happen, there may be an additional attachment point that you missed. Then inspect the surface again; you may need to pry it a little to determine the location of fixation.
Rice. 9. Power cord
After the lamp is separated from the casing, it is necessary to disconnect the power cord. If they have a plug-in fixation, then it is enough to open them; if they have a bolted fixation, they need to be unscrewed.
Also make a note of which wire goes where, as you will need to reconnect them. In this situation, the power wires for the lampshade are multi-colored and easy to navigate. If they all have the same color, they can be marked with a marker or electrical tape, depending on what you have at hand. The main criterion for such spontaneous marking is that you can easily determine the original location of the wires in the lampshade.
Rice. 10. Removing the lamp from the lampshade
If everything went smoothly for you and you have not yet dismantled the lamp, remove it from its mounting location. In this case, you should not apply force to the glass bulb; if the lamp does not come out freely, pry it out from under the metal clamp near the end.
Rice. 11. Installation of LED board
The mounting of the NIGHTON ML-6 board clearly fits the holes on which the lighting lamp clamps were fixed. Screw it with the same bolts as shown in the figure.
Rice. 12. Connect the black wire
The black wire must be connected to the closest of the lamp mounting bolts. As indicated in the instructions for the lighting board.
Rice. 13. Connect the green wire
The green wire is connected to the outermost contact in the connector; it is considered unused. The remaining pins (red and white) are connected to the power connector.
Rice. 14. Connect the wires back
Consider the drawing, the red and white wires are connected to the corresponding terminal block terminals as shown on the left to match their color coding.
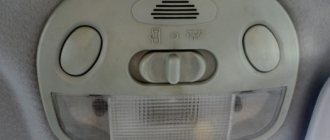
What should you pay attention to before removing the ceiling light?
Before working with the side or central lamp, be sure to remove the power terminal from the car battery, as this may result in a short circuit in the circuit. Which can lead to additional damage and a seemingly simple procedure will result in a number of unexpected costs.
Before removing the lampshade, you will need to inspect the outside where the diffuser is attached to the body. As a rule, these are small depressions into which you can insert a screwdriver or some other flat object.
Rice. 1. Lock on the lamp
In each car model they can differ radically. But the most common are mechanical clamps and spring latches. The mechanical clamp can be easily opened using a screwdriver or other flat object. The spring latch can also be opened by pressing on it with a screwdriver or other object that can penetrate the hole.
It should be noted that at this stage the movement of the diffuser should be as easy as possible. If, after disengaging the lock, you cannot easily separate the diffuser from the lamp body, then somewhere there is an unreleased fastening unit. Therefore, it is better to check the entire body again, it is quite possible that there is an unnoticed lock somewhere, perhaps it is covered by a casing or a sticker. There is also a possibility that while opening the lock on one side, the lock on the opposite side could return back into the groove.
Detailed description of replacing Chevrolet Cruze 2013 interior light bulbs
Wandering around the expanses of this wonderful site (drive 2), I was looking for where at least someone would post “how to change interior light bulbs with a photo description” in a Kruzak? and the most interesting thing I didn’t find either here or in Yandex - maybe I wasn’t looking for it well? correct me…
Well, in general, I’m posting instructions for replacing standard lighting bulbs with diode ones in the cabin: both for front passengers and for rear ones (the one in the middle).
Tools: 1. Hands