About the design of an LED strip with a touch switch: pros, cons. We assemble an LED strip with a touch switch ourselves. 5 questions you need to understand. + TEST for self-test
TEST:
4 questions to test your knowledge
- What is the assembly formed from?
A. Tape.
B. Switch.
B. Wiring.
G. Nutrition.
- What type of button is right for the switch?
A. Infrared.
B. Dimmer.
B. Sensory.
G. The most common one.
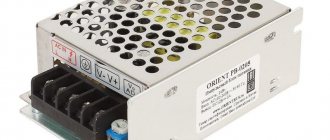
- Adapter power supply.
A. 12 W.
B. 16 W.
V. 18 W.
G. 5 W.
- Why do you need a plastic profile?
A. Beauty.
B. Ease of installation.
B. Security of the system.
G. Not needed at all.
Modern interior solutions often use electrics with motion sensors. It would be more correct to call them touch radio switches. Let us consider in detail the advantages, areas for proper use and much more.
More about LED strip (hereinafter referred to as S.L.): 3 main points
The tape can be either ready-made or homemade. Its types:
- Invoice. Variety - linear. Can be purchased as a set or individually. In the set, the modules are connected into one complex by a special adapter.
- Invoice. Variety - dotted. Look at the picture:
Invoice.
Variety - dotted. Today you can buy items 1 and 2, which already have touch switches built into them. It is enough to lightly touch their body in a certain area to turn the light on or off.
Touch sensor
The touch sensor usually appears as a constantly lit blue LED.
- Mortise tape. It can also be linear or pointwise. A good advantage is the thickness. Installation of the mortise strip usually occurs in the lower shelf of the cabinet towards the lower surface.
Mortise strip
This type of lighting fits entirely into the bottom shelf. Installation requires certain skills.
Where are they in demand?
The need to connect an LED lamp or strip may arise in various situations. Most often, these lighting devices are used if necessary:
- Ensure sufficient lighting of the work area in the kitchen;
- Connect several lighting fixtures at once;
- Organize lighting of staircases and landings;
- Connect the smart home system.
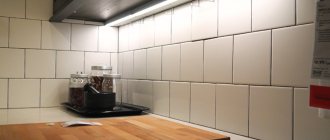
The location of the LED strip in the kitchen is chosen taking into account the goals being pursued. If you need to organize LED lighting for the work area, choose a powerful light source, which is located directly under the cabinets. This option is the most popular, as it helps prevent negative effects on the eyes due to insufficient light levels and makes it easier to care for the countertop.
Integrated lighting is selected for the space around the hood or for furniture. The LED strip is mounted above the upper cabinets or placed under the lower ones. Sometimes they are fixed under the tabletop.
Touch switches (S.V.): 1 switch for everything
Switches of this type have not been on the market for long, but have already become very popular. Often the touch switch already comes in a duo with a ribbon.
First you need to find out what a sensor is. Its appearance is a panel made of crystals. There is a special marking on it. Household versions are designed for a 220 V system.
Such devices are excellent solutions for installing in the kitchen using LED strips. This way the functional surface is illuminated powerfully and efficiently. A switch attached to the strip greatly facilitates work in the evening and at night. But for problem areas, the following remote control was invented:
Remote controller
You can connect sconces to such a switch. It also helps control lighting in multi-tiered ceilings. Of course, if a ribbon with one color or a multi-colored palette is used. This system is convenient to control using the remote control.
No matter how the switch is used, it should be borne in mind that the connection plan may be different.
Some changes appear in the circuit when the remote control is used.
A touch switch is easy to purchase in a store, but you can create it yourself. Self-installation of such a switch is not difficult. Work can be carried out in the kitchen or in another room. For installation in the kitchen, an aluminum profile should be used.
Connection and installation
How are they connected? Let's look at an example of an almost finished backlight. Let's say we have an aluminum profile with a soft LED strip inside.
First, remove the cap and diffuser.
To get to the strands, cut away the heat shrink. Ready-made LED lighting kits, they are already equipped with soldered wires and an output connector.
Since the switch module takes up a certain space, a piece of tape will need to be cut.
Next we move on to welding work.
Choose a low-power soldering iron (up to 40W) and solder the wires.
Now you need to position the module correctly. Which wires should I connect them to?
Look for clues and corresponding labels on the back. For example:
- GND (-) and VCC (+) are the main power supply of the device
- Led (-) and led (+) - output to load
If there are no entries or they have been deleted, proceed as follows. The contacts remote from the button are powered by a voltage of 12-24 V, and those close to it go to the tape itself.
With this arrangement of the module (photo above), the lower contacts will be negative and the upper contacts will be positive.
First, solder the wires from the power supply.
After this, be sure to insulate the connections with shrink film to prevent accidental short circuits inside the aluminum profile with its body.
Then an ice ribbon is connected to veins with a cross-section of 0.5-0.75 mm2. Just don't confuse more and less.
It is often necessary to make a cross connection to maintain polarity.
These wires are also necessarily insulated. The switch module itself is glued to the surface of the box with double-sided tape.
Additional sensor functionality: 5 important points
This device has a variety of activations. It may also have additional features. With certain skills, a homemade sensor can be equipped with a good range of functions. Today, similar switches are produced with the following versions of added functions:
- Remote control. It greatly facilitates control over the light spectrum of multi-color tape. In this case, the use of a controller is mandatory. Otherwise the remote control will not work. The remote control is also good at controlling sconces. And when connecting to a tape, the remote control must be selected in tandem with the controller.
- Timer. Thanks to this device, significant energy savings can be achieved. In the timer, you can set the time to turn off the lights when there are no people in the room or in the house.
- Volume response. This product reacts even to light contact. Often this device is made independently and complements the timer.
- View without contact. The reaction of these devices occurs when the situation in the room somehow changes. These may be different movements, temperature and lighting changes.
- Dimmer. Any designated touch strip devices can be equipped with a dimmer. This addition allows you to control the brightness of the light in the room.
Optimal for a residential apartment is 1 netxt LED lamp with a touch switch. But it is not prohibited to work on modern electrics with your own hands. More on this below.
Why does the dimmer sometimes not work?
The cap and diffuser are inserted. In this case, there is no need to drill holes for the spring!
If you connect such a module without pressing the spring from the speaker, but simply press it with your hand, failures and incorrect operation of the device may occur. Therefore, it is recommended to install it in a profile with a lid.
It also protects the switch from dust and moisture.
Early models of these dimmer switches usually came with a solderless spring. It was simply pressed with a lid to the contact pad in the right place.
Also note that the protective cap does not have to be thick. A diffuser screen with a thickness of 1 mm is an ideal option, but if you place such a switch behind a thicker material (plexiglass more than 2-3 mm), no response to tactile pressure is expected.
In standby mode, the point you need to press with your finger should be illuminated by an LED.
Press left or right lightly and the switch will not operate.
By the way, in standby mode the device consumes only 10 mA. So at the end of the month, such lighting will not lead to huge kilowatts on the meter.
To turn on the light, you need to lightly press or touch the diffuser where the spring is installed. When pressed for a long time, the brightness will begin to change, reaching a maximum.
To reduce it, release your hand and press again, again holding the spring for some time. The brightness gradually decreases.
A short touch is enough to turn off the backlight.
What is the structure of September off: 4 main points
In order to independently assemble a switch with a sensor, and then correctly mount it using a suitable profile, you need to know its structure and operation algorithm.
Whatever type of device you use to connect to the tape, this will not affect the algorithm of their operation in any way.
And in any modification there are four components:
- Front side. This is the outer part of the device. In some cases, lighting may be installed behind it.
- Touch indicator. Its type determines what its reaction will occur to.
- Switching diagram. Thanks to it, the signal is converted into current. Otherwise, it already activates the lighting equipment connected to it (this could be a tape or other light source).
- Frame. They can be integrated or overhead. Depending on its type, the type of installation work is determined. The housing can be installed directly inside the wall, or it can simply be superimposed.
The duration of its operation also depends on the quality of all components of the device. Therefore, it is important to select modifications that have optimal proportions of cost and quality.
The sensor device is externally a module. This device is quite compact. For this reason, it can be simply mounted into an aluminum profile. Thanks to this profile, the switch can be positioned next to the tape (or other light source).
During the installation process, it should be taken into account that the housing reacts to various touches very quickly. Therefore, contact with the device must be made only at one point. In the intended installation area, any unintentional interference with the sensitive housing console is completely excluded.
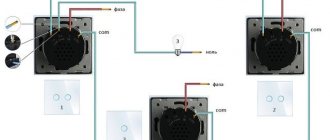
It is better to connect the device according to the proposed scheme:
Scheme
Follow it strictly and connect the device correctly and quickly.
Video description
The correct switch for the LED strip.
Mini motion sensor
The device is designed to work together with 12 V light sources with a power of up to 36 W Source foton.ua
You can also install a miniature motion sensor as a switch in the profile of the LED strip. The difference between this device and a contactless switch lies in the range of response to movement - here it increases to two to three meters. That is, when you enter the room, the tape will begin to gradually gain brightness with a delay of up to 5 seconds (the time is set by the manufacturer). Such devices are mounted not only in the profile of the tape, but also in baseboards, fillets, kitchen wall furniture, etc.
Independent assembly process according to 1 scheme
Skills in working with a soldering iron and good knowledge of electronics are required here. All components of the structure must also be present. Only under such conditions can you make a high-quality switch yourself. Then connect it to the desired tape.
It must be designed to operate from a household system - 220 V. The most difficult and important aspect here is the correct soldering of the required circuit.
Below is the simplest version of the scheme. Even a novice shareholder can master it.
Note: in the second scheme, you can refuse to use a capacitor.
Scheme:
Scheme
The parts needed for the job are:
- A pair of transistors. Type - KT315.
- Resistance. Parameter -30 Ohm.
- Semiconductor. The required type is D226.
- Ordinary capacitor. Parameter – 0.22 µF.
- Adapter or battery of the required power. E output voltage is 9 V.
- Capacitor. Type – electrolytic. Parameter – 100 uF, 16 V.
All these components are soldered according to the proposed scheme and placed in the required housing.
Installation of RBG controllers
Those who love bright colors and cannot make a choice in favor of a certain glow of the LED strip will be interested in the RBG strip. Such products have 4 contacts, each of which is responsible for a specific color. They are marked in a specific way:
- R, corresponding to the red glow;
- B, responsible for blue color;
- G, allowing you to get green;
- W, available in a limited number of tapes. Responsible for white backlighting;
- V+, indicating overall plus.
To install such a product according to all the rules, wires connect the outputs of the tape and the terminals of the same name on the controller. If the selected model of the lighting element has five outputs, this should be taken into account when selecting a device for control. Manufacturers offer devices with 4–5 terminals, which always allows you to choose the best option for your lighting system.
To supply electrical current to the controller, terminals designated V+ and V- (COM) are used. In this way, several tapes can be parallelized, the total length of which does not exceed 5 meters. If the specified value is exceeded, you will have to use an amplifier.
Basic parameters of 220 volt tape
Ice at 220 V has the following parameters:
- Cut into 50, 100 and 200 cm.
- Power watts per meter.
- There is protection against moisture.
- Colorful temperature.
Like any other tapes, this one is available in different modifications depending on the degree of protection against moisture penetration. They use IP 67 and 68. This protection is a durable silicone tube. When using such a sealed tape, it is allowed to install diodes in damp rooms, for example, on the street and in a bathhouse.
Read also: Accuracy class in mechanical engineering
If we study consumer reviews, we can conclude that the LED strip is suitable for use in low and high temperature conditions.
The base of the tape is quite rigid, but at the same time flexible. Due to the fact that the LED has a rigid base, a piece of tape is turned into an LED module and a ruler. A lamp is assembled from a similar line.
Installation can be self-adhesive or without an adhesive base.
Connecting the lighting system
First of all, you will need to carry out the necessary calculations, mark out the diagram, and prepare materials. Let us outline the key steps of the connection algorithm.
- It all starts with a power outage.
- The required length of the tape is measured. Conductors are soldered to it. Connectors can be attached.
- In accordance with the conditions of use, the contacts will need to be sealed.
- The tape is fixed in the selected area. This could be a ceiling or wall, steps or furniture.
- The wiring must be connected to the power supply, and after it to the distribution panel.
- The conductors are routed to the sensor from the distribution module.
- The sensor is mounted on a bracket. Regulators should be installed according to the instructions.
- All conductors are connected according to the diagram.
- Then all that remains is to turn on the power and test the system.
At the final stage, if such a need arises, additional adjustment of the sensor is performed.