A suspended ceiling made of plasterboard or other materials provides the owner of the room with a lot of space to implement bold design ideas. To add expressiveness and ensure the functionality of this solution, there are many techniques. A special place in the design of the ceiling is occupied by hidden lighting, which is performed using LED strips of different shades. The expected lighting effect is achieved provided the element is correctly positioned and installed.
Advantages and disadvantages of ceiling lighting with LED strip
When installing hidden wiring in a plasterboard ceiling using LED strip, the owner of the room receives a whole set of undeniable advantages:
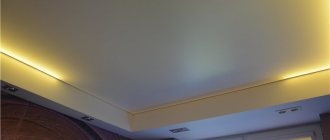
- First of all, the expressiveness of the design solution when decorating the room. LED lighting can be designed in such a way that it creates the effect of a floating ceiling, or soft light will improve the visual characteristics of the room and add volume to it.
Interior design with floating ceiling
- Small dimensions eliminate cluttering of space - the tape can be invisible to prying eyes, unlike lamps of other categories.
- LED strip consumes a minimal amount of electricity. Some models operate on 12V or 24V voltage, provided that a step-down transformer with the required rated resistance is installed in the cable line.
A step-down transformer
- There are many options for LED strips on the market - in different color solutions, with different brightness levels and a set of bulbs. There are models with a flickering effect, as well as with changing the color parameters of the light.
Products with shimmer effect
- The flexible tape can be bent in any direction, which allows the master to install continuous lighting around the entire perimeter of the room, taking into account angles.
Tape bending
- If necessary, the product can be combined with other lighting components, provided that they have the same technical characteristics.
- High-quality products from reliable manufacturers are characterized by increased durability - they can be used for up to 10 years without the need for replacement or repair.
- During operation, the LEDs do not heat up, which is why the polymer shell of the tape does not emit toxic substances that negatively affect human health.
Included tape
- Unlike many other types of lighting devices, they have an increased level of fire safety.
In addition to the advantages, LED strips on the ceiling also have some disadvantages, which is why their use is somewhat limited:
- Difficulty in installation and replacement - an extended strip is fixed along the entire lighting circuit, and if it fails, the element, regardless of its length, must be completely replaced.
Product replacement
- As a rule, light diodes are included in the lighting circuit in blocks 1 m long. If the contact of one light bulb fails or burns out, the entire block stops working.
- As mentioned above, for normal operation of low-current tapes, an additional step-down transformer is needed, which entails additional installation costs.
Despite the presence of some shortcomings, LED ceiling lighting has been used for many years as the main element of adding expressiveness to the interior when installing suspended structures.
Correction of space with light
A suspended ceiling structure takes a few centimeters from the height of the room. Since most apartments are small, such systems visually reduce the space. A light on a suspended ceiling will help solve this problem.
If you direct the light flux from a chandelier and additional lighting devices to the ceiling, it will appear higher than in reality. The best effect is obtained on glossy vinyl sheets.
LED strips help adjust the geometry of the room. Since they are flexible, they allow you to implement any design of lighting on a stretch ceiling. The tape is hidden in the ceiling cornice, which makes it possible to correct the geometry. It is also used to emphasize steps in a multi-tiered structure. If the transitions are not highlighted, they will not look three-dimensional, as required by the design, and the levels will merge together.
What characteristics should you pay attention to when choosing an LED strip?
Given the wide range of products on the market, choosing the most suitable lighting device can sometimes be very difficult. In order not to make a mistake when purchasing, you need to pay close attention to the following parameters:
- Brightness of LEDs - the need to install additional lighting in the room will depend on this indicator.
Bright LEDs
- Diode density – a different number of light bulbs can be placed on one linear meter of strip. At a low density, the brightness may not be enough, which requires a duplicate device with a parallel connection.
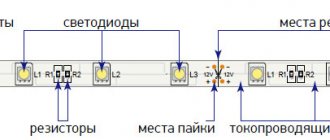
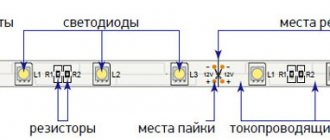
- Characteristics of the tape board - every 1 meter, the product is equipped with a microcircuit that displays the basic parameters of the product - diode dimensions, number of light bulbs per unit length, as well as the degree of brightness and voltage consumption from the operation of the element.
Board on tape
- Flexibility of the tape and reliability of the polymer structure. You should purchase products with silicone braiding to avoid damage during installation and operation.
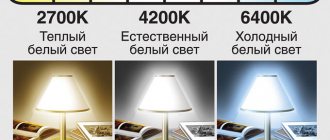
- Color and flickering effects - depending on the type of design solution, you need to choose the desired shade of lighting. In case of an error, the effect of the LED element will irritate the eye.
- Required voltage in the network - when purchasing a low-current tape, you must purchase a step-down transformer, or connect directly to a 200V network.
- Tape length - depending on technological needs, products are offered for sale in several versions. The consumer can buy the tape in the form of finished lamps with a length of 2, ..., 10 meters, as well as in the form of coils, from which any length that is a multiple of 1 meter can be cut.
Tape on reel
- Product protection class. Depending on the installation location, the tapes have different thicknesses of protective coating, which guarantees reliable operation in aggressive environments.
There are 3 main protection classes:
IP 20. The simplest and cheapest products, the use of which is possible only in living rooms, in the absence of high humidity.
IP 65. Tapes with an increased level of moisture protection, which makes them possible to use in bathrooms and other wet rooms.
IP 68. Armored products designed for unhindered outdoor use.
LED luminaire with protection class IP 68
Also, when purchasing, you should pay attention to the country of manufacture and price. Usually. Too cheap products made in China quickly burn out, fail and must be replaced.
Tools and consumables for installation
When installing an LED strip with your own hands, you need a certain set of tools and consumables:
- To cut and assemble the tape into a full-fledged lamp:
- Scissors or wire cutters for cable products.
Cable cutters
- Tape measure for measuring the required length of the cut.
Roulette
- Permanent marker for marking cutting.
Permanent marker
- Construction knife with a retractable blade for stripping contacts from silicone braiding.
Construction knife
- Electrical tape for reliable protection of the free end of the tape after cutting.
Insulating tape
- A section of cable with a plug, a step-down transformer and a removable contact for connecting the tape to the electrical network.
- To install the tape to the ceiling structure:
- When installing an element without the use of mechanical fasteners, use double-sided adhesive tape. To ensure that the product stays in place for a long time, you should choose only high-quality products from well-known brands, for example, 3M.
Double sided tape 3M
- With a mechanical fastening method, you will need special mounting loops made of plastic or metal with a landing groove dimension such that the entire tape fits into it.
- A set of self-tapping screws for secure fastening.
- Dowel nails for fixing fastening elements to the wall.
Dowel-nails
- A hammer drill for making holes in reinforced concrete structures or brickwork, depending on the location of installation of the product.
Hammer
- A screwdriver for tightening screws in LED strip holders.
Screwdriver
- A stepladder with dielectric inserts, or mounting scaffolding for easy work under the ceiling.
Ladder
- To connect electricity:
- Power cable of the required cross-section.
- Wire cutters and electrical tape mentioned above, or PVC heat shrink tubing to ensure a reliable seal on exposed cable sections.
Heat-shrink tubing
- Terminal boxes with crimp sockets for contact areas of cable cores.
Terminal box
- A circuit breaker in the panel, selected based on the total current in the connected circuit.
Automatic RCD
- Multimeter for determining the voltage and maximum short-circuit current, as well as the response time of the RCD.
Multimeter
All tools used must be in good working order and consumables must be of high quality to ensure long-term uninterrupted operation of the product.
DIY installation of LED strip on the ceiling
When installing LED strip to illuminate the ceiling, no special skills are required. Work in this category can be easily done with your own hands, provided you follow the flow chart and the sequence of each stage. Below are step-by-step instructions for installing an LED strip with a description of all production operations.
Preparatory work
Before you begin the main work of installing and connecting the LED strip on the ceiling, you need to perform a number of preparatory operations:
- The required amount of tape is cut to be installed in the design position.
Cutting the tape
- The tape is assembled into a finished structure with a power supply, terminals for interfacing with a power cable and a step-down transformer.
Tape assembled with power supply
- If it is necessary to change shades and provide a flickering effect, a controller must also be included in the circuit.
Device with mounted controller
- Degreasing the adhesion surface of the polymer casing of the tape to the building structure or plasterboard sheet.
- If there is dirt, dust or other foreign objects on the contact surface, they must be removed.
Before starting installation, you should check the functionality of the LED strip in test mode with the circuit assembled. This will save the technician from unnecessary work on repairing and replacing the product later.
Tricolor lamps
Strip lighting devices differ in the type of lamps used. In RGB strips, each diode is an assembly of three LEDs, having red, blue and green colors.
Such diode strips have 4 outputs. One of them is general, and the other three are intended for each color. By combining them, it is possible to obtain a rich range of shades. In a similar way, a variety of colors can be achieved on a television screen.
If three-color diode strips are used to install ceiling lighting, they must be controlled, which requires a device - a controller. Thanks to its use, you can adjust the speed of color change or fix one color. In an RGB strip, it is not at all necessary to run a multi-color option - you can only use white.
Today, high-tech types of diode strips are available for sale, equipped with built-in Wi-fi. They can be conveniently controlled from a smartphone if the appropriate application is installed on it.
When choosing a power supply, you need to take into account that strips with RGB bulbs are designed for voltages of 12 and 24V.
Installation of LED strip on ceiling plinth
When installing the tape into a polyurethane or plastic plinth placed around the perimeter of the room, you must follow a certain algorithm:
- First of all, the plinth must be fixed to the wall, with a slight indentation from the ceiling surface. Compliance with this condition is necessary to create a niche for the refreshment element.
Skirting board mounted for LED strip installation
- The LED strip is rolled out along its entire length on the floor.
- Double-sided adhesive tape is applied to the back surface of the product.
- The lighting device with all the elements installed to it - the power supply, transformer and controller, is carefully glued to the inside of the ceiling plinth along its entire length, pressed and smoothed.
Double-sided tape sticker
- After installation, the cable is connected and the product is tested in the designed position.
If the length of the LED strip exceeds 5 meters, it is better to carry out work on its installation together, from 2 ends of the room, since if the edge overhangs too much, the plinth may break or tear off due to the high concentrated load on its area.
What it is?
A modern strip with LEDs is a functional lighting device consisting of many diode lamps. The basis of this design has an adhesive surface, which is initially protected by a film. It contains diodes, additional elements, and a contact pad. In order to ensure uniform illumination, the LEDs are placed at an equal distance from one another. Some types of such devices are attached to the ceiling with plastic brackets.
LED strip is quite flexible and is usually sold in reels, which eliminates the formation of creases. It is considered an auxiliary lighting, but the power of such a device (up to 25 W per 1 meter) often allows it to replace the main central lighting.
Important! The uniqueness of the LED strip lies in its high efficiency: the energy consumption of a ten-meter section is less than that of an ordinary incandescent light bulb.
To ensure uniform lighting in a room, light sources are placed at the same distance from each other Source prosvetodiod.ru
Expert recommendations for installing LED strip
To ensure that the result of installing an LED strip on the ceiling meets your expectations, you should listen to the advice of professional craftsmen. Thus, the effect of installing lighting in this category will be higher if the following nuances and subtleties are carefully observed:
- If you plan to organize multi-level lighting in a room, before starting work and purchasing products, you should draw up a working draft with specifications and assembly diagrams for the cable network.
Room lighting project
- It is better to glue the tape not to whitewash or drywall, but to a pre-mounted plastic element, for example, a strip or corner with a glossy surface.
Plastic corner
- The cutting of the tape is carried out strictly after 1 meter of strip, since it is in these places that opening the contacts will not lead to loss of its performance.
- When joining a tape from several parts, no more than 2–3 interface points should be provided. If you get more of them, it is better to purchase a reel with a solid product in advance.
- When connecting one row of LEDs, you can use a sequential circuit. If you plan to use several rows of tape, then installation must be carried out in parallel.
Several rows of tape
- You should not include high-voltage and low-current devices in the same circuit, as voltage drops can damage them.
- When the tape is installed using mechanical clamps, increased pressure on the element should be avoided. If there is excessive pressure on the conductive channel, it begins to heat up and can cause the circuit to burn out.
Mechanical fasteners
If all installation and connection rules are followed, the product can be used for up to 5 - 10 years or more without the need for repair or replacement.
Light sources for suspended ceilings
Manufacturers have a wide selection of models and modifications of light sources in this area. It must be said about the popular options that are used more often than others.
LED strip is the most popular option. The tapes are cheap, easy to install, durable and have low energy consumption. LED strips can be used to beautifully illuminate a room. There is a regular LED strip for interior work, and there is a strip with a coating that protects it from moisture. This tape can even be used in street work. LED strips can have different glow colors.
LED Strip Light
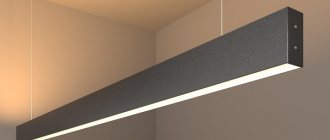
Duralight looks like a transparent cord with lamps inside it. This cord is very strong, durable and waterproof. There are durolights with LED lamps and incandescent lamps. From a savings point of view, it is better to choose an option with LED lamps, which have reduced energy consumption.
Duralight is actively introduced into street advertising (signs, stands), and is found in various architectural lighting and in the lighting design of various interiors. The only downside of duralight is its price.
Durolite
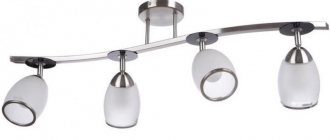
Spotlights are simple ones that look more expensive than they are. There are many types of ceiling lights, they differ in design. Ceiling spotlights “steal” the height of the ceilings in the room (usually the height reduction is 5-10 centimeters).
Spotlight
Examples of installing LED strip in interiors
LED strips are widely used when performing finishing work in residential and public buildings. Depending on the method of laying them, the shade of the glow and other characteristics, designers emphasize the expressiveness of the interior in any style:
- Classic interiors - soft light from LED strips located in plasterboard niches illuminate the space of a white or cream ceiling. When decorating a room in this style, ribbons are successfully combined with chandeliers and symmetrical decorative elements.
- Modern interiors - multi-colored lighting reflects the individuality and excellent taste of the owner of the room.
- Ultra-modern interiors - the presence of sharp corners and the spirit of minimalism with floating ceilings give the room special expressiveness.
- Oriental interiors - illumination of niches and cornices concentrates attention on the elements of luxury in the decor of the ceiling.
- Vintage interiors - lighting the walls, as well as the central part of the ceiling, allows you to better see paintings, prints and bas-relief plinths.
- Country or loft style - light interior details look better in soft light in the evenings.
- Japanese style - airy ceiling structures float above the space of the room with correctly installed LED lighting.
- Scandinavian style - natural wood combined with soft light adds coziness for the owner of the room and his family.
- English style - dark oak panels and other heavy decorative elements look less bulky and gloomy with the right lighting.
- French style - hidden lighting perfectly complements natural wood furniture and room decoration elements.
LED strip can be used for any interior, regardless of the style, dimensions and functional purpose of the room.
Briefly about the main thing
Illuminating the ceiling with LED strip is an important step in creating a design solution when decorating a room. For correct installation, you must purchase the right products in accordance with the required protection class, luminous shade, and length. Installation must be carried out using special tools and consumables. LED strip can be installed in cornices, niches and on the back side of ceiling plinths. Fastening is done using double-sided adhesive tape or using mechanical clamps.