A dimmer for an LED strip is an electrical device that combines a switch and a dimmer in a single housing, installed in the LED strip control circuit. Its operation is based on smooth adjustment, the rheostat principle, of the voltage level supplied to the lighting circuit. Due to this, the brightness of the lighting is adjusted from 0 to 100%. The dimmer is installed and connected to the network in the same way as the switch.
Some manufacturers install a choke in the dimmer chip, which can be used to cut off interference and noise created during operation.
Why do you need an LED strip amplifier?
The RGB amplifier is used precisely when connecting several LED strips in series and supplies current directly from the power source to each individual strip section.
Interesting materials:
How to determine 200 grams of sour cream? How to determine 350 grams of flour? How to determine 70 grams of butter? How to determine the absolute error by accuracy class? How to determine the absolute speed of a point? How to determine abscissa? How to identify paragraphs in a text? How to determine the cell address? How to determine if a bathtub is acrylic or not? How to determine whether it is aluminum or not?
Types and features of dimmer control
Based on their design features, they can be divided into the following options:
- modular - devices of this type are mounted in distribution cabinets;
- monoblock - installed in a mounting box instead of a switch.
According to the method of controlling the lighting system, dimmers are divided into:
- A device with a separate light switch button and a wheel for adjusting the light.
- Sensory. The brightness of the LED strip is adjusted by touching the sensors on the panel or using the remote control.
- With a handle on a turn-and-press mechanism. Switching on is carried out by pressing the control, and setting the required level of illumination is done by turning in one direction or another.
- Turning. Almost the same, but the difference is that turning on and regulating is done by turning the knob.
- Devices with keys. Changing the light level is achieved by pressing a key.
- Remote. Controlled using remote controls.
- Acoustic. They are activated by clapping or voice commands.
- Multichannel devices. Help control lighting in several points of the room at once. For example, if necessary, highlight some areas of the room by adding a lighting level and at the same time reduce the brightness in others. As a rule, they are equipped with wireless or remote control via remote control or using a telephone.
Tips for choosing
We have already talked about the need to select a dimmer strictly in accordance with the voltage consumed by the lighting device. Also, when choosing, you should take into account that the tapes are either monochrome, or RGB, RGBW. In accordance with this, dimmers can be:
- Single channel;
- Multichannel;
When you connect a multi-channel dimmer to an RGB strip, you will be able to not only adjust the overall brightness of the diodes, but also each color individually. You also need to decide on the set of functions that you need. It could be:
- Exclusively dimming;
- Dimming and flickering mode, color music, support for the DMX protocol, the ability to control several lighting zones.
determine the power reserve,
- If in the future you do not plan to increase the length of the LED line, then the power reserve of the dimmer should be at least 20-30% higher than the power of the strip;
- If an increase in the length of the tape in the future is not excluded, then it should be understood that at the same time its power will increase. Therefore, to the above 20-30% it is necessary to add another 20-50% as a reserve. In the event of a lack of power, the device will either simply not turn on, and therefore not perform its functions, or premature wear and failure of the entire line will occur.
In addition, do not forget to decide on the preferred method of controlling the dimmer. If finances allow, it is better to prefer models that have the ability to be controlled by a remote control. This will make operation as comfortable as possible.
Installation instead of a conventional switch
Installation of a dimmer as a switch is carried out as follows:
- are drilled into the wall with a hammer drill or a drill armed with a crown (cylindrical drill). Sputtered bits (diamond, tungsten carbide) are used to drill in a non-impact mode, while gear bits are used in an impact mode. The dimensions for drilling are equal to the depth and diameter (slightly larger) of the socket box;
- use a chisel or punch to knock out the material inside the drilled circle, forming a blind hole;
- punch a groove in the wall with a wall cutter, hammer drill, grinder or chisel - a channel leading from the distribution box to the hole made. From the point of lowering the grooves to the place where the dimmer is installed, they punch a groove to the lamp. On approaching the hole, it is buried obliquely so that the wire can be brought to the back wall of the socket box;
- lay wires in the grooves and fill it with solution.
Then:
- in the socket box, squeeze out one of the plugs from the side from which the wire is connected;
- insert the wire sticking out of the wall into the hole;
- prepare alabaster or cement mortar and place a small portion of it in the hole;
- install the socket box in the hole. The solution is squeezed out and fills part of the space between the socket box and the wall. The rest is filled with mortar using a trowel;
- the wires sticking out from the socket box are freed from insulation, the ends of the wires are stripped and they are connected to the terminals on the inside of the dimmer;
- folding the wire like an accordion, place the inner part in the socket box and unscrew the special screws, spreading the spacer tabs to the sides;
- screw the inner part with self-tapping screws to the socket box;
- snap the front panel to the socket box.
All that remains is to connect the wires to the lamp and check the functionality of the dimmer.
It is better to place the wires in a corrugation: if they burn out, they can be replaced without opening the groove.
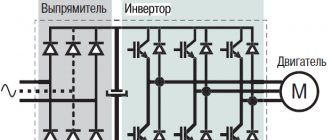
Operating principle of pulse width modulators
Since pulse-width modulators are most often used today to regulate LED strips, let’s consider their principle of operation in more detail.
Pulse width modulator
The principle of their operation is to change the duration of the working fraction of the period for a rectangular pulse current, as well as the duration of its supply to the product. These parameters are determined relative to the zero level. This refers to the fraction of the period when the maximum voltage is observed. This parameter is called latitude. Its changes occur in the range from 0 to 100%, causing characteristic changes in the value of the available voltage of the light source.
Note! In this situation, the output current remains stable, and at the most optimal level.
In this case, the spectral composition of the light flux is not subject to change, and the dissipated power will be kept within the range of nominal values. It is worth noting that the losses of the dimmer itself during operation in pulse mode remain minimal. You also need to know that such regulators are best suited for connecting computer and digital methods of controlling light levels. The disadvantages of such models include increased flicker. This is typical for cheap devices. This phenomenon can occur even at low brightness levels and is harmful to the eyes. Long-term observation of such a light effect can lead to various negative consequences:
- the appearance of unpleasant visual sensations;
- development of headaches;
- increased fatigue;
- loss of attention and visual acuity.
To avoid such a negative impact on your body, you need to give preference to higher quality and more expensive models.
What is PWM in monitors?
There are two ways to lower the brightness of your monitor:
a.) Reduce the intensity of the backlight lamp (the lamp reduces the glow) b.) Shine intermittently so that there is less light per unit of time (the lamp begins to flicker)
From a technical point of view, it turned out to be easier to make sure that the brightness is regulated by flickering, part of the time the lamp is on, and part of the time it is not lit.
Pulse width modulation (PWM) is a process of power control by changing the duration of pulses at a constant frequency.
In PWM monitors, when the screen brightness decreases, the duration of the backlight or LED light pulse decreases, resulting in more noticeable flickering, which can negatively affect our vision.
In the figure you can see a comparison of two ways to adjust brightness:
Comparison of brightness adjustment methods for monitors
PWM works as follows: at 50% brightness, we see a pulse of light half the time, and the second half of the time we see a black screen, the eye averages what it sees and we perceive a gray glow. When the brightness is lower, the flicker is noticeably greater.
But such flickering is not at all good for the eye.
Power supplies for lighting devices
The variety of lighting devices, including floor lamps, chandeliers, table lamps, etc., amazes even those people who have a rich imagination. The emergence of the latest technological developments not only provides high-quality lighting, but also saves energy resources to the maximum extent.
Alternative products are LED strips, which are energy-saving lighting devices. The choice of lamps, the production of which is based on progressive LED technology, is quite wide. These devices have a good design and high-quality technical characteristics.
The use of LED lighting is widespread in advertising, landscape and interior design, car interiors, equipping household appliances, etc. A large assortment of such lamps allows you to choose the appropriate option, be it 40w by 300w or 24w by 250w.
For many it may raise a lot of questions. The power supply is the main component of the LED system, which is a compact transformer capable of providing power to the LED strip. Miniature dimensions ensure discreet placement of this device in various suitable places.
Ways to adjust brightness
Dimmer for LED strips
One of the main reasons why LED strip has become so popular today is that you can easily attach a special device to it with your own hands - a dimmer. It allows you to change the intensity of lighting in the room.
If such an element is present in the circuit, the tape will be called “dimmable”. Note! You can use such a dimmer, suitable for LED strips, only there. It is not suitable for interaction with conventional energy-saving light bulbs. Otherwise, you risk damaging the entire system. There are two main types of dimmers for LED strips:
- passive. Their role is played by variable resistors (potentiometers and rheostats). This is the simplest method of adjustment, but it is characterized by a loss of power, which negatively affects its energy efficiency (it decreases);
Note! Here, due to the high nonlinearity of the I-V characteristic of the LED, a situation arises that was described above (large energy losses occur). It cannot be leveled even when using potentiometers with a logarithmic characteristic to change the resistance.
- active control dimmer circuits based on semiconductor devices.
The last type of dimmers, in turn, is divided into two subgroups:
Analog dimmer
- analog. They make it possible to maintain the output current at a stable level and in the required range with a low voltage drop. As a result, there is a slight loss of power on the LED strip;
Note! The disadvantages of such products include the fact that when changing the operating current parameter flowing through the LED in the range of 20~100 mA, a change in power dissipation is often observed. This, in turn, leads to a change in the temperature of the device. But when the LED heats up significantly, significant changes occur in its technical characteristics.
- pulsed. They are more modern models, devoid of many of the disadvantages of analog dimmers. Most often today, pulse width modulators (PWM) are used to regulate the glow level of LED strips. For LED products, these are the most efficient dimmers.
As you can see, for an LED strip, the optimal choice for adjusting brightness is a pulse dimmer. It, when properly connected, will allow you to effectively and conveniently control the level of luminous flux emitted by the LEDs.
What should I do if my monitor flickers?
If you find that your monitor is flickering at a comfortable brightness level, there is a way to avoid damaging your eyes:
Adjust brightness using your video card driver
The image quality may be a little worse, but it will be much easier on the eyes.
You need to adjust the brightness of the monitor so that there is no flickering, and if in the end the brightness is too high, reduce the brightness in the video card driver settings.
The setup algorithm is simple:
- Adjust your monitor brightness to either maximum or a flicker-free level;
- Go to the video adapter driver settings and reduce the brightness to a comfortable level;
- Apply the settings.
Brightness setting example
If you have any difficulties finding driver settings, write in the comments, I will try to help.
Today you learned what PWM is, why it is dangerous for the eyes and how to minimize risks.
Write if you are interested in lessons on health and if you need details on the issues discussed in the article.
PS Don’t forget to read the article about other causes of eye fatigue when working at a computer, and see you at IT lessons!
Sergey Bondarenko https://it-uroki.ru/
Copying is prohibited, but links can be shared:
Share with your friends:
A lot of interesting things on social networks:
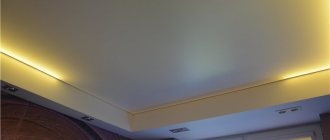
Thanks to their convenience and versatility, LED strips have become almost indispensable when arranging a wide variety of lighting systems. From them you can create complex configurations for interior and exterior design, background lighting of shop windows, decorative installations and stand design. At the same time, specialized control systems allow you to adjust the brightness of lighting and even create dynamic special effects.
Many people think that additional equipment creates installation difficulties and requires special knowledge. Indeed, unlike LED lamps, here you have to independently select and install power supplies, dimmers and regulators. However, in practice, understanding the power supply and control devices for diode strips is quite simple.
Powering LED strips and controlling their brightness
The main feature of the LED is the nonlinear dependence of the flowing current on the applied voltage. The operating voltage of a typical white LED is 3 V, and the current is 20 mA, and even if these parameters are slightly exceeded, the diode fails, which makes it very demanding on the quality of the power source, and also complicates the control of its brightness. To ensure stability of characteristics, LEDs are installed in groups (usually 3), and a limiting resistor is connected in series with them.
For example, for a series triple of LEDs at 3 V and 20 mA, a 150 Ohm resistor is installed (in a 12-volt strip).
When a current of 20 mA flows through the circuit, the voltage drop across the resistor is 3 V, but if the current increases to 40 mA, the resistor will drop 6 volts. This reduces the likelihood of LED failure and allows you to expand the range of supply voltages.
To provide the LED strip with a stable voltage, a power supply designed for the appropriate voltage (most often 12 or 24 V) is used. It is not so important how it is made structurally. This could be a modern switching power supply, or a somewhat outdated and more bulky transformer one. The main thing is that it ensures constant voltage over the entire range of required power.
With brightness control, everything is somewhat more complicated. Linear thyristor dimmers used to control conventional incandescent lamps are inappropriate here. The operating range of the LED strip is quite narrow, and most importantly, there is no linear relationship between voltage and brightness. Ideally, it is not the voltage that should be regulated, but the current flowing through the LEDs. For these purposes, special drivers, dimmers and controllers are used, which we will consider in more detail.
Devices for controlling the brightness of LED strips
As we have already found out, classic rheostats, potentiometers and wide-range dimmers are not suitable for LEDs. Ideally, the device should flexibly control the output power (or at least current), and not voltage. But since manufacturers do not know the parameters of our LED strip in advance, most commercially available devices are designed for smooth voltage regulation within 10-12 Volts (for 12-volt strips).
To control the brightness of LED strips, the following are used:
- linear regulators and voltage stabilizers;
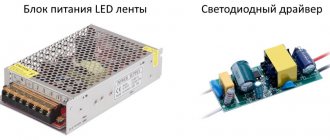
- drivers – switching power supplies with controlled output;
- dimmers – pulse converters with high efficiency;
- RGB controllers – three-channel dimmers for controlling three-color LED strips;
- RGB amplifiers are devices controlled by external regulators, but delivering significantly more power per channel;
- DMX controllers are professional devices for organizing spectacular light shows.
The linear regulators specified in the first paragraph are obsolete and are used less and less. With the same power indicators, they are very bulky, have low efficiency and get very hot. The remaining listed devices use a more modern operating principle. The output voltage is controlled by a PWM controller, which provides it with very high efficiency (80-95%). Let's consider their principle of operation in more detail.
Dimmers and Drivers
The easiest way to explain the operating principle of pulse converters is to use the example of a dimmer. This compact device operates on the principle of a pulse converter. Energy is transmitted using high-frequency pulses controlled by a PWM controller. In this case, all elements participating in the transmission operate at 100% of their power in each pulse, therefore, their efficiency is maximum. Any output characteristic (voltage, current, power) can be dynamically adjusted by simply changing the number of pulses.
The narrower the conversion range, the more compact, powerful and efficient the device can be made. Dimmers for controlling the brightness of LED strips are designed for an input voltage of 12 V and an output voltage of 10-12 V, due to which they are characterized by high efficiency and small size. At the same time, the power they produce can be adjusted within the range from 0 to 100% of the calculated value.
The driver is a power source that already has an output voltage regulator built into it. It does not matter whether the output voltage of the voltage converter is controlled directly, or whether a separate control element is built inside the housing. Today, both types of schemes are common, but for the consumer the difference is not fundamental.
RGB regulators, amplifiers and DMX controllers
These are more complex devices designed to control three or more channels. In essence, they are devices assembled on the basis of dimmers. At the same time, the RGB controller allows you to change the color of the three-color LED strip within a wide range. Since regulators are usually designed for low power, an RGB amplifier may be required to power long strips. This is a special device capable of delivering tens of times more power, but at the same time ensuring that the output voltages match the input (control) voltages.
DMX controllers are professional multi-channel consoles that allow you not only to create complex installations with adjustable lighting, but also to manage complex light shows. There are models similar to music consoles with numerous knobs and controls. There are also USB models, which are small boxes controlled from a computer using specialized software.
Controlling Dimmers, Drivers and Regulators
Ease of control is an important parameter of devices that regulate the brightness of LED strips. Today there are four main options:
- Stationary control using a potentiometer located directly on the dimmer or regulator body. This design is not only simple and cheap, but also the most reliable, so this option is usually used in lighting various warehouses, industrial and other premises.
- Remote control control. An infrared remote control may be used, which must be pointed directly at the receiver, or a radio frequency transmitter, which can transmit the signal even from another room.
- Control via Ethernet, Wi-Fi or Bluetooth. These technologies are becoming increasingly popular because they allow you to control lighting from your phone or computer, even remotely.
- Combined control. Common dimmers are wall-mounted with a potentiometer and additionally equipped with electronic control using a remote control or via Wi-Fi.
The main disadvantage of inexpensive switching regulators is flicker. It is for this reason that linear control schemes, characterized by large dimensions and low efficiency, are still widely used. But the improvement of technology leads to the fact that modern dimmers are conquering the market more and more confidently. Their control chip very accurately takes into account the nonlinear I-V characteristic of the LED, and the high operating frequency and good filters completely eliminate blinking.
A little about the scope
When purchasing an LED strip, for example, for home, many of us do not even think about the possibility of dimming its luminous flux. Why? Because often this is not necessary. For example, organizing lighting in the kitchen under wall cabinets or lighting a wardrobe, where maximum light output is always required to obtain the desired effect. It’s another matter when a single-color or RGB tape is mounted around the perimeter of the room’s ceiling. In this case, a dimmer will help reduce the intensity of the glow and select a comfortable twilight, and in the children's room, set the minimum brightness at night so that the child does not sleep in the dark.
The practical use of a dimmer for a white LED strip is justified when it is used as the main source of lighting in the room. Multifunctional RGB dimmers are an integral part of the Smart Home system.
DIY dimmer on a chip
Despite the fact that you can find many types of dimmers on sale, some craftsmen prefer to assemble such devices themselves. As an example for assembly, consider a dimmer on a microcircuit, which is quite easy to configure and has protection functions.
The reference voltage at the control electrode is created using resistor R2. The output value is adjustable from 12V (maximum) to any minimum, down to a tenth of a volt. For optimal cooling of the integral stabilizer (KREN), the installation of an additional radiator is necessary, and this is perhaps the only serious drawback of such a homemade lighting controller.
Let's start assembly
Or rather, disassembling the power supply. In the case cover (on the left in the photo) we drill a hole for installing a variable resistor.
We install a variable resistor in the cover of the power supply. The resistor can be fixed using hot glue (there was no original nut for this resistor, for some reason they don’t sell them in the store along with the resistor)
In this model of power supply, the installation of a resistor was prevented by a capacitor. I had to place it in the free space of the case and connect it to the printed circuit board using a PVA wire with a cross-section of 0.5 mm2
Having tried to close the cover of the power supply, it turned out that a couple of diodes were also interfering.
I had to move them to the back of the PCB.
Now we are looking for free space for the transistor.
We attach the transistor to the cover using a bolt and nut.
We assemble the LED strip brightness control according to the following diagram. I used the same circuit in the brightness control on the backlight of the computer desk.
Dimming circuit for LED strip
All fixed resistors are fixed on the housing cover using hot-melt adhesive. Insulation from heat-shrinkable tubing has been added to the legs of the transistor.
At this stage, you can assemble the power supply into the case and check the operation of the brightness control on one segment of the LED strip. This is how the tape shines at minimum brightness.
Now we unscrew the resistor all the way and get the maximum brightness of the glow.
The regulator works as expected. We can move on.
The handle for rotating the potentiometer can be made from ordinary juice or mineral water caps.
The cover attaches perfectly to the resistor using hot melt adhesive.
And on top you can put a lid with a larger diameter. I chose white to make it easier to find the regulator in the dark.
Now we proceed to install the LED strip segments on the side surfaces of the power supply. It is better to attach the tapes with a second of superglue than with the double-sided tape with which they are usually supplied.
Solder the wires from the power supply to the tape segments in accordance with the polarity.
Everything is the same on the second side of the case.
When all the wires are soldered to the segments of the LED strip, you can check the functionality of the device. Also, wires and soldering points can be covered with a thin layer of hot-melt adhesive for safety and better fixation.
This is how an adjustable night light works in full brightness mode.
Minimum brightness.
So, we got a compact night light made from an LED strip with a brightness control and powered by 220 volts.
Thank you for your attention!
PS the first week of use showed that this is a very convenient thing! The previous model is now collecting dust on the shelf and awaiting an upgrade
Advantages and disadvantages
Advantages of dimmers:
- Setting the required level of illumination in the room depending on the requirements of the situation.
- Ability to regulate the amount of electricity consumed by the lighting system.
Disadvantages of dimmers:
- Dimmers are extremely “gentle” in terms of overheating. They have this property because they are based on a microcircuit. Before purchasing, you need to know how much power the dimmer should control.
- The dimmer is also demanding on the minimum load value. If the values indicated on the case are lower, the device will fail very soon.
- Many people still use and are unlikely to part with fluorescent and energy-saving lamps soon. And they, as their manufacturers warn, either cannot be adjusted at all, or they can be adjusted, but this significantly reduces their service life.
Input voltage regulation
The diode strip connected to it must have the appropriate input power, for which a limiting resistor is built into the lighting device itself. It provides the optimal mode for the operation of the LED. The input voltage of the connected dimmer and regulation device must correspond to the number of diode crystals placed on the tape.
| Voltage, W | 20 | 30 | 45 | 60 | 100 | 150 | 200 | |
| Type of modular system | Number of modules, units | |||||||
| Accent 15 o *60 o ,160 o | 13 | 19 | 28 | 38 | 64 | 95 | 126 | |
| Skat | 17 | 25 | 38 | 50 | 83 | 125 | 166 | |
| Matrix | 2 | 35 | 51 | 78 | 103 | 174 | 260 | 347 |
| 3 | 23 | 35 | 52 | 70 | 115 | 174 | 231 | |
| 4 | 17 | 25 | 37 | 50 | 83 | 125 | 166 | |
| Simple 3, 2, 3 mini | 55 | 84 | 125 | 166 | 277 | 416 | 556 | |
| Genius 3L, 3Q | 12 | 17 | 25 | 33 | 55 | 84 | 111 | |
| Simple 4 | 27 | 40 | 60 | 79 | 132 | 196 | 263 | |
Expert opinion
It-Technology, Electrical power and electronics specialist
Ask questions to the “Specialist for modernization of energy generation systems”
Dimmers for LED lamps: what they are, how to select and connect Integrated devices convert alternating current into direct current, pass it through diodes and maintain a given voltage. Ask, I'm in touch!