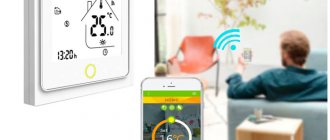
The operation of modern heating systems is impossible without the most accurate control of the heating level. A special underfloor heating sensor is used precisely for this purpose. Let's look at what this device is, how it is designed, why and when it is needed, on what principle it works, what types of it exist and what their features are, what criteria need to be taken into account when choosing and what are the specifics of installation and operation.
Electronic thermostat for underfloor heating system Source livolo.ru
Design and purpose of a temperature sensor
The temperature sensor is an important element for ensuring high-quality operation of heated floors. From it, data is sent to the thermostat, which regulates the temperature by increasing or decreasing the power.
Thanks to this, you can set comfortable temperature levels in the room, prevent overheating and damage to the floor covering, and significantly reduce energy costs.
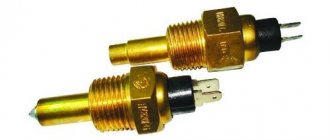
The temperature sensor is simple: two wires connected to a thermocouple - two wires connected at one end. Actually, they are the unit for measuring temperature indicators.
Before pouring the screed, the functionality of the heated floor and the temperature sensor itself is checked. To do this, the resistance of each part is measured. The system works if the difference between the indicators and the values in the technical passport is no more than 10 percent.
Precautionary measures
When working with any electrical equipment, installation work must be carried out carefully, connections must be made reliably, wiring must be designed for the power consumed by the heated floor. For safety, it is advisable to connect the power circuit to an individual RCD.
It should be remembered that thermostats do not tolerate high humidity and water ingress, therefore, when installing a heated floor in a bathroom, the control unit should be installed outside this room.
The serviceability of all parts must be checked before installation. Filling the screed and laying the finishing coating must be carried out carefully. If there is no mechanical damage, the heating cable will last a long time.
Features and Benefits
If you do not install thermostats, it is impossible to control the temperature of the heated floor. This is dangerous due to overheating of the device and the creation of an emergency situation. If we talk about the advantages of sensors, we need to consider: the device operates with or without electricity. The advantages of a mechanical regulator include low price and energy independence. The disadvantages include a relatively short period of operation and increased inertia.
The electric device allows you to set the exact temperature and can be controlled remotely. But such a device costs more.
Even more expensive is a programmable device that also runs on electricity. Cunning electronics guard the safety of the home: when the set temperature is reached, the thermostat turns off the heating. Moreover, he can program connection and shutdown for the required time, which saves electricity while people are away from the apartment.
There are options for temperature controllers that are equipped with an external IR sensor. It is able to detect the temperature of the floor covering. The device is powered by a battery and is attached to the wall using Velcro.
Functions and selection of thermostat
When choosing a regulator for a heated floor, you need to take into account the following characteristics:
- Technical specifications. Think about which device is suitable - mechanical, electrical or programmable.
- Installation method: surface-mounted, built-in or for mounting on a DIN rail.
- Stylistics. The thermostat can be of different shades and shapes (square, circle).
- Number of channels. Devices can be single-channel or dual-zone.
The control also differs - it can be carried out mechanically, electronically or sensory.
Types of temperature sensors
The classification of thermostats according to their operating principle was considered when reviewing their advantages and disadvantages. But it’s worth learning more about how they work.
Electromechanical
The simplest and most inexpensive type of regulator. Its main working part is a special metal plate that reacts to an increase or decrease in temperature. The system is turned on and off by changing the curvature of the plate during heating and cooling. It will not be possible to set the exact temperature value on such a regulator.
Electronic
The device contains a special element that produces a special signal. Power depends directly on the ambient temperature values. On such devices, you can set precise heating temperature indicators down to a fraction of a degree. The system is controlled via buttons and a small screen.
Programmable
The most expensive of thermoelements. You can set certain values on it, upon reaching which the entire system is turned on or off by the regulator. Thanks to the device, a microclimate is created in the room that suits a specific person. It is possible to configure the thermostat so that the system turns on at a certain time. That is, the floors are heated before the owner comes home, and electricity is not consumed when the owner is away.
Many models have a bright and stylish design, and are also equipped with LCD screens that display information and facilitate precise settings.
The difference between expensive electronic thermostats and mechanical ones
What super-tasks are solved by smart thermostats filled with electronics and a display? It would seem, why buy an expensive product if you can buy a regulator with a mechanical wheel and set the desired temperature for yourself in the same way?
And the point here is one of the fundamental problems of comfortable operation of heating systems - inertia.
The fact is that having set an acceptable temperature on warm floors in the region of 23-25C, after reaching it, even with the heating device turned off, the system will still continue to gain degrees by inertia up to a certain point.
The same applies to the minimum parameter. In fact, such fluctuations in a room can reach from 19 to 27C.
There is no question of maintaining comfortable conditions with such variations. In smart electronic thermostats, all this is solved by PWM regulation.
This term comes from radio electronics. There PWM is pulse width modulation. In heating, this principle consists of changing the switching time and operation of the heating elements.
While the temperature in the room is far from the desired parameters (set at +25C, in the room +18C), the heated floors are turned on all the time (heating, heating and heating).
However, as the set point is reached (+25C), heat begins to be supplied as if in small, short pulses (on-off). Due to this, the temperature is accurately maintained in a comfortable area.
In this case, you can forget about inertial processes associated with overheating or, conversely, excessive cooling. You won't get anything like this from a thermostat with a wheel.
Sensor selection rules
A temperature sensor for a heated floor is selected taking into account such characteristics as power, type of top covering, installation method and additional functionality.
Power
The value must necessarily meet the requirements and load of the heated floor. Otherwise, the sensor will not operate correctly. When the power of the heating element is greater than that of the regulator itself, it becomes necessary to additionally install a magnetic starter between them - to prevent damage to the device due to increased load.
Feature Set
The heated floor is controlled by an electrical unit, which allows you to configure the operation of the heating elements. Modern regulators have such functionality as starting and de-energizing the system, adjusting temperature conditions, and also setting the frequency of connecting and switching off the heating element.
Ease of use
If you don't think you can handle programming, you shouldn't buy a complex device. Even taking into account all its functionality. For example, it is quite problematic for older people to understand programmable devices. They are better off choosing the mechanical option.
Easy to connect
The accompanying documentation for the thermostat always indicates how to connect the heated floor sensor. The terminals are located at the edge on one side of the control unit. Having connected the electrical wires according to the diagram, you will need to check the functionality of the heating system. To do this, measure the resistance at the terminals of the temperature sensor and the heating electric cable, or connect a heated floor and increase the temperature values from zero to the value recommended by SNIP, that is, up to 30°C.
Appearance
The temperature sensor should not only be functionally understandable, but also attractive in design. Modern regulators are available in various color and shape variations. You can choose an option that harmonizes with the interior of the room.
Phasing on the thermostat
A common question is: is there a difference where to connect the phase on the thermostat and where to connect the zero?
Yes, I have. This does not affect the operating logic of the device, but it does not affect the safety.
If you confuse the phase and zero, then when the thermostat is turned off, it will not be the phase conductor that will break, but the neutral one. Thus, the phase will be constantly present on the underfloor heating cable, which is naturally not safe.
In those devices that have a separate switch on the case, when it is pressed, two conductors are broken at once, both phase and zero. But this is in manual shutdown mode, and not in all models.
Often the zero is fed directly through its track. I went into the terminal and immediately went to the heated floor.
In this case, the switch itself is only responsible for interrupting the power supply to the control board. When automatically triggered by a sensor, only one wire is always broken.
Features of choice depending on the floor covering
Sensors for the “warm floor” system are divided according to the type of coating they are installed under. However, the installation differs.
Under soft cover
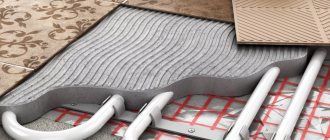
A temperature sensor mounted under carpet, linoleum, or cork flooring is a small cylinder attached to the end of a piece of cable. Place it when the screed is completely set. To do this, a narrow groove is made in it.
Under hard surface
Mounted, for example, under wood, tiles. The temperature sensor here is larger and covered with gel that protects it from damage. Its installation is somewhat more complicated and can be direct or using a mounting box.
Installation sequence
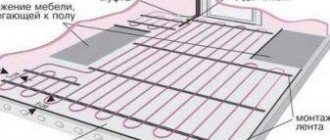
Before installing the regulator, be sure to read the attached technical documentation. It is best to install the thermostat next to sockets at a height of 60–100 cm from the floor. Before installation work, turn off the electricity in your home network.
Directly
To install a temperature sensor using this method, the regulator and heating cable are connected directly. With this type of connection, the heating element itself is in conjunction with the thermostat.
Using a junction box
This part is used as an intermediate part between the thermal device and the heating element. The connection diagram is as follows: one cable is pulled from the regulator to the wiring block, and another to the heating wire.
In order to mount the regulator you will need: corrugated tube, screwdriver, mounting screws, mounting box, level, indicator.
Step-by-step installation instructions:
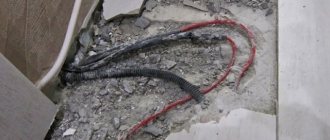
- A hole is cut in the wall for a box for mounting a thermal device. Below is a groove for pulling electrical wires. The box is placed in the right place.
- Electrical wiring is being pulled. The power cable and temperature sensor element are connected to the junction box.
- The electrical wires are connected to the thermostat, after which it is mounted in the box and secured.
- The main system components are connected to the product in accordance with the technical documentation.
- Once finished, the front panel is leveled and secured with screws.
Continuous operation of the heating system should begin no earlier than 3–4 weeks after pouring the screed. And if you chose tiles, after laying them. Under the influence of heat, the screed may simply burst.
Step-by-step installation instructions
For the thermostat to work and accurately determine the temperature, it is not enough to choose it correctly; it is also important to install the device correctly. Installation usually does not cause problems, but we decided to clearly explain this.
Regardless of which regulator you decide to install, you should start by choosing a location for it. It should be convenient to use. It is necessary to calculate so that the device is located close to the sockets and doors, the height from the floor is 1.5 meters. It cannot be mounted near a window.
Usually, the thermostat kit includes instructions that you need to read.
Sequencing:
- Before starting work, the installation site is de-energized;
- the wires from the heated floor must already be connected to the socket box;
- then the sensor is installed - it is placed in a corrugation, one end is brought out into the socket box, and the second is located between the heaters (cable or infrared film floor plates);
- insulation is removed from the floor wires - 6 cm;
- the cable screens are connected to the yellow-green wire, then everything is placed in the socket box;
- the top panel of the thermostat is removed - you need to insert a straight screwdriver into the groove from below, pressing the lid will snap off;
- the floor wires are connected to the required terminals of the regulator according to the diagram;
- the wires are carefully bent, the device is inserted into the socket;
- the frame is installed and the top panel is attached.
The floor heating thermostat is connected, all that remains is to check its operation.
Setting up the thermostat
All steps for setting up the thermostat are described in the operating manual. If the model is not programmable, then you just need to set the required heating level with a switch.
Setting up a programmable thermostat is more complicated and requires following a certain sequence:
- Sets the day of the week and current time.
- Checks which temperature sensor is turned on. Usually this is a floor sensor, but if there are several of them, it is recommended to turn on both.
- Selectable from the “menu”: “Morning”, “Night”, “At Home”, “Away from Home”. The time and temperature are adjusted, then the set values are confirmed.
You can program the controller so that the heated floor will heat up during the day and turn off at night.
It is clear that effective operation of a heated floor without a thermostat is not possible. It's up to you to decide which model to choose. However, you should take into account the characteristics of a heated floor so as not to purchase a fancy, expensive model for a heating system that will work well with a simple device.
Sources
- https://ProDatchik.ru/vidy/datchik-temperatury-teplogo-pola/
- https://savesys.ru/umnyiy-dom/datchiki/datchik-na-teplyj-pol.html
- https://TrubaNet.ru/teplyjj-pol/kakoy-termoregulyator-dlya-teplogo-pola-vybrat.html
- https://obzor-expert.com/termoregulyator-dlya-teplogo-pola-kakoj-luchshe-vybrat-top-11-luchshih-modelej/
What do you think of this article?
What to do if the sensor is not installed
The simplest solution is to connect a thermal device that has a built-in control temperature sensor that turns off the heating wire when the air warms up to the required temperature.
If a warm floor is needed only to make the surface pleasant to walk on, a thermostat with a smooth power control mode in the range from 0 to 100 percent is suitable.
The thermostat operates on the principle of a timer. For example, when set to 80 percent for 10 minutes, electricity flows to the heating element for 8 minutes, but not for 2 minutes.
There are regulators that can automatically switch to timer mode.
The best thermostat models
Manufacturers offer customers a wide selection of thermostats of different types, functionality and price categories. Based on reviews from users and experts, you can choose the highest quality, reliable models among them.
Teplolux TR 520
Electronic programmable model. Inexpensive and easy-to-use thermostat for electric and water heated floors. It has a graphic display that shows the selected programs and the degree of heating in the room at a given minute.
The temperature sensor and user-friendly interface make settings easy. Main characteristics of the device:
- minimum temperature level - 5 degrees, maximum - 35;
- power - 3500 W;
- communication current - 16 A;
- Warranty period - 3 years.
Model advantages and disadvantages:
- low price;
- beautiful display;
- the ability to adjust the heating level for any day;
- “anti-freeze” mode;
- availability of air temperature adjustment.
- After disconnecting, you need to configure it again.
National comfort 711
Inexpensive model with rich equipment. Includes floor and air temperature sensor, large graphic display with backlight. The regulator has a self-diagnosis function, its results are reflected on the screen.
The warranty period for the device is 1 year. The device allows you to save up to 30% of the resource.
The disadvantage of the model is low protection, so it is not recommended to choose this device for a bath or shower. Problems may also arise when pressing the buttons, since they are not located very well.
Varmel RTC 70.26
Electronic wired mechanical thermostat for electrical and water systems. Operates at a minimum temperature of 5 degrees, maximum - 40. Permissible load level - 3600 W. Warranty - 1 year. Installation is carried out in an installation box.
Advantages and disadvantages:
- convenient on and off buttons;
- the presence of a remote-type sensor with a 3-meter wire.
- makes a clicking sound when switching.
Thermo Thermoreg TI-200
A simple and cheap mechanical device. This is a cheap device with an indicator and a temperature sensor. With it you can quite accurately adjust the desired heating level and maintain it. The heating indicator is set on a scale, and the presence of a two-pole switch makes it easy to turn off the regulator.
Operating temperature from 5 to 40 degrees. Maximum load - 3600 W. Guaranteed service life 3 years.
Pros and cons of the model:
- Compactness;
- low cost;
- ease of operation;
- the presence of an anti-freeze function.
- inability to adjust heating by day of the week, lack of display.
Terneo SX
“Smart” thermostat equipped with a touch panel and temperature sensors. It is chosen when remote control is required, as it can be controlled via a smartphone. The interface is simple, making setup easy. Hysteresis can be adjusted to reduce the number of switches on and off. Installation is simple - it is installed in a metal box on the wall.
Terneo SX has a number of useful features:
- timer;
- protection from children;
- departure mode.
Main characteristics:
- temperature level from +5 to +45;
- thermostat power 3000 W;
- Warranty period - 3 years.
The advantages include low price, ease of operation, fast response of the screen to touch, and the ability to track statistical data on operation and electricity consumption. Disadvantages - difficult connection to a smartphone, low-quality plastic.
SpyHeat ETL-308B
SpyHeat ETL-308B
Compact mechanical model, easy to operate, high quality, but inexpensive. It has a pleasant appearance and works for a long time without interruption. The case is equipped with a temperature switch and indicator. The setting is carried out by turning the switch.
Model characteristics:
- minimum temperature - 15 degrees, upper limit - 35;
- maximum power - 3600 W;
- there is a temperature sensor;
- service life - 2 years.
The disadvantage is a possible clicking sound when the heating relay is activated.
Rexant R70XT
Compact mechanical wired thermostat with simple controls. The switch operates smoothly, which allows you to change the heating degree by one division. The case is equipped with a system power-on indicator. The device is mounted in a distribution box.
Device characteristics:
- adjustment within +5 - +35 degrees;
- power – 3500 W;
- Warranty period - 1 year.
Nest Learning Thermostat 3.0
Nest Learning Thermostat 3.0
This model is the third generation of this type. Externally, it is no different, only it has a larger disk size and higher resolution (320X320 pixels).
The device is equipped with a large display and new functions:
- autoschedule;
- programming;
- auto shutdown;
- notification in case of violation of the regime.
Management is simple, possible with a smartphone via the Internet. Installation is also quite simple. Warranty - 2 years. The only downside is the high price.
Menred RTC 70.26
Inexpensive thermostat for mechanical electric floors with hidden installation and remote sensor. Wired control, with the ability to regulate floor heating.
Characteristics:
- Maximum load - 3600 W;
- temperature limit – from +5 to 40 degrees;
- warranty - 3 years.
The thermostat is equipped with a light indication. Installation of the device is simple; it is installed in a mounting box.
Grand Meyer HW500
A universal, inexpensive electronic model of a programmable type. Controlled by buttons, they can be locked. Has several modes. Equipped with temperature sensors - built-in and wired.
Specifications:
- operating temperature fluctuations – from + 5 to + 35;
- power 3600 W;
- communication current 16 Amp;
- warranty period 2 years.
The disadvantages of this model include clicks when turned on and the lack of locking when the mode is on.
Electrolux ETA-16
A device with a small display and a minimum number of icons. The screen glows brightly and lights up when you touch any button. The interface is clear, it is easy to set the regulator to turn off, set and maintain heating at a given level. The device is equipped with a temperature sensor.
Characteristics:
- temperature setting in the range from +5 to + 50 degrees;
- permissible power - 3500 W;
- Warranty period - 3 years.
Caleo 520
A surface-mounted device with a control sensor. It has a backlit display that shows the temperature. Equipped with a keypad lock function.
Main characteristics:
- temperature range from 0 to 40 degrees;
- Warranty period - 2 years.
Advantages of the model:
- easy setup;
- ease of use;
- low power consumption;
- modern design;
- low price.
Disadvantages noted by users are the clicking of the relay during operation.
Almac IMA-1.0
Modern, electronic, inexpensive device of high quality assembly. Equipped with temperature sensors - portable and built-in. A positive feature is that the hysteresis can be adjusted; the lower and upper temperature limits are set with high accuracy.
Specifications:
- maximum temperatures - from -50 to +110 degrees;
- power - 3600 W;
- warranty - 1 year.
How to check a temperature sensor
To find out why the temperature sensor is not working, you can use a multimeter:
- The input line is being tested. You need to turn on the power and check if there is voltage in the wires.
- If no problems are found, the output line is tested. The heating cable is disconnected from the regulator and the power is turned on.
If there is no voltage at the output terminals, we can say that the thermal device has become unusable. It is removed and replaced with a new one.
Do you need land?
Also note that the protective grounding is directly to the thermostat itself at class=”aligncenter” width=”700″ height=”434″[/img]
This can be a separate, separate terminal through which the heating cable shield is connected to the protective conductor.
The thermostats themselves even have a “square within a square” icon, which means a device with double insulation.
These marks are typically found on portable tools that do not require a grounding pin on the power cord plug.
Review of manufacturers
There are many companies involved in the production of heated floors. The most popular brands are Devi, AEG, Thermo Industri AB. Each manufacturer's sensors have their own characteristics.
Devi devices
Temperature regulators of this brand work with any type of heating elements. They are divided into mechanical and electronic, with conventional or touch controls. In addition, the Devi line of regulators includes models controlled remotely via smartphones.
Advantages of devices of this brand:
- availability of models for outdoor installation;
- savings on the operation of heating appliances up to 30 percent;
- availability of control via the Internet.
The advantage is the variety of options to solve any problem.
AEG regulators
Thermal sensors of the German brand belong to the premium class. Excellent quality guarantees durability and trouble-free operation. But such devices also cost a lot.
The product range is wide: from simple basic devices to “smart” temperature sensors that fully control the operation of the heated floor and the microclimate in the room.
But even basic models have many advantages:
- maintain temperature indicators at the required level;
- controlled very simply - by manually turning the key on and off;
- Thanks to convenient controls, they are suitable for older people who are not familiar with programming.
An external timer can be connected to the device to control the temperature reduction mode.
Devices Thermo Industry AB
Such thermostats are installed exclusively indoors. Capable of controlling elements of a heating cable or thermomat. Models have been developed that are ideal for parquet or laminate flooring. Most devices are equipped with smart air temperature meters.
Electronic devices are capable of adjusting heating with an accuracy of 1°C.
They are used for anti-icing systems if it is possible to combine them with a thermostat in the house. Built-in intelligent heating sensors make it possible to reduce electricity consumption, and Swedish quality guarantees many years of operation.
Types of temperature sensors for underfloor heating systems
The operating mode of STP heating elements directly depends on the correct temperature measurement by temperature sensors. They can be built into the body of the control box or placed remotely.
Thermal sensors come in four types:
- To determine air temperature.
- Infrared, measuring the heating of the floor surface from a distance.
- To determine the temperature of the floor surface by contact method.
- Combined.
The air heating sensor is usually built into the thermostat or its mobile unit. It is used when the heated floor is the main heating system. The main requirement for its location is the presence of natural air circulation around the device.
The tips of temperature sensors should be made of materials that conduct heat well, then the speed of the thermostat's response to excess heat will be higher
Infrared floor temperature meters can be built into the thermostat housing or placed as a separate unit. The main requirement for their installation is that there are no obstacles between the sensor and the floor. The distance between the device and the surface to be analyzed must be at least 30 cm.
Contact-type temperature sensors look like a long wire with a thickening at the end. On the one hand, they are connected to the thermostat unit, and on the other, they are placed in a special long corrugated pipe under the floor. This installation feature makes it easy to replace a broken sensor with a new one.
The advantage of underground placement is the possibility of multi-zone control of floor temperature within one room. Typically, such sensors are installed when installing a heated floor as an additional heating system.
Several sensors can be connected to the thermostat, but this scheme is used mainly within the framework of an integral set of equipment.