LED strips are becoming more popular every year. They fit favorably into the interior of living rooms, entertainment facilities, or are used to attract attention on advertising banners. But, like any backlight, LEDs can fail after a while. To solve the problem, the tape can be replaced, but this is not always beneficial.
If the breakdown is not critical, the elements can be repaired yourself. To do this, you need to understand their design and operating principle. Experience in soldering microcircuits will also come in handy. But before you start repairing, you need to understand whether it will help or not. Sometimes a breakdown cannot be fixed.
What problems may arise
The causes of breakdowns are as follows:
- The backlight does not come on completely . First you should check if the power supply is turned on. The next step is to check the voltage at the outlet. A multimeter or test lamp is suitable for this. If everything is in order, you should check the wire that leads to the power supply. If there are no problems, pay attention to the quality of the connection between the tape pad and the wire. Also, the cause of the malfunction may be in the printed circuit board;
- the diodes lit up only up to the center of the tape . The cause of the malfunction is the burnout of one of the segments;
- LEDs flicker constantly . There may be several reasons for this. One of them is a failure of the power supply. It is also recommended to check the entire length of the connections and the supply wires. Sometimes flickering occurs due to overheating or gradual failure of diodes;
- A separate piece of tape or some diodes flicker . This occurs due to damage or burnout of one of the chips. The resistor may also be faulty.
LED strip does not light up halfway
This breakdown is common - in one of the segments the track has failed. Diagnostics consists of applying power to areas that are located behind the problem area of the LED strip. Don't rush to blame diodes for a breakdown. Sometimes this happens due to a break in the conductor. To prevent this from happening, the bends should not be too sharp.
An example of a break on a bend.
To repair, the non-working section must be removed and the working parts soldered together. This repair option is not always appropriate, since the tape will become shorter. In any case, you will have to buy another product to fill the gap.
Lost brightness
The loss of brightness may not be immediately noticeable. The ribbon will continue to glow, but not as brightly as before. This can happen with a single section or along the entire length. Possible reasons:
- The LEDs are reaching the end of their service life. If the diodes stop shining as before after 2-3 months, this indicates a manufacturing defect. Attenuation may also indicate overheating;
- power supply failure. Check the contacts where the tape connects to the power source. If a plug-socket pair or connector was used at the junction, oxidation may have occurred, causing current conduction to be impaired in these places.
Dimmed LEDs.
There's no light at all
If all the diodes do not light up, you should look for the cause in the power supply. First you need to check the 12-volt adapter and the presence of 220 volts. The problem may occur at the low voltage output and input. In most cases, the cause of this is a poor connection in the area with the first three chips. To find out, power should be supplied from the following diodes in order. If the backlight is turned on, the problem area is cut off along a special line.
Line for removing the damaged section.
Flashing
Flashing LEDs may indicate insufficient adapter power. To prevent this from happening, each source must have a power reserve of at least 20% . In addition, soldering that was performed with aggressive types of flux can cause flickering. When connecting individual sections, it is recommended to use regular rosin or immediately neutralize the flux that remains on the substrate.
Recommended rosin for soldering.
If the product operates on a 220 V network, there is a possibility that the smoothing capacitor has failed. In this case, the flickering will be almost invisible.
The most harmless reasons for blinking LEDs are a breakdown of the control panel, a problem with a section of three chips, or the diodes running out of resources.
Principle of operation
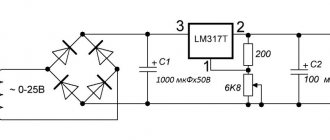
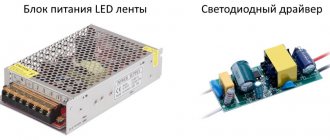
LEDs place increased demands on the quality of electrical power. The diode lighting circuit contains a special device - a driver (or technically more correctly - a power supply). Thanks to it, the output current is stabilized regardless of the load level and in accordance with the permissible output power.
The power supply can be switching or transformer. The latter includes a step-down transformer (from 220 V to 12 or 24 V) or an autotransformer. The switching power supply is based on an inverter system, according to which the input voltage is rectified.
The tape contains the following elements:
- current limiting resistors;
- flexible printed circuit board;
- glue-treated base.
The structure of the 12-volt model includes sections with 3 diodes and resistors. The number of diodes in a section is explained by energy needs: to power one diode, a little more than 3 V is required, which gives a total of 10 V. The remaining 2 V from 12 are extinguished by a resistor that sets the required current.
Different models use the following number of diodes:
- 30 pieces (per linear meter);
- 60 pieces;
- 120 pieces.
The tapes are also classified according to the type of light diodes:
- 2835;
- 3528;
- 5050;
- 5630.
Only the most popular models are listed above. If desired, you can select other types of lamps.
Pulse blocks (the most popular) are of the following types:
- Based on a self-generator (another name is a blocking generator). These are the most inexpensive models. They are distinguished by low power (up to 25 W).
- On a PWM controller with a power switch installed. They belong to the middle price category. Power - from low to medium (30-50 W).
- On a PWM controller with an external power switch (or several switches). Such models are also called half-bridge. These are the most expensive and powerful blocks. At the same time, pulse blocks of this type are the most stable and reliable in operation.
Diagnosis of nutrition problems
Checking the power supply is carried out according to the following scheme:
- Checking the reliability of the connector connection to the power supply.
- If the unit has a network indicator diode, you need to check whether it lights up or not.
- If there is no diode, the serviceability is checked with a multimeter. There should be no voltage at the output. Otherwise, the unit needs to be repaired.
One of the first things you need to check is the control panel. Sometimes just replacing the battery is enough. If it does not sit down, the infrared sensor may have failed.
The next step is to check the LED strip. You need to apply voltage to its terminals using two additional wires, without using a power supply. “Plus” is connected to the terminal, it is indicated by an arrow on the plug, and “minus” is alternately fed to the remaining terminals. At this stage, the main thing is not to make a mistake so that there is no short circuit between the wires of the unit.
Power unit.
Power can be supplied from a battery or 5-15 V batteries. The tape will not shine brightly, but this is enough to check its performance. If several chips or one of them turn out to be inoperative, the backlight will not light up only in problem areas. The repair will consist of replacing damaged diodes with new ones.
Exploitation
Does the LED lamp glow when the switch is off? It is recommended to replace the device with a new one if there are no problems with the electrical wiring. Try not to neglect the rules for using LED lamps, then they will work properly.
- Dismantling and installation of the device is carried out with the electricity turned off.
- Do not allow the LED lamp to come into contact with water.
- It is not recommended to use a lamp for street lighting unless it is protected from water and dust.
- Lamps cannot be used in devices with a brightness control.
- If the LED is used in a circuit with a switch that has a neon backlight, the light will glow faintly when turned off.
- Connecting the lamp to a voltage different from the rated voltage leads to a reduction in service life.
- Temperature changes in the operation of the lamp lead to its failure.
- LEDs do not need to be recycled as they contain no hazardous substances.
- The lamps are guaranteed for three years from the date of purchase.
LED lighting can completely replace traditional lighting. Such light bulbs are used in any lighting fixtures and interiors, depending on a person’s preferences.
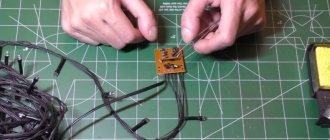
How to fix an LED strip
If one of the chips is burned out, it can be replaced and the backlight will be fully restored. When it comes to the breakdown of the SOV plate, repair will not help. First, they check with a tester, then unsolder the damaged diode, connecting the circuit without it or with another element. In most products, the circuit board is made of aluminum to effectively dissipate heat to the heatsink.
Structure of LED strip.
The heat dissipation substrate on the back side of the chip is soldered to the current-conducting track. During dismantling it will have to be unsoldered. Plastic printed circuit boards also contain such tracks. Based on the material, it is necessary to choose the correct soldering method. To work you will need:
- blade;
- tester;
- holder;
- tweezers;
- flux;
- soldering iron (it is recommended that it be thin). For a standard soldering iron, you will have to make the tip yourself. Copper wire is suitable for this.
To remove the aluminum board, the case is separated from it. You can use a knife. The board is usually soldered to the base with two wires; they need to be unsoldered. For convenience, the tape can be fixed in the holder. At the next stage, the tester checks each track. A burnt-out diode can be visible to the naked eye, but not always.
Burnt out diode.
The quality of soldering should be inspected. If there is a defect in production, this will affect the service life of the diodes. When the burnt chip is identified, you need to take a soldering iron and tweezers. The burner should be on the other side of the board. When the soldering softens, the diode is removed with tweezers. The new chip must be fastened before the aluminum base cools down.
Basics of proper installation
Installation errors lead to rapid burnout of the entire LED strip due to damage to the conductive paths and overheating.
To prevent problems, firstly, you need to ensure that the bending radius is at least 5 cm. Copper conductors at the base are easily broken from such deformations, so you should not wrap the tape around thin pipes and sharp corners.
Secondly, when installing the tape, you must leave a gap between the strips (at least 1/3 of the width of the web). When glued tightly, the board overheats, since more than half of the LED power is converted into heat. It is recommended to avoid connecting the tape near heating appliances.
By following the recommendations, you can not only easily identify and fix problems with the LED strip, but also prevent their occurrence by following the installation rules.
Functional testing steps
Before purchasing an LED strip, all buyers have a justified desire to check its performance. To do this, you need to have a battery with you, for example a “krona”.
Checking the tape using a crown.
The product will not light up at full brightness. To test a long section, you will need a large battery, for example, which is used in an uninterruptible power supply for a computer. It is suitable because it has 12 volts at the outputs. One of the best options is a car. To test individual LEDs, use a multimeter or a 3-volt battery.
Video example of repairing a 220 volt LED strip
Drivers and blocks from a computer - is it possible or not?
Let's take a closer look at the question of what power supplies there are and where it is better to use certain power supplies. After all, completely different types are used to connect LED lighting in the bedroom, on the street or in the pool.
However, do not confuse power supplies and drivers. These are completely different devices and they perform different tasks.
By connecting the LED strip from the driver, you can easily burn it and damage it. Why this happens is explained in a separate article.
People often wonder whether it is possible to use power supplies from a computer instead of a standard magazine unit?
If its characteristics match the characteristics of the LED strip - there is a constant stabilized voltage of 12V + sufficient power, then connect.
Everything will light up and work properly. However, for high-quality illumination, it is better to select specialized types. Let's move on to them.
Tips before buying a new tape
When looking for suitable lighting, you should not pay attention to cheap Chinese online stores with attractive prices. Such products contain low-quality chips that quickly burn out or become dull. In addition, the backlight is unlikely to be returned under warranty.
It is also worth considering the purpose of the LED strip. It comes in single color and multi-color. The latter is used as decorative illumination of a surface or individual objects. A single color is suitable for highlighting a certain area in a house or apartment, window and door openings.
Low quality of the lamps themselves
Low quality products mean that cheap lamps quickly burn out. Chinese LED devices attract with their budget price, bright and stylish design, but, unfortunately, they are not durable.
At the first voltage surge, they will burn out, because their circuit does not have a driver that adjusts the current strength in the device.
When buying a lamp, we look for a device that is in the budget price segment, but at the same time shines brightly. Manufacturers of LED products and diodes satisfy the requirements of customers - they select capacitors and resistors so that the light is bright, and the price of the product is budget-friendly.
But such lamps operate at full power, which reduces the service life.
Poor-quality lighting devices cause a blow to the family budget, so you shouldn’t skimp on light bulbs. In addition, high-quality lighting has a beneficial effect on your vision and overall health.
Additional sources of unpleasant phenomena
Have you managed to work through all the options outlined above, but still haven’t figured out why the LED strip is blinking? Perhaps the root of the trouble lies in the following aspects:
- Lack of power. In this combination of circumstances, blinking does not occur immediately, but only after heating the microcircuits and the electrons of the system elements.
- After soldering the ends, traces of flux and acid remained on the tape. In this case, the lighting defect is caused by the corrosive action of the acid.
- The battery in the remote control is exhausted.
- Incorrect installation. Flickering will make itself felt if you confuse zero and phase.
Minor faults
A chandelier with a remote control may not turn on for other reasons that are minor.
- Broken wiring or poor quality contacts.
- The LEDs themselves do not work.
Therefore, before the chandelier is installed on the ceiling, we recommend that you carry out a small check on the floor or table. To do this, it is connected to the network through an outlet using a plug.
It is checked whether there is voltage at the input contacts of the controller, then at the output contacts. Then you need to make sure that electrical current is supplied to the power supplies. Then the voltage is measured after the power supplies (it must be reduced and correspond to the rating indicated on the device body). Be sure to check the wires connecting the power supplies to the light sources. And lastly, the groups of LEDs themselves are checked. In principle, nothing complicated, but sometimes this will determine whether the chandelier is on or not.
Incorrect operation
Even though all problems have been eliminated and all factors that lead to lamp failures have been reduced to a minimum, they can still burn out. It is necessary to check how correctly the lighting devices are used.
Turning on/off too often
You need to understand that when the light is turned on, a surge of voltage occurs through the step-down capacitor. Therefore, there is a risk of burning out the fuses on the capacitor or the path through which the current passes.
To avoid burning out the capacitor, do not constantly turn off the lights if you leave the room for a few minutes.
Lack of surge protection
The lack of protection against voltage fluctuations in the device is the main problem of cheap light bulbs. The driver ensures a stable supply of the required voltage to the diodes.
Most often, it is the driver that fails due to a wiring fault. You need to check the voltage coming out of the power supply, as well as the integrity of all diodes in the lamp.
Why does an LED lamp glow when the switch is off?
Miracles do not happen and I, as an electrician, responsibly declare that if an LED light bulb lights up after turning off, there can be only 2 reasons for this:
- the switch does not break a phase, but a zero, and there is a section in the wiring with poor-quality insulation;
- A backlit switch is used.
Let's consider both cases in more detail.
Illuminated switch
The most common reason for an LED lamp to glow after being turned off is the use of a backlit switch.
Inside such a switch there is an LED with a current-limiting resistor. The LED lamp glows dimly when the lights are turned off because even when the main contact is turned off, current continues to flow through them.
Why does an LED lamp burn at full heat and not at full power? Thanks to the limiting resistor, the current flowing through the electrical circuit is extremely insignificant and insufficient to light an incandescent electric lamp or ignite fluorescent lamps.
What does it look like? There can be two lighting options. Either the LED lamp lights up continuously after turning off, which means that sufficient current flows through the LED backlight of the switch, or the light flashes periodically.
This usually happens if the current flowing through the circuit is too small to cause a constant glow, but it recharges the smoothing capacitor in the power supply circuit.
How to fix? The simplest is to remove it from the backlight switch. To do this, we disassemble the housing and unscrew or bite off with wire cutters the wire going to the resistor and LED. Or change the switch in the house to a regular one, without backlight.
You can purchase such a resistor at any radio store. Installing the resistor is not difficult. It is enough to remove the lampshade and fix the resistance legs in the terminal block for connecting the network wires.
If you are not particularly friendly with electricians and are afraid to “interfere” with the wiring yourself, another way to “fight” backlit switches can be to install a regular incandescent lamp in the chandelier. When turned off, its spiral will act as a shunt resistor. But this method is only possible if the chandelier has several sockets.
Incorrect connection of the lamp
The reason for the continuous burning of the lamp may be hidden in connection errors. If, when installing the switch, a zero was connected instead of a phase, it will turn off when the circuit is opened. At the same time, due to the preserved phase, the wiring (and, accordingly, the light bulb) will be constantly under voltage. The LED light will illuminate when the switch is off, due to leakage current through worn insulation or poorly insulated connections.
Violation of polarity (phase and zero) during installation causes a constant supply of current, which leads to the glow of LED devices even when the switch is off. This situation is quite dangerous for the inhabitants of the apartment: since the device is energized, even if it is turned off. And you can accidentally get an electric shock (for example, when replacing a light bulb).
How to fix? It is necessary to turn off the power supply, disconnect the wires, and then mount them in the correct way (phase to switch).
Contact oxidation on connectors
Not everyone likes and knows how to solder tape, so they connect it in another, more accessible way - with connectors.
However, they have one significant drawback - oxidation of contacts. Most often this happens in rooms where the walls have recently been painted, whitewashed or screeded.
That is, where there was an excess of moisture. The current flowing through the connector often exceeds 10A:
for an area of 5m and a power of 75W - 6.5A
for tapes power 30W per meter – 12.5A
The same can happen due to insufficient contact patches between the contact pads, which is often observed in such connectors.
1 of 2
Therefore, it is recommended to carefully select connectors. Which types of them are the most common and how to choose the best one can be found in the article “3 types of connectors for connecting an LED strip.”