A country house is undoubtedly a convenience. But if it is two or three stories high, it has a staircase, which means there is a possibility that the residents of the house may accidentally fall from it in the dark. Automatic staircase lighting helps solve this problem. Modern technologies can not only provide lighting for the entire staircase, but also for each step separately. At the same time, a pleasant soft light will not dazzle the eyes, which not only ensures safety, but also adds an additional element of aesthetics to the design of the entire house.
Beauty, safety, savings
Automatic lighting gives a very impressive appearance. In addition, the safety of movement increases. In addition to this there are other benefits:
- There is no need to feel for a switch on the wall in pitch darkness.
- Even if only slightly, energy is saved. Due to automation, the system is in an economical standby mode.
- Using automation tools when installing lighting, you can set up beautiful visual effects.
And you don’t have to worry that it’s expensive and inaccessible to an inexperienced user. The entire set of additional lighting is initially very inexpensive, and can easily bring additional comfort and benefit to residents.
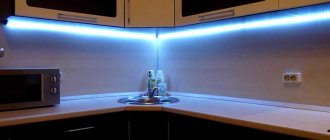
Connection diagram for work area lighting in the kitchen
To power an LED strip in the kitchen, professionals recommend choosing sealed units with a protection level of IP65-67, and not those with through holes in the housing.
Although, if you place it at the very top of the cabinets, and not inside next to the dishes or hood, then there is not much difference.
True, be prepared for the fact that such a perforated thing will suck in dust, be healthy.
And this will definitely affect its performance.
When placing in a closet, secure all units to the wall, as far as possible from foreign objects.
The power must be selected based on the connected length of the LED strip and its brand. There is a universal calculation formula.
The power supply is supplied with phase and neutral from the general 220V network.
You can take them from the nearest junction box, hiding the wires in the cable channel.
Or, as an option, use the top socket from which the kitchen hood is connected.
Just insert a tee there and a plug into the block.
As a last resort, if you have nowhere to get 220V, and you don’t want to spoil the walls with ugly cable channels, you can try to power the entire backlight from a block of 18650 batteries.
True, the LED strip in this case should be short and of minimal power.
Next, a voltage of 12 or 24V must be supplied to the unit from the infrared sensor. Here on these terminals.
Since this is your “wet zone,” it is better to choose an infrared sensor that works on the principle of a wave of the hand at a low voltage of 12V rather than 220V.
More details
However, most still use models for standard mains voltage. They are more powerful and more common.
More details
In addition, by mounting them in front of the LED strip power supply, you will thereby turn on this unit only for a certain time. That is, it will not work for you and is under voltage 24 hours a day.
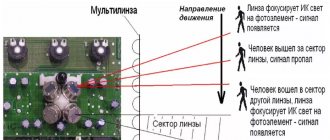
How automatic backlight works
What’s good about this type of auto-backlight is that it’s independent. She herself will determine when and for how long to turn on the light. Due to the fact that the circuit includes motion sensors, they will react to the appearance of a person and turn on the lighting either of the entire staircase at once or of each step separately. It is better to provide two motion sensors in the circuit - at the beginning and at the end of the flight of stairs. This way the system will determine that after a person passes the light can be turned off. Also, the power circuit is necessarily supplemented with controllers that can be programmed for different response conditions. An additionally installed sensor for turning on the light when darkness sets in will allow the operation of motion sensors and prevent the backlight from turning on if the lighting level in the room is high enough.
In case the stairs in the house are very long and have several flights, it is possible to install additional sensors. It's even more interesting this way. The connection circuit can be complicated:
- Include not all stages, but several - in groups;
- Or one step along the route of a person’s movement.
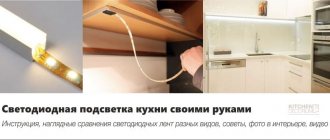
How to make your own backlight
To mount the lighting yourself, you need to wisely choose a scheme, calculate the number of materials and lamps and install them.
Choosing the optimal scheme
First of all, you need to decide what spatial position the backlight will occupy:
- On the surface of the wall or in its structure.
- On the sides, top or bottom.
- At each step or after one or two.
- Along their entire length or just in the center.
Having drawn up a plan for the lamps and wiring for them, you must immediately set them to a control method - simple, automatic or combined.
Calculation of the required amount of materials and lamps
Only by accurately calculating the distribution diagram of lamps, wiring and other equipment can you purchase all the components of the system. Stores today can offer ready-made kits of various types of lighting designed for one or two-level flights of stairs.
When calculating materials, you need to take into account that plastered walls will require gating and, as a result, additional finishing costs. If you use the overhead cable option, you will need to purchase decorative cable channels. The more complex the circuit, the more additional devices and consumables there are. So, to provide autonomous backlighting, you will need to install drivers, a controller, a power supply, and sensors.
General recommendations for installing lamps
When choosing lamps for staircase lighting and carrying out work on their installation, it is recommended to be guided by the following list of rules:
- Economic indicator of lighting devices. This criterion becomes more relevant the more often the ladder is used.
- The flight of stairs is always an increased source of danger in the house, especially when there is a power outage in the public network. Therefore, the system must have a backup (and in some cases it may be the main) autonomous power supply option.
- Lighting is most important in rooms where the stairwell does not have windows.
- When choosing and installing lamps, one cannot ignore the interior of the staircase itself.
- The backlight should not irritate the eyes, but it should have good and uniform illumination.
- Self-installation factor - can you install the selected devices yourself or will you need to order the services of a professional electrician?
Selecting lighting sources
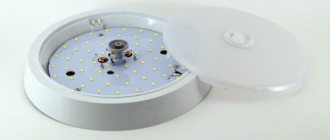
The most common option is LEDs.
The most affordable models that emit light of one tone.
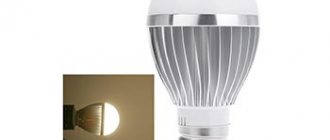
More expensive LEDs with RGB backlighting. Such LEDs produce light of any shade that the controller sets for them.
Due to the fact that LED strips of both types operate from a 12 V mains voltage, do-it-yourself automatic staircase lighting is absolutely safe to use. In addition, the installation of the staircase lighting system itself is possible on your own without special equipment.
LED lighting options
The operating modes can be the following:
- Constant lighting;
- intelligent lighting.
Continuous operation
The advantage of this lighting method is maximum ease of installation and minimal costs. When darkness falls, you turn on the lights and they work until the morning.
Disadvantages of constant backlight operation:
- Constant power consumption
- significant reduction in LED lifetime
Intelligent control systems
Lighting control is widely used in complex solutions for smart home projects. Control units are created on the basis of microcontrollers. Most authors suggest using an Arduino board as a control module.
Indeed, such a device can easily control the lighting of the stairs, but this option is for amateurs. The power and control channels of such a board are enough to coordinate lighting throughout the entire house, and as a bonus, you can also connect heating system control and microclimate control to it.
To solve our problem, such a small chip, which costs less than a pack of cigarettes, will be enough.
Preparing for installation
If there is no ready-made kit for lighting the steps of the stairs, you need to think through the lighting scheme yourself. It's not difficult at all. In this age of the Internet, you can find almost everything on this topic.
If you have already decided where all the necessary elements will be placed, it is best to sketch out a small drawing on a blank sheet of paper with connection elements with their installation locations directly on the stairs. This will give you a clearer picture of the future outcome of your project.
Knowing the initial dimensions of the room, the dimensions of the stairs and flights of stairs, it is not difficult to calculate both the footage of the LED strip and the number of sensors that will work in the future lighting system.
This type of lighting scheme is often found on the Internet:
This scheme is quite workable if you use a regular and inexpensive strip of LEDs. Although there is a significant drawback to it. It is necessary to install a special controller for each piece of tape. That's how many steps there are, that's how many sections of LED strips there are. Each strip needs its own output and all the wires are combined together. Therefore, already at the output of the controller you get an impressive braid of wires.
But the most interesting effects are provided by the addressable RGB LED strip. In addition to simplifying the scheme, we will get the color design of the steps with a variety of color effects.
If anyone doesn't know, we'll explain. The addressable LED strip makes it possible to control a separately soldered LED. And each LED in the strip is capable of producing about 16 million different shades!
A more simplified diagram of the project “staircase lighting on steps with a motion sensor” can be presented in this version:
Now about the details.
Addressable type light strips are highly directional and are connected to the DI pin.
As can be seen from the example, all separately cut strips of tape are connected through D0 to DI.
We recommend using ws2811 chip strips to illuminate small flights of stairs.
Tapes of this type can be powered from a 12 V source. Every three LEDs in this strip are controlled by their own chip, which produces a certain light on the 3 LEDs for which it is responsible.
We advise you to buy a roll of tape (or as much as you need according to your calculations) on the Chinese trading platform Aliexpress. You will not lose in quality, but you will definitely gain in price. For some reason, in our retail chains similar tapes cost orders of magnitude more than in China.
At the time of writing, a five-meter roll of tape with a density of sixty diodes could be purchased for only 700 rubles.
A denser arrangement of LEDs is also on sale, and costs more. But for staircase design there is no point in buying such a strip, since 60 LEDs per meter is the optimal parameter for illuminating steps.
Now we need to talk about one more parameter.
There are tapes on sale with different degrees of moisture protection - IP:
- IP30 without protection;
- IP65 - silicone coated tape;
- IP67 - sealed tape in a silicone casing.
It doesn’t make much sense to buy IP67 for indoor stairs, but illumination of stair steps from IP30 or IP65 is at the discretion of the owner. It seems to us that giving preference to IP65 would be wiser. Do you still need to wash the steps sometimes?
Here on Ali Express you can find the bright tape. It will cost an order of magnitude more, but you will benefit from the power of the luminous flux - the light will be much brighter.
Immediately on Ali you need to select a microcontroller to control the tape. We recommend paying attention to similar devices on the Arduino Nano platform.
Light strips
It is worth starting the purchase with the most significant part of the estimate - with the purchase of lighting fixtures.
As we noted above, there can be two options here.
- LED strip is a strip of elastic polymer material equipped with a thin conductive coating. LEDs are attached to it at certain intervals, which, when voltage is applied, emit a fairly bright light.
LEDs on the awning
- By design, tapes are divided into two categories - open and waterproof. We need models with a sufficient level of waterproofing to prevent water droplets from contacting conductive elements when washing floors.
- The vast majority of models are attached to the surface using a self-adhesive layer. If it seems to you that the glue has dried out a little, you can strengthen the fastening by fixing the backlight with double-sided construction tape.
- As for the type and configuration of the diodes themselves, to ensure comfortable movement along the steps in the dark, the SMD 3528 model is quite sufficient. SMD 5050 have a brighter light, and therefore they should be used for general room lighting.
Note! If you need colored lighting for stairs, then you need to purchase the so-called RGB strip. To adjust the color change you also need to install a special controller.
Photo of installed side lighting
- To prevent the light from the tape from scattering, a special aluminum U-shaped profile can be attached to the lower part of the staircase overhang. Also, instead of installing a profile, the lighting of a wooden staircase can be mounted in a groove made under the step.
Metallic profile
Lamps for stairs
Lamps differ significantly from strips:
- Most models on the market have a housing designed to be built into a wall. Preference should be given to devices with a cylindrical body, since standard socket boxes can be used for their installation.
- The main part of the market consists of white light lamps, but if desired, you can also find yellow (“warm”) and colored models.
Model with directional light housing
- Often such lamps are sold in sets of several pieces, united by one controller. The use of such a kit greatly simplifies the installation of a backlight control system.
Note! When purchasing a backlight, pay attention to the design of the protective grille. It must provide a directional flow of light, otherwise it will blind your eyes when turned on. A plus will be the ability to adjust the reflective casing.
Controls
Now we come to the most complex part of our system - the controls.
To ensure that the sensors are triggered and the lamps or strips are turned on, we will need:
- The microcontroller is the core of the entire system. The best option, from the point of view of experts, would be the Arduino staircase lighting, since this series of microcontrollers allows for fairly simple programming by connecting to a computer.
Arduino microcontroller and its connection principle
- To make the system operate more efficiently, you can use an LED driver or similar device. In the simplest versions, a 74HC595 type chip is used. The price of such parts is low, but they significantly expand the range of system capabilities.
- To detect movement, you need to install two motion sensors. They can be either ultrasonic or infrared.
Built-in sensor
- In order for the system to turn on only in the dark, you need to connect it to a light sensor on a phototransistor.
Naturally, to operate the entire control circuit and the backlight itself, you will need a 12V power supply. We will also need wires to connect all the elements, and some other little things - we will talk about them during the description of the installation process.
Required tools, components and materials
Let’s summarize what we may need to continue the DIY automatic staircase lighting project:
- Ready-made Arduino Nano control board;
- LED strip with or without a motion sensor, addressable type;
- A pair of infrared motion sensors;
- Light sensor;
- 12V power supply;
- Soldering iron;
- Device for removing insulation from wires;
- UTP wires.
Advertising design
Very often, step lighting is used as advertising. In this case, the logo or name of the advertised product or service is displayed with LED strip. After all, it is flexible and can change colors according to the customer’s wishes.
You can place running line lighting on the steps. In this case, there is a double benefit - advertising and lighting.
Important! You can implement advertising lighting in an expensive but original way - install a laser gun, which will highlight the necessary pictures and words on the steps.
Where can I buy
You can purchase equipment for creating lighting either in a specialized store or online in an online store. In the second case, the budget option for purchasing products on the Aliexpress website deserves special attention. For some video cameras there is an option for shipment from a warehouse in the Russian Federation; they can be received as quickly as possible; to do this, when ordering, select “Delivery from the Russian Federation”:
| Compatible Arduino Nano controller with bootloader | Wireless LED strip with motion sensor | IR sensor HC-SR501 |
| Light Sensor Module LM393 | Power supply 5,12,24,36,48 Volts | Digital electric soldering iron |
Calculation of tape length and power supply power
Let's assume that you decide to highlight the steps of the stairs. Their total number is 10 pieces, width – 1 meter. Thus, you will need 10 meters of tape or two five-meter rolls. The ice tape is cut into meter-long fragments, which are connected in series into a train with a total length of no more than 5 meters.
Exceeding the length of the cable over 5 meters is not allowed. The reasons are a large voltage drop, a decrease in brightness, and burnout of current-carrying tracks on the printed circuit board.
It turns out two loops of five meters each. You can connect them to separate low-power power supplies, or in parallel to one, more powerful AC/DC converter.
Then you need to calculate the total load power and add a margin of 25% to it. Let's say it turns out to be 100 W, add another 25 W, we get 125 W. It is based on this indicator that it is necessary to select the rated power of the power supply.
Sensors
We install one motion sensor at the beginning and end of a flight of stairs.
We recommend that you learn more about how to adjust the motion sensor if you are using a non-programmable version of the device.
Our infrared motion sensors for turning on the lights on the stairs are quite functional, but the installed caps narrow the viewing angle. Therefore, we get rid of the caps and leave the sensor itself. In order for it to turn on when approaching the steps, it is advisable to even deepen it a little during installation in order to further narrow the viewing angle. Thus, it will react to movement precisely when approaching and leaving the steps.
Another light sensor wouldn't hurt. Thus, we get automatic control of the brightness of the backlight so that it does not blind the eyes after dark.
The final system diagram looks like this:
Preparing the controller
What is a controller with Arduino based driver chips? This is a microcontroller with many ready-made settings and hardware modules.
In order for it to work in the desired mode, it needs to be programmed. Suitable firmware with download instructions are freely available on the Internet. Below is also a sketch of the program, you can download the sketch here: https://cloud.mail.ru/public/5GtW/5M5CvRwLc
We take our Adruino scarf and connect it to a computer or laptop. Go to the Arduino IDE and click on the “Download” button.
Once the selected firmware is downloaded to the board, we can begin the final assembly of our entire backlight circuit.
Backlight assembly process step by step instructions
If you plan to install lamps, the algorithm of actions is as follows:
- markings are made for laying wires and installing lamps;
- grooves are made for the cable along the outlined contours;
- wires are placed and fixed inside the finished cavity;
- holes are made at the marked points using a hammer drill;
- inside the resulting recesses there are socket boxes with places for lamps;
- lamps are screwed into the finished holes or ready-made modules are connected;
- system operation is checked;
- If everything works fine, the wires are covered with mortar.
LED strips are installed faster:
- preliminary marking is made and pieces of the LED strip are cut according to its parameters;
- wires are connected to the ends of each fragment;
- the locations of the strips with lamps are treated with a solvent to degrease the surface;
- The protective film is removed from the tape and the adhesive part is applied to the treated surface;
- small holes are made in the steps, wires are threaded and secured into them;
- The system is connected to the power source and turned on.
When installing a night lighting system, consider the possibility of exposure to moisture when cleaning steps. If the lamps are installed in the lower part, use moisture-resistant lamp options.
The power box is placed in a predetermined location and should not be obvious when looking at the stairs.
Stages of work
Once we have all the necessary components, we can begin installing the entire circuit. It is probably better to first assemble the entire sequence of components on the floor, check its operation, and after making sure that everything works as it should, you can begin installing all the elements directly on the stairs.
So, the stages of work:
- But first we need to cut the LED strip into the required lengths.
- It is necessary to solder the stripped ends of the wires to them at the required points on the tape.
- At the edge of each piece of LED strip there are marked points (D0 and DI). Wires are soldered to them in a certain order.
Important! When soldering wires, observe polarity.
- Protect the soldering areas with a plastic tip.
Checking the circuit
After the circuit is soldered, it’s time to check the functionality of the automatic staircase lighting.
We lay out all the elements on a flat surface (on the floor).
And we make the connection.
As soon as a person enters the zone of the first sensor, the strip either sequentially turns on the stripes of the LED strip or the entire one lights up. If the system has lighting effects built into it, they should work.
After crossing the second motion sensor, the staircase should go out after a certain timeout.
Each time the backlight is turned on, the lighting effect changes to the next one.
If the system does not notice movement after crossing the first motion sensor for the stairs (you change your mind about going up/down), after 7 seconds all this festive illumination will turn off automatically and the light will gradually go out.
When and where is it better to install smart lighting?
Staircase lighting is installed if there are small children and elderly people in the house. Local light will allow you to safely move along the steps:
- in the dark;
- in case of insufficient illumination by other devices;
- if there is not enough natural light;
- if the steps lead to the basement;
- people with poor vision.
In the latter case, the light carrier is installed under the steps so that the user can see clear boundaries of the levels and safely place his foot.
System installation
Installing the tape under the step is best done with double-sided tape. The surface is treated before sticking. Dust particles are removed and the surface is cleaned with a solvent.
The wiring for the lamps is laid in the cable channel.
- Wall option.
- Under the stairs.
Since the tape is attached under the step, it is more advisable to cover it with a small visor.
After installation work, it is necessary to carry out a test run of the system. If malfunctions are found, they must be eliminated or amendments must be made to the operation of the software module.
Dimmer, RGB controller and amplifier for staircase lighting with ice tape
Additional equipment will be needed in three cases:
- Brightness adjustment is required - install a dimmer;
- multi-color ice tape is used - an RGB controller is installed;
- The dimmer/controller power is not enough - an amplifier is added.
All these devices are connected to an electrical circuit between the power supply and the tape. Connection options are shown in the figures:
Wireless staircase lighting
Wireless lighting of staircase steps using autonomous power sources is an effective solution to the problem of staircase lighting automation. On the modern market you can find various models of wireless lamps.
Typically the kit consists of:
- motion sensor;
- lamps.
Typically, a standard kit is a set of 5 light sources and 2 motion sensors. All devices operate on batteries.
The installation of all elements is so simple that even an untrained person can handle it.
Manufacturers of such systems, as a rule, claim that a set of batteries is enough for a year of operation. In fact, the battery life is much longer.
Types of lamps for staircase lighting
- Halogen lamps provide excellent illumination of the room, but the heating of the lamp can cause a fire in a wooden house.
- Neon light sources provide soft lighting; the lamps are durable, but not resistant to vibrations and external influences.
- LED lamps are great for span lighting.
The lamps are characterized by high energy efficiency, durability and a variety of colors.
Standard kit
- lamps - 5 pieces;
- motion sensors - 2 pieces;
- installation instructions.
What is attractive about staircase lighting:
- When a person enters the field of view of the sensor installed before the start/descent of the stairs, a smart autonomous motion sensor installed on the stairs is triggered, which transmits a control signal to all lighting elements.
- The wireless circuit allows you to install elements in any, even the most inaccessible places.
- The maximum distance between all elements of the system is about 16 meters.
Subtleties of choosing lighting equipment for staircases
The light produced by LED lamps looks most impressive. In terms of service life, such lamps can last more than ten years with minimal power consumption.
Example of LED backlight.
Compared to incandescent lamps, LEDs consume 20 times less energy. And if we take into account that the switching on occurs from the movement of the object, then the cost of electricity will be minimal.
Description
All elements of the lighting system operate autonomously. Each device contains 3 batteries.
More extensive information on the operation of autonomous backlight can be obtained either from the product data sheet, or you can find the desired model on the Internet.
But in any case, such a system will not require much effort for installation, and the stairs will no longer be a source of increased danger.
Connection sequence
- Select the location of the installation box. It is recommended to place it under the stairs in a place where it will be easier to lay wires to any area.
- From each step, route the wires to the mounting box. During installation, be sure to mark the wires with a marker. You can put masking tape stickers on them so that later you won't get confused about where each end of the wire came from.
- We lay the wire to the sensor installation locations if an automatic circuit is used.
- Run wires for walk-through switches installed at the beginning and end of the stairs.
- Install the controller into the box.
- Connect the wires to the appropriate sockets on the block.
- Supply power. To connect the power supply, do not use solid copper wire. A more convenient solution is to use a multi-core cable.
- Carefully review the entire diagram and sequence, whether all the wires are connected correctly, whether the “pluses” are not confused with the “minuses,” whether the cable connection markings on the sensors and on the control unit match.
- Start the backlight system and make settings.
It is important that the mounting surface is grease-free. If you need to bend the tape while applying it, remember that the minimum bend radius is 2 centimeters
You will have to work with power wires. Some tape models do not have contact wires at all, and if they are present, the quality of their soldering is not the best. To replace the contact wires you will need a soldering iron. Use a low-power tool - up to 40 watts - so that the LEDs do not overheat when soldering. The suitable wire cross-section is 0.75 mm, and the length is from 20 centimeters. When installing a single-color tape, you will need two wires - red and black. Differences in the colors of the wires are necessary so as not to confuse the polarity: black will be “minus”, and red will be “plus”. If you choose an RGB strip, take wires of several colors: blue, red, black, green. This will help you avoid mixing up color channels when connecting the ribbon to the controller.
LED strip connection diagrams: correct and incorrect
Strip the ends of the wires from the tape side to 0.5 centimeters, and from the opposite side to 1 centimeter, then solder them to the tape, but so that the diodes do not overheat. Place contact tips on the ends of the wires. This solution improves the quality of contact in the power supply terminal block. To secure the wires in the lug, ensuring quality connections, use a crimp.
Be sure to insulate the soldering areas. The best way to do this is heat shrink tubing. The isolation process is simple:
- cut a small piece of tube;
- put it on the place where soldering was done;
- heat the tube with a hair dryer with a narrow nozzle so that the heat does not reach the LEDs;
- If you don't have a hairdryer, use another heat source.
The result is strong insulation and reliable cable soldering. The use of insulating tape is not recommended.
Types of stairs
When choosing the type of automatic lighting, it is wise to match it to the type of stairs that are installed in your home.
- Wooden stairs . Considering the fact that wooden products have a risk of fire, lighting devices should not become very hot. Also, all wooden elements must be treated with a fire-resistant compound.
- Metal. From the point of view of safe operation, it is most reasonable to wall mount overhead LED lamps.
- Spiral staircases. Such stairs are ideally suited for illumination using LED strip. You can decorate not only the steps, but also the railings.
- Glass stairs . Spot wireless LED lighting looks very advantageous.
Which lamps to choose for lighting steps
In most cases, halogen and neon lamps, as well as LED strips, are used to illuminate stairs. In addition to high aperture ratio with low energy consumption, they have many characteristic advantages, as well as disadvantages. Let's consider which lamps are best combined with the illumination of stair steps and what their features and purpose are.
Halogen
Halogen lighting is one of the brightest. However, its main disadvantage is the excessive generation of heat. It is not safe to install such lamps in wooden stairs. With bright and uniform lighting, they are very sensitive to the slightest changes in network voltage. Therefore, they can only be installed through a stabilizer or rectifier and in fireproof structures made of metal or stone.
Safety rules for installation and connection
Installing LED strip lights is a simple process. Even a non-professional can take on this work, doing everything efficiently with his own hands, but subject to the necessary safety rules:
- parallel connection is preferred.
- Installation and fastening of LED products, as well as the procedure for connecting to the electrical network, are carried out taking into account the safety of working with electricity.
- When connecting, be careful not to damage or destroy the conductive paths in the circuit.
- When installing, strictly observe polarity.
- Do not expose the LED strip to mechanical shocks or falls.
- Make sure the ballasts match the total load of the light sources. The use of power supplies with a power less than the consumed tape is not allowed.
Wire routing
Manufacturers recommend hiding the tape in a special box to protect it from dirt and moisture. Each illuminated step is covered to protect the diodes from damage. This cover consists of an aluminum profile. You need to put tape on it. To do this, cut the tape into pieces of equal length, corresponding to the width of the steps. We equip the ends of the tapes with connectors.
Connectors for LED strips
Before gluing the tape, degrease the surface, and the strands need to be pulled through the cracks under the steps. A cable channel is fixed on one of the spans, into which the wire is pulled from each step. Opposite the first and last stages there are places for installing sensitive sensors when using an automatic connection scheme.
Using cable ducts allows you to hide the wires. They look natural. Additionally, you can choose a color to match your steps.
Cable laying can be done without pipelines, along steps. But in this case, the appearance of the staircase system will deteriorate. The best option is to lay the wire from the inside, but this is not possible in all cases.