Home / Lighting / Diode and LED backlighting / Features and procedure for installing hidden backlighting
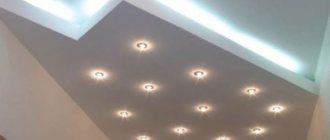
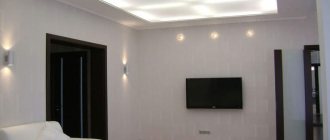
Illuminated ceilings are one of the most common designs in modern apartments. You can illuminate the ceiling in different ways - from various spotlights to lighting elements built into the ceiling structure itself. More often than others, hidden ceiling lighting is found in houses and apartments, as it makes it easy to install and gives an excellent look to the coating.
Advantages of a plasterboard box
Installation of such a plasterboard box has the following number of advantages:
- plasterboard equipped with a galvanized profile is a heat-resistant material, so it can be used together with, for example, incandescent or halogen lamps without fear of a fire risk;
- the internal ceiling lighting of this design is fixed directly to the profile, which indicates the strength and reliability of the plasterboard box on the ceiling compared to other options;
- installed drywall will not only reliably hide lighting fixtures and all wiring, but also other communication networks located on the ceiling.
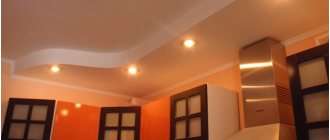
It is important to remember that it is not advisable to install a plasterboard box in the kitchen, since high humidity and temperature fluctuations can deform the plasterboard surface over several years.
Peculiarities
Such lighting can have many functions. Sometimes, it serves as a decorative design element, and in some cases, it acts as an additional light source. Light sources for such compositions can be installed in two main ways:
- In a special niche, which is assembled from plasterboard
- In a decorative cornice mounted below the main canvas
In both cases, the light source itself is not visible, and only the light effect it creates is visible to the eye. At the same time, the system installed in a decorative plinth has some restrictions on weight and power. In gypsum plasterboard structures you can install any type of lamps and there are no restrictions on the weight of the system either.
Installation of drywall box
The sequence of installing a ceiling with a niche for lighting using plasterboard:
- Using a level on the wall, you need to mark a line that will serve as the mounting location for the main profile for the niche.
- To mark the profile fastening line on the ceiling, you should use a simple tape measure.
- The profiles are fixed using screws with plastic dowels. The use of wooden fasteners is not recommended, since any changes in humidity can lead to swelling of the wood. The fastening pitch is 40 - 50 centimeters.
- After this, you need to cut the racks to size and fix them to the wall. Since the frame will not experience excessive loads, there is no need to connect the racks using a profile running parallel to the wall.
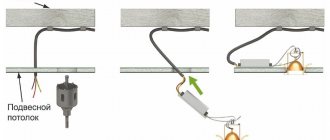
- Next you need to lay the lighting wires.
- Then the drywall is hemmed. In this case, it is necessary that the connection and fastening of two plasterboard sheets be made to one profile.
- Start finishing. The areas where the screws are attached and all the seams obtained during the laying of the material must be puttied with gypsum putty, and the seams must also be taped with paper tape. The entire box should be primed and painted.
- After this, the lighting of the ceiling niches is installed. It would be better if it were presented with a strip equipped with LEDs, but due to the high heat resistance of plasterboard, the material can easily withstand other, hotter lighting sources.
It is important to remember that if you are installing a niche for ceiling lighting, the most economical lighting option for both hidden and open lighting will be LEDs, the efficiency of which is approximately 10 times greater than that of standard incandescent lamps.
Installation of ceiling lighting around the perimeter with step-by-step photos
The main ceiling in this version was puttied, so the first tier was not made. We attached only the box around the perimeter: the height is already small and 7-8 cm, required for organizing the hanging one, is critical.
Lighting box plan
Near the window there is space left for a cornice, the width of the box is 60 cm, it is lowered by 12 cm relative to the main ceiling, the height of the side is about 5 cm, the protruding part is 6 cm, roundings are made in the corners.
Sectional diagram of the lighting box
The first method was chosen - a step under the lighting without support. Since the lighting is planned from a regular LED strip, its load-bearing capacity is more than enough.
First make markings on the ceiling. All given dimensions are set aside and lines are drawn using a paint cord. Please note that the line on the ceiling is laid at a distance of 54 cm, and not 60 cm, as in the first diagram. It is obtained taking into account the fact that the step is moved forward by 6 cm.
Using a paint cord we make markings on the ceiling and walls
When drawing curves, their center is made not in the place where the profile is attached, but taking into account the protruding step: this way the element turns out to be more expressive.
How to draw a curve on the ceiling
The profile guides (CD or PNP as marked) are attached along the marked lines. They attached it to dowels at 50 cm intervals. They drilled straight through the metal. Having installed the plug, we tightened the dowel-nail.
The contours of the box are lined with profiles
Where it is necessary to form a rounding, the walls (sidewalls) of the profile are cut, the back remains intact. After this, the profile can be laid out in a circle.
From the front side, we attach a strip of plasterboard 12 cm wide to the guide profile on the ceiling. This will be the back side of our box. We fasten it around the entire perimeter with self-tapping screws at a distance of about 10 cm.
We attach a gypsum board strip 12 cm wide
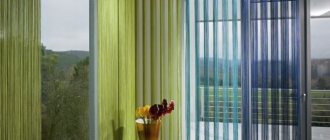
Near the window we attach a strip that will cover the string curtain rods
On the back side of the installed side we attach vertical posts from the CD (ceiling) profile. Their length is small - 9.8 cm (12 cm height of the box, minus 1 cm for installing profiles, and another minus 1.2 cm for the thickness of the gypsum board screwed from below).
In each segment the lower part is trimmed. The side walls are removed so that another guide profile can be screwed on. As a result, its bottom shelf should be flush with the profile screwed to the wall. The installation step of the vertical posts is about 40-50 cm.
We screw short vertical pieces around the perimeter
Another angle
Next step: screw on the PNP profile that goes along the bottom of the boot. It is also installed on self-tapping screws in increments of 10-12 cm.
Next, we proceed to install the horizontal jumpers, which will hold the gypsum board sheet covering the box from below.
Installation of horizontal jumpers
They connect two guide profiles: the one that is screwed to the wall, and the one that is attached to the main side. They are made from a supporting profile in increments of 40-50 cm.
Collected around the entire perimeter
Let's start creating the curves. To make the strip bend along the required path, we take a strip of drywall about 15 cm wide. We cut it in 5 cm increments and break the plaster. The result was pieces of plaster that were held on cardboard.
Cut the cardboard every 5 cm on one side and break the plaster
Now we attach such pieces to the profile. For each fragment - one self-tapping screw, approximately in the middle of the width, so that it does not burst.
We fasten the cut strips
Using a laser level, we transfer the height markings to the inside. If you don't have a laser level, use a water level and draw a line with a pencil.
Then we take a piece of the supporting profile 9.8 cm long, just cut it both at the top and bottom. Approximately in the middle of the arc, we place one edge behind the profile and fasten it with a self-tapping screw.
How to make a rounding
Then we take a piece of profile cut into fragments (as we did when forming a circle on the ceiling) and fasten it along the mark.
Finished rounding “from the inside”
Now the excess pieces of gypsum board can be removed. They are cut level with the bottom edge of the profile, carefully cutting the paper and breaking off small fragments.
Trim off excess pieces
This is how it looks from a different angle
The next step in making a backlit plasterboard ceiling is putty. The ceiling and main side are plastered. This is the most convenient moment for this. Later, the bottom hem and the protruding cornice will interfere.
We putty the side and ceiling
Next, we begin to hem the box from the bottom. The width of the strip is 60 cm. We cut it and screw it with self-tapping screws. The procedure for working with plasterboard is standard. Some explanation is required only for sewing corners.
We screw a sheet that fits well into the corner and is slightly larger in external dimensions than the required rounding
The most convenient way is to cut out a square, then trim it on one side. First we screw it in straight lines. Then, gradually, in an arc, drawing the required edge shape.
Draw the shape and cut it
First you can draw, then bite off small pieces along this line. Smooth out any uneven surfaces with a wallpaper knife.
Next, screw on the guide profile. An additional side will be attached to it, which will cover the backlight.
Screw the guide profile along the edge
No news: to make curves, we cut the sides, bend them to the required diameter and install them in place, fixing them with self-tapping screws.
This is what it looks like from below
If you are planning to use LED lighting for a plasterboard ceiling, now is the time to attach the tape. Then it will be very uncomfortable. It is glued in the right place, if necessary, installing some kind of inclined plane.
We install the tape before installing the outer side
Next, a strip of plasterboard 5 cm wide is attached to the profile. One of the features is that it is fastened in the middle, and not at the top and bottom: the height is too small. The bends are also done in a familiar way. We cut a strip every 4-5 cm, break the plaster and fasten it.
Installed side
Rounding closer
In this option, to facilitate the work and give the ceiling a finished look, fillets (ceiling plinth) are glued to the side. Similar ones are glued at the junction of the box and the wall.
Fillet glued
Now all that remains is to putty everything and achieve a smooth surface. Almost everything. The plasterboard ceiling with lighting is ready, all that remains is to install the lighting itself. And it can be different.
Final version
Another option can be seen in video format, but with working backlight.
The installation of a two-level flow is demonstrated in the following video. The steps are shown schematically, but the assembly of the first level is clear. So that might be useful.
Installation of polystyrene foam cornice for hidden lighting
An undeniable advantage of this type of design is its much simpler design compared to the previous installation scheme.
The disadvantages of such a cornice are insufficient strength and resistance to heat, so the only source of lighting for the cornice can only be LED strips.
Installation sequence:
- Mark the line for attaching the cornice. It is better that the distance from the ceiling is 5 - 10 centimeters.
- Then you should glue the cornice. The optimal solution would be to fix it on bare plaster after finishing the primer using a primer. But it is also possible to install a cornice on wallpaper, as well as install a cornice in a plasterboard ceiling. Liquid nails are used for gluing.
- All joints between the cornice strips must be glued and given additional reinforcement using dowels made of matches.
- After laying the wiring behind the eaves, it is necessary to mount the power supply for the LED strip, which is best secured to the wall with nylon clamps.
- It is important to remember that a tape with a length of more than five meters must be connected to the block in a parallel manner.
Installing hidden lighting on the ceiling does not pose any difficulty and can be done independently, and in different ways.
What type of lighting is preferable to use?
Neon or LED lighting is most often used. The first is more energy-intensive, but can create an original glow. LED is a leader in energy saving and is easy to install. Let's take a closer look at them.
Neon lighting
This type of lighting is possible thanks to the use of a phosphor that converts ultraviolet radiation into light of a certain spectrum. Depending on the chemical composition, neon lamps will have different shades. Nowadays, electronic converters are increasingly being additionally installed, due to which you can independently adjust the color of neons.
In general, neon lighting is very soft and looks good both in large areas and in small rooms. It is worth remembering that the cold spectrum is suitable for large living rooms and halls, and warm shades look great in small-sized options. There are about 100 shade variations in total.
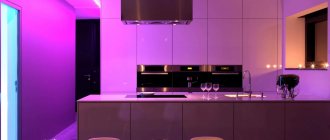
Neon lighting in the interior
A distinctive feature of neon lighting is its durability (on average about 10 years). But there is also a significant disadvantage. They consume a sufficient amount of energy. But if you approach the issue “wisely” and install one converter at 15-20 meters, it can work out quite moderately.
LED lightening
It uses semiconductor LEDs. Their peculiarity is that they can be installed in various rooms, including those with high humidity. To do this, you should take care of purchasing specially adapted lamps.
By installing chiseled micro lamps around the perimeter or fixing an LED strip, you can create any shade from a million variations. Using an RGB controller will allow you to switch colors as you wish. Unlike neons, LEDs emit clear, unblurred colors. With their help you can even get pure white light.
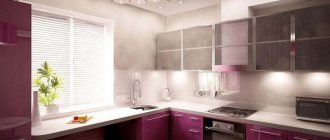
LED lighting in the interior
A huge advantage is their budget, which allows you not to save on the number of lamps, but to place them in sufficient quantity for your discretion.
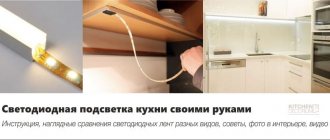
One of the varieties of this lighting is the use of LED strip. This is the cheapest way to create hidden ceiling lighting.
Frame on the ceiling
Having decided to take on the job yourself, the first priority will be to make a box from plasterboard. To do this, you will need to build a frame from metal profiles. They are sold at a building materials store. Make sure that the profiles are of high quality and free from defects. If all is well, get to work.
This is done as follows:
- They retreat about 10 cm from the ceiling and draw a line along the entire perimeter of the room. Here, use a hydraulic level to make the line as smooth as possible;
- The initial (starting) profile is attached along the line;
- The main profile is inserted into the initial one, and additionally secured to the ceiling with hangers. The pitch between fasteners is 40 centimeters;
- To make the structure sufficiently rigid, crab connectors and jumpers connecting the main profiles will be required;
- Now a box is created, that is, the surface of the frame is sheathed with gypsum board.
This is how you create the first level. As you can see, making it yourself was not difficult.
Niche for lighting
At the next stage, we move on to the second level, which will allow us to build a box for lighting.
- At the first level, a diagram of the second is drawn.
- About 4-6 centimeters are retreated, depending on the width of the cornice, and the starting profile is attached. It is marked with the letters UD.
- Then you need to cut the main profile to a length equal to the height of level two. They are fixed in the starting guide. The purpose of such profiles is to act as suspensions.
- One starting profile is attached to the hangers on the bottom side.
- A frame is constructed into which ceiling profiles are inserted and thereby form the overall structure.
- Now comes the stage of covering the gypsum boards, as when creating the first level.
Some novice craftsmen create a protruding cornice of small size, which is why the LED strip is visible. The situation can be corrected. Use liquid nails to which strips of plasterboard are glued around the perimeter. This way you can close the feed.
Connecting the backlight
Now comes the big moment - installing your LED lighting. All gypsum board panels are secured, which means you can proceed.
When installing LEDs, it is important to follow some rules:
It is allowed to cut the tape only in places marked by the manufacturer; You don't have to use a lot of separate tapes. They are easily connected to each other using special connectors. But, as practice has shown, the best connection quality is achieved by using a soldering iron; When choosing a power supply, focus on its power reserve. It should be about 30 percent. If this rule is not followed, the unit will soon burn out and you will have to buy a new one; You cannot attach tape and blocks to metal elements. Be sure to insulate the box and use insulating materials; Watch the voltage input (220V) and output (12V). Don't confuse them
This is a common mistake made by beginners who want to do everything with their own hands and who have not bothered to familiarize themselves with the basics of working with electrical appliances; Before starting work, it is important to do one thing - turn off the power to the apartment.
The LED backlight connection diagram itself looks like this:
- One end of the power supply goes to a 220V wire, and the other is used for the LED strip;
- When using RGB tape, it should be connected through the controller, being sure to observe the polarity. The red wire is always a plus, and the minus is black or blue;
- After connecting the equipment to the gypsum board box, check its functionality. If everything works properly, arm yourself with self-adhesive film, on which the tapes adhere perfectly. Making such a connection with your own hands is not difficult and will not take much time.
High-quality gypsum board, well-chosen lighting and proper DIY work are the main keys to the successful construction of plasterboard ceilings with decorative lighting. It is more than possible to do all this yourself.
The main thing is to follow the basic recommendations, use really high-quality materials, and not violate the main safety rules. You will be working with electricity, and this is always associated with some danger.
If you don't have enough experience to make your own lighting, contact a professional. Craftsmen who install plasterboard ceilings always offer their services for connecting the main lighting. It is difficult for them to connect additional LED decorative strips for illumination.
Be sure to read the materials:
- Photo of plasterboard partitions
- Photos of plasterboard arches
- Profile for drywall
Selecting a lamp
Plasterboard ceilings are often made of a combined type. This means that both open and hidden lighting are placed on one ceiling structure. To get such a ceiling, you need to assemble a box and a hidden niche. The following types of lighting fixtures are suitable for plasterboard ceilings:
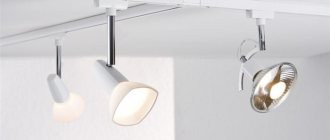
- Spotlights. They are used to create open lighting. In addition to spotlights, you can use a classic chandelier;
- LED Strip Light. It most often serves as a light source for a hidden niche.
Combined backlight type
In addition, the LED strip in a hidden niche can be replaced with flexible neon or duralight. These lighting fixtures, like the strip, are flexible and can be easily installed in hidden niches, thereby achieving the effect of “floating air”. This effect is created due to the fact that light is reflected from the surface of the ceiling and scattered, thereby creating a soft and diffused glow.
Note! By combining a plasterboard box and a tension fabric using hidden lighting, you can create amazing lighting. The reflection of light is more beautiful from the stretched fabric, which has the appearance of a mirror reflection.
To make the right choice of light sources for hidden lighting, you must be guided by the following principles:
- financial capabilities of a person;
- type of ceiling (single-level, multi-level, figured);
- purpose of lighting;
- installation method (in boxes or niches);
- option for installing lighting elements (by yourself or by a specialist);
- the presence of insulation and sound insulation in the design.
Hidden lighting is used for:
- creating additional lighting in the room;
- creating a certain atmosphere in the room (romantic, fairy-tale, subdued, etc.);
- visualization of certain decorative elements;
- night lighting of the room.
With the right lighting fixtures for your room, you can achieve:
- high-quality lighting of space;
- visual expansion or reduction of space;
- zoning the premises into separate zones (rest, work, eating, etc.);
- exquisite decorative lighting of plasterboard ceiling elements.
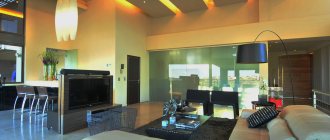
Decorative lighting
Hidden lighting for plasterboard ceilings allows you to solve many design and lighting issues. Therefore, the choice of lighting fixtures for such lighting should be approached carefully.
Tips and tricks
The main point that requires constant attention is the thoroughness and accuracy of the work. You should not proceed to the next step without making sure that all previous steps have been completed completely. In addition, it is necessary to constantly monitor the progress of parallel operations - installation of electrical wiring, platforms for lamps, etc.
To obtain the expected result, it is better to deliberately slow down the pace of work, increasing attention and control. Ultimately, the absence of rework and elimination of errors will speed up the completion of installation
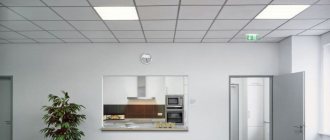
Flush mounted LED lighting for home and office
Concealed lighting has a modern appearance and is extremely elegant. Our recessed lamps are available in many designs and colors. In addition to the already mentioned colors that can be matched to the interior design, the variety of shapes and decorative finishes also deserves attention. The range also includes mobile, antique, double and other models. Considering that LED recessed lighting is also energy efficient, our collection is ideal for both the home living room and the modern office.
How to decorate a plasterboard ceiling with lighting (photo)
A illuminated ceiling can also be made of wood. If desired, the walls can be illuminated using the same principle.
Smooth lines look amazing
Broken lines are suitable for high-tech and minimalist interiors
LED lighting of a plasterboard ceiling is just an effective design technique. Lighting must be taken care of separately. The most effective options are using different light sources. Illumination options for the corridor.
Beautiful, but difficult to execute
Two-level plasterboard ceiling with lighting
Ceiling lighting in the bedroom
Combination of lines and circles
The most spectacular options are combinations of different lamps