Halogen lamps are increasingly used every day in decorating various shopping malls and shop windows. The bright colors and richness of the image rendering make them increasingly popular. Their service life is much longer than that of conventional lamps. At the same time, they can work for a long time without switching off. Halogen lamps use filaments, but the glow process is different in comparison with incandescent lamps due to the filling of the cylinder with a special composition. Such light bulbs are used in various lamps, chandeliers, kitchen furniture and come in 220 and 12 volt. A power supply for halogen lamps with a voltage of 12 volts is necessary, because if they are connected directly to the electrical network, a short circuit will occur.
Specifications
The voltage of halogen lamps is not only 220 and 12 volts. On sale you can find 24 and even 6 volt light bulbs. The power can also be different - 5, 10, 20 watts. Halogen lamps from 220 V are connected directly to the network. Those that operate on 12 V require special devices that convert current from the network to 12 volts - so-called transformers or special power supplies.
Twelve volt halogens work very well. Previously, in the 90s, a large 50 Hz transformer was used, which ensured the operation of only one halogen lamp. Modern lighting uses pulsed high-frequency converters. They are very small in size, but can pull 2 - 3 lamps at the same time.
On the modern market there are both expensive and cheap power supplies. As a percentage of expensive ones, about 5% are sold, and much more cheap ones. Although, in principle, high cost is not a guarantee of reliability. Cool converters, unfortunately, do not use high-quality parts, but only use clever circuit “bells and whistles” that contribute to the normal operation of the power supply, at least during the warranty period. As soon as it runs out, the device burns out.
Classification
Transformers are electromagnetic and electronic (pulse). Electromagnetic ones are affordable, reliable, and can be made with your own hands if desired. They also have their disadvantages - decent weight, large overall dimensions, increased temperature during prolonged operation. And voltage drops significantly shorten the life of halogen lamps.
Electronic transformers weigh much less, they have a stable output voltage, they do not heat up much, they can have short-circuit protection and soft start, which increases the life of the lamp.
Recommendations from practitioners
Practicing electricians are often faced with the need to install low-voltage halogens when the wiring has already been installed and is being successfully operated. In this case, it is not always possible to parallel connect lamps to a transformer without radically altering the wiring.
To minimize costs, experts recommend in this case connecting each lamp with its own transformer. As a rule, these will be devices that are small in power and size.
If this seems wasteful, you can put high-voltage 220 V halogen lamps instead of low-voltage lamps. But in this case, you will have to equip them with a soft start device. Or, as an option, if the design of the lamp allows, you can replace halogen lamps with economy class LEDs.
The article, which thoroughly examines all aspects of the issue, will introduce you to guidelines for choosing halogens for installing a lighting system.
The ability to adjust the lighting intensity attracts many. Most electronic transformers are equipped with the ability to reduce the input voltage, which allows you to adjust the brightness of halogen lighting
Very often it is planned to regulate the lighting intensity, for which a dimmer is added to the overall circuit. You need to know that most pulse transformers are not designed to work together with a dimmer.
Since the latter negatively affects the functioning of the electronic converter, this ultimately significantly reduces the service life of the connected halogen lamps.
For this reason, the best option for working in conjunction with a dimmer is a toroidal electromagnetic transformer. And one more note.
Electricians strongly recommend not to forget about servicing already installed step-down devices. It is optimal to carry out a routine inspection of them every six months to check their functionality. If problems are identified, the devices are repaired or replaced.
Transformers for halogen lamps
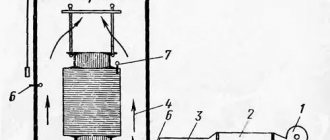
The analysis will be carried out using the example of a power supply. The output of this transformer is no less than 5 amperes. For such a small box the value is amazing. The case is made in a hermetically sealed manner, with the absence of any kind of ventilation. This is probably why some copies of such power supplies melt from high temperatures.
The converter circuit in the first version is very simple. The set of all the details is so minimal that it is unlikely that anything can be thrown out of it. When enumerating we see:
- diode bridge;
- RC circuit with a dinistor to start the generator;
- generator assembled on a half-bridge circuit;
- transformer that reduces the input voltage;
- low resistance resistor that serves as a fuse.
With a large voltage drop, such a converter will “die” 100%, taking the entire “blow” upon itself. Everything is made from a fairly cheap set of parts. Only there are no complaints about the transformers, because they are made to last.
The second option looks very weak and unfinished. Resistors R5 and R6 are inserted into the emitter circuits to limit the current. At the same time, the blocking of transistors in the event of a sharp increase in current is not thought out at all (it simply does not exist!). The electrical circuit (in the diagram it is red in the diagram) raises doubts.
produces halogen lamps with power up to 60 watts. The output current of the power supply is 5 amperes. This is a bit much for such a light bulb.
When removing the cover, pay special attention to the dimensions of the radiator. For a 5 amp output they are very small.
Operating principle of halogen lamps
Analogues of traditional incandescent elements are more economical, have an increased service life, and provide a pleasant and gentle light. For low-voltage models, you need a transformer that allows you to connect the lamp correctly and safely.
Halogen lamps are direct competitors of LEDs and, in some respects, objectively outperform them. They are cheaper and provide light that does not irritate the eyes. Low-voltage options can be installed in areas sensitive to high temperatures, including ceiling-mounted lighting systems.
Low voltage halogens definitely need a transformer. A reasonable question arises - why? They serve to convert the network indicator to the parameter for which the lamp is designed (usually 12 volts). The functions of the transformer include protection against voltage surges and ensuring smooth startup.
Calculation of transformer power for lamps and connection diagram
Various transformers are sold today, so there are certain rules for selecting the required power. You should not take a transformer that is too powerful. It will work practically idle. Lack of power will lead to overheating and further failure of the device.
You can calculate the power of the transformer yourself. The problem is rather mathematical and is within the capabilities of every novice electrician. For example, it is necessary to install 8 halogen spot lights with a voltage of 12 V and a power of 20 watts. The total power will be 160 watts. We take approximately a 10% margin and purchase a power of 200 watts.
Scheme No. 1 looks something like this: there is a single-key switch on line 220, with the orange and blue wires connected to the transformer input (primary terminals).
On the 12 volt line, all lamps are connected to a transformer (to the secondary terminals). The connecting copper wires must have the same cross-section, otherwise the brightness of the light bulbs will be different.
Another condition: the wire connecting the transformer to the halogen lamps must be at least 1.5 meters long, preferably 3. If you make it too short, it will start to heat up and the brightness of the lamps will decrease.
Scheme No. 2 – for connecting halogen lamps. Here you can do things differently. Break, for example, six lamps into two parts. For each, install a step-down transformer. The correctness of this choice is due to the fact that if one of the power supplies breaks down, the second part of the lamps will still continue to work. The power of one group is 105 watts. With a small safety factor, we find that you need to purchase two 150-watt transformers.
Advice! Power each step-down transformer with its own wires and connect them in a junction box. Leave the connection points freely accessible.
Installation features
To correctly connect spotlights, you need not only to choose the right circuit. It is necessary to follow a certain sequence of actions, which depends on the type of ceiling.
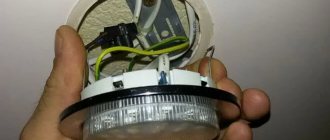
You just need to connect a few spotlights - and you have a beautiful interior
In suspended ceilings
Spotlights are usually installed with suspended or suspended ceilings. If the ceilings are suspended, all wires are laid in advance. They are attached to the ceiling without connecting to power, the lamps are placed and secured on pendants, then the wires are connected to them and the operation is checked.
Prepared for installation of suspended ceilings
Before installing suspended ceilings, turn off the power, remove the lamps and remove parts that may be damaged by temperature. After installing suspended ceilings, holes are cut in the material (the lamps are visible or can be felt), sealing rings are installed, and then the lamps are assembled.
In plasterboard ceilings
If the ceiling is made of plasterboard, you can proceed according to the same scheme, but the lamps must be installed after the ceiling has been plastered. That is, separate the wiring and leave the ends of the wiring hanging freely. To avoid problems with determining the location of lighting fixtures, it is necessary to draw a detailed plan indicating the exact distances from the walls and from each other. According to this plan, markings are made and holes are cut out using a drill with a crown of the appropriate size. Since there may be small movements - a few centimeters - when cutting the cable, leave a margin of 15-20 cm. This will be quite enough (but do not forget that the wires are attached to the main ceiling and they should extend 7-10 cm beyond the level of the drywall. If the ends turn out to be too long, you can always shorten them, but extending them is a big problem.
If you need to install a converter
There is a second way to connect spotlights to a plasterboard ceiling. It is used if there are few light sources - four to six pieces. The entire installation of spotlights along with wiring is done after the work on the ceiling has been completed. Before installation begins, the cable/cables from the junction box are led beyond the ceiling level. After finishing the puttying and sanding work, markings are made and holes are drilled. The cable is passed through them, bringing the ends out. Then the lamps themselves are installed.
Everything is simple, but this method cannot be called correct: the cables simply lie on the drywall, which definitely does not comply with fire safety standards. You can still turn a blind eye to this if the ceiling is concrete, the cable is non-flammable, the cross-section of the wire is not small, and the connection of the wires is done correctly.
Sequence of work in photo format
If the floors are wooden, the PUE requires installation in non-flammable all-metal trays (cable ducts) or metal pipes. You can install such wiring only before starting work on the ceiling. It is very undesirable to violate installation rules - wood, electricity, heat generation during operation... not the safest combination.
Do-it-yourself power supply modification
To operate halogen lamps, pulsed current sources with high-frequency voltage conversion began to be used. During home production and setup, expensive transistors quite often burn out. Since the supply voltage in the primary circuits reaches 300 volts, very high requirements are placed on insulation. All these difficulties can be completely avoided by using a ready-made electronic transformer. It is used to power 12-volt halogen backlights (in stores), which are powered from a standard electrical outlet.
There is a certain opinion that getting a homemade switching power supply is a simple matter. You can only add a rectifier bridge, a smoothing capacitor and a voltage stabilizer. In reality, everything is much more complicated. If you connect an LED to the rectifier, then only one ignition can be detected when turned on. If you turn the converter off and on again, another flash will occur. In order for a constant glow to appear, it is necessary to connect an additional load to the rectifier, which, taking away useful power, would convert it into heat.
One of the options for self-manufacturing a switching power supply
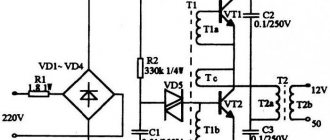
The described power supply can be made from an electronic transformer with a power of 105 W. In practice, this transformer resembles a compact pulse voltage converter. For assembly, you will additionally need a matching transformer T1, a mains filter, a rectifier bridge VD1-VD4, and an output choke L2.
Bipolar power supply circuit
Such a device operates stably for a long time with a low-frequency amplifier with a power of 2x20 watts. At 220 V and a current of 0.1 A, the output voltage will be 25 V; when the current increases to 2 amperes, the voltage drops to 20 volts, which is considered normal operation.
The current, bypassing the switch and fuses FU1 and FU2, goes to a filter that protects the circuit from interference from the pulse converter. The middle of capacitors C1 and C2 is connected to the shielding casing of the power supply. Then the current is supplied to input U1, from where a reduced voltage is supplied from the output terminals to the matching transformer T1. The alternating voltage from the other (secondary winding) rectifies the diode bridge and smoothes the L2C4C5 filter.
Self-assembly
Transformer T1 is manufactured independently. The number of turns on the secondary winding affects the output voltage. The transformer itself is made on a K30x18x7 ring magnetic core made of M2000NM ferrite. The primary winding consists of a PEV-2 wire with a diameter of 0.8 mm, folded in half. The secondary winding consists of 22 turns of PEV-2 wire, folded in half. By connecting the end of the first half-winding to the beginning of the second, we obtain the midpoint of the secondary winding. We also make the throttle ourselves. It is wound on the same ferrite ring, both windings contain 20 turns.
Rectifier diodes are located on a radiator with an area of at least 50 sq.cm. Please note that diodes whose anodes are connected to the negative output are insulated from the heat sink with mica spacers.
Smoothing capacitors C4 and C5 consist of three K50-46 connected in parallel with a capacity of 2200 μF each. This method is used to reduce the overall inductance of electrolytic capacitors.
It would be better to install a surge filter at the input of the power supply, but it is possible to work without it. For a line filter choke, you can use a DF of 50 Hz.
All parts of the power supply are mounted on a board made of insulating material. The resulting structure is placed in a shielding casing made of thin sheet brass or tinned sheet. Don't forget to drill holes in it for air ventilation.
A correctly assembled power supply does not require adjustment and starts working immediately. But just in case, you can check its performance by connecting a resistor with a resistance of 240 Ohms and a dissipation power of 3 W to the output.
Lamps for 220 V
The use of recessed lamps allows you to obtain uniform lighting.
In addition, you can choose a beautiful placement of spotlights on the ceiling. Thanks to the development of new technologies, lamps have been developed that are connected to the mains without step-down transformers, which has greatly simplified the use of spotlights. Therefore, 220 V lamps are mainly used, although in some cases it is better to use a step-down transformer for safety.
Connection options: daisy chain connection
This connection scheme involves the sequential inclusion of spotlights (in the form of a garland). In addition to the advantage of the circuit, which is associated with a minimum number of conductors, this connection option has a significant drawback. The fact is that series-connected lamps will not glow at full strength and the more lamps are turned on, the weaker their glow will be.
Scheme of sequential connection of spotlights
The circuit is simple, since the phase is connected in series to all lamps, and zero potential (neutral) is supplied to the last one. In practice, such a connection scheme is used extremely rarely.
Electrical wiring when connecting spots in series
The figure below shows a similar diagram, where the junction box and switch are marked.
Scheme of sequential connection of spotlights to a two-key (double) switch
It is very important that the phase wire is connected to the lamps through a switch, and the neutral wire is connected to the last lamp in the circuit. This is very important for safety reasons.
In the case of using 3-core wires, when a protective (grounding) conductor is used, this conductor is connected to the luminaire body, if this is provided for by the design of the luminaire.
The implementation of this connection option is most acceptable with a regular wire without double insulation, since one conductor requires several breaks, while the second conductor does not require any breaks. As mentioned above, this connection option is practically not used in practice.
Parallel connection
Parallel connection of lamps
This connection scheme is most widespread, despite the fact that for its implementation it is necessary to use more conductors, although not always. But this switching option allows you to obtain a uniform glow of all lamps. As a rule, luminaires are connected using a non-flammable cable, type VVG, with a cross section of 1.5 or 2.5 mm square. It is possible to use a 3-core cable if the lighting circuit provides protective grounding.
Implementation methods
Such a connection scheme can be implemented in two ways:
- Beam connection, when a separate pair of wires is suitable for each of the lamps.
- Daisy chain connection, when a pair of wires alternately approaches each lamp.
Two ways to parallel connect spotlights
Daisy chain connection
In this figure, as well as other figures, you can see how such a connection scheme is implemented in practice. After the wire comes out of the junction box, it goes to the first light fixture.
This is what it looks like if you do it on a suspended or suspended ceiling
After connecting it, the same wire (or another piece of wire) goes to the second lamp and so on, depending on the number of lamps.
The following image shows how four lights are connected in a similar manner. In the case when it is necessary to divide the lamps into groups, a 2-key (3-key, etc.) switch is used. The circuit turns out to be somewhat more complicated, but each group is connected identically, although the number of wires will have to be increased.
With two key switch
The presented video shows an implementation option for the circuit, although terminals of any design can be used.
No. 5 Correct wiring for a spotlight. Say no to loops and trains.
Beam switching circuit
With this connection scheme, each spotlight is connected via a separate piece of wire. Although this option is more expensive from an economic point of view, it is more reliable, since the number of connections (twisting, soldering, welding, etc.) is reduced. If a group includes many lamps, then you need to look for the best option. In this case, it is better to extend the wire to some middle point on the ceiling, and then connect a separate lamp (each) from this point. This option is more economical, but it is not without its drawbacks, since several conductors have to be connected at one point at the same time, which reduces reliability. In addition, the connection point is located in a hard-to-reach place, which makes the circuit unrepairable.
In the figure you can see that wires come out to each lamp from one point (usually from the junction box or from the lighting panel). Since the connection point is located in an accessible place, the connection diagram is more reliable, especially since it is repairable. To make the connection reliable, it is better to crimp the wires (twist) and then weld them. Reliable, but impractical, since the connection is permanent. The best option is to use special connectors in the form of terminal blocks, and you need to choose connectors designed to connect a certain number of conductors.
Parallel connection - cable to each lamp
There are both screwless and screw connectors, which are not so expensive, but their reliability is at the required level. The most important thing is to correctly calculate the load, as well as the current flowing through the contacts. If you do not connect with a current reserve, the contacts may be damaged due to heating, which can lead to emergency operating conditions.
This way you can use screw terminal blocks
The method is rarely used, especially at high load currents, especially since it is not so easy to ensure reliable contact at the connection points of several conductors at the same time.
Recommendations for using a transformer
Step-down transformers for halogen lamps generate a very large amount of heat during operation. Therefore, several requirements must be met:
- Do not connect the power supply without load.
- Place the unit on a non-flammable surface.
- The distance from the block to the light bulb is at least 20 centimeters.
- For better ventilation, install the transformer in a niche with a volume of at least 15 liters.
A power supply is required for halogen lamps operating on 12 volts. It is a kind of transformer that lowers the input 220 V to the required values.
Why does a halogen need a transformer?
Halogen lamps successfully compete with LEDs. Despite the best performance characteristics of the latter, it is often halogens that win, which is explained by their lower cost and, accordingly, availability, as well as some features of the light beam of LEDs, which can tire the eyes.
The main “trump card” of LEDs is operation without heating, which makes it possible to widely use them. Halogen lamps have the same advantage, but only for low-voltage lamps. They can be installed in areas sensitive to high temperatures. For example, in lamps built into the ceiling.
But you need to understand that low-voltage halogen lamps can only work with transformers. The latter are necessary to convert the mains voltage to an acceptable value for the lamp. Usually this is 12 V.
In addition, the transformer protects the light source from power surges, overheating and short circuits, and can also provide the ability to smoothly turn on the lighting. It must be admitted that, on average, lamps with transformers last much longer. Although a lot depends on their quality.
Low-voltage halogen lamps are not capable of operating from a mains voltage of 220 V, so they must be connected only through a step-down transformer