The decision to replace a chandelier on a suspended ceiling is made if the lamp is out of order or the apartment owner wants to update the interior.
And if there are usually no problems with dismantling the lighting structure, its installation can cause difficulties. The work process consists of several stages: preparation, removal of the chandelier, installation, connection.
The last 2 points are considered the most difficult, since it is quite easy to damage the delicate coating during installation of the mount, and working with electrical wiring can be life-threatening. Therefore, if you decide to carry out the work yourself, then you need to know exactly how to replace a chandelier on a suspended ceiling and follow safety rules.
Although in some cases it is impossible to do without the help of professionals.
Dismantling options
Depending on the purpose, the chandelier can be removed for:
- replacing lighting lamps;
- cleaning decorative elements;
- complete replacement of the lighting device;
- finishing or upgrading the ceiling covering.
In this case, the dismantling option will be completely different for each case. So, to replace a light bulb, it is not at all necessary to remove the entire structure; it is enough to remove the lampshade, which can be dismantled by unscrewing the bolts, unscrewing the threads, removing the spacers or pressing the clamps.
If you need to wash a chandelier or perform finishing work, and the device is removed temporarily, and a socket with a light bulb is installed for the period of cosmetic repairs. In this option, dismantling is also partial, since it is advisable to leave some elements in place. You only need to release the power wires to which you connect a temporary lighting fixture.
In the case of a complete replacement, all elements are dismantled. And if the fastening structures interfere with the newly installed equipment, they are also removed.
Step-by-step instruction
The entire process of dismantling a chandelier with your own hands can be represented in the form of a simple algorithm of actions:
- Power outage.
- Preparing tools.
- Removing decorative elements, shades, and light bulbs from the chandelier frame.
- Dismantling the decorative base.
- Disconnecting wires.
- Fastening works.
- Removing the frame from the ceiling.
- Insulation of exposed contacts.
Despite the apparent simplicity of the actions, each stage is characterized by its own nuances.
We remove lampshades, decorative elements and components
After completely turning off the light from the input panel, you can begin to “disarm” the lamp. The design of most lighting fixtures is similar. It includes the following components:
- decorative cap (cup);
- wires;
- frame made of metal or plastic;
- lampshades;
- light bulb sockets;
- hanging decorative parts (depending on the model).
First, all hanging elements and shades are removed.
The second stage is incandescent lamps or their LED analogues. Next, the ring or washer securing the cap is unscrewed and the latter carefully goes down, providing access to the connection diagram.
De-energize and disconnect the wires
The room is de-energized at the very beginning of work. To do this, you can use a switch, but it would be more expedient and safer to turn off the circuit breaker.
Disconnecting the wires is quite simple. When twisting and manual insulation, it is enough to carefully cut off the layer of insulating tape with a knife and disconnect the chandelier contacts from the wiring cables.
When using terminal blocks, you need to press the lever or release the spring (depending on the clamp model) and release the contacts.
Removing the chandelier from its mount
There are several ways to remove a chandelier from the ceiling. It all depends on the method of its initial installation.
Hook
An anchor hook is the most common method of installing ceiling lights. In this case, removing the chandelier is very simple. It is enough to lower the closing cap, stick your hand into the hole, feel for the hook and carefully remove the chandelier frame from it. Then disconnect all wires.
In case of large weight or volume of the suspended structure, it is best to carry out the work together with a partner.
Mounting strip
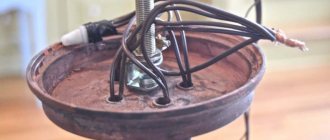
Mounting strips are used to attach massive and heavy light sources. After dismantling all the removable structures of the chandelier, as well as removing the protective decorative cup-base, you can gain access to the fastening element - the strip.
The bar is fastened with nuts that need to be unscrewed, after which you can remove the frame and disconnect the contacts. After this, if necessary, you can remove the bar itself by unscrewing the screws and pulling it into the hole in the panel. The last step is insulating the wires.
Cross bar
The chandelier is removed from the cross-shaped strip in almost the same way as with a longitudinal type of fastening. After releasing the decorative cap, the screws are carefully removed from the fastening system, and the base of the chandelier is removed from the platform.
In some cases, the entire fastening system, consisting of a timber or piece of moisture-resistant plywood, is removed. To do this, you need to unscrew the screws, disconnect the hangers and insulate the contacts.
Other types
The I-beam mounting strip is used for canopies of the most massive and heaviest lighting devices. Its dismantling is similar to the work with a cruciform analogue, with the exception that its base is more durable and is attached to the ceiling with a large number of screws.
Dismantling the chandelier mount
During a major renovation, it is often necessary to completely clean the ceilings. This means that you not only need to remove the profiles and tension fabric, but also remove the fastening, which consists of a mortgage and adjustable hangers.
The mortgage is a wooden beam that is attached to the base of the ceiling with self-tapping screws or a piece of moisture-resistant plywood on hangers. In order to remove this system from a concrete slab, it is enough to unscrew the screws on which it is attached.
After dismantling, it’s worth dealing with the wires.
If they are not marked, then using an indicator screwdriver and a multimeter you need to mark them and insulate them or place them in terminal blocks. We must not forget about the mandatory power outage during any work, including when removing the chandelier. No tags for this post.
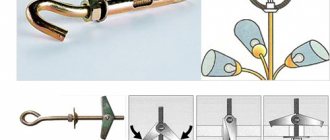
Hook fastening
- To install the chandelier using a mounting hook you will need:
- hammer drill or hammer drill;
- set of concrete drills;
- mounting hook (or hook-shaped anchor) with a new settler (usually included with the lighting fixture);
- hammer.
First of all, using a puncher in the ceiling, at the installation site, it is necessary to make a hole, the diameter of which corresponds to the size of the new home. Next, use a hammer to drive the base for the hook into the hole made. Then screw the mounting hook into the new housing to the required depth. The most common anchor diameter is 6÷14 mm.
There are 4 of the easiest and most reliable fastening methods. Let's take a closer look at each.
- Method 1.
- You need to take an anchor bolt, the size will depend on the weight of the chandelier, on average 7-15 millimeters.
- Drill a hole in the ceiling and insert it.
- The nut on the anchor must be screwed in all the way until the sleeve loosens itself.
- Method 2. Applicable only to private houses.
- We make a through hole in the interfloor slab.
- We take 2 orthogonal plates with an area of 25x25 or 35x35 cm, up to 3 mm thick with ready-made holes in the center.
- We place the first one in the floor of the upper floor. If it is not there, then in the attic, and the second under the ceiling.
- Take the hook and tighten the nut. It will hold the plate.
- Next, we insert the hook into the ceiling hole and screw a second nut on top, which will tighten the 2 plates together.
- Method 3. Used if the floor slab is six-hollow.
- We make a 30–50 mm hole in the ceiling.
- We insert a piece of reinforcement with a diameter of 9-10 mm into it and place it in a hollow channel parallel to the ceiling slab. The length will depend on the thickness of the slab.
- We make a hook from wire rod (d 10 mm), at the other end of which there should be a ring.
- We put the ring on the reinforcement. All is ready.
- Method 4.
- We prepare materials: 2 nuts, a metal plate, a hook.
- We take the plate and drill a pair of holes with a diameter of 9.0 mm diagonally.
- Screw the nut onto the hook until it stops.
- We put the plate on and screw another nut on top, pressing it against the plate, tighten it.
- Cut off the protruding edge.
- We attach the structure to the ceiling with 7.0 mm studs.
Anchor hook
Perhaps the most common option, which many people also love because in many apartments such a hook is already installed, as they say, by default.
- If it is missing, but there is a need to hang a chandelier on a suspended ceiling in this way, follow the basic procedure that will help you quickly deal with the problem:
- using a drill, make a hole in the concrete base with a diameter of 6 to 14 mm;
- Insert the anchor hook into the hole and tighten the hanging nut.
Have you installed a stretch ceiling? Let it dry - maintain exactly the time period specified in the performance characteristics of the film.
Many beginners, who don’t really know how to hang a chandelier on a suspended ceiling, rush to complete all the operations faster - and then pay with a torn canvas, not only spoiling their mood, but also significantly undermining their budget: find the location of the hook; stick a plastic ring onto the suspended ceiling; when deciding on its size, take into account the size of the cap - it should completely cover the diameter of the ring; cut out with the inside; pull out the wires; All that remains is to connect the lamp.
Through mount
Distributed mainly in private homes. In this case, not only a hook with a thread on the rod is used, but also two plates 2x2 or 3x3 mm.
- make a through hole and place the first plank;
- screw a nut onto the hook to hold the second plate;
- insert the hook into the hole and screw another nut on top;
- As a result, the 2 plates should be pulled together - all that remains is to hang the chandelier.
The further steps are nothing fundamentally new: we also fix the rings on the stretch ceiling, cut out a part, pull out the wires and connect the chandelier. Again, when using plastic rings, keep in mind the diameter of the decorative cap of your lighting fixture - it should be a little smaller so that the final installation pleases the eye and does not make you wince from aesthetic defects on the stretch ceiling.
Preliminary preparation
When removing lighting fixtures from the ceiling, you must comply with safety requirements. Initially, de-energize the wiring. To do this, in private houses, both plugs are turned out in the electrical panel, and in apartment buildings, the safety switch is turned off in the distribution panel on the staircase at the apartment meter.
Removing the protective casing and pulling out the lamp
Dismantling
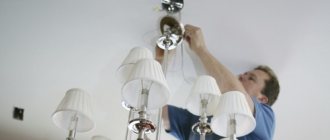
How to change a chandelier on a suspended ceiling yourself? In this case, the operation of dismantling old equipment must be carried out, of course, as carefully as possible. They remove an LED chandelier using approximately the same technology as simply removing it from a concrete ceiling. The only thing is that in this case you will have to work through a hole in the PVC film. Remove the decorative cover from the old chandelier under the covering, cut the wires, strip their ends and move them apart. Of course, the home network is first de-energized. Then check the strength of the hook or the structure of the bar. If necessary, change these mounting elements. Next, a new chandelier is hung on the ceiling.
When you may need professional help
The help of craftsmen is necessary if you want to change the location of the chandelier. Covering with PVC film is an expensive pleasure, so stop experimenting.
You need to turn to professionals if you want to supplement the lighting in the room with lamps or install another chandelier. The risk of damage to the decorative canvas during work is quite high, so do not skimp on the services of an experienced craftsman.
If you are not sure that you can cope with electrical installation work, then it is also better to call a specialist, because such work requires professional skills and accuracy.
Installation with transfer
How to change a chandelier on a suspended ceiling if a new installation location has been chosen for it? To perform this procedure, the old lampshade is also first dismantled. Next, the suspended ceiling itself is removed for a while. Of course, you should not carry out this procedure yourself. To do this you will need to hire professionals.
After the suspended ceiling is removed, wiring is pulled to the new installation location of the chandelier. Next, hang the PVC film in place. To install the chandelier in it, of course, you will need to make a hole and reinforce it with a plastic ring. After access to the reinforced concrete ceiling slab is opened, a hook is hung on it:
- drill a hole in the ceiling using a hammer drill;
- screw a hook into it (such elements are supplemented with threads);
- secure the hook with a spring latch.
Next, a new chandelier is hung on the ceiling using standard technology. Before performing this procedure, the film must, of course, be carefully leveled in height.
How to attach a chandelier if the canvas is not yet stretched
It is easier to prepare a place for the lamp if the floor slab is free. Nothing will prevent you from moving its location, extending wiring to it and preparing a base - a block or jumper. Any technical solution becomes possible.
Using a drill, a hole is made in the ceiling for a dowel and a threaded hook is installed. If the PVC film is located at a large distance, it is better to use thicker fasteners. In such cases, craftsmen recommend fixing it on a wooden block. This method will provide a more reliable connection if you choose denser wood or use a thick chipboard or fiberboard plate installed on brackets of the required length.
The best option would be to install a steel fastener bent at the end into the concrete and place a 25 x 25 cm plywood plate on adjustable metal posts, flush with the ceiling covering, which should fit snugly against it. It is more convenient to purchase a ready-made cross-shaped stand. It is necessary to prepare a hole in the plate in advance for the wiring and hook. With this method you will have to drill more holes, but it is the most reliable. The cut location is rigidly fixed, and sagging under the influence of temperature or weight of the baguette is completely excluded. For heavy structures weighing up to 10 kg, it is better to use impact dowels about 10 cm long and 1 cm in diameter.
Connecting the lamp
You learned how ceiling chandeliers are attached and how to hang the device. After fixing the lamp on the ceiling, the crucial moment comes - connecting to the electrical network.
Do not forget that hanging a chandelier from the ceiling is the first stage, and the next one, connecting the device, must be done with precautions:
- Before work, turn off the power supply;
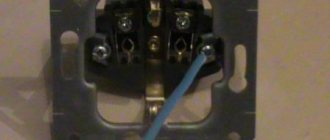
- connect the wires in phases, connecting three wires;
- brown vein - phase. Direct it to the transfer case;
- the remaining two - to the lighting fixture;
- yellow wire - grounding;
- blue - zero;
- distribute the wires among the terminals.
With a one-button switch, all the light bulbs in the lamp light up simultaneously. The yellow wire is attached to the lamp, the brown wire is attached to the ceiling phase, the blue wire is to zero.
With a two-button switch, the device is partially turned on and off. Here is the following sequence: yellow is connected to the hook or plate, blue is connected to the phase, brown is brought to zero.
Don't forget to insulate all wires after connecting.
Before hanging the device, carefully read the step-by-step instructions. There are no difficulties here. The main thing is to follow safety rules when working with electricity.
Safety precautions
The first thing you should pay special attention to is your own safety, since you will be working in an active electrical installation. Therefore, it is initially necessary to ensure that voltage is removed from current-carrying elements. To do this, it is not enough to turn off the switch key, since for a number of reasons it can break the neutral conductor instead of the phase conductor. As a result, a dangerous potential will be present at the cartridge contacts.
To remove the chandelier safely, follow these steps:
- Disconnect the input circuit breaker on the distribution panel; it will be good if it is a two-pole switch that simultaneously breaks both the phase and neutral conductors.
- If the machine is single-pole or you are operating not an input machine, but a dedicated machine, be sure to check the absence of voltage. The easiest way is to turn on the switch; if the chandelier does not light up, the circuit breaker has broken the circuit. But this does not guarantee the absence of potential if the machine breaks zero instead of phase. Therefore, it is more advisable to use an indicator screwdriver.
- When performing work to remove or replace a chandelier, it is necessary to install a stepladder so that all work is carried out to the side of you. Since when you are under the device, there is a possibility of small particles and debris getting into your eyes.
- If nothing is immediately connected to the supply wire after dismantling the chandelier, it is better to insulate the wires. This will ensure that you don't get an accidental electric shock from touching them.
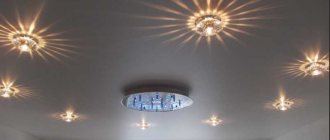
Replacing a spotlight
Such elements are often used in apartments when decorating the ceiling with PVC film. And, of course, spotlights on such coatings sometimes also have to be changed. The answer to the question of how to change an LED chandelier on a suspended ceiling is also a fairly simple technology. Do-it-yourself dismantling of old equipment of this type is usually done as follows:
- de-energize the lamp connection line;
- disassemble the junction box and disconnect the wires;
- carefully remove the old lamp.
Next, a new spotlight is assembled. The light bulbs are not screwed into it first. After the lamp is assembled, the actual installation begins. For this:
- open the junction box;
- connect the apartment wiring with the lamp wires according to the diagram provided by the manufacturer;
- crimp the wires and cover them with protective caps;
- Place the wires neatly in the box and cover it with a lid.
1st stage. Applying markings along the perimeter of the ceiling
The suspended ceiling must be at least 10 mm below protruding obstacles
These obstacles will be: distribution (socket) boxes, platforms for lighting fixtures;
It is also worth considering that when installing the ceiling, a special profile is used - a baguette, which must be securely fastened along the entire perimeter of the site, that is, you need to evaluate the possibility and convenience of installing the baguette;
In rooms with small wall heights, every centimeter is precious, so you need to “lower” the ceiling very carefully, otherwise the new stretch ceiling will simply “press” and cause discomfort. Therefore, in small rooms it makes sense to use glossy stretch ceilings for
When we have decided on the height of the ceiling, it is necessary, using a laser level and a painting cord, to draw a line along the entire perimeter of the area.
Applying markings using a tapping cord
Correct dismantling of a chandelier with a cross-shaped strip
- Remove all fragile elements from the lighting fixture: lamps, shades, glass pendants and other decorative elements.
- Unscrew the cap, which can be secured with a locking screw or a central nut. Pull it down and it will expose a hole in the suspended ceiling. Looking into it, you will see the mounting system. Then do everything as during installation, only in reverse order. You can also watch a video about removing a chandelier from a suspended ceiling and then replacing it.
- If you find a rectangular or cross-shaped strip under the hood, then first disconnect the hangers that are screwed to the main ceiling with self-tapping screws. Now pull out the entire structure along with the chandelier through the hole in the suspended ceiling.
- Disconnect the wires and temporarily insulate the exposed ends with electrical tape. The lamp is in your hands and you can send it for repair or replace it with a more stylish lighting fixture.
It turns out that not everyone knows how to remove a light bulb from a stretch ceiling. Meanwhile, it is no more difficult to remove or replace than in a floor lamp. The only inconvenience is that you will need a stepladder. If it is not there, then you can climb on the table and simply unscrew the lamp from the socket, which is located in the lampshade. In this case, the electricity is usually not turned off, but you can completely turn off the power to your home just in case.
If the suspended ceiling is equipped with additional spotlights, then their removal is carried out in the same way as dismantling a chandelier. This is everything you need to know to remove any lighting equipment. The main thing is to do everything without fuss and haste, otherwise you can damage something.
Step-by-step instructions on how to replace a fluorescent lamp in a ceiling light
To change a burnt-out fluorescent lamp in a ceiling light:
- Relieve the voltage from the lamp. To be safe, turn off the power supply at the panel.
- Provide access to the lamp by removing the shade or reflective grille. The lampshades are attached to the light source with screws or latches. Unscrew the screws and release the latch lock. Remove the lampshade or reflective grille.
If there is no glow, press the light source - there may be poor contact between the base and the socket.
How to remove, insert and assemble lamps with G5 and G13 sockets
Fluorescent light sources with G5 and G13 sockets are used in the kitchen, bathroom, and for illuminating mirrors. They are installed in ceiling lamps. Burnout is confirmed by a dark ring at the end of the flask. The cause of the malfunction may be a failure of the starter (ballast) or throttle. To replace the fluorescent source:
- Relieve the voltage from the lamp. To be safe, turn off the power supply at the panel.
- Disassemble the lamp. Provide access to the bulb by removing the lampshade or reflective grille. The lampshades are attached to the light source with screws and latches. Unscrew the screws with a screwdriver or release the latch lock. Remove the lampshade or reflective grille.
- In single-lamp lamps, the shade is attached to the lamp itself. In this case, pull it and release the burnt out light source.
- To remove the flask, grab it with both hands and turn it around its axis 900 in any direction. The pins of the base will come out of the guide sockets in the socket.
- Pull the light source away from the fixture and out of the socket.
- Buy a new lamp. Its characteristics and dimensions must be the same as those of the burnt-out source.
- To install a new light source, place its ends into the socket until it stops, turn it at an angle of 900 in any direction until it clicks slightly. Lock the position. Apply power to the lamp and check its operation. If the light is normal, replace the lampshade or grille. If the lamp does not light, turn it off and move the bulb in different directions for better contact with the cartridge. If there is no light, remove it and reinstall it.
Installation of new equipment
The answer to the question of how to change a chandelier on the ceiling is actually a fairly simple technology. After the old lampshade is removed from the ceiling, you can begin hanging the newly purchased one. This operation is also performed in several stages. After installing the hook or strip:
- carefully clean the ends of the wires protruding from the ceiling;
- spread them apart;
- turn on the machine in the dashboard;
- check each wire using an indicator, thus determining the polarity;
- turn off the voltage again;
- Mark each wire with electrical tape of the appropriate color.
Next, the new chandelier itself is hung on a hook or bar using pins. At the final stage, guided by the diagram provided by the manufacturer, connect the corresponding wires of the lighting device to the cables marked in the previous stage. After this procedure is completed, the chandelier is checked for functionality. If the light turns on correctly, secure the decorative cover in place.
Dismantling methods
They will differ depending on the method of mounting the chandelier under the ceiling.
Removing a chandelier hanging on a hook
Hanging hook for a chandelier
With this fastening, dismantling will not cause any difficulties.
For independent dismantling work, the protective cap is first removed. Then you need to stick your hand into the hole and by touch find the hook that holds the lighting device. There are no more fastenings; the lighting device must be carefully removed from the hook and pulled out along with the wires suitable for it. Next, the wires are disconnected one by one. The process is simple and does not require outside help.
Removing a chandelier from a cross-shaped strip
Initially, fragile parts are removed from the lighting device, which include lamps, glass pendants, shades and other decorative elements. After they are removed, the cap is removed, secured with a locking screw or nut. A hole will open in the suspended ceiling. The fastening system is visible through it.
The hangers screwed with self-tapping screws to the concrete base are disconnected from it. When the process is completed, the structure with the chandelier attached to it is removed through the hole and pulled out.
Removing a chandelier from a cross-shaped mount
Next, you need to remove all the wires and insulate the exposed ends. After this, you can replace the chandelier with a new one or send the broken one for repair.
Many people still don’t know how to remove a light bulb from a lamp on a suspended ceiling, and they call the experts if they need to replace it, but in fact this process is simple. But you may need a stepladder or other stable tall object. To perform this procedure in normal mode, the electricity is not turned off, but to be on the safe side, for personal safety reasons it is better to turn off the power to the house or apartment.
Removing spotlights is no different from dismantling a chandelier.
How to unscrew a light bulb with your own hands
Each type of fixture and lamp has its own replacement instructions, but the first steps are the same for all cases.
Completely de-energize your home at the panel or meter. In this case, there is no need to worry about electric shock. To access tall chandeliers and spot lights on a suspended ceiling, find a stable stepladder or stool. When working with such fragile parts, you need to be sure of where you stand. We carefully stand on a stool (or remain on the floor if the light bulb can be reached without effort), working only with the switch off with dry hands. Further steps for replacing lamps depend on their type
If these are threaded sockets, then with one hand we grasp the light bulb itself (attention, it may still be hot), and with the other we hold on to the socket. With gentle movements we begin to unscrew counterclockwise
Do not squeeze the glass too hard - remember, it is thin. When unscrewing a halogen lamp, remove it only with clean and soft gloves. If the light bulb cannot be unscrewed, you need to try to loosen it, then it will give in. If it burns out because it burst, then unscrewing it will be quite difficult. How to change a broken light bulb in this case? There is nothing to grab hold of - only sharp shards of glass stick out from the cartridge. A regular potato will help you. Cut it in half, carefully place the cut on the protruding fragments, and then unscrew the remaining light bulb with gentle counterclockwise movements.
Unscrewing a broken light bulb using a potato
- Even if the fragments do not stick out, but the base is firmly seated in the socket, it can be unscrewed using an ordinary plastic bottle. Using a match or lighter, melt the neck of the bottle a little, and while the plastic is hot, insert it into the empty base. Wait a minute for the plastic inside to harden, then unscrew the rest. The E14 base can be removed using a wine stopper. This method is not suitable for replacing light bulbs in a suspended ceiling lamp.
- Long tubular fluorescent lamps have their own fixation method. To remove, grasp the body of the lamp with both hands and carefully rotate it along its axis in any direction. During the process, several characteristic clicks will be heard along the edges of the lamp - this is how it should be, these are the fasteners clicking. After turning approximately 45 degrees, the lamp contacts will appear along the edges of the mount, and it can be easily pulled out of the grooves.
Mounting a tubular fluorescent lamp
How to change a light bulb in a spotlight? With built-in lamps the situation is a little more complicated. The lamps are secured in them using special springs made of hardened metal. To interact with them, there are special levers on the body; by pressing them, you will release the light bulb from the mount, and it can be removed. The main thing is not to overdo it with pressing the levers - they are quite fragile, they are very easy to break. In addition, if you suddenly release the light bulb, it may slip out and fall to the floor, which will lead to the formation of a large number of dangerous fragments and damage to the floor covering - not the best way to replace a lamp in a suspended ceiling.
If you can't find any levers, but you can grasp the device with your hands, try gently turning it 90 degrees counterclockwise. How to remove a spotlight? There are fasteners that, after turning the light bulb and making a quiet click, allow you to remove it. After removing the lamp, set it aside in a safe place.
Types of lamps with different mounts
Chandelier on a suspended ceiling: rules for choosing
Sometimes apartment owners are also interested in whether it is possible to change the chandelier on a suspended ceiling themselves. This procedure will also be easy to perform with your own hands. But when replacing chandeliers on suspended ceilings, you still need to follow some rules.
Firstly, it is believed that only lighting fixtures without sharp edges are suitable for such a coating. Also:
- the base of the tension lamp should be made of plastic, not metal;
- the lamps of the chandelier should be directed in the direction opposite to the covering;
- The length of the suspension of a chandelier with an incandescent lamp should not be less than 15-25 cm.
Unfortunately, the last rule can be difficult to follow when choosing lighting equipment for suspended ceilings. In most cases, modern chandeliers are designed in such a way that after installation the lamps are practically pressed to the ceiling. Therefore, for such coverage, home owners usually choose lighting equipment with LED elements that do not heat up during operation.
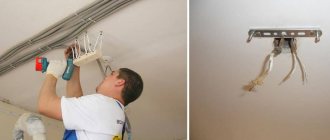
Installing a new fastener
To install the mounting hook in the floor slab, you need to drill a hole into which the fasteners will then be screwed. Since the thread is located along its entire length, you can easily adjust the height of the chandelier suspension. Additional fixation of the metal hook in the hole is provided by a convenient spring latch. The plank can be attached directly to the rough surface or to an embedded structure made of wood or plywood.
Relocating the wiring and installing new fasteners will require removing the stretch ceiling and reinstalling it, which may not be possible for a non-professional. After this, if you decide to hang the chandelier in a new place and not use the old hanger, you will have to make a hole in the canvas and carefully secure it so that it does not unravel and cause a decrease in the degree of tension of the film or fabric. To do this, you can use special plastic rings, which are used to glue the edges of the hole along the contour.
If the wires are not long enough to move the lamp to the side, they will need to be extended. To do this, special terminals are used to connect sections of cables of the required length to the old wiring. A corrugated tube is put on the extended wires, which is then fixed at the base of the rough surface using clamps.
Having brought out the wiring, secured the hole in the canvas and installed the mounting structure, the ceiling covering will need to be leveled in height in order to then hang the lamp at the required level. And the last thing you need to do is to properly seal the place where the chandelier was previously located so that there is no hole in it. To do this, you need to use a special patch or stick an applique on the hole.
Tools and accessories
The variety of lamps leads to the need to know exactly when you can simply replace a light bulb, and when replacing it requires disassembling the lamp. In this case, you will need some tools and accessories:
- stepladder or strong table;
- indicator screwdriver with LED or tester;
- pliers for removing retaining rings;
- flat screwdrivers 2 pcs.;
- Phillips screwdriver;
- construction knife;
- terminal block.
Attention: in many works you can find a recommendation to have insulating tape to insulate twisted wires. In our opinion, it is better to refrain from this type of connection - due to poor contact, the wiring may heat up and ignite. A simple terminal, which costs several times less than electrical tape, will quickly and reliably connect the wires.
Dismantling the elements that make up the chandelier
When you have collected all the necessary tools, visually examine the chandelier. Once again, make sure that there is no voltage, and then begin to remove all hanging elements from the device, which include glass decorations, lampshades, etc.
Be sure to unscrew the light bulbs from the sockets and remove the cover under which the wires are hidden. The remaining parts used to connect the device to the electrical network are located under a decorative cap secured to the base of the ceiling with a screw.
Helpful information
Moving lighting equipment on a suspended ceiling with your own hands will, of course, be problematic. Usually, apartment owners still hire specialists for this purpose. At what price can craftsmen change the chandelier in this case? How much does such a procedure cost with transfer to today? If it is necessary to move the lighting equipment and dismantle the covering with subsequent installation in place, such an operation will most likely cost the apartment owner about 3-4 thousand rubles. If you just need to replace the old chandelier with a new one on a PVC ceiling, specialists will ask for about 800-1000 rubles.
Features of working with different lamps
The range of lighting devices produced today is very diverse. Often, installation and dismantling problems are associated not so much with the processes themselves, but with the unusual designs of pendant lamps.
The type of ceiling covering is also of great importance. The algorithm for working with a suspended ceiling may differ from manipulations with a standard or suspended type of structure.
Removing a chandelier from a suspended ceiling
Stretch ceilings are most often found in modern houses and apartments. They are attractive due to their ease of installation, cost and variety of designs. When installing lamps, a special fastening system is often used, which includes a wooden mortgage or a suspended platform. As for the type of fastener, it all depends on the type of lighting device.
In order to change the chandelier in such conditions, it is necessary to turn off the power to the room and prepare a stepladder and tools. The further algorithm of actions will look like this:
- cleaning the body (removing all decorative parts, shades, glasses and lamps);
- dismantling the protective cap;
- releasing wires from terminals and insulation;
- checking the absence of electricity in the network (using an indicator screwdriver);
- dismantling the lighting fixture from a hook or strip with careful removal through a slotted hole in the ceiling.
The remaining ceiling wiring must be insulated to prevent short circuits after the power is turned on.
How to properly remove spotlights from a suspended ceiling
Spotlights do an excellent job of providing additional lighting, replacing outdated wall sconces.
Replacing such a lamp in an apartment yourself is quite simple. You just need to strictly follow the sequence of all actions, namely:
- De-energize the room.
- Using a flat blade screwdriver, remove the housing cover and remove the light bulb.
- Carefully pull out the body of the spotlight, if a gap forms, insert your fingers and press the latches, thereby releasing the lamp and dismantling it completely.
- Using a lever or hidden spring, open the terminal block and pull out the contacts.
Removing a spotlight from a suspended ceiling
The instructions for dismantling built-in lighting fixtures from a suspended ceiling differ from the suspended version. Its design is much more rigid, which allows the luminaires to be installed using a spacer system. Such fasteners provide more reliable fixation of the device.
To remove the spotlight, you need to carefully hold the device, pull it out, forming a gap, and then unscrew the base, gaining access to the wiring diagram. Then everything is simple: the contacts are disconnected and isolated.
Step-by-step instruction
The entire process of dismantling a chandelier with your own hands can be represented in the form of a simple algorithm of actions:
- Power outage.
- Preparing tools.
- Removing decorative elements, shades, and light bulbs from the chandelier frame.
- Dismantling the decorative base.
- Disconnecting wires.
- Fastening works.
- Removing the frame from the ceiling.
- Insulation of exposed contacts.
Despite the apparent simplicity of the actions, each stage is characterized by its own nuances.
We remove lampshades, decorative elements and components
After completely turning off the light from the input panel, you can begin to “disarm” the lamp. The design of most lighting fixtures is similar. It includes the following components:
- decorative cap (cup);
- wires;
- frame made of metal or plastic;
- lampshades;
- light bulb sockets;
- hanging decorative parts (depending on the model).
First, all hanging elements and shades are removed.
The second stage is incandescent lamps or their LED analogues. Next, the ring or washer securing the cap is unscrewed and the latter carefully goes down, providing access to the connection diagram.
De-energize and disconnect the wires
The room is de-energized at the very beginning of work. To do this, you can use a switch, but it would be more expedient and safer to turn off the circuit breaker.
Disconnecting the wires is quite simple. When twisting and manual insulation, it is enough to carefully cut off the layer of insulating tape with a knife and disconnect the chandelier contacts from the wiring cables.
When using terminal blocks, you need to press the lever or release the spring (depending on the clamp model) and release the contacts.
Removing the chandelier from its mount
There are several ways to remove a chandelier from the ceiling. It all depends on the method of its initial installation.
Hook
An anchor hook is the most common method of installing ceiling lights. In this case, removing the chandelier is very simple. It is enough to lower the closing cap, stick your hand into the hole, feel for the hook and carefully remove the chandelier frame from it. Then disconnect all wires.
In case of large weight or volume of the suspended structure, it is best to carry out the work together with a partner.
Mounting strip
Mounting strips are used to attach massive and heavy light sources. After dismantling all the removable structures of the chandelier, as well as removing the protective decorative cup-base, you can gain access to the fastening element - the strip.
The bar is fastened with nuts that need to be unscrewed, after which you can remove the frame and disconnect the contacts. After this, if necessary, you can remove the bar itself by unscrewing the screws and pulling it into the hole in the panel. The last step is insulating the wires.
Cross bar
The chandelier is removed from the cross-shaped strip in almost the same way as with a longitudinal type of fastening. After releasing the decorative cap, the screws are carefully removed from the fastening system, and the base of the chandelier is removed from the platform.
In some cases, the entire fastening system, consisting of a timber or piece of moisture-resistant plywood, is removed. To do this, you need to unscrew the screws, disconnect the hangers and insulate the contacts.
Other types
The I-beam mounting strip is used for canopies of the most massive and heaviest lighting devices. Its dismantling is similar to the work with a cruciform analogue, with the exception that its base is more durable and is attached to the ceiling with a large number of screws.
Dismantling the chandelier mount
During a major renovation, it is often necessary to completely clean the ceilings. This means that you not only need to remove the profiles and tension fabric, but also remove the fastening, which consists of a mortgage and adjustable hangers.
The mortgage is a wooden beam that is attached to the base of the ceiling with self-tapping screws or a piece of moisture-resistant plywood on hangers. In order to remove this system from a concrete slab, it is enough to unscrew the screws on which it is attached.
After dismantling, it’s worth dealing with the wires. If they are not marked, then using an indicator screwdriver and a multimeter you need to mark them and insulate them or place them in terminal blocks. We must not forget about the mandatory power outage during any work, including when removing the chandelier.