Selecting and installing lighting fixtures is one of the most enjoyable stages of home interior design. A beautiful chandelier with a spectacular design can become the “heart” of the entire design of an apartment or house. Properly selected lighting can highlight all the advantages of a room and hide possible flaws.
However, assembling and installing a chandelier is often associated with certain difficulties. Problems especially often arise when connecting models with an abundance of lampshades to a switch with several keys.
But often homeowners can still do without the services of a specialist and install the chandelier themselves. In this material we will look at the main stages of assembly and installation, talk about the intricacies of the electrical connection of the lighting device and provide step-by-step installation instructions with visual photos and useful videos.
Mechanical assembly
As a rule, the main components of any chandelier are easily connected into the finished product, but in difficult cases you will have to rely on the documentation with the diagram.
Usually the lampshades are separated from the horns, the base, and the terminals are packaged next to the other elements of the product. Even a beginner will quickly figure out what to connect to what.
Important: Before starting assembly, you must ensure that all components are present.
Assembly steps
- The upper part of the chandelier base is assembled.
- The plate is mounted on the rod and tightened with a nut.
- Horns for lampshades are installed.
- It is necessary to unscrew the special nut on the base. The horn is inserted into the corresponding hole.
We study the chandelier. If everything is installed correctly, we move on to the next stage. Do not rush to install decorative elements and lampshades; they will be installed a little later.
Fastening the product to the ceiling
Having dealt with the electrical component, you need to understand how to hang a chandelier on the ceiling. The sequence of work will depend on two factors - the design features of the fixture itself and the type of ceiling surface.
Hook fastening
This type of chandelier installation is the oldest and most proven. A special hook, ring or loop is installed on the ceiling plane and serves as a fastener for hanging the lighting device.
Installing an anchor hook for a chandelier Source sledcomspb.ru
The installation of such a hook was envisaged during the construction of old high-rise buildings. If it is mounted, then it is enough to check its reliability and you are allowed to hang the chandelier. To check, hang an object twice the weight of the device on a hook. If the mount holds the load, then you can safely mount the lamp.
But how to hang a chandelier if the hook does not inspire confidence will be discussed further. It is enough to install a new chandelier mount to the ceiling.
The wooden ceiling is simply designed for screwing in a hook-screw and fastening a lamp. The presence of problems with such a ceiling is excluded.
Self-tapping hook for wooden ceiling Source prom.st
Understanding the wires
In the case of connecting a chandelier with a switch based on a single key, our task is simplified. If it’s two, then you’ll have to understand the wiring diagram in the chandelier, because otherwise the switch won’t be able to work correctly.
The horns have a separate wire for connecting to the power core. For clarity, the wire colors are offered in different colors, but in some cases the manufacturer uses one visual design option.
The wires are carefully routed through the corresponding hole on the chandelier and grouped together for the actual wiring process.
We connect the wires to one switch key:
- The neutral wires are twisted.
- They usually have a blue or blue color.
- We connect the phase wires.
- Such a vein is framed in white, brown, gray and other colors.
To connect to two switch keys, the main wire must have three functional cores. Conventionally, L1, L2 and N. For correct connection, the zeros are connected as for one key. But the phase ones are divided into two groups L1 and L2 for use on both switches.
Now you need to connect the chandelier to the ceiling. To do this, use a hook or a special fastening strip in the case of a concrete floor.
Video description
An example of hanging a chandelier on drywall:
Fastening to a suspended ceiling
It is impossible for an ordinary person to carry out such work without preparation. They should be trusted exclusively to specialists even before hanging the ceiling sheet.
You will need a platform prepared in advance and suspended from the ceiling slab at such a height that the plane of the suspended ceiling passes along its lower edge. Taking into account the placement of this platform and the level of the canvas, specialists cut and process holes for the passage of wiring and fasteners.
Independent attempts to carry out any work with the covering already stretched are guaranteed to lead to failure.
When installing the chandelier to the fastenings and wiring terminals prepared by the craftsmen, it is important not to catch the tension surface. A tear, cut or puncture will lead to complete damage to the fabric.
In the case of a suspended ceiling, it is recommended to use only chandelier models for LED lamps. Other types of lighting will lead to rapid deterioration and loss of attractiveness of the ceiling canvas.
Mounting a chandelier on a suspended ceiling Source yandex.net
Phase search and final connection stage
Now we have figured out how to properly assemble the chandelier, but all that remains is to connect the wires to the power cores to provide lighting for the room.
Before starting the connection, you should not trust the color of the wires. It is necessary to check the phase and zero using an indicator screwdriver. To do this, you must follow safety measures.
Do not touch exposed wires. But the finger must be pressed against the contact plate. Otherwise, you will not be able to get the correct result.
Finding grounding with a multimeter:
- After checking the wires with an indicator screwdriver, you can use the multimeter in ground search mode.
- To do this, it is connected to the operating state at 220 V.
- The probe is connected to the phase.
- The other probe is alternately connected to the remaining 2 supply wires. The readings are recorded.
- On this basis, the presence of grounding is detected. In most cases it is not used, but it is necessary to check.
If one of the wires shows a voltage of less than 220 V, then protection or grounding is applied. After this, you should turn off the voltage to the entire living area and you can begin connecting the chandelier wires to the main supply wires of the general electrical network.
Compliance with safety regulations
Before hanging a chandelier, you need to remember the safety rules. This is especially true for electrical safety. To prevent injury, you must adhere to the following rules:
- Work is carried out only during daylight hours with high-quality natural light (or simply with high-quality autonomous lighting).
- Carefully think through the entire sequence of actions and prepare all the tools that may be needed so that this issue does not distract you from your work.
- Disconnect the wiring you are going to work on.
- Check for voltage in the wires using a tester or screwdriver. A light that does not light up allows work to begin.
- It is best to connect the wires using terminal blocks.
- Do not forget about grounding if it is provided for in the home wiring.
Before work, be sure to check whether all the screws and terminals in the chandelier are properly tightened and fit. Poor contact can lead to sparking and burnout.
You cannot neglect safety rules when working with electricity Source tlt-land.ru
We connect the chandelier with the supply wires
This is the most important step because you need to connect the correct wires. For reliability, VAGO terminals and PPE caps are used.
PPE caps or connectors are often included with the chandelier. For use, the wire is carefully wrapped around the product. Now you need to complete the connection of the corresponding wires. After this, the chandelier body structure is closed, lamp shades and decorative elements are installed.
Preparatory work
Private house complete instructions for installing electrical wiring
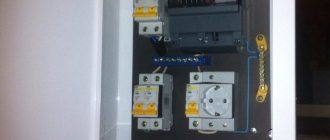
Before installing the mount and installing the ceiling chandelier, you need to ensure its power supply. How to do this correctly? To do this, in the lighting system, which can be made with or without protective grounding, find: phase, neutral and protective grounding wire. Often the ground wire is green; if the wiring has already been done, it may look like the one shown in the figure.
The grounding wire, which serves to protect people from electric shock, must be connected to the metal part of the chandelier if there is no grounding bolt installed by the manufacturer.
If the wiring is done independently, then the chandelier must be powered from a circuit breaker. In this case, using an indicator screwdriver or a special probe, you need to determine the phase wire. This procedure is performed in order to connect the phase wire to the switch. If the wiring already exists, then you need to turn on the voltage, before doing this, separate the wires separately from one another so that there is no short circuit, and carefully find the phase wire at the place in the ceiling where the new chandelier will be located in the future.
Learning to assemble an LED chandelier with a remote control
Many people do not understand how to assemble a chandelier with a control panel, since many parts are offered. Therein lies the complexity of this matter.
- You will have to spend time assembling the structure. Usually a film is applied to shiny elements. It needs to be removed.
- After this, everything is untwisted and connected to the main structure, glass elements with rhinestones are inserted. At the final stage, the light bulbs are screwed in.
- After this, you need to devote time to the receiver and controller, but there are different power supplies for adequate operation of the light bulbs.
These elements are carefully mounted so that they are securely on the chandelier and do not dangle in different directions, as this will complicate operation and the process of fixing to the ceiling.
Double-sided tape is used for fastening. As a rule, it is offered along with the package; if not, you will have to buy it separately.
Video description
Option for installing and connecting a ceiling chandelier in an apartment:
Fastening via mounting plate
As well as hook mounting, many chandeliers use hanging by means of a separate mounting strip that is attached directly to the ceiling. This design is considered more reliable, because The weight of the device is distributed over several attachment points.
Such a bar is usually embodied in various forms and designs, which are determined by the model and weight of the device. The planks can be straight or curved, using brackets for fastening or with protruding screws.
Oversized chandeliers are equipped with cross-shaped slats or made of reinforced profile parts.
Often the plank already has a gap with insulated edges for passing wires from the ceiling. This allows the strip and elements of the device to close the hole with the wiring coming out of the ceiling.
Next, the standard drilling of holes on the ceiling for the dowel is carried out, in accordance with the location of the strip fasteners, and tightening the screws.
After securing the structure, its reliability should be checked with an increased load.
Attaching the mounting strip for a chandelier to the ceiling Source gid-str.ru
During the installation process, it is advisable to avoid drilling new holes near old ones. The edges of the concrete in these places may be more fragile and will not provide the necessary reliability. But the choice of location remains solely with the owner of the premises, because... The main thing remains the ease of use of lighting.
Sometimes in old buildings it becomes difficult to figure out how to hang a chandelier on a hook if the chandelier has a strip. There are several solutions to this problem.
When the hook does not interfere with the installation of the plank, it can enhance the quality of the fastener. To do this, you need to tie a thin metal wire to the hook, the edges of which are attached to the ends of the bar, securing them securely. After this, carry out the standard installation of the strip.
If the hook cannot be used due to the design features of the chandelier, then it is either dismantled or simply bent to the ceiling with a hammer.
Fastening the device to the bar is also individual, since everything depends on its shape, size and model. Often, outside help may be required to hold the chandelier when carrying out switching work with wiring. Having connected all the contacts, the base of the chandelier is fixed to the bar with decorative nuts and screws.
Learning to connect an LED chandelier
First you need to prepare a place for connection, if you previously used an LED chandelier and marked the wires with phase, neutral and ground, then this greatly simplifies the task. The connection diagram is no different from a regular chandelier.
But in this case, a bracket or mounting strip is used to secure an LED lighting device with a control panel.
Important: In the case of a stretch ceiling, the bracket is secured, thanks to the embedded bar, it is connected to the main ceiling.
Usually the ceiling near the chandelier does not have a flat surface. Therefore, you will have to add a washer or level the surface using another method. To hide the wires we use a terminal.
- A hammer drill is used to install the bracket. After creating depth and a suitable surface, two size 6 or 8 dowels are driven into the ceiling.
- If space allows, it is more reliable to use 4 dowels.
- The bolts for securing the lower part of the chandelier are protected by grounding.
- Before securing the main wires to the terminal, you should ask someone to hold the chandelier for comfortable completion of the connections.
- We complete the installation with decorative nuts to secure it to the bracket.
Now we realize that connecting any type of chandelier is not as difficult as it seemed before starting work. This can be performed by any man with a healthy musculoskeletal system without concomitant diseases.
Frequently asked questions from readers
Is it possible to connect a chandelier, a switch and 9 sockets using a cable from a 3x1.5 cable?
Yes, you can use it, there are no restrictions on cables and wires with a core cross-section of 1.5 mm2.
Moreover, in accordance with clause 524.1 of GOST R 50571.5.52-2011, the cross-section of conductors in household electrical circuits must be at least 1.5 mm2. Therefore, from the point of view of the requirements of regulatory documents, this is a completely acceptable option for wiring. In terms of the electrical strength of such a cable, copper conductors with a cross-section of 1.5 mm2 can withstand a rated load of 4.1 kW or 19 A.
Therefore, to determine the possibility of using it in connecting a chandelier through a key switch and 9 plug sockets with a cable, you need to sum up the total load from the chandelier lamps and electrical appliances that you plan to connect to the plug sockets.
If the calculation results in a load greater than 4.1 kW, for example you need 5 or 6 kW, then this cable will not be enough.
If, as a result of the calculation, the planned power turns out to be 4 kW or less, then a cable with a cross-section of 1.5 mm2 will be sufficient. However, if the planned load exceeds the permissible limit, there is an option to switch on the load separately.
Photo instructions for assembling the chandelier
Share with friends
Important to remember!
When choosing a chandelier, it is recommended to pay attention to the socket or base - their dimensions should be standard for the market.
In this case, it is easier to replace their light bulbs and find a suitable one. It wouldn’t hurt to ask the seller or consultant where to buy them and from which manufacturers.
Purchasing ceiling lights should not be looked at from a financial perspective. Often, trying to save money, people choose unreliable manufacturers. These quickly become unusable and need to be replaced.
Therefore, you need to pay attention to the provided warranty and consumer reviews to assess the reliability of the lighting device.
Fusion
The combination of decorative elements and furniture in a variety of styles gives room for imagination. The chandelier for such a room is selected to be original and quite catchy. The choice here is very wide - from bronze and gilding to glass and ceramics, it all depends on the design idea.
It’s not difficult to give a finished look to your decor using a suitable chandelier model, based on the designers’ recommendations. The most important thing is a sense of proportion. The product should complement the decor, so maintain proportions.
Give up the idea of decorating a small room with a large specimen, and in spacious rooms, make sure that every far corner is well lit. This will help make the room as comfortable as possible.
Weaknesses of the device
To identify a malfunction, you need to know the structure of the chandelier
LED lamps with remote control have a lot of advantages, but malfunctions still happen. Some problems have explainable causes.
If the power line from which the chandelier is powered is two-core, the risk of the device burning out increases.
Confining a large amount of electronics in the chandelier body provokes overheating. The equipment can't stand it and breaks down. Budget Chinese models are especially guilty of this. You need to carefully monitor the incoming voltage and continuous operating time.
Common faults:
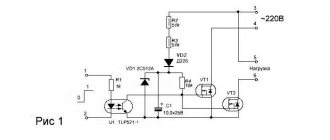
- The chandelier does not respond to commands or turns off spontaneously. The circumstances do not change after replacing the batteries - you need to check the buttons using the phone's camera, which will show a beam when pressed. If found, you can clean the contacts or change the remote control completely. If the buttons are fine, the problem is most likely a faulty wireless switch. The device circuit contains a metal film capacitor designed to suppress overvoltage. After 1–1.5 years of operation, its capacity drops, the voltage drops to 6–7 V, the electromagnetic relay stops closing, and the microcircuit does not work correctly. The problem is solved by replacing the capacitor. It is better to opt for an expensive imported model.
- When the chandelier moves, the light bulbs may glow if there is weak contact with the power cable. In this case, you should check the wiring components.
- The lamp group is not functioning. If one LED malfunctions, the entire strip stops working. You can try to find and replace the non-working element or buy a new tape. The cause may be the transformer. If the multimeter shows no voltage at the terminals, replace the part.
- Failure of a lamp to work is a reason to check the voltage of a suitable cable with a voltmeter, eliminate a short circuit between phase and neutral, and check the integrity of the lamps.
- Noticeable flickering or turning off of lamps when adjusting the lighting. Standard dimmers are not suitable for adjusting the brightness of LED sources; connecting an LED chandelier requires special equipment based on pulse width modulation (PWM).
Advantages
Surface-mounted wall lamps and other LED products (despite the fact that they cost quite a lot of money) have a number of significant advantages that distinguish them from other lamps. This is for example:
- A large number of different functions;
- Fire safety (the likelihood of fire is minimized);
- Light dispersion occurs evenly, which allows you to create a comfortable feeling for a person;
- Lighting brightness level (can be set via the control panel);
- Long service life;
- Built-in music center.
And another advantage of such models, of course, is ease of use. Say what you want, but when you don’t have to run to the switch every time to turn it on and off, it’s worthy of applause.
Thanks to remote control, you can adjust the light from anywhere in the room. In addition, a person also has the opportunity to play with flowers, displaying something new every day.