Who among us has not encountered faulty electrical outlets? Very often, developers or property owners save on these products and purchase the cheapest product. This leads to the fact that sockets quickly become unusable and require replacement. So why does this happen and how to change the socket correctly if necessary?
- The first cause of malfunction is incorrect use. For example, if you plug a non-standard plug into an outlet, you can easily damage it.
- And, the second reason is low-quality materials. In their desire to save money, manufacturers do not shun anything. They use simplified production technologies and low-quality materials in order to release cheaper products to the market.
So, now you know that you need to choose reliable products and use them correctly. At this stage, it no longer matters for what reason the breakdown occurred; now you need to solve the question of how to change the socket? There are two ways:
- On one's own. In this case, you will need to stock up on tools and a new high-quality electrical outlet.
- With the help of an electrician. You don't have to spend your time on this, but you will need to pay for this service. find out how much it costs to change an outlet by calling one of the many advertisements in the newspaper or on the Internet.
But are you ready to pay an electrician every time there is any breakdown at home? Most likely, the majority will answer no. Then the question arises, how to change the socket yourself? For this you will need:
Let's look at step-by-step instructions on how to change an outlet in an apartment. Be extremely careful when working with electricity!
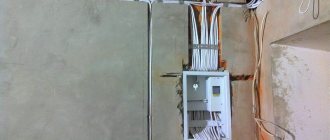
- It is necessary to de-energize the apartment.
- Next, unscrew the bolts on the front panel. There can be two on the sides or one in the center.
- Carefully remove the top.
- We unscrew the screws or bolts that hold it in the box.
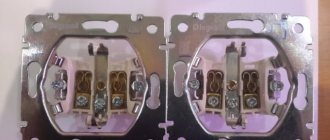
- The old socket is removed from the socket.
- The screws that secure the current-carrying conductors are unscrewed.
This is the first stage of solving the question of how to change the outlet in the apartment. Next we need to install a new mechanism.
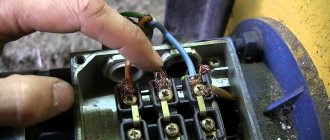
- The ends of the wires of the new socket are tightly secured with screws. This must be done carefully and carefully. Make sure that all wires are correctly connected, including grounding, otherwise the outlet may quickly fail.
- It is necessary to carefully place the wires in the box.
- The main part of the socket is placed in a box and secured with screws or bolts. Try to secure it well so that it does not fly out during use.
- The screws for the top cover and the cover itself are installed.
- Turn on the electricity and check the presence of current in the network.
Now you know how to change the socket in your apartment and you can easily save on electrician services. If you are afraid to do everything according to written instructions, then you can watch how to change the socket video .
Expert opinion
It-Technology, Electrical power and electronics specialist
Ask questions to the “Specialist for modernization of energy generation systems”
Detailed instructions on how to change the socket Naturally, there is a reasonable desire to move the socket with your own hands to another place closer to the TV and away from the sofa. Ask, I'm in touch!
Removing the internal socket
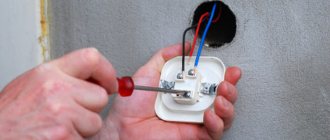
Removing the socket is easy. To do this, first unscrew the screw and remove the cover. This operation often has to be carried out when repairing an old socket, when it is necessary to gain access to its interior in order to tighten the fastening legs and electrical contacts.
Next, the spacer plates are loosened with screws, and the socket is removed. After the power wires are disconnected, they are inspected, cut to complete insulation, and the ends are stripped with a special device. It is not recommended to cut the insulation at the ends with a knife. At the points of contact, there are risks on the wires that can break off when the wires are bent.
What kind of lighting do you prefer?
Built-in Chandelier
The wires should protrude from the wall to the width of four fingers. If they are too short or one has broken off, use a connecting terminal block to extend it. If the wires to be connected are copper, you can use twisting, after which it is soldered and insulated. Then there will be reliable contact between them, and the connection will last a long time.
Expert opinion
It-Technology, Electrical power and electronics specialist
Ask questions to the “Specialist for modernization of energy generation systems”
Transferring the socket without grooves - When using a hidden socket, all the wiring is hidden inside the wall, the cable is laid in special grooves of the groove, and the socket with the socket box is mounted in a recess specially drilled for this purpose. Ask, I'm in touch!
Market representatives
There are now several main competitors in the retro sockets market:
Zion is a domestic manufacturer of retro beauty.
Retro rosette Zion color chocolate
Rosette from Zion with flowers
Rosette from Zion with a pattern Lazur Rosette Zion with gold finish
The model range of retro sockets from this manufacturer is represented by 7 types of ceramic sockets with grounding and the same number without grounding with two different sockets, the height of which is 10 mm - ideal for installation on open electrical wiring. All sockets are designed for connection only to open electrical wiring. This is one of the most budget options on the market and deserves attention.
Bironi are worthy retro sockets.
Also a domestic manufacturer, but its certification and equipment are Italian. The quality of the products deserves the highest praise
Rosette from Bironi model Schedel color wood
Retro rosette Bironi Lisette Exclusive. Bamboo color
Retro rosette Bironi Faberge color mother of pearl
The model range is very extensive and includes:
- Four types of materials used
- Ten types of colors
- Two types of installation: open/hidden
That is, you have the opportunity to choose from 80 different socket configurations to decorate your home
Salvador is a Moscow manufacturer of premium retro electrics.
Salvador products are recognizable and in demand on the Russian market and are perhaps the most acceptable choice when it comes to sockets, switches or retro-style wiring.
Retro sockets Salvador for outdoor installation
Salvador rosette with pattern. Outdoor installation
Salvador socket mechanism for indoor installation
Salvador frame for interior retro socket
Unlike its competitors, Salvador presents retro-style sockets not only for external, but also for internal installation, which allows them to be used in an apartment in standard places, with standard socket boxes.
Removing the overhead socket
- Turn off the voltage and check with an indicator.
- The mounting screws are unscrewed and the cover is removed.
- The power and ground wires are disconnected.
- The base of the socket is disconnected. To do this, you need to unscrew 2 fastening screws.
- The dowel is turned out and the wooden base is removed. All that remains are the wires coming out of the wall. This frees up space to prepare it for installing a hidden outlet.
When replacing a surface-mounted socket, when the wiring is under the plaster, it is advisable to hide the new socket also in the wall. For this purpose, a hammer drill with a crown equal in diameter to the socket box is used.
Drilling a hole in the wall of a house for a hidden socket
Scope of application
Retro sockets, like retro switches, are primarily a design element, so they are installed exclusively in residential premises with the appropriate design style. In non-residential premises, the use of open electrical wiring is permitted only with the use of special boxes or corrugated pipes. The aesthetic effect of a beautiful rosette is reduced to almost zero.
The use of retro sockets in the countryside or in a private country house is popular. Where there is exposed retro wiring.
It is important to know: all “antique” sockets are designed in such a way that the cable enters it at a height of approximately 10 cm. Take this into account when designing the installation. The nearest ceramic dielectric should be no more than 5 cm from the outlet
Such sockets are not installed above the baseboard, like ordinary ones - their place is at a height of 90-100 cm from the floor, where they are visible and attract attention, while remaining convenient for use.
We connect the wires and install the socket mechanism in the socket box
Remove the insulation from the wire. As a rule, the contact depth in the socket is small and is approximately 6-7 mm. We clean a little more and in place, using wire cutters or pliers, we adjust the wire to the desired size.
The unstripped part of the wire should not protrude much from the contact, no more than 2-3 mm.
Insert the wire into the contact hole and tighten it with the clamping screw. We check whether the wire is securely fixed in the contact clamp by pulling it towards you; it should not swing or wobble. If everything is normal and the wire remains motionless after checking, the contact is good.
We remember that poor contact will burn out over time and lead to premature failure of the socket.
Now, let's move on to the next wire. Also, remove the required amount of insulation and insert the stripped part into the contact clamp.
In old houses, grounding was not previously used inside apartments and houses. If it took place, then the maximum that was grounded was the input power cabinet, the so-called switchboard. There was no need to bring earth into the apartment, since there was no equipment that needed it, and the plugs on all electrical appliances were made without a grounding strip.
Perhaps you have already changed the electrical wiring or live in a new house and you have a grounding wire, then connect it to the appropriate contact.
Align horizontally and secure with spacer pads. Next, install the frame and protective plastic insert.
Expert opinion
It-Technology, Electrical power and electronics specialist
Ask questions to the “Specialist for modernization of energy generation systems”
How to add an outlet in an apartment yourself To determine what cross-section of wires you will need, to choose the right devices with the necessary parameters, and then to install it all efficiently, you need to work hard. Ask, I'm in touch!
Conditions of use
This type of sockets is designed for use in domestic conditions. The power of the connected electrical appliance should not exceed 3.5 kW ; therefore, connecting an electric hob, electric oven or water heater to such an outlet is under no circumstances allowed.
Otherwise, the functionality of retro devices is no different from standard ones. Try, if possible, to install sockets with grounding, because... If today you plan to include only a phone charger in it, then tomorrow or in a month you may need to connect something else that has a ground loop.
Comments:
Victor
To me, this is dubious beauty. I don't see anything beautiful about open wires. Moreover, it is not always possible to firmly fix an open socket on the wall. Because dowels that will be drilled are not designed for the daily kinetic load from sticking/pulling out a plug
Electronic
Belarusian socket in a brass case - really pleased