Due to the design features of a stretch ceiling, the installation of a chandelier is carried out differently than with traditional types of finishing. In addition, you will need thermal rings to protect the PVC film, and if the lighting fixture is attached through a bar, then also mortgages. Let's look at how to choose the right chandelier so as not to damage the material and look at several ways to install it on a suspended ceiling. Additionally, we will tell you what to do if the canvas is already stretched, but fastening was not provided.
A little about stretch ceilings
Constant attempts to decorate your home, as well as premises intended for receiving people (restaurants, cafes, etc.) leads to the emergence of new finishing materials. This applies to all components of the room, including the ceiling.
Many different materials are used to decorate the ceiling. One of the popular ones now is a suspended ceiling.
It is a thick film, tightly stretched over the entire area of the room.
This allows you to create a perfectly flat flow surface without any transitions or joints. It looks really beautiful.
But the film itself is not placed on the surface of the ceiling; it is fixed to a special frame fixed to the walls of the room, at a short distance from the main ceiling.
In a way, a suspended ceiling can be called a false ceiling that hides the main one.
This ceiling decoration looks aesthetically pleasing and beautiful, but there is a small nuance - the film cannot be load-bearing; trying to attach anything to it will lead to it stretching or tearing. This leads to the need to think in advance about mounting lighting equipment - chandeliers, shades, etc.
A suspended ceiling involves the installation of chandeliers, but this operation has its own characteristics, which we will describe.
So, it was decided to decorate the room with a suspended ceiling. You won’t be able to stretch the film yourself, but you can do the preparatory work to secure the chandelier.
Also read: How to find hidden wiring in the wall.
Features of choosing a chandelier for a stretch ceiling
First you need to decide on the chandelier itself. When choosing, you need to take into account several parameters to avoid problems in the future:
- You should not select chandeliers with a small height (you need to ensure a sufficient distance between the chandelier lamps and the ceiling film to avoid the possibility of sagging of the film due to the heat generated by the light bulbs);
- It is advisable that all lamps be placed in separate shades (they will additionally protect the captivity from overheating);
- It is better to choose a chandelier that uses several lamps, the more of them, the better (with a large number, even low-power lamps will provide good lighting, and they will not affect the film);
- When choosing, you should pay attention to the protective cap that will cover the wiring, as well as the chandelier fasteners (this cap needs to be large enough. This will primarily facilitate the installation of the chandelier);
- The protective cap should not have sharp edges (to avoid the possibility of cutting the film);
- You need to decide in advance on the fastening method.
Adviсe
- Begin installation only in accordance with the instructions, it is included. If you need grounding, do it.
- Come up with color markings for the wires: black or brown indicates the phase wire, blue indicates the neutral wire.
- You cannot attach metal plates to a plasterboard ceiling; they are not suitable for this.
- When you choose a dish-type lamp, choose one without a metal base; it gets very hot, and this will subsequently have a negative impact on the coating.
- It is advisable to choose models that are equipped with energy-saving lamps.
- When choosing, give preference only to those whose assembly and disassembly technology is clear and simple.
Methods for attaching a chandelier
The last point mentioned, fastening methods, is the most important for the correct installation of the chandelier on a ceiling covered with film.
Since chandeliers can have several types of fastening, you need to immediately decide on the fastening in order to carry out the preparatory work correctly.
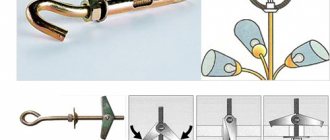
At the moment, three methods of fastening a chandelier are used.
The first - fastening to a mounting hook is the simplest and most common.
It can be used for many lighting devices and can provide both small and fairly large chandeliers.
The second method is fastening to a mounting plate. A small wooden beam is used as a mounting strip, which is attached to the main ceiling, and a chandelier is already attached to it.
Usually used for not very large chandeliers.
The last method is usually used for large chandeliers that have significant weight - mounting on a cross-shaped bar.
Tools and Supplies
For installation you will need the following tools and materials:
- screws and dowels;
- drill with drill bits for working on wood and concrete;
- pliers;
- screwdrivers - indicator, Phillips and slotted;
- wooden block;
- insulation;
- mounting gun plus staples.
Important: work related to the installation of the chandelier should be carried out when the power supply is turned off. These precautions reduce the risk of injury.
Preparatory work
Now about the preparatory work itself. They are carried out even before the film is stretched, but already with a frame mounted on the walls for it. You should immediately decide on the location of the chandelier.
If the room was already habitable, and there was a chandelier in it, there is nothing special to invent, unless, of course, a decision was made to move its location.
The selected installation location must have suitable wiring for powering the chandelier.
If it will be installed in place of the previous one, you should estimate the length of the protruding wire - it should be long enough to ensure easy connection of the chandelier.
If the installation location is moved, or the room is new and there is no wiring yet, you should ensure that the wiring is laid to the place where the chandelier is attached.
Moreover, it is not necessary to hide the wire, because it will be hidden by the film. It is only important to secure it to the main ceiling so that it does not sag.
To ensure that the base for installation does not protrude beyond the level of the film, and at the same time is not far enough from it, you need to stretch a fishing line across the entire room so that it passes through the place where the chandelier is attached.
The ends of this fishing line must be secured to the film frame, and the line itself must be taut. This will allow you to determine the position of the film after it has been stretched.
Next, the base for installation is fastened to the main ceiling. It depends on the chosen fastening method.
Installation of the mounting base
Attaching the mounting hook is, in principle, simple. It is enough to make a hole of the required diameter in the main ceiling using a hammer drill, and then screw the mounting hook itself into it.
A stretched line will allow you to correctly select the length of the hook that should protrude. The hook should not reach the fishing line by about 1-2 cm.
Installation of a base made of wooden beams is done a little differently. First you need to decide on the length of the beam itself - it should be the same length or slightly longer than the mounting metal strip that comes with the chandelier.
To secure the beam to the ceiling, a metal construction profile is used.
First, the height at which the beam will be located is measured, and the pieces of the profile required in length are cut off. There must be at least 4 of them to secure the timber.
A stretched line will help determine the level of the film. The lower edge of the beam should not reach the fishing line by 0.5-1.0 cm.
If necessary, the profile can be used as a suspension - this is if the distance from the main ceiling to the film level is significant.
Using dowels, the profile sections are attached to the main ceiling, and the timber is attached to them with self-tapping screws.
Before fixing the beam in the center, you need to make a hole in it for the wiring to come out.
After all installation work, you need to pull the wiring through the hole and secure its ends so that they do not interfere with further work.
If the fastening is using a cross-shaped mounting strip, you will need plywood with a thickness of 10-12 mm.
From it you need to cut a square, identical in size to the cross-shaped bar.
In the center of this square you need to make a hole for the wiring.
Installation of a plywood square is similar to installation of a wooden beam.
First, the position of the square is replaced, all measurements are taken and, using pieces of metal profile, the plywood is fixed to the main ceiling.
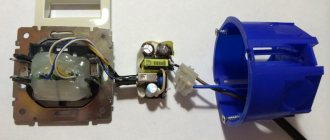
One of the mortgage options
Different types of fittings require a base of different sizes. Most often you can find a regular rectangular plate, which should be attached to the ceiling with screws.
A simple rectangular plank will require a very small mortgage, usually made from a block of wood. This type of fastener is used for most lighting fixtures.
The cross-shaped plate needs to be fixed with several screws, and the base needs a larger one. This type of fittings is used for round, square and oval lamps. Basically, these models are quite massive, so the strength of the prepared site must be appropriate.
After installing the mortgages, you should mark on the canvas the points where the screws will be screwed in. These places must be reinforced with pads or O-rings, otherwise the film will tear.
Many houses already have plasterboard structures installed, which you don’t want to give up. They are often combined with “soft” coatings. Together, these two types of finishes harmonize perfectly.
But if several light sources are planned, one of which will be located on a gypsum sheet, the same set of preparatory work will be required as with stretched ceilings.
Important: plasterboard ceiling is not suitable as a base. Heavy lighting fixtures cannot be attached to it.
When these operations are successfully completed, you can stretch the PVC film.
Important: the height of the embedded structure must exactly correspond to the plane of the stretched fabric or film.
If you do not pay enough attention to this point, the result may not be satisfactory.
Attaching the chandelier to a hook
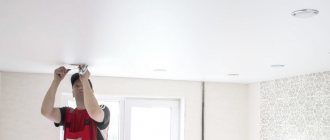
The first step is to find the location of the hook. You can press lightly on the film to find the hook.
You need to glue a heat-resistant ring to the place where it is located. Its diameter must be selected depending on the size of the hole that will be needed to access the mounting platform.
During further work, it will not damage the film sheet.
The ring is glued with superglue, and you need to make sure that the glue is on the entire surface of the ring, which will be pressed against the film.
Omissions are unacceptable, as they can lead to tearing of the fabric.
After gluing the ring, you need to check the tightness of its fit. Then, using a construction knife, a hole is cut in the film to access the hook.
The wiring is pulled out through the hole. Afterwards the chandelier is hooked onto the hook and the wiring is connected. The sagging wire is hidden under the film.
All that remains is to lift the protective cap to hide the hole and fasteners of the chandelier.
Connecting the lamp to the electrical network
When the fasteners are prepared, the chandelier needs to be connected to the network. Using a pre-made hole, the wires are pulled out through the thermal ring. The lamp is hung on a bar or hook to free your hands, and the wiring is connected.
The wires are connected according to the chandelier manufacturer's instructions, the lamps are screwed into the shades and the functionality of the device is checked. If it functions properly, proceed to insulating the wiring and securing the lamp. This work is performed with the power supply turned off.
Having twisted the wires, they are placed in a corrugation and the glass of the device is secured. Using decorative bolts, begin to adjust the clamp of the chandelier and the density of its contact with the ceiling surface.
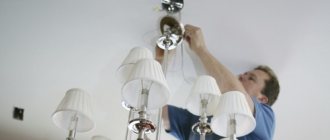
Installing a chandelier on a mounting plate
Installing a chandelier on a beam is done a little differently. First you need to find the location of the timber, and stick a heat-resistant ring in this place.
In this case, its diameter should be such as to ensure ease of access to the beam, but it should not be larger than the size of the protective cap.
Then the mounting strip of the chandelier is secured to the beam using self-tapping screws. When tightening the screws, it is important not to press them in completely so as not to bend the plate.
Next, the wiring is connected, and then the chandelier itself is attached to the mounting plate.
All that remains is to hide the wiring and cover the hole with a protective cap.
Using the D-pad
For a heavy ceiling lamp, the method using a cross is more suitable. In this case, make five holes in the ceiling at once using thermal rings. Four of them are intended for the crosspiece, one for the chandelier. The crosspiece is installed when attaching the frame, after which the ceiling is stretched. The wires are pulled through the cut hole. The chandelier is mounted on a crosspiece, the connection is closed with a cap, which is secured with decorative nuts. You can also use an I-plate to install the lamp.
After installing the chandelier, you need to connect the electricity. If installed correctly, all the lamps light up, otherwise a mistake was made somewhere. Usually everything works out right away, since installing the lamp is not difficult. Sometimes when buying a new chandelier, it turns out that its cap is smaller than the old one. In this case, a decorative overlay helps.
The main thing when installing a ceiling lamp is accuracy and lack of haste. It is better not to save money and use energy-saving lamps that last a long time and do not heat the surface. This will help preserve the coating and increase its service life.