LED spotlights appeared relatively recently. They are especially actively used in the installation of street lighting. Cheap Chinese products are available to almost every owner of a private home. These lighting devices are actually efficient, the glow is even and bright, and energy is saved.
The composition of the driver circuit for a 50 W spotlight does not differ from the circuits of low-power lighting devices. The main difference is the replacement of COB diodes with SMD LEDs, which allow for better removal of excess heat. With a minimum of electrical knowledge, a faulty spotlight can be repaired. Some craftsmen make such devices with their own hands and claim that they managed to save money.
LEDs for LED drivers
I couldn't decide on LEDs.
They are the same in both modules, although their manufacturers are different. There are no inscriptions on the LEDs (on the reverse side either). I searched from different sellers under the line “Ultra-bright LEDs for LED spotlights and LED chandeliers.” They sell a bunch of different LEDs there, but all of them are either without lenses or with lenses at 60º, 90º and 120º. YF-053 CREE LED
I have never met one similar in appearance to mine.
Actually, both modules have the same malfunction - partial or complete degradation of the LED crystals. I think the reason is the maximum current from the drivers, set by the manufacturers (Chinese) for marketing purposes. Like, look how bright our chandeliers are. And the fact that they shine for at most 10 hours does not bother them.
If there are complaints from buyers, they can always answer that the spotlights are out of order due to shaking, because such “chandeliers” are mainly bought by the owners of jeeps, and they drive not only on the highway.
If I can find LEDs, I will reduce the driver current until the brightness of the LEDs noticeably decreases.
It is better to look for LEDs on AliExpress, there is a large selection there. But this is roulette, depending on your luck.
Datasheets (technical information) for some high-power LEDs will be at the end of the article.
I think the main thing for long-term operation of LEDs is not to chase brightness, but to set the optimal operating current.
See you later, Sergey.
PS I have been a fan of electronics since 1970, when I assembled my first detector receiver during a physics lesson.
Circuit boards and radiators installed in the floodlight housing
The last thing we have to look at today is the heat sink.
The efficiency of any LED light source is an order of magnitude greater than that of incandescent lamps. The temperature regime of the LN is about 200 degrees Celsius. In LEDs - no more than 100-150, depending on the type. The temperature of the lighting fixtures should not exceed 80 degrees, which will minimize the process of degradation of LED crystals.
To reduce the operating temperature of the LEDs, the floodlight device has a circuit board and a heatsink. Previously, boards were made of aluminum. Currently, the technology for producing boards based on ceramic-aluminum materials is being developed. This allows you to obtain not only a good electrical connection, but also a fairly effective heat dissipation. When installing diodes on a board, it is necessary to generously lubricate the junction of the chips with the board with thermal conductive paste.
There is a misconception that a circuit board made of aluminum can handle the heat on its own. This is not true. An additional heat sink in any LED light source is simply necessary. For spotlights and lamps, this is a radiator. Each manufacturer has its own developments. Radiators are shaped like circles, balls, rectangles, etc. and so on. There are good examples of floodlights - with additional artificial cooling - a fan. These include sources with a power of 100 W or more. In such designs, coolers are more than desirable.
In general, radiators are a rather sensitive topic. And someday I will definitely devote a large article to this. In the meantime, I bow...)
Operating principle of LED lamp
LEDs are the most economical type of lighting – it’s hard to argue with that. Such elements are used both in everyday life and in production. Street lighting is gradually moving towards similar energy savings. Light diodes, in addition to being economical, have another undeniable advantage over other types of lighting devices - they have no competitors in terms of durability. But they cannot work directly from a 220 V AC network. This requires special devices called a driver.
The circuit of a 220 V LED lamp includes a device that is quite compact and fits in the base. There is nothing else complicated about the lighting device, but the driver, while doing the job of stabilizing the voltage, more often fails. It’s not difficult to replace burnt-out LEDs; it’s enough to use a soldering iron at the “just learned” level. But today we will figure out how to repair drivers.
Components of an LED lamp: schematic illustration
The general principle of operation of LED lamps is as follows. The alternating current of the network enters an electronic device - a driver, which stabilizes voltage drops. Direct current is sent to the LEDs, which produce the light we see.
Related article:
Electrical connection
To connect most lighting devices to a single-phase 220 V network, they are equipped with three terminals:
- phase (denoted by L);
- neutral conductor (N);
- grounding conductor ().
Video on the topic:
Obviously, the connection must be made using an electrical network with TNS neutral mode. The peculiarity of this mode is that it consists of phase conductors, neutral (N) and protective (PE). In this case, the connection diagram for an LED spotlight with three wires is simple - phase conductor to phase, neutral to neutral, grounding to PE. The same applies to the TNC-S system. In it, the neutral and protective conductors are separated at a certain point, usually at the entrance to the building. But many networks are made according to the outdated TNC scheme, where the neutral and protective conductors are combined.
In accordance with the rules, in these networks it is necessary to use lighting devices that do not require grounding. Such devices include devices with the following protection class:
- 0 – protection is provided by one layer of insulation, the least safe option;
- II – devices with double or reinforced insulation are noticeably more expensive;
- III - devices powered by ultra-low safe voltage (below 50 V AC), they are beyond the scope of this article.
Important! The protection class of an electrical appliance can be determined by its passport, technical specifications or markings:
In class II devices, safety is ensured by the presence of protective grounding, and their use in a TNC network without grounding is contrary to the rules and can lead to dire consequences if the main insulation is broken and voltage appears on the luminaire body. It is also contrary to the PUE to connect the grounding terminal to the working neutral conductor (N, PEN).
Download and buy
Here are the datasheets (technical information) for some high-power LEDs:
• led datasheet 4.8W- / Technical information on high-power LEDs for headlights and spotlights, pdf, 689.35 kB, downloaded: 711 times./
• led datasheet 10W / Technical information on high-power LEDs for headlights and spotlights, pdf, 1.82 MB, downloaded: 888 times./
Special thanks to those who send circuits of real LED drivers for the collection. I will publish them in this article.
With the advent of LED technology, lighting systems have reached a whole new level. Economical, environmentally and electrically safe devices are used everywhere today - they have replaced the standard “Ilyich lamps” and the “housekeepers” that have gained popularity. The former have long been outdated from a moral point of view, the latter are extremely dangerous to health due to the mercury vapor contained inside.
Despite their long service life, even such devices fail over time. In some situations, expensive repairs of LED lamps can be done independently, at home, which we will consider further.
LED spotlight driver repair
When repairing an LED spotlight driver, you will need to pay attention to all the elements that are present in the circuit. It must produce certain DC voltage values, which are used to power the installed diodes
When repairing this system, pay attention to the power parts that have radiators. This is due to the fact that with poor cooling, certain driver elements can quickly fail and need to be replaced with new and better ones. In this case, the connection and dimmer circuit are useful, which will save time on this procedure.
Electrical circuit of the driver.Replacing parts
Replacement parts can be found at stores that sell LED equipment. You need to choose according to technical parameters, but you also need to control the installation dimensions. It may turn out that there is a driver on sale that is suitable in terms of technical characteristics, but not suitable in terms of installation dimensions and dimensions. In this case, it is necessary to evaluate the possibility of installation in an existing case and, if possible, drill additional holes for mounting.
You can also purchase spare parts via the Internet, in Russian and foreign stores. If a keyword search does not produce the desired result (especially for light-emitting matrices), then some Chinese trading platforms have a photo search function. In some cases this method works.
You can also use the same type of lamps that are out of order as donors. From 2-3 faulty spotlights you can often assemble one working one.
LED spotlight driver repair
When repairing an LED spotlight driver, you will need to pay attention to all the elements that are present in the circuit. It must produce certain DC voltage values, which are used to power the installed diodes
When repairing this system, pay attention to the power parts that have radiators. This is due to the fact that with poor cooling, certain driver elements can quickly fail and need to be replaced with new and better ones. In this case, the connection and dimmer circuit are useful, which will save time on this procedure.
Electrical circuit of the driver.
Driver circuits
When repairing LED spotlight drivers, you need to know its structure. The driver design includes a diode bridge, resistors and capacitors. The diode bridge serves to rectify the electric current, which is then stabilized by resistors and capacitors.
Here are some simple driver circuit diagrams. The diagrams are provided for a visual description of the operating principle and may differ from those installed in other devices.
But LED floodlights use drivers with more complex circuits that provide better performance.
Example of a switching driver circuit
Circuits with capacitors to reduce voltage
To create the optimal voltage for operation of a device using diodes, the driver is assembled based on a circuit with a capacitor or a step-down transformer. The first option is cheaper, the second is used to equip high-power lamps.
There is a third type - inverter circuits, which are implemented either for assembling dimmable lamps, or for devices with a large number of diodes.
Let's consider an example involving a capacitor, since such circuits are common in household lamps.
Elementary circuit of an LED lamp driver. The main elements that dampen the voltage are capacitors (C2, C3), but resistor R1 also performs the same function
Capacitor C1 protects against power line interference, and C4 smoothes out ripples. At the moment the current is supplied, two resistors - R2 and R3 - limit it and at the same time protect it from a short circuit, and the VD1 element converts alternating voltage.
When the current supply stops, the capacitor is discharged using resistor R4. By the way, R2, R3 and R4 are not used by all manufacturers of LED products.
Disadvantages of a circuit with capacitors:
- The diodes may burn out, since the current supply is not stable. The load voltage is completely dependent on the supply voltage.
- There is no galvanic isolation, so there is a risk of electric shock. It is not recommended to touch current-carrying elements when disassembling lamps, as they are under phase.
- It is almost impossible to achieve high glow currents, because this will require an increase in capacitor capacities.
However, there are also many advantages, which is why capacitors remain popular. The advantages are ease of assembly, wide range of output voltages and low cost.
You can safely experiment with making it yourself, especially since some of the parts can be found in old receivers or televisions.
Useful tips
Some useful tips for repairing LED floodlights:
When replacing the matrix, be sure to pay attention to the polarity. Be sure to remove the hardened heat-conducting paste under the matrix. The surface should be degreased with alcohol. When soldering, you do not need to overheat the surface. Soldering time - up to 2 seconds
If the matrix is overheated, the crystals will be destroyed or their new characteristics will not allow the spotlight to function normally.
- To repair a high-power spotlight, the knowledge used in repairing low-power lamps is sufficient. There are no special differences between devices of different power.
- If a matrix with a large number of diodes is not filled with a compound solution, the non-working diode will need to be replaced. To perform this operation, a micro-soldering iron is required. You need to work carefully so as not to overheat the crystals.
- If it is impossible to see the values on the burnt-out resistances, you cannot do without the instructions for the spotlight. It must contain the relevant data.
Anyone can fix a spotlight. However, to perform repair work, at least basic knowledge of electrical engineering is required, as well as skills in using a soldering iron and a multimeter. You also need the ability to read diagrams to understand the design of the spotlight.
Required tools and materials
To connect the lamp you will need the usual electrical tools:
- wire cutters for cutting power cables;
- installer's knife for stripping cable sections;
- a screwdriver for connecting the wire ends to the terminals.
Electrical wire cutters.
This is enough to make the connection. But a professional would also advise:
- special insulation stripper;
- lugs for wires of the appropriate diameter and crimping tool.
If the installation is carried out with multi-core wire, it is a good idea to tin the stripped areas - a soldering iron is useful for this.
And, of course, you need an electrical cable of the appropriate cross-section. For a voltage of 220 V, it can be selected from the table in accordance with the power of the spotlight:
| Conductor cross-section, sq. mm | 1 | 1,5 | 2,5 | 4 |
| Load power for copper conductor, W | 3000 | 3300 | 4600 | 5900 |
| Load power for aluminum conductor, W | — | — | 3500 | 4600 |
Important! When choosing a cable, you must take into account the power consumption of the lamp, and not the equivalent power (corresponding to the power of an incandescent lamp).
The reason for the burnout of the LED matrix in the spotlight
There are 2 types of LEDs for spotlights:
- SOD matrices, which may include several hundred one-watt crystals filled with phosphor;
- clusters of ultra-bright SMDs with a power of 0.5
The price of SOD modules is 30-40% lower than clusters with SMD, and their service life is 3-4 years shorter. The elements of the SOD matrix are connected into lines using thin wires, which break when overheated. SMDs have the same parameters, are soldered separately, and provide more even and powerful lighting.
The matrix (cluster) can fail for various reasons:
- poor-quality connections from the input to the power supply or from the driver to the LED module, causing a short circuit;
- in a powerful flashlight, the thermal balance is disturbed, the phosphor degrades, the connecting wires break, the crystals burn out;
- in the SOD cluster the contact pads are poorly soldered; if the contact is broken by one crystal, the entire circuit stops working;
- poor quality of the housing or the absence of a composition under the matrix that removes excess heat.
The worst thing is if the connecting wire has not completely burned out. The 50 W LED lamp begins to blink, due to the increased current on the working lines, serviceable crystals begin to collapse. Theoretically, this could continue until the last line fails. In practice, overvoltage protection is triggered.
Low-quality cases are found mainly in products from Chinese manufacturers. The production uses an aluminum alloy, part of the body near the radiator is not polished, and thermal conductive paste is not applied to the entire area of the matrix. The diode module is not pressed tightly to the body, the crystals burn out due to too high a temperature.
Causes of malfunctions
The cause of the malfunction is:
- violations of assembly rules at the factory (for example, lack of heat-conducting paste under the LED module);
- incorrect connection;
- voltage drops in the electrical network;
- phase short circuit to zero or housing;
- overheat;
- ingress of water or dirt;
- incorrect setting of the motion sensor (if available);
- violations of operating rules.
If there is at least one reason, the power supply fails (a resistor or capacitor burns out), the LED module or its individual elements. If there is no repair, the lamp cannot function normally.
What to do if the LED lamp is broken
These days, there is a huge amount of lighting equipment on store shelves made using diodes. The cost has become affordable, moreover, there are many cheap options. For all their advantages, they are unreliable and fail very often, especially if there are power surges and power outages.
Often faulty parts can be found by simple visual inspection.
After a breakdown, first check the equipment. If there are traces of melting on it, most likely it will not be possible to repair it. Also, products with physical damage cannot be restored. If they are dropped or broken, it is easier to throw away the lamp than to repair it
It is important to turn off the lamp or chandelier at the first sign of malfunction, in this case the likelihood of a successful repair is many times higher
Can it be repaired at home?
Repairing LED lamps and lamps is not a difficult job if you understand the design features. The process is simplified by the fact that the device for all varieties is the same, they consist of the same components:
- Lamp body. The load-bearing part of the structure, which contains all the main parts. It can come in different shapes and sizes, it all depends on the model. It is most often made of plastic, but can also be metal. If we talk about light bulbs, then there is a base made of ceramic, heat-resistant plastic or metal. There are different types of socles, it all depends on the standard.
- Driver. The main working unit, which is responsible for power supply, compensates for voltage surges and converts alternating current into direct current, supplying it to the LEDs. There are two options - capacitor, which are cheaper and are used in budget models, and electronic, which are more reliable, but more expensive. The equipment is designed for temperatures from -40 to +70°C, has good efficiency, but at the same time is the most vulnerable part of the structure.
- Circuit board. It contains LEDs and other necessary working units. Most often it is made of aluminum - a durable material that removes excess heat well.
- Diodes provide luminous flux. The more of them are installed on the board, the brighter the lamp or light bulb. The most common types are SOV and SMD chips.
- Wires go from the driver to the light bulbs; they can be soldered or connected with terminals. Depending on the brand of the lamp and the functions available to it, one light bulb can have from 1 to 12 wires.
- If the chandelier is remote controlled, it will contain an antenna, a control unit, a voltage regulator and modules responsible for automatically configuring the equipment.
Typical design of an LED lamp with a control panel.
Contents may vary. For example, transformerless capacitor-type power supplies are used in cheap lamps. They serve as a current and voltage limiter. Ideally, it is better to find instructions with a diagram of the lamp, usually it is on the packaging or insert leaflet.
What else is worth paying attention to?
The LED spotlight must be convenient for use in the conditions for which it is purchased.
Additional functionality
The presence of special options makes the LED floodlight more comfortable to use. For example, a motion sensor will only turn on the light if there are people nearby. This will significantly save energy consumption. The presence of a light sensor will allow you to automate lighting based on the time of day. The user can program the device to turn on after dark or at a specific time.
Number of LEDs
The number of light-emitting elements is also of great importance. Single LED models have limited brightness and illumination area. At the same time, they are reliable and durable. Such spotlights are great for illuminating a suburban area, garden, swimming pool or other small area.
LED spotlights with multiple LEDs are characterized by increased light output. A group of diodes installed on the matrix is capable of generating an extremely bright directional beam. Also, such spotlights have a wider dispersion angle, which makes them an excellent choice for illuminating large areas.
Nutrition
LED spotlights are either stationary or portable. This criterion determines not only the dimensions of the device, but also its power source:
- Electrical network. Direct connection to wiring is used for stationary LED spotlights. The devices are mounted on a support, ceiling or wall. Their cable connects directly to the electrical network. Such models are ideal for creating a constant source of directional light, for example, in a parking lot, courtyard or stadium.
- Battery. The built-in battery is used in mobile LED spotlights. The device can be powered by a battery or connected to an outlet. Portable models allow you to create temporary illumination of zones during a power outage. They are also great for hiking, camping, or outdoor recreation.
As you can see, the variety of models allows you to purchase an LED spotlight for any purpose and purpose. If the device is needed for domestic use, it is enough to determine the power source, dimensions and characteristics of the light, taking into account personal preferences. However, if a floodlight is purchased for a public, industrial or other facility, it is important that its parameters meet the requirements of the project and industry standards.
The Emitter catalog presents a wide selection of LED spotlights for different purposes. You can also always contact our managers - they will be happy to advise you and help you choose the optimal lighting fixtures for your needs.
Checking and developing a LED matrix connection diagram
When connecting the matrix installed on a massive radiator to a 220 V network, it lit up, the current consumption was about 45 mA, which corresponded to the power declared by the seller. But with a frequency of 100 Hz they were large. After all, there was no electrolytic capacitor in the matrix.
Such a spotlight is suitable for street lighting, but I planned to use it to illuminate objects when photographing, where a minimum pulsation coefficient of the light flux is needed.
As you know, LEDs operate on constant voltage, and when connected to alternating voltage, a rectifier bridge is installed at the input in the electrical circuit of any driver.
Based on this, I decided to try to power the LED matrix with a constant voltage. For this, a driver was used on a current-limiting capacitor (it was soldered off and the contact pads were closed) of an LED lamp and a capacitor with a capacity of 150 μF for a voltage of 400 V.
Tests confirmed the correctness of the idea. The matrix lit up with a bright, even light. The check showed its complete absence. All that remains is to place all the parts in the spotlight body.
Measuring the operating temperature of LEDs
Although the body of the spotlight was slightly heated to the touch, the question was raised about the possible overheating of the LED matrix due to the threefold increase in power supplied to it. Therefore, I decided to measure the temperature of its substrate.
To do this, a multimeter thermocouple was inserted into the remaining wire hole in the spotlight housing leading to the matrix substrate.
The back cover was attached to the body. The spotlight is turned on in the position with the least amount of air flow around it, with the emitting side of the light placed on a horizontal plane. After half an hour of operation of the spotlight, the temperature stopped increasing and reached 60°C at an ambient temperature of 21°C. The overheating of the matrix was 39° degrees.
According to the technical documentation, the service life of LED matrices when the substrate is heated to 60°C, and the crystals to 80°C is 50,000 hours.
Consequently, we can conclude that the design of the ten-watt LED matrix under study with a built-in driver and the overall dimensions of the spotlight body make it possible, with high-quality installation of the matrix, to ensure a safe thermal regime for its operation.
LED spotlight design and typical faults
LED floodlights are considered devices that combine high levels of operational efficiency and cost-effectiveness. These products have a long service life, but sometimes require qualified repairs. To ensure quality repairs, it is recommended to contact specialized workshops staffed by qualified and experienced specialists. This spotlight is a bright lighting device that consists of certain parts and elements, some of them are:
- Special LEDs that are capable of emitting light.
- Special drivers.
- Frame.
- An effective diffuser that significantly increases the efficiency of the device.
- Lenses.
LED spotlight device.
A frequent breakdown associated with the presented device is driver failure. Due to such malfunctions, a lighting device quickly loses brightness and burns out over time, because the quality of heat transfer to the atmosphere decreases. This problem is typical for inexpensive products. Combustion or unclear operation of the driver is a common problem that often occurs among manufacturers who skimp on installing high-quality radiators.
Improvement of LED elements
After you have repaired the LED spotlight and made sure it is working, you can improve the device a little. In some devices that normally operate under 220 Volt power conditions, a rectifier and stabilizer are not usually installed. When performing repairs yourself, such devices are very easy to install. To do this, you should connect pairs of LED sources in series, which are switched on oppositely, and attach a ballast capacitor to them.
Frequent problems with lighting at home involuntarily require troubleshooting yourself. Agree, regularly inviting a specialist to bring an LED or any other type of device into working order is quite inconvenient. To avoid such discomfort, we suggest you learn the basics on how to repair LED spotlights yourself.
LED spotlight device
You should know that the design of any LED spotlight consists of two main parts: the LED matrix and the driver. The Matrix is a source of light. The spotlight can have one or more matrices installed, which can consist of several LEDs. Another important part of the spotlight is the driver, or power supply.
LED spotlight device
Driver for LED spotlight
LED matrix
Accordingly, repairing a faulty LED spotlight will involve identifying the faulty part and replacing it with another that matches the parameters.
From the current source, power is supplied to the driver electronic board, where the electric current is converted and then supplied to the matrix, which emits light.
In addition to the matrix and driver, the LED spotlight device may include:
- A radiator used to remove heat.
- A reflector, lens or mirror that serves to focus a light beam.
- Devices for mounting the spotlight.
Photo of Navigator floodlight, 50 W
And finally - the Navigator floodlight with a power of 50 W.
LED floodlight Navigator, 50 W. Front view with glass removed
Please note that instead of a matrix, a plate with discrete (single) LEDs soldered on it is used.
Once, at the dawn of such spotlights, I tried to replace a couple of such diodes in an array. It didn’t help - some burned out, others shone very dimly. Because the parameters must be strictly the same!
LED floodlight Navigator, 50 W. LEDs – 90 discrete diodes
In theory, the power of each is a little more than 0.5 W.
LED floodlight Navigator, 50 W. Driver. GT503F board
LED floodlight Navigator, 50 W. Driver. View from the soldering side
LED floodlight Navigator, 50 W. Driver. Chip – MT 7930
Continued – how to repair LED spotlights >>>
I also recommend an interesting video on the construction of a spotlight from my colleague Dmitry:
That's all for today, good luck everyone!
Eliminating flickering LED spotlights
Flashing is the most common malfunction of LED spotlights. They flicker on and off, in cold weather and when overheated.
The reason may be:
- Motion Sensor;
- freezing of the starting capacitor or controller;
- broken wiring or poor contact in the connection;
- incorrect connection of the illuminated switch;
- malfunction of driver elements;
- matrix malfunction.
Motion sensors require settings; without them, the LED spotlight cannot work for more than a few seconds. The lighting device also blinks if there is poor contact in the wire connections between it and the sensor. Do-it-yourself repairs involve securing the connections. If the motion sensor is faulty, it needs to be replaced.
If the spotlight blinks while on, you need to check the starting capacitor. Flickering in the off state indicates that current is supplied to the spotlight through the backlit switch. There is not enough power to turn on, so the device blinks. Do-it-yourself repair - connecting the backlight directly.
Information before the manufacturing process
Before you start assembling your homemade floodlight, you need to know a little about the light source, power source (LED driver and power supply) and the device body
About the light source
The light source is LEDs, of which there are three main types:
- Plastic capsule with pin terminals (the simplest, cheapest and most popular diodes, they are suitable for the manufacture of low-power spotlights, they are inexpensive, easy to work with and easy to repair, but their glow intensity is very low, their service life depends on the manufacturer)
- Ultra-bright white on a metal substrate (used in the manufacture of powerful lighting equipment, they have a simple and effective heat dissipation system, and they also have a relatively low cost)
- LED-light emitting diodes in matrices (this type of LEDs is used in the manufacture of professional high-power lighting equipment; they do not have a heat dissipation system, so a cooling radiator is required to manufacture a spotlight with them)
I’ll give you some advice - buy more spare diodes, about 10 of them.
Even craftsmen often install diodes incorrectly, so having a supply of diodes at home will be a plus, because you won’t have to constantly go to the store.
Source robostore.com.ua
About the case
You can order a housing for a homemade spotlight on the Internet; they are inexpensive.
You can also use an old halogen lamp, in which case you will not need foil, because the reflector will already be present in the housing
Or, as a last resort, you can make the housing for the spotlight yourself.
However, such a case, firstly, will not be as aesthetically pleasing as ready-made designs, and secondly, the degree of protection of the device from moisture, dust, and dirt will be much lower than that of factory ones.
Source mastergrad.com
Power supply
LED driver.
The light source of the spotlight (LEDs) does not need high voltage (220 volts will not work); about 3.2-12 volts are enough for them.
If you apply more voltage, you will most likely simply burn out the equipment.
Therefore, household power supplies are not suitable here - you need an LED driver that will supply a pulsating stable current to the device.
In principle, almost every LED lighting system can use an LED driver from interior lighting systems or a driver from LED strips.
However, you can buy it in specialized electrical goods stores or order it online.
Source evrosvet.com.ua
Power unit.
For low-power spotlights, you can use a standard household power supply with an output pulsating current of 0.5-1.5 amperes.
The block voltage should be several volts higher than the diode voltage.
To stabilize the current, use LM317 and similar microcircuits, and if you are assembling a high-power spotlight, then LM350 and LM338 circuits are suitable.
Types of spotlights by light source
Depending on the light source used, floodlights are divided into four main types. They come in halogen, sodium, LED and metal halide. More details about each type:
- In the first, a halogen lamp is used as a light source. In essence, we are talking about an improved incandescent lamp. The differences are associated with the internal cavity of the flask, which is filled with an inert gas, which increases the glow and service life.
- Sodium floodlights are powered by a gas-discharge lamp. Unlike the first type, the flask does not contain inert gases, but sodium vapor that emits light.
- Metal halide lamps differ from halogen lamps in the use of a gas-discharge lamp, higher brightness and more complex design, supplemented by an ignition unit. Special operating rules must be observed.
- LED spotlights operate on a matrix with LED diodes. Unlike others, they are more compact and durable.
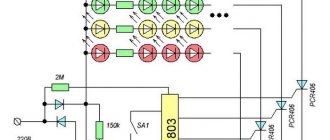
Electrical circuit of the LED spotlight driver
The composition of the LED spotlight driver circuit is practically independent of power.
The power supply consists of:
- fuse (input);
- LC filter;
- diode bridge;
- electrolytic capacitor;
- current limiting resistors;
- zener diode;
- transformer;
- diode;
- field effect transistor;
- resistors at the junction with the matrix.
The LC filter consists of zero-resistance capacitors and inductors. Its purpose is to delay currents of one frequency and pass/extinguish currents of another. After filtering, the flow rectifies the diode bridge and smoothes the capacitor. The voltage at its output is constant.
The zener diode is designed to supply 9 volt power to LEDs, therefore it is the main element of the driver.
From the electrolytic capacitor at the input, current (except for resistors) also flows to the transformer. When current appears on the primary winding, voltage is generated on the second. It is rectified by a diode and smoothed by a capacitor. Next, the current is transmitted to the field-effect transistor (in the form of pulses with high frequency) with a resistance close to zero. The electric current characteristics for diodes are determined by resistors.
The driver delivers the power it is designed for. If you buy a cheap 50-watt LED lamp, during operation it can produce only 30-40 W. It often turns out that there are not enough elements in the circuit. Without them, the equipment cannot operate stably.
Chinese manufacturers use low quality components. As a result, the capacitors and diodes that make up the bridge at the input and high-frequency diodes at the output “swell.” If the zener diode fails, the diodes stop functioning.
A budget option
Today on the market you can find products from several branded manufacturers. The companies Philips, Osram, and Hyundai have long established themselves, but the products of Feron, Luna, and Jazzway are practically not inferior to them.
There are also domestic options, which are much better than cheap Chinese products with inflated parameters according to the passport. We bring to your attention a review of inexpensive 50 W floodlights from three different manufacturers:
| Name | Foton FL-LED MATRIX | FERON LL-133 1LED | IEK |
| Luminous flux, lm | 4000 | 4700 | 4000 |
| Color temperature, K | 4200 | 4000 | 4200 |
| Degree of protection (IP) | IP65 | IP65 | IP65 |
The degree of protection indicates that such options can be used outdoors. The cost of each of the listed spotlights does not exceed 2,500 rubles. The actual value of the luminous flux is lower, but not more than 5-10%. The operating temperature range everywhere is from -40 to +60 degrees. Celsius. Still, it is worth paying attention to the radiator - if it is small, then it is not recommended to turn on the device on a hot summer day.
An LED spotlight is a universal lighting device used in many areas of life. More expensive models can be used in almost any conditions. They are characterized by high-quality luminous flux, minimal energy consumption and no need for constant maintenance during the entire service life. If possible, you should buy devices from branded manufacturers. But there are also decent options among lesser-known companies!
Electrical specifics of the spotlight
Before starting assembly, it is necessary to clarify the electronics features of the LED-based floodlight. This will help to perform the work correctly and eliminate the impact of high temperatures on the active zone of the device. The fact is that solid-state semiconductors are highly sensitive to such changes, which causes their degradation and loss of dopants. Ultimately, a critical increase in temperature (from +60 degrees) causes a decrease in lighting intensity or complete breakdown.
The design of a simple LED includes the following components:
- anode;
- cathode;
- lens and crystal;
- conductor.
A high-power LED includes a conductor, a heat sink, a crystal, a lens, and a cathode. It must be remembered that the power of the diode increases the risk of its premature wear due to overheating
When creating a homemade product, it is important to provide a good heat removal system, correctly divide the emitter into several parts and install them correctly (in series or in parallel). In simple spotlights you can make only 1 emitting element
It is equally important to stabilize the network in terms of current, otherwise overheating cannot be avoided. The current must be regulated by the applied voltage and limited by resistors on the diodes
When creating a circuit for an LED device, a strict calculation is made: if the voltage is exceeded, the LEDs will soon deteriorate, and if the voltage is too low, they will shine dimly.
Heavy Duty COB LEDs for Floodlights
For 2015-2016, floodlights based on such diodes received great preference among buyers.
And this is not only because of the cheapness of the chips, but also mostly because you can easily “stuff” several crystals into one such diode and get 10, 20, 30, 50 watts or more. Up to 500 W! There are already such diodes. I didn’t “torture” them, but I think there must be terrible problems with the heat sink. Structurally, SOB diodes also have big differences. From round, oval, to rectangular and square. From 9 to several dozen crystals are placed in one case and filled with phosphor.
High-quality LED spotlights differ from cheap ones because they have good chips. On good ones, the board consists of a copper alloy or materials with increased thermal conductivity. This makes it possible to obtain up to 0.5 K/W. This allows for efficient heat dissipation. Floodlights with a power of 10, 20, 30 and 50 W have become very popular using COB diodes.
Service life of a repaired lamp
How long will such a light bulb with a “shunted” LED last?
Everything will depend on two factors. Firstly, what is the voltage in your network (normal, high (>230V) or low).
Secondly, where is this light bulb located? If this is a corridor, toilet, utility room, barn, etc., where it is turned on for a short time, then the lamp can easily last for several months.
If this is a living room, bedroom, kitchen, then we are talking about a much shorter period.
It is believed that the missing element will cause an increase in current in the entire circuit. Which is often what actually happens.
And this already leads to the sequential failure of the remaining LEDs one after another.
But if the driver in the lamp is made of high quality and has a good pulse current stabilizer, then the operation of the lamp will be maintained for a very long time.
Here is a visual comparison of the current strength in a “shunted” lamp...
and in a lamp, where instead of a burnt-out LED, several additional resistors were soldered in, which were precisely supposed to reduce the current.
As you can see, there is practically no difference. Do you think it’s worth bothering with this and worrying about a shorter service life?
But again, we repeat, this is only if you have a good driver.
With the classic cheap power supply circuit for an LED lamp using a quenching capacitor, the service life is reduced significantly.
Current stabilization in such lamps is very conditional.
Features of Chinese
Many people like to buy from the largest Chinese bazaar, Aliexpress. prices and assortment are good. LED driver is most often chosen due to its low cost and good performance.
But with the rise in the dollar exchange rate, it became unprofitable to buy from the Chinese, the cost became equal to the Russian one, and there was no guarantee or possibility of exchange. For cheap electronics, the characteristics are always overestimated. For example, if the power specified is 50 watts, at best this is the maximum short-term power, not constant. The nominal will be 35W - 40W.
In addition, they save a lot on the filling to reduce the price. In some places there are not enough elements that ensure stable operation. The cheapest components are used, with a short service life and low quality, so the defect rate is relatively high. As a rule, components operate at the limit of their parameters, without any reserve.
If the manufacturer is not listed, then he does not have to be responsible for the quality and no review will be written about his product. And the same product is produced by several factories in different configurations. For good products, the brand must be indicated, which means that he is not afraid to be responsible for the quality of his products.
One of the best is the MeanWell brand, which values the quality of its products and does not produce junk.
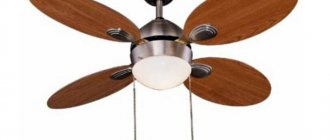
DIY chandelier repair
There are actually only two faults in such chandeliers, and both can be fixed with your own hands, now I’ll tell you how.
A chandelier with a remote control does not turn on using the remote control or switch
This is the most common malfunction - the chandelier does not turn on at all. We must first check the obvious - the batteries in the remote control and the power supply to the chandelier. The switch may be faulty or there is no contact on the ceiling.
Then act according to the circumstances. Often, if there is power, but the entire chandelier does not turn on, the controller (receiver) is faulty. If it’s part, you need to look at the lighting groups.
Chandelier with remote control clicks but does not turn on
Clicks when trying to turn on from the remote control or from the switch indicate that most likely the chandelier controller is working. As a rule, not all groups are included at once, but only one or two.
Repair often comes down to replacing the control panel complete with receiver, controller, electronic transformers and is not particularly different from the repair of other chandeliers.
A couple of things to renovate
It also happens that when one group in a chandelier does not turn on, the problem is in the LEDs connected in series. If a break occurs in one of them, then all of them do not burn.
In addition, I would like to warn against installing overly powerful halogen lamps. This will either burn out the transformer or the cartridges. And changing cartridges in such chandeliers is the most difficult thing to repair.
Changing the controller often is expensive, difficult and not particularly necessary. In this case, I suggest removing the chandelier control unit with the remote control altogether, and connecting the lighting groups through a regular switch. Cheap, in our opinion.