Electricity is a delicate and dangerous matter. It is enough to accidentally close two contacts with your fingers and you can go to the next world. To protect yourself, always wear rubber gloves. Tools you will need:
- a pair of screwdrivers - regular and electric (probe or indicator);
- wire cutters;
- socket;
- desk lamp.
The most common reason for no sound is improper installation. If the device previously worked, and then suddenly stopped, you need to conduct a full check of it, and then make a decision - buy a new one or call a technician.
How to set up a wireless call?
When purchasing such a device, you need to find out how to install it so that in the future there will be no problems with its fastening. There are the following options for fixing it. The main one is on the door. Often there are problems with screwing screws into the wall, or double-sided tape does not adhere to the wall finishing material. In this case, you can attach the bell directly to the door leaf.
The second possible option is next to the doorway. Fastening occurs at some distance from the platbands. You can also choose placement on the gate. This method is intended for installation in private homes. In this case, you should protect the call from adverse weather conditions or the sun.
The sound unit itself must be placed inside the building. Usually this is a convenient place in the corridor near the door, or in those rooms in which the sound of the bell is difficult to hear. For a private house, the most suitable places to install an additional unit are the attic, workshop, basement, or outside the house if the residents spend most of their time outdoors, in the garden.
The doorbell can be installed next to the door. Installation, as a rule, occurs with adhesive tape or screws. This installation method is suitable for lightweight models located inside the house. On the street side, preference should be given to fixing elements in the form of screws. With their help, special protective canopies or stands are secured to protect the device from snow or rain.
If desired, you can change the location of the call. In addition, it is possible to convert it to a standard model, powered by an electrical network using wires.
How the wireless model works
How to fix the problem
Wireless calling devices are some of the most inexpensive devices, and most of them are made in China. The cheapest devices carry a lot of hidden problems. For example, a board that was initially flooded with something or a poor assembly. In more expensive options, it is even possible to adjust the frequency without disassembling the gadget. Below are solutions to the most common problems:
Clear call
The first thing you can do if the wireless bell does not ring is to open the case and clean the board with alcohol. This will help if the gadget has been in the package for several years, has been exposed to rain, or only rings when it is near the receiver. In this way you will process oxidized contacts, and, perhaps, correct the original problem if the board was filled with some kind of liquid before assembly.
Change frequency
If your wireless doorbell does not work at all, then move it closer to the signal receiver. Perhaps the button only works at a minimum distance. If cleaning the board does not help, then the problem is the frequency range shift. Ideally, the adjustment wheel is provided by the manufacturer and is located on the device itself. Gently twist it while pressing the button. When you hear a sound, increase the distance between the parts of the device, sometimes turning the wheel. This way you will find out the maximum distance and ensure proper operation of the device.
If there is no frequency adjustment wheel, you will have to open the case. Also, you will need a dielectric screwdriver. It is necessary to tighten the inductor trimmer. It can be located in both the receiver and the button. You need to act very carefully and smoothly, remembering the number of revolutions in order to return everything to the initial position if there is no result. Otherwise, proceed as in the case of the wheel, gradually increasing the distance between the receiver and the button. By setting up the gadget in this way, you can determine the distance over which it will work.
You can always contact a service center so as not to perform the operation yourself. Craftsmen in the radio market will also help you. Thanks to this instruction, you will be able to speak with them “in the same language” and accurately indicate the problem and a possible way to solve it.
Metal gates
Why doesn't a wireless doorbell work on a metal fence, gate or door? Metal is a barrier to radio signals, and sometimes it is a huge antenna capable of receiving other people's signals. Place the gadget not on the metal surface itself, but on a brick wall or wooden pole. Or attach a wooden plate behind the bell - a barrier between it and the metal.
There are ways to connect a wired button and a wireless one: the first is located outside the gate, the second is inside. When you press the first, the signal is transmitted via wire to the second and then wirelessly to the house. If you have amateur radio skills, you can find circuit diagrams on the Internet and improve the gadget yourself.
Another good option: solder an antenna to the gadget. It is necessary to disassemble the button and connect the internal antenna and a new wire. This wiring can be raised above the fence or brought out through a small hole in the gate into the inner part of the yard. This operation can be performed for you by a skilled tradesman at the radio market or a service center.
When placing the bell outdoors, remember about dust and moisture protection. Also note that if the wireless call stops working in low temperatures, this is normal. After the frost passes, you will have to replace the batteries.
Connecting a doorbell button - instructions and rules
You can connect a wired doorbell yourself.
You just need to have the necessary tools and materials on hand:
- Electric drill with concrete drill,
- Dowel nails of suitable diameter;
- Screwdriver with indicator;
- Copper two-core wire with a cross section of 0.5 sq. mm. and a cable channel - they will be needed if the wires are not laid;
- Construction knife;
- Side cutters;
- Electrical tape.
The only difference is that a sound device is used instead of a lamp, and a button is used instead of a switch.
Which wire should I run to the bell button - phase or neutral? Zero is connected directly to the sound mechanism, and phase is supplied to it through a button.
If you have moved to a new building and are going to connect a call, use the following instructions:
- Turn off the power supply at the electrical distribution panel;
- Choose the most suitable place to install the sound mechanism in the apartment and the button near the front door. The optimal installation height for the bell button is 145-150 centimeters;
- Lay a wire that will connect all elements of the circuit;
- Secure the button and sound mechanism by removing the front covers to provide access to the wire terminals;
- Connect zero directly to the sound mechanism;
- Connect the button phase to the doorbell phase;
- Connect the phase from the sound mechanism to the corresponding terminal of the distribution box;
- To connect the button, disassemble its body in accordance with the instructions and secure it to 2 dowel nails. Connect two wires to the button contacts - you can connect the wires to the bell button in any order;
- Double-check that the wires are connected correctly.
Bell connection diagram
The connection diagram for a 220 V wired bell is as follows (in the same way, in most cases, old electric bells from the developer are connected):
An electrical cable with three conductors (zero, phase and ground) is laid to the distribution box from the electrical panel. A three-core cable is laid to the same distribution box from the installation location of the main bell unit. Next, from the installation location of the doorbell button, a two-core cable is pulled to the box.
After laying all the cables, the conductors are connected. The grounding conductor and the neutral from the electrical panel are connected to similar terminals from the main bell unit. The phase from the power supply is connected to one conductor from the button, and the phase to the main unit is connected to another conductor from the same button.
Be sure to carefully insulate the exposed wires in the junction box using electrical tape, heat shrink tubing, or special PPE caps.
Repair procedure
If the switch sparks due to a loose contact, it is necessary to ensure a continuous connection between the pair and the receiving plate when the light is on.
Important! All work related to electrical wiring can only be carried out after the line has been de-energized!
When a light switch crackles, there is probably a short circuit in the circuit, so you need to clean the wire contacts and reconnect the device to the line. If it continues to work incorrectly, you need to replace the device with a new one. A shorted switch cannot be used.
How to repair your device:
- Disconnect the power supply and check with an indicator screwdriver that there is no voltage.
- If the key switch sparks, you need to pry off the housing with a screwdriver.
- Pull out the circuit of the switch cover, check the voltage at the terminals.
- If there is carbon deposits on the wires, they need to be disconnected from the socket and cleaned.
- When the indicator sparks due to unstable contact, it is enough to tighten the terminals with screws.
After this, you need to assemble the device in the same sequence
It is necessary to pay attention that a phase should be connected to the contacts of the key switch - this guarantees the safety of replacing lamps in lighting fixtures. By pressing the key the phase is switched off
In addition, there are lamps that stop working if the switch is connected incorrectly - the light may flicker and not deliver the full load.
How to connect a bell in an apartment correctly
So, how to connect a bell in an apartment so that you cannot be disturbed again by hooligans, the chairman of the HOA, a drunk neighbor who forgot the keys to the common door on the landing, debt collectors and other uninvited guests. Everything is very simple: we will break the power supply circuit of the bell and put a switch there.
All bells from the side of the stairs look almost the same: in the form of a button. But from the apartment side, they are all so different from each other. We will be interested in that part of the call that is located inside the apartment. Before us is the most ordinary call that hangs on our wall (yours may be different, but the essence does not change):
Let's carefully remove the decorative cover of the bell and see what's inside:
Any bell has 2 contacts, to which wires are connected and form an electrical circuit:
All you need to do is install a switch in the bell circuit:
The switch can be anything. It can be a push-button or toggle switch type. Next, you need to drill a hole in the decorative bell cover for this switch. This needs to be done carefully so that overall everything looks aesthetically pleasing:
When you have drilled the cover, installed the switch in it, and seen that everything turned out beautifully and neatly (you, as they say, tried it on), you can now remove the switch from the cover and start working on the electrical work. What should be done? Wires are connected to the two contacts of the bell. You need to unhook one of the contacts and make an electrical circuit through the switch. I think that everyone at school in labor class assembled an electrical circuit consisting of a light bulb, a switch and wires. So, here is a reason to “shake off the old days.” Instead of a light bulb, we have a bell. There is nothing complicated in the bell connection diagram, just look at the following picture:
We passed the wire that was directly connected to the right contact of the bell through the switch, using 2 more pieces of wire for this.
Nuance. We can have 2 calls to the apartment: one from the landing near the elevator, the second - directly in front of the door. In this case, when you remove the decorative cover, 2 wires may go to one of the bell contacts at once. In my case, this was the case: 2 wires went to the left bell terminal. It makes absolutely no difference which terminal the switch is connected through. Of course, it is easier to do this where only 1 wire is supplied, which is why I chose the right terminal.
So, everything is finished: the wires are connected to the switch. Now you can install the switch in the decorative cover, and place the cover itself on the bell body:
As a result, your call may now look something like this after some minor modifications. You can choose a switch on the market that completely matches the color of the cover, but you yourself decide which is better, which is more beautiful. But the main thing is different! Now, if you don’t want to hear anyone, don’t want anyone to ring your doorbell, just press the button on the side of the apartment, and that’s it!
So, you know how to connect a bell in an apartment to be protected from uninvited guests. By the way, there is a situation exactly the opposite, when you are expecting guests, but after a while you realize that these are strangers and you urgently need to get rid of them. Read about it here.
Local reasons for lack of lighting
Calling an electrician takes a certain amount of time, and if it’s evening, you’ll have to wait a very long time. Most problems with your home electrical system can be fixed on your own. The main thing is to understand a little about electricity and use protective equipment and tools with insulated handles.
- There are many reasons why lighting disappears in houses and apartments.
- The most common lighting problems:
- Incandescent light bulbs burn out very often. With the advent of LED lamps, incandescent lamps are of poor quality. The easiest way to solve this issue is to replace incandescent lamps with LED lamps. Although they cost several times more than incandescent lamps, they work tens of times longer;
- contact failure in the room lighting network. If the lighting in a room goes out, but the lamp is intact, the contact of the lighting network in this room is broken. The contact comes off either in the socket or in the switch;
- if you hear a bang and all the electrical appliances in the room turn off, this indicates a local short circuit. In the event of such an accident, the circuit breaker is switched off. It is designed for a certain current strength, and at the moment of a short circuit, the current at the short circuit point instantly increases exponentially. In this case, the circuit breaker cannot be turned on until the short circuit is eliminated.
- It happens that when you turn on additional electrical appliances, the electricity goes out. The reason is the installation of a weak circuit breaker.
Localized, localized lighting problems are covered here. But it happens that the light goes out in an entrance, in a house, on an entire street. This is due to large-scale power outages. Why does this happen, how to deal with it?
Mass power outages
- In windy weather, short-term outages occur for a large number of electrical energy consumers. This is due to short-term short circuits that occur due to overlapping wires. During a short circuit, the protection is triggered and disconnects the line. After a few seconds, an automatic restart at the supply substation is triggered and the power supply is restored. If this happens, you need to turn off all expensive electrical appliances, because the protection may fail and high voltage will appear in the network.
- Separate switches are installed at each entrance. If the total load exceeds the permissible load on the entrance, the entire entrance will automatically turn off. In this case, the reason may be due to automation. She has spent her resource.
Another reason for mass outages is transformer overload. Many transformers were installed decades ago. They are not designed for modern electricity consumption. And if the load, during peak hours, approaches the permissible limits, the protection is triggered and several apartment buildings or streets are left without light at once. In this case, you need to submit a mass application to the electricity supply authorities. But it is unknown when the relevant services will respond to the request. Therefore, it makes sense to purchase autonomous power supplies.
Electricity has been serving humanity for over a hundred years. Thanks to him, people made a huge industrial breakthrough. Without electricity, it is impossible to imagine the future development of humanity, except that we can only hope for the emergence of new, alternative energy sources.
An easy way to fix a doorbell in 10 minutes.
Greetings, dear reader!
It often happens that a powered door lock suddenly stops working. Or you move into a new apartment and want to install a new bell - but that’s not the case. I encountered this myself for the second time.
Even if you haven’t encountered such a phenomenon, it doesn’t hurt to be prepared! In this article I will look at the simple and most common options, without resoldering the chips.
So, if the call does not work, then this could be for three reasons:
- The bell mechanism itself does not work
- The button doesn't work
- Damaged or incorrectly connected wiring
To understand what to do, you need to identify the cause. How to do this?
Do not forget that working without turning off the power to the apartment is dangerous! Before starting work, turn off the electricity in the apartment at the distribution panel on the floor.
Checking the bell mechanism.
In order to check the mechanism, instead of a bell, you need to connect some other device, for example, a lamp, to the wires.
By the way, I have a socket with an incandescent lamp set aside for such cases. You can also connect the outlet and connect the device through it, or use a multimeter if you have one.
How to connect - press the bell button, if the lamp lights up, then the problem is a defective bell mechanism. If the call is new, replace the receipt in the store with another one and enjoy life. If it’s old, perhaps it’s time to go get something new.
Let's check the button.
A faulty button is the most common reason for a doorbell not sounding.
In order to check the button, you need to remove the front part of the button - it is usually held on either by latches or by a single screw from the bottom. Then unscrew the clamping screws and remove the wires.
The wires are live - we close them; if there is sound, the problem is really in the button itself.
In this case, we unscrew the button housing from the wall, and then disassemble it, it’s not difficult, there are usually only one or two screws.
There is nothing special to break there, and the problem most often lies in the oxidation of the contacts.
We take the unscrewed pressure element, and on the back of it you will see a jumper (1), which, when pressed, closes the contacts (2):
Take out the jumper and clean it with a knife or something sharp, then do the same with the contacts.
The contacts (2) have a slightly bent shape towards the jumper; if the bell is not new, they could have bent back. Fix this, but so that the jumper does not short them without pressing the button.
Both times when the lock did not work for me, I was faced with oxidation of the jumper and cleaning it and the contacts helped.
After all this, we assemble in reverse order.
Incorrect wiring.
If the first two steps did not help, then the problem is in the wiring. For the mechanism to work, one wire - the phase - must go directly to the bell, and the second wire - zero - must go through the button.
List of required tools
Some consumers, if they detect a malfunction of the switch due to sparking, crackling or humming of the device, immediately turn to electricians. However, damage that can be repaired can be repaired yourself. In most cases, it is enough to bend the contacts for the device to function normally.
The following tools are needed for repairs:
- indicator screwdriver with a lamp or electronic display;
- a regular type screwdriver for unscrewing screws/screws;
- insulating tape and fine-grain sandpaper;
- pliers, marker, knife for stripping wiring insulation.
All switches have a plastic housing, a protective frame and an internal operating mechanism. The frame can be attached to the mechanism with latches or screws. The socket box contains a working mechanism, fixed with spacer tabs or screws. To perform repairs, you need to provide access to the contact group by removing the outer box from the device.
What will you need for the job?
Electricity is a delicate and dangerous matter. It is enough to accidentally close two contacts with your fingers and you can go to the next world. To protect yourself, always wear rubber gloves. Tools you will need:
- a pair of screwdrivers - regular and electric (probe or indicator);
- wire cutters;
- socket;
- desk lamp.
The most common reason for no sound is improper installation. If the device previously worked, and then suddenly stopped, you need to conduct a full check of it, and then make a decision - buy a new one or call a technician.
Read the instructions for the machine
According to the established rules, you should not repair complex technical devices yourself, so as not to create additional problems for the technician. Interruptions in power supply, uneven current flow, negatively affect the serviceability of washing machines, important parts may burn out, and repairs are required. If there is a risk of voltage surges, it is better to remove the cord from the outlet and turn it on after power is restored.
It is necessary to check whether there really is no light in the entire house, find out the reason, maybe non-payment for light influenced the emergency shutdown, or maybe the machine has broken down.
The plug is inserted into the socket, if there are no signs of operation on the electronic monitor, there is no movement of the drum, the washing does not start, which means that no current is flowing. The reason may lie in the RCD, electrical panel:
- the circuit breaker has failed;
- emergency shutdown triggered;
- current leakage has occurred;
- the plugs were knocked out due to a short circuit or a sudden power surge.
If there are no interruptions in the power supply, check the reliability of how the washing machine is connected to the network. You need to check the condition of the cord with the plug. The wire may become damaged due to long-term use due to kinks and clamps.
If there is a smell from combustion products, melting is visible at the junction of the plug with the socket, the wiring will have to be changed.
Circuit break
Such a breakdown cannot be repaired on your own - you need to call an electrician. However, before this, it is worth carrying out a number of manipulations to find out whether there really is a break in the circuit or whether the bell has simply broken due to old age and needs to be replaced with a new one.
What do we have to do:
- Using wire cutters, carefully remove the insulation from the bell wires.
- Connect an outlet to them.
- Plug in the desk lamp.
If the lamp works, there is no break in the circuit.
Check if the call itself is working:
- Unplug the outlet.
- Connect an ohmmeter to the wires and press the button.
- If the arrow deviates, the equipment is working properly.
If the arrow remains motionless, the problem may be with the button itself. How to check and repair it is written above.
If it is possible to save the old call (from the USSR era), do so. Modern devices of Chinese origin are of poor quality and burn out if you hold the button down for an extra second.
After all the manipulations, assemble the call and check its functionality. If it still does not ring, and there is no break in the circuit, then it needs to be replaced with a new one. It is quite possible to install it yourself.
We will manufacture custom metal doors for any purpose. The site presents doors for apartments and private houses, offices, and public buildings. Call us and we will advise you on all questions.
Sequence of actions when repairing a bell
So, if all the tools specified in the paragraph above are prepared, then you can get to work.
Step 1 Power outage
In order to begin repairing the door lock, you must first turn off the power to it. But it is worth considering the fact that the table lamp must also be powered by something. To do this, you just need to turn off one automatic plug. Most often, the doorbell is powered by the same circuit breaker as the chandelier, so you need to turn on the chandelier and turn off the plugs one by one until it turns off. Once the required plug is disconnected, you can begin to work. At the same time, it will be possible to connect a table lamp to the outlet.
Step 2 Check for a network break
Before you begin repairs, you need to check the network for a break. To do this, you need to first wear gloves and remove the insulation from the bell wires. Then you need to temporarily connect the socket to the wires, and connect the lamp to the socket. After this, you should turn on the corresponding machine. If the lamp turns on, there is no network break. If switching does not occur, then this is direct evidence of a break in the network. This breakdown should not be repaired on your own, and you must call an electrician.
Step 3 Checking the Equipment Using an Ohmmeter
Again you need to turn off the corresponding machine. Then you need to turn off the temporary outlet. Afterwards, you should connect the ohmmeter to the wires, holding them by the insulated parts. Your partner must press the button, and if at this moment the arrow deviates, this means that both the wire and the button are in good condition.
Step 4 If the ohmmeter needle does not deviate
If the arrow does not deflect, then you need to disassemble the button. Then check the tightness of the ohmmeter contacts and carry out the testing procedure again. If necessary, clean the button contacts. Also, in order to avoid burnout, it is necessary to check the contacts to see if they are constantly occupied.
Step 5 Call verification
After all the above measures have been carried out, it is worth checking it. To do this, you need to connect all the contacts in place, turn on the corresponding machine and perform a test run. If after this the call does not work, then it cannot be repaired. You need to buy a new device and install it as indicated in the manufacturer's instructions. If the call starts working, it means you have done a good job. It is necessary to attach all the elements in place so that the wires do not get tangled or stick out.
How to fix a wired call
Before starting work, for safety reasons, you must turn off the electricity.
To repair the mechanism, you need to take the following steps:
- Checking the network for a gap. Wear rubber gloves and slightly remove the insulating layer from the device wires. The next step is to connect the stripped wires to the outlet. You need to insert the plug of the table lamp into it. To continue the manipulation, you will have to temporarily turn on the machine in the panel. If the light comes on, then there is no break in the network. Accordingly, if nothing happened, then the factor causing damage to the mechanism was the loss of the electrical signal. To fix the problem, you need to call a specialist.
- What to do if a button or sound unit is broken? Take them apart first. Then check the tightness of all contacts. If necessary, clean them again. If after these manipulations the mechanisms still do not function, you will have to buy new ones and install them according to the instructions.
- If the new bell does not work, then you first need to verify the correctness of each installation stage. Where to turn if everything is done correctly? To the seller. The company will help repair the device or replace it with a new one under warranty.
Our staff will help you decide not only on choosing a quality door, but also on the components for it. Sign up for free opening measurements on the website.
Which doors are better suited to an apartment or a house, with two or three contours?
Proper installation of a metal door is one of the conditions for long-term and proper functioning.
Check out the TOP 5 most reliable metal structures from.
Lamp glow when the load is off
There are several likely factors that could explain why the lighting element is still lit after being disconnected from the power source, albeit dimly:
- Problems with electrical wiring, in particular, poor-quality insulation on one of the sections of the circuit.
- The LED lamp is connected to a backlit switch.
- Poor quality emitters used in the design of the light source.
- Functional features of the lamp.
If the emitters burn when the switching device is in the off position, it is recommended to first consider all other factors except the first, since it is problematic to determine the area of hidden wiring that is weak in insulation.
To do this, conditions are created under which a circuit breakdown occurs (high voltage is applied for 1 minute). The problem area, due to which the diode lamps glow after the load is turned off, will have to be opened: the integrity of the wall is compromised if the wiring is laid using the gating method.
The problem of cheap LED products is no less common. If a product of low quality at an affordable price was chosen, and usually the connection between these factors is direct, then there is a high probability of an error in the soldering board. But it happens that the emitter, although dimly, burns due to the functional features of the design.
In particular, we are talking about the processes that occur in the resistor when a load is applied to the lamp: this element accumulates energy as current flows through the circuit, and after the load is turned off, it maintains the glow in the emitters.
Why does an ordinary wired doorbell ring by itself?
I didn’t understand this at first, but then I just noticed that an ordinary bell sometimes rings at night. So I was just checking. and there is no one there. And when you unexpectedly wake up at night, you will believe in mysticism. But then my friends said that this happens to them very often and sometimes the phone rings for a long time.
Author of the publication
Beard
Achievement received 12/04/2018
Similar:
It also happens that the contact closes. When the doorbell suddenly starts ringing for no reason and cannot calm down for a long time, I simply lightly hit it with a slipper. He immediately calms down. This contact comes loose inside the bell, and I honestly can’t get around to fixing it and tinkering, so my method is to hit the annoying dialer with a slipper. Works!
Truly mystical. A wired call is considered to be any call that is triggered by a button or sensor connected to the call not via a radio channel or an optical infrared channel, but via wires. In this case, the power supply of the bell is not important. Both when powered from the network and when powered by batteries, the call will still be called wired.
In the simplest designs of such calls, the control button is mounted in a break in the power wire. In more complex models, the button is connected to a common power wire and the control pin of the microcircuit. There are no apparent reasons for the bell to go off spontaneously, and it’s really strange that the devilry with it only happens at night, when the forces of evil reign supreme.
Unfortunately, the question does not contain a detailed description of the design of your call. Perhaps it uses a membrane button. The distance between the contacts in such buttons is calculated in fractions of a millimeter. It may well be that at night, when the air temperature drops, the gap between the contacts decreases and at some point they close, which leads to a false alarm.
Try disconnecting the button from the device for a couple of nights. If the false calls stop, then the problem is in the button. If, even with the button turned off, the call does not give you peace of mind, then look for the reason in the insides of the call itself. Try soldering a low-capacity non-polar capacitor in parallel to the conductors of the printed circuit board, to which the start button wires are soldered. If there is already one in the design, then increase its capacity or solder an additional one in parallel with it. Although, without seeing the call or its detailed description, it is difficult to advise anything.
Source: borodatiyvopros.com
How to install a doorbell button and other questions answered
The store may offer you two options for doorbells with a button: wireless and wired.
The most interesting and convenient choice is a wireless bell; its installation does not require wiring.
It transmits a signal over a distance of up to 50 meters or more, which is very convenient not only in apartments, but also in private houses, since there is no need to stretch the wire from the gate to the living area.
In this regard, traditional wired doorbells are much more practical, especially if we are talking about a city apartment, where all the wires have already been installed by the builders.
A wired bell works on approximately the same principle as any lighting device in the room: one of the two power wires of the sound device is supplied directly, and the second is connected to the break (via a button). When the button is pressed, the circuit is closed and a signal is triggered.
This is what a standard doorbell button connection diagram looks like:
Causes of electric bell failure
- Incorrect installation. The most common mistake is an incorrect connection to the network.
- Malfunctions of the button or noise units. To determine if the first one is broken, you need to detach the wires from the pressure element using a screwdriver. Next you need to connect them together. If there is a sound, then the button is really broken. To check the speaker, you will have to disconnect the top cover, remove the wiring from the screw terminals and check the presence of current in them using a voltmeter or multimeter. If the devices show an electrical signal, then the sound unit needs to be replaced.
- Natural wear and tear of the device after many years of use.
To determine if a mechanism element is out of working order, use the tips from the previous paragraph.
Prices for services of electricians registered on YouDo
For a service such as installing a doorbell, the price is calculated individually by YouDo specialists. The cost depends on:
- call patterns
- the need to dismantle the old cable, drilling, gating walls
- room size (in case of wired devices)
If installing a doorbell in an apartment requires non-standard solutions (for example, you will need to hide the cable behind platbands, baseboards, under the door frame), the cost of YouDo services will increase. A YouDo technician can tell you exactly how much it will cost to install a new or replace an old doorbell only upon arrival to the call.
Search for artists on YouDo
On the Yudu website you will quickly find good electricians offering bell installation and repair services. Study the profiles of our specialists, review reviews of their work, and positions in the rankings. Contact YouDo contractors - the installation of a doorbell will be carried out by professionals quickly, efficiently and at an affordable cost.
How to Make a Smart Doorbell with Notifications on iPhone
Doorbells with smart features have long appeared in the niche of interesting gadgets for the home.
Initially, these were devices with dubious capabilities and a large number of shortcomings. Now many manufacturers have seriously improved smart doorbells and offer various modifications. There are several similar solutions in the model range of our beloved company Xiaomi.
Now let's look at each of the devices and see who will be interested in them.
Why might the doorbell button not work?
There may be several reasons why the sound signal does not sound when you press the bell button:
- The sound mechanism itself is faulty. To check this, you should try to apply voltage to the bell terminals directly. If the signal does not work in this case, the reason is a faulty sound device.
- The button doesn't work. As a rule, the reason is that the bridge does not close the contacts. You can check this by connecting the contacts with a jumper (for example, a screwdriver). There may be no contact due to the formation of oxide on the bridge, which in most cases is made of a copper alloy. The problem in most cases can be solved by cleaning the bridge and contacts.
- The button-sound connection is not made correctly. Zero should go to the bell through the button, and phase should go directly to the sound mechanism. To fix the problem, you should check the correct connection and correct the error.
- The integrity of the wire is broken. To check the serviceability of the circuit (presence/absence of breaks in it), you should ring the wire with a multimeter (tester).
Basic safety rules must be followed when working with electrical appliances.
Answers to frequently asked questions about doorbell button protection
If the bell is installed indoors, no additional measures are required to protect the button. It is a completely different matter when the bell button is installed outdoors, where it is exposed to moisture and temperature changes.
- How to protect the bell button from rain? For these purposes, you can build a small canopy from any available means. However, it is better to purchase a ready-made waterproof button. Additionally, it would not be superfluous to treat the surface with hydrophobic (water-repellent) agents.
- Are there anti-vandal doorbell buttons for outdoor installation? Yes, there are special buttons on sale in an ergonomic, highly durable metal case. They are sold separately and cost about 200-300 rubles.
Other reasons
- Interference from other radio devices. Even a car alarm or a wireless radio remote control for children's cars can trigger it. In this case, you need to change the frequency as described above.
- The button is stuck. Click on it several times. If the problem persists, you can disassemble the button and reassemble it.
- Effect of low temperature. We are talking not only about frost, but also about temperature changes in general. Expansion and contraction of parts of the device may well cause spontaneous operation, and it will start ringing on its own.
- Liquid ingress. If the wireless call works on its own, it may simply be shorted due to moisture. Moreover, for this it is not necessary that it be outside or exposed to rain: high air humidity is sufficient as a reason. In this case, it is advised to clean the board and fill it with varnish. Or you can buy a bell with dust and moisture protection.
- Metal door or gate. If you hang a wireless device directly on a conductive surface, it may stop working altogether. Metal blocks radio signals. In another case, the metal acts as a large antenna and the bell may begin to ring spontaneously. To avoid problems, use a wooden block or place the device on a separate pole or brick wall.
- Parts have worn out, wiring has come loose. If the dangling wire is visible visually, you can solder it yourself. In another case, a visit to the master will help. It will be difficult to identify or correct the problem yourself if you are not a radio amateur.
Follow these steps, and the call will stop “living its own life.” Unfortunately, if the frequency of the device matches the call of your neighbors, and there is no tuning mechanism on the board, you will have to buy a new device or try to shield it with foil. In other cases, the problem will most likely be resolved.
The intercom handset does not work: what could be the reasons?
In most cases, damage occurs at the location of contacts - buttons and switching parts, that is, those elements that are used most often and are subject to intensive use.
If the intercom handset does not work, the first step is to find the causes of the malfunction. Sometimes, to restore the functionality of the system, it is enough to move the switch to another position, clean the contacts from dust, or replace a worn part. In difficult cases, you cannot do without the help of a specialist.
The following algorithm will help identify the location of the defect:
- No sound? Check the integrity of the cable line for breaks.
- Is there complete silence on the phone? Remove the cover of the speaking tube and evaluate whether the contacts are securely sealed and whether there is communication between the boards.
- Can you barely hear your interlocutor? It is possible that the cable has almost moved away from the contacts.
These are just the general and most common problems. If a specific option of an audio intercom does not work correctly, the reason should be sought in the element that is responsible for this function.
Almost all defects can be divided into two large groups - malfunctions due to external mechanical damage to the housing and failure of internal elements. Next, let's take a closer look at each of the categories.
Mechanical defects of the speaking tube
A common form of mechanical failure is wear of the holder. If it serves only as a supporting element, the defect will not affect the functionality of the device. But in most intercoms, the holder is equipped with a tongue that controls the start and stop of the intercom circuit. To solve the problem you will need a soldering iron. With its help, you need to heat a piece of plastic and construct a replacement for the broken tongue from it.
You need to act carefully. If you break the mechanics, the communication circuit will always be on or off. In rare cases, it is similarly necessary to restore the functionality of the intercom when the plastic part holding the internal elements of the device is broken.
Sometimes the tongue just sinks. In this case, to restore functionality, it is enough to loosen the screws holding the element and return it to the correct position.
The intercom button is subject to the most intensive use and is often the first to fail. The easiest and fastest way to repair a device is by purchasing and installing a new element.
Electromechanical defects of the speaking tube
The next group of breakdowns is more extensive and varied. These are electromechanical defects. Let's take a closer look at their symptoms, causes and ways to solve the problem.
One of the common malfunctions is that the entrance door open button does not respond to pressing or only works every once in a while. The probable cause of the breakdown is the microswitch. To restore functionality you need to:
- Remove the plastic tube cover.
- Assess the quality of soldering wires.
- If the wires are securely fixed, then the cause of the defect is a broken switch.
- Repair measures include soldering a disconnected wire or replacing a broken switch.
Digital intercoms are highly sensitive to mechanical influences; their operation is based on a pattern of intersecting light rays. The button on the device may not function correctly due to normal wear and tear and intensive use. Sometimes physically cleaning the element can solve the problem. If after this the button does not restore functionality, you should look for the cause in a processor malfunction. To do this, you need to seek help from an experienced master.
The second common electromechanical problem is that instead of opening the door when you press the button, it resets and the lock remains closed. In most cases, the problem is a violation of the integrity of the wire or poor contact near the speaker. A soldering iron will help restore functionality. Sometimes a call is dropped due to a broken wire in the speaker coil. To accurately identify this defect, you cannot do without a multimeter or tester.
If a visitor dials an apartment number on the outside panel and then the call is dropped, it is necessary to check the polarity of the wires. It was probably broken when installing the intercom.
Problems with sound in the speaking handset
A large group of audio intercom problems is related to the quality and volume of sound during the launch of the communication chain. The cause of poor hearing is usually a worn-out microphone or speaker of the subscriber device. You can try to restore their functionality as follows:
- remove the tube body;
- find a trimming resistor on the printed circuit board, which is responsible for setting the microphone and speaker (not all intercoms have it);
- fill the initial position of the slider;
- turn the switch first in one direction, then in the other direction;
- return the slider to its original position.
Repair of doorbells in Moscow and Moscow Region
A doorbell is one of the most familiar and irreplaceable devices in modern life, the breakdown of which causes a number of inconveniences for apartment owners and their guests. The need to urgently repair a doorbell arises in the following cases:
- Broken bell button;
- Signal device failure;
- Problems with electricity supply;
- Transformer or battery fault.
If you don’t know how to repair a bell in an apartment, you can call an emergency LOCKSERVICE technician. We offer:
Doorbell repair can be greatly simplified by installing a wireless device. In this case, you no longer have to worry about current or wiring, since the wireless system is battery-powered. Some doorbells of this type come with additional features, such as different button tones for the front and back doors or a special motion detector. Repairing wireless doorbells often comes down to replacing the batteries.
Self-repair of the device
Repairing a bell yourself involves the need to search for suitable parts in specialized stores, which can take quite a lot of time. To understand how to fix a doorbell of one type or another, you need to have a good understanding of electrics. An inept attempt to repair the product can lead to even more serious damage or even a painful electric shock, so it is better to entrust this work to a professional.
When choosing suitable repair specialists on the Internet, you should keep in mind that not every technician has the necessary competence to repair a complex electronic device with advanced functionality. A sign of an unqualified master may be too low prices, as well as versatility - offering too wide a range of different services, such professionals often do not have sufficient experience in each of their specializations.
To avoid the negative consequences of unprofessional doorbell repairs and extra money spent on their elimination, it is best to entrust this work to an experienced LOCKSERVICE employee, who will quickly and efficiently complete work of any complexity with a guarantee of up to three years for all types of services.
How to connect a bell in an apartment is very tricky!
I want to tell you one way that will allow you to get rid of unwanted guests. I think many people love the so-called private time: when you want no one to disturb you, no one to invade your personal space. I want to be alone, or alone with my family, or get some sleep without anyone waking me up ahead of time. Home and cell phones can be turned off, but, unfortunately, as for the front door, no one is immune from the fact that someone suddenly calls you at the most inopportune moment. Using personal experience, I will show you how to connect a bell in an apartment in such a way that it can be turned off at any time, like a telephone.
Selecting a doorbell
A doorbell notifies home owners that someone has decided to make a visit. Structurally, it consists of a bell button and a sound device that emits a signal. Modern call models differ in design, design and cost. How to choose a doorbell among the available variety?
Wired doorbell
The simplest design is an ordinary wired electric bell. An electric bell is an open electrical circuit that closes when the device button is pressed. While the circuit is closed, an audible signal is played. These doorbells are not only simple, but also reliable. Modern wired calls allow you to select one of the recorded melodies for the signal. As a rule, there are about 5 dozen different melodies available. The main disadvantage of the device is the inability to work in the absence of electric current.
Wireless doorbells
The wireless door lock runs on batteries, so it can be used in a country house where there is often no electricity. Another advantage of a wireless device is that there can be a distance of about 100 meters between the doorbell button and the signal source. This means that it is not necessary to place the bell on the porch; it can be installed at the gate.
Will the device work if the neighbors also decide to buy a wireless doorbell? No, since each call operates on specific radio frequencies. The disadvantage of this type of call is that the radio waves may encounter an obstacle along the way. For example, a concrete wall. Moreover, there is a need to regularly replace batteries or charge them in a timely manner (if you use batteries).
Leroy Merlin offers a wide selection of goods at low prices for residents of Moscow, as well as the cities of the Moscow region: Balashikha, Podolsk, Khimki, Korolev, Mytishchi, Lyubertsy, Krasnogorsk, Elektrostal, Kolomna, Odintsovo, Domodedovo, Serpukhov, Shchelkovo, Orekhovo-Zuevo, Ramenskoye , Dolgoprudny, Zhukovsky, Pushkino, Reutov, Sergiev Posad, Voskresensk, Lobnya, Klin, Ivanteevka, Dubna, Yegoryevsk, Chekhov, Dmitrov, Vidnoye, Stupino, Pavlovsky Posad, Naro-Fominsk, Fryazino, Lytkarino, Dzerzhinsky and Solnechnogorsk. You can order the necessary products online with delivery to all these cities or visit one of our retail stores.
How to repair a call
Hello, dear forum users! Life has turned out in such a way that I have to solve some repair issues myself. Now the door bell, installed more than 30 years ago, has broken down. I'm interested in the process of diagnosing a fault. How to check whether the wire running from the button to the bell itself is intact? What to do if visual damage is not visible?
Moderators, please don't delete this thread because I have nowhere else to get advice!
vera3128 wrote: How to check if the wire going from the button to the bell itself is intact? What to do if visual damage is not visible?
It's 220 volts. Are you sure it’s worth climbing there on your own with this level of training? Do you at least have a tester?
Ask someone who understands electricity. There is no need to ring the button, there is 220V
vera3128 wrote: What to do if the damage is not visually visible?
Install a battery-powered wireless bell.
AlexEE wrote: Install a wireless bell powered by batteries.
Good idea If all else fails, I'll install this
E_Z wrote: There are 220 volts. Are you sure it’s worth climbing there on your own with this level of preparation? Do you at least have a tester?
Yes, my level of training is low. But, in my opinion, what is important is a person’s desire to understand the issue and reasonable caution. Everyone started learning at some point. I have a tester.
Arpan wrote: There is no need to ring the button, there is 220V
Why shouldn't you ring the button?
2vera3128 A friend of mine installed a wireless one even when the regular one was working normally: he often works on the loggia (he has a workshop there) and, if he’s alone at home, he takes the call to the loggia with him - he says it’s very convenient! And one more “+” of battery power: the neighbors somehow had their entire apartment destroyed when they went on vacation. Someone pressed the button and it “stuck.” Moreover, the neighbors were lucky that the apartment had decayed and not burned down - the windows turned out to be very airtight.
vera3128 wrote: I have a tester.
Algorithm of actions: 1) Is the bell itself working? IMHO, it's better to change it altogether. Now there are a lot of electronic calls with different melodies (for 220 volts). At the same time, the currents in them are less, which in the case
AlexEE wrote: Someone pressed the button and it “stuck”
ALL WORK IS TO BE CARRIED OUT BY TURNING OFF THE SWITCH FOR THE APARTMENT! For additional safety: check ALL contacts with a phase indicator screwdriver (just in case), perform work with tools with insulated handles.
2) Is the bell button working? Take it apart and look. IMHO, if the wire has not been bent, the probability of a break in it is less than probability 1 and 2.
vera3128 wrote: But, in my opinion, what is important is a person’s desire to understand the issue and reasonable caution. Everyone started learning at some point.
This is true, but it is better to see once than to read a hundred times. That's the problem. Think again if it's worth it.
E_Z wrote: This is true, but it is better to see once than to read a hundred times. That's the problem. Think again if it's worth it.
Are there courses where they teach all this? The fact is that when men from the company come to fix something, they somehow react inadequately when I ask them to explain to me and show me how it’s done. Yesterday I took apart the call button, everything seems to be fine there. If you believe the diagnostics carried out independently, then somewhere the wire is broken or frayed on a bend. What should I do if it is walled up in the wall and not in a box?
vera3128 wrote: I took apart the call button, everything seems to be fine there
Now it’s time for the call itself.
And then we can talk
vera3128 wrote: If you believe the diagnostics carried out independently, then somewhere a wire is broken or frayed on a bend
I recently repaired a bell, I also have a nine-hundred-haired one, the problem was in the button, there are 2 contacts, and on the button itself it’s like a washer, so sometimes it doesn’t touch the contacts, and that’s why the bell doesn’t work, try connecting these contacts very carefully with an insulated tool , there will be small sparks, but don’t be afraid, you will close the circuit (this is what the button does) if it doesn’t ring, then it’s definitely the bell itself, there are practically no other options
vera3128 wrote: Are there courses where they teach all this?
There are not just courses, but entire educational institutions.
vera3128 wrote: when men from a company come to fix something, they somehow react inappropriately
Well, everything is simple here. Firstly, why should they deprive themselves of work? Secondly, they are not paid for teaching. And thirdly, to put it mildly, the gender factor apparently plays a role (I’ll say right away - I don’t agree with them here). Try taking lessons from DIYers after hours.
vera3128 wrote: If you believe the diagnostics carried out independently, then there is a wire break somewhere
How did you check?
vera3128 wrote: What should I do if it is walled up in the wall and not in a box?
| Still, first you should check (it’s better to throw it away and install a new one) the call itself. If the problem is in the wire, it's worse. The bell connection diagram is as follows: _________________________________o 220 V |
| __ ___________Call______o |
That is, only one wire goes to the bell from the button, the other goes somewhere into the junction box.
In general, check the call. If he is not to blame, we will look for a break.
Cable laying methods
Cable laying will only be needed for wired calls. To do this, the surface of the walls inside the room near the exit from the house or apartment is inspected for the presence of the nearest junction box. Usually it is located at the top of the wall where the cable enters the house from the meter. Inside the premises, the cable can be laid externally or hidden, and outside the apartment only hidden, in order to provide reliable anti-vandal protection. For hidden wiring, grooves of a suitable size are cut into the wall using a hammer drill. External wiring is placed in boxes secured with self-tapping screws. [rek_custom1]
What is included in the wireless call kit?
A standard wireless device includes:
- door bell;
- remote control;
- screws (2 pcs.);
- battery (12V).
The wireless doorbell can also be equipped with an LED indicator, which will be especially useful for people with hearing impairments. It is triggered along with the playback of a melody when the call button is pressed. You can make such an indicator yourself. It will also come in handy during night visits, in low light conditions. In general, when pressing, a light or color indicator will simply be a beautiful addition.
Related article: How to insulate the front door?
The wireless call has several dozen melodies, so choosing the right one will not be difficult. It is worth giving preference to one that does not hurt the ears and does not cause any discomfort. Why? To exclude subsequent substitutions.
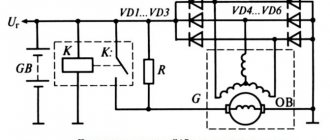
Wireless model diagram
Problems with wireless calling? What if it doesn't work?
Almost every modern apartment or house has a bell. The most budget-friendly devices are those made in China, which include a block and a button. Such a call does not require the use of wires, which makes their installation easy, which anyone can handle.
The button is installed outdoors and secured with double-sided tape to any convenient place - a fence, gate or wicket. The block itself is mounted directly in the room. It is important to read the instructions, which indicate the maximum distance that will facilitate the normal operation of the call.
Attention! Sometimes a problem arises that the wireless call does not work. It also happens that he calls on his own. This may be the result of poor-quality equipment, installation problems, or simple wear and tear. It is important to understand the design of the equipment and correct the current situation.
Electromechanical bells
This type of bell is an improved model of mechanical bells. It consists of two blocks: a remote button and a housing with a resonator located inside. They are connected to each other by wires, and the main unit is connected to the electrical network. Inside the main unit there is an electromagnetic coil, which, when voltage is applied, transmits force to the attached metal plate and thus creates a sound signal.
Such models are practically not used, since their mechanical parts are very unreliable, and the sound tonality does not change.
Chip-based calls
This type of call is a modern chip-based solution. They are available in two types: wired and wireless. Both options have compact sizes, several built-in melodies, as well as additional functions, including motion sensors, an autonomous power system, etc. The main difference between them is that the wireless doorbell circuit is significantly simplified and to install it, you just need to place a button - signal transmitter and receiver within the permissible zone of reliable signal transmission.
Mechanical bells
They are a fairly simple design that, when exposed to external influences, creates various sound signals. These include small bells hung indoors and driven by an external rope or simple rings attached to the door. Currently, they are obsolete and are used for decorative purposes. Their advantage is independence from any power sources, as well as simplicity of design. That is, connecting a doorbell will not require complex installation work and the use of special knowledge in the field of construction and electrical engineering.
Doorbell kit