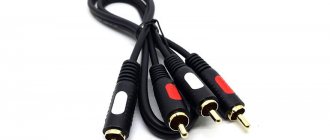
An intercom is a set of individual electronic elements that are connected by cable lines into a single system. To avoid equipment failure, it is necessary to establish a stable and reliable connection between all devices. And for this you need to choose the right cable for the intercom. Let's figure out what types of wires exist and what to look for when purchasing them.
Cable lines Source scart.com.ua
Peculiarities
This technique combines the functions of an ordinary intercom with the possibility of video surveillance. A video intercom is a system consisting of the following nodes:
- monitor;
- locking device;
- intercom calling panel;
- power unit.
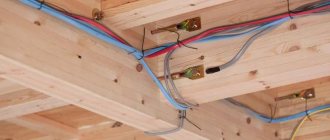
In order to connect these devices, various cables are used. You should focus on the manufacturer’s requirements, technical tasks and climatic conditions. Correct calculation, high-quality installation, high quality materials are the key to long-term operation of the intercom system without failures.
Live
If the fall fell within the specified parameters, the door opened. Selection of equipment and installation of the call panel The call panel is one of the elements of the video intercom.
Place the KSPV cable inside the lock. This degrades the signal, and after a year or two leads to the inoperability of the entire system.
To establish communication, the signal is sent through the DAT1 line to the switch.
Electromagnetic lock Its design consists of a coil winding, powered by a voltage from a power supply, usually 12 volts, and a magnetic circuit having two separate contact pads: 1. Nowadays, the most common connection is a digital intercom with an electromagnetic lock.
If there is 12V only from the monitor, without an additional power supply, a strong voltage drop occurs when the lock is opened. The use of IP cameras expands the capabilities of control systems and increases the level of security of citizens. Also, intercom calling panels can be selected by the future owner so as to ensure operation with already used magnetic or radio keys. Mechanical control. Connecting a video intercom, calling panel, controller, reader, electro-mechanical lock
What materials are the cables made from?
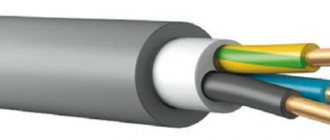
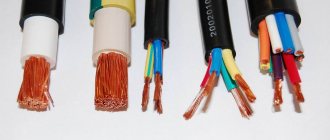
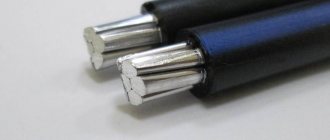
The conductors can be copper or steel. Wires made of alloys and steel wires coated with copper are available for sale. All of them will differ in their characteristics. Cables should be purchased from trusted suppliers.
Conductors made of copper have lower resistivity per linear meter and are more resistant to wave interference. Copper strands are durable and flexible, making installation easy. Less susceptible to corrosion and oxidation.
Steel conductors are used in inexpensive products; such cables are not recommended. They have a lot of resistance and weight. Steel is a less efficient conductor than copper. As the signal passes through it, it loses power. It is not very convenient to work with such material due to the greater rigidity of the wire.
The insulating material of the shell plays an important role. The durability of the system depends on its material. If the line is laid outside the room, materials that are resistant to temperature changes and ultraviolet rays are preferred.
It is important to choose insulation that will not crack in the sun. A cable with damaged insulation is unsuitable for use. Through cracks in the insulation, water can enter the electrical line, and then the line can become unusable.
Shielded cables are available. Shielding protects the signal from electromagnetic fields created by current-carrying power lines. Typically the screen is made in the form of a mesh of copper or steel wire. Foil tape is used as a protective layer. Such a power line can be grounded.
Wires should be selected for specific tasks:
- transmission of video signal to the subscriber device and additional monitors;
- supplying electrical power to the electromechanical lock and surveillance cameras.
For the system to work correctly, it is important to correctly calculate the line length, core cross-section, line attenuation and power supply power.
Varieties
UTP (twisted pair)
A multifunctional cable, which consists of one or more pairs of insulated cores, twisted together, enclosed in plastic insulation. Inexpensive and easy option. It has different degrees of screen protection according to the marking:
- UTP – unshielded;
- FTP – with a common foil screen;
- STP – twisted pair with general insulation;
- S/FTP – with an individual foil screen for each pair and a common copper shell;
- U/FTP – availability of general shielded protection;
- U/STP – presence of a screen for each pair separately.
The insulation of unshielded twisted pair (UTP) cable is made of polyvinyl chloride (PVC). Used indoors at short distances. Inside, along with the cores, there is a nylon thread, which is needed to give mechanical strength and rigidity to the wire.
Twisted pair FTP differs from UTP by the presence of a protective screen that is more resistant to external interference and mechanical damage. In installation, 4-core and 8-core wires are most often used. They are lightweight, flexible, easy to install, and are offered in a huge range on the modern market.
RG (coaxial cable)
It consists of a conductive core and a screen, located coaxially and separated by an insulating polymer. You can find a protective layer of foil. The design eliminates energy loss due to radiation and protects the cable from electromagnetic interference. They differ in material, degree of shielding, diameter and rigidity. Doesn't bend well during installation.
The conductor is made of copper or steel. Insulated from negative climatic conditions with polypropylene or polyethylene foam. Then covered with a layer of foil or braided shielding made of copper or aluminum. Enclosed in rubber or plastic insulation. Such wires are classified according to their characteristic impedance:
- 50 Ohm - a well-balanced cable with minimal signal loss and sufficient strength;
- 75 Ohm - durable and inexpensive, easy to install cable.
This is an inexpensive, rigid cable available in a wide range. To connect such a wire to devices, you need a connector. Connectors for crimping such a cable are more expensive.
KVK (combined video cable)
It is a coaxial cable combined with power wires. Sometimes in addition there are wires for connecting additional devices. This cable is convenient to use where video surveillance power and signal transmission are carried out from one point. This greatly simplifies installation and saves time. The price per linear meter will be higher than for ordinary wires. It is important to calculate the cross section correctly. The type of insulation determines the operating conditions and temperature range in which the multicable will be used:
- PVC insulation has high plasticity even in cold weather, and is resistant to ultraviolet radiation and chemical attack;
- rubber insulation is elastic and resistant to high temperatures;
- fluoroplastic insulation is considered very durable and rigid.
Some types of such wires include a supporting steel cable, also protected by insulation, which is important for outdoor installation. Scope of application according to marking:
- KVK-V – for indoor installation;
- KVK-P – for external installation;
- KVK-PT – for external installation, with supporting steel cable included;
- KKSVG and KKSPG – wires with a stranded conductor for indoor and outdoor installation, respectively;
- KKSV and KKSP are wires with a single conductor used for analog video surveillance systems.
A combined cable will be an excellent solution for installing a video intercom if a lot of wires are required, for example: for data transmission, for supplying voltage, for controlling a camera drive or for an intercom.
The electrical installation equipment industry offers a huge number of products from Russian and foreign manufacturers. The price/quality ratio does not always “work” - you should not overpay for a brand if products from a different price category can cope with the task. Products from lesser-known companies are capable of performing the assigned tasks. Much depends on the quality of installation and operating conditions.
For information about which wires to lay, the features of connecting the intercom and its installation, see below.
When installing an intercom, special attention is paid to the quality of the cable - whether it meets all standards and requirements. This is due to the fact that not all types of wires are suitable for establishing communication between the visitor and the subscriber.
Content
Preface
First of all, it’s worth considering how feasible and possible it is to install a video intercom yourself. We need to realize that:
- It will take you much more time than a qualified installer due to the need to introduce the topic - starting with this article and ending with studying the instructions for the monitor and video panel. And time is also money.
- No one will train you for free, including the seller of the product, who, by the way, in 95% of cases himself knows how to install video intercoms,
- During installation, you can damage the electrical wiring, the video intercom itself, or even “short” the entire intercom line,
- And it’s not a fact that you will be able to correctly select all the necessary equipment, since the classification of an apartment intercom itself is broader than just dividing intercoms into digital, coordinate and IP,
- If you are taking on this type of work for the first time, keep in mind that you risk damaging the aesthetics of your apartment or house, and in the worst case, you can even harm your life and health by careless handling of electricity,
- You will need specialized equipment - a hammer drill and a drill (unless you are installing a video intercom in a wooden house, then it is enough to have a drill and drill bits). What’s most offensive is that you quite possibly won’t need this equipment anymore, and at a conservative estimate it will cost about 2 thousand rubles (if you buy non-branded Chinese equipment). The same applies to remnants of wires, boxes, etc.
- If you are unable to do everything yourself, and you have already purchased a video intercom and related equipment, it will be very difficult for you to find an installation company that will undertake such an installation, and the price will most likely be higher than usual, since when ordering the installation along with the product, the installation price lower, and the installation company compensates for the low price of the work by also making money from the sale of the equipment itself.
If all of the above does not scare you / you have experience in electrical installation work or you want to learn / are learning the installation craft, then this article is for you!
Requirements for intercom wire
Combined high-frequency cable
Each type of construction work has its own specific and general operating requirements. For intercom wires they are as follows:
- To power the external unit and electronic lock, the voltage should not exceed 24V.
- If frequent voltage fluctuations are observed, it is recommended to temporarily de-energize the device, otherwise the likelihood of a short circuit and fire increases.
- The intercom and all auxiliary elements are placed away from sources of moisture and environments with high humidity.
- If there is damage in the cable as a result of mechanical, chemical or thermal effects, replace the damaged section of the circuit or the entire cable. RK-75 - Coaxial cable for connecting a video intercom with a copper central conductor
- The electromagnetic field emanating from some types of wires can distort the operation of the intercom, so it is more advisable to give preference to modifications equipped with separate shielding.
- If the resistance value is 20 Ohms, the device is used to establish long-distance communications.
For uninterrupted operation of the electromagnetic lock, electricians recommend connecting a separate cable to it.
The length of the wire directly depends on the distance from which the call panel is located. If the distance is no more than 15 meters, use any types of cables; if the interval is significantly larger, experts recommend considering the following models:
- UTP;
- STP;
- FTP;
- KSPV-4*0.5;
- SHVEV;
- SHVEP.
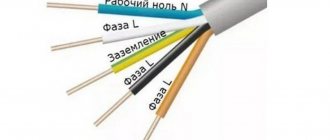
STP KSPV-4x0.5 FTP UTP ShVEP ShVEV
The peculiarity of the models is their combined structure. They are designed to work both indoors and outdoors around the entire perimeter.
Description of models
There is a wide variety of cables and each of them is used for specific purposes.
| Cable brand | Description |
| ShVEP and ShVEV | Specially designed for connecting video intercoms. This is confirmed by the presence of one core with a shielding braid. They are used to connect the system over long distances without distorting the quality of image and sound. |
| KSPV | The model is universal. Used to connect both audio and video intercoms, but over short distances. KSPV is also common for connecting the system in apartment buildings. Experts attribute the inconvenience of installation due to high rigidity to the main disadvantages of the model. |
| Twisted pair UTP 5e | Used to connect systems over short distances (no more than 10-15 meters). UTP 2 and UTP 4 are additionally used for connection. The main disadvantages include the low degree of noise immunity. |
| KVK-2P | It is preferable to use for dachas and country houses when the call panel is located on the street. To ensure that the camera is constantly supplied with voltage, a separate line is laid. To save money, it is better to give preference to combined models. Inside the winding there are 2 types of conductors. One of them is coaxial, its resistance reaches 55 Ohms. The shielded core is located in the center; two lines for power supply run parallel to it. |
The range of cables in stores is extremely large. To choose the most suitable one, you need to familiarize yourself with their characteristics and compare them with the requirements of the system.
Combined cable KVK for connecting a video intercom Intercom
systems equipped with video are quite demanding, so they are vigilant when choosing auxiliary components and performing installation work.
For high-quality and uninterrupted operation, four-core cables are connected to the system. Experts also advise buying models with a separate shielded core. This will improve image quality. The shielded core protects the signal from interference.
At the installation stage, first of all, wires are laid between the monitors and calling panels. Each of these devices must be included in the overall system.
The power supply in the circuit is 12 V, this indicates the complete safety of using such wiring.
To avoid emergency and emergency situations, the wires for the intercom are laid separately from the power electrical lines.
Is it possible to
If you want to save money, or you simply like to work with your own hands, using a manual from the Internet, you can easily connect a video intercom and configure it to full functionality.
There are no serious difficulties in the task at hand - the process itself requires minimal skills and knowledge, and with the help of the information below, anyone can solve the problem.
Let’s skip the process of selecting and purchasing an intercom - this is a separate issue and requires attention. Let's assume that you have solved it, and the selected model is lying at your home, waiting to be connected.
The scheme is simple: You just need to connect two devices (the call panel and the monitor located inside the house) with a wire. The whole process can be roughly divided into the following points:
1. Connecting the call panel. 2. Laying the cable from the call panel to the monitor. 3. Connecting a monitor. 4. Lock control connection.
Now - sequentially and in detail about each installation point. As an example, let's take a video intercom that has one call panel. This scheme is the most common, although, of course, there are also systems with two panels or even more (this is mainly used in large offices or in large private houses, when there are several entrances).
How to choose a wire for an intercom
Before proceeding with the selection of wires, determine the type of intercom being installed. If the system is equipped with an audio system, a two-wire intercom wire is used.
If the system has a video intercom, you should take special care when choosing a cable, since these devices are very demanding and capricious. They require a minimum of 12 V. In this case, four-wire wires are used to provide communication with the panel, the built-in monitor and to ground the structure.
When choosing a wire, the distance over which the signal will be transmitted is of great importance. The larger it is, the longer the wire and its cross-section should be, since the quality of the signal will depend on this.
Recommendations for laying and installation
To drill concrete walls you will need a hammer drill.
Before starting work, you need to prepare working equipment and consumables.
- construction knife;
- self-tapping screws (their number depends on the number of connected devices);
- latex gloves;
- putty;
- insulating tape;
- cable (length, cross-sectional size and model are selected individually);
- perforator;
- wire cutters, screwdriver and pliers.
Connection diagram for a video intercom in a country house
When all consumables and working equipment are prepared, proceed to familiarize yourself with the recommendations and algorithm for laying wires for the intercom:
- To implement two-way communication, you need to calculate the footage by measuring the distance from the intercom to the unit.
- The cable is selected depending on the length.
- If an intercom is installed in the entrance of a multi-storey building, a common riser is installed inside along which the wires will run.
The issue of careful masking of wires deserves special attention. This is required to create an aesthetic appearance and limit access to them. If the wires are not hidden, robbers will easily cut the cable and the owners of the living space will not respond to the potential danger in a timely manner.
In order to ensure a stable audio or video signal, you need to carefully select a cable for the intercom.
Price category
The pricing policy for wires depends on several factors.
- how long did you live under the main insulation;
- How protected is the wiring from external influences?
- wire length;
- manufacturing company, country of manufacture.
Note! All these are key points when buying a cable. But in general, it all comes down to the fact that the more material that goes into creating a product, the more expensive it is.
Connection diagram for a private house
Choosing a quality cable is a rather difficult procedure, and it will be difficult for a person without experience to carry it out. Therefore, it is recommended to consult with the seller and refuse Chinese counterfeits, which can cause short circuits and fires.
You may be interested in this Features of the heating cable
How to choose the right cable for an intercom?
First, you need to consider the type of intercom - audio or video.
To connect audio intercoms, a two-wire cable, for example, TRP 2x0.4, is sufficient. For video intercoms, you will need a cable with 4 cores, since between the calling panel and the intercom itself you need to provide power (12 V), video transmission, audio signal and grounding. The cable connection diagram depends on the specific intercom model. The general diagram for connecting the intercom is shown in Fig. 1
Secondly, when choosing a cable for an intercom, distance is important. The further you are from the calling panel, the larger the cable cross-section you need to take, since the signal level depends on this (it is lower in thin wires).
- For distances up to 15-20 meters, twisted pairs (UTP, FTP, STP), KSPV, SHVEV, SHVEP are perfect.
- If the signal needs to travel 30-40 meters, use the KVK cable.
- To connect an intercom at a distance of up to 50 meters, you must use a coaxial cable of the RG-6, RK-75 brands.
- If the distance is more than 50 m, then it is possible to use a combination of RG-6 type coaxial cable and any power supply wire with a cross-section of 2x1.5
| Need advice on intercom cable? Contact the specialists of the Cable Systems company by calling our toll-free number 8 |
Cable for video intercom - review of brands
Twisted pair UTP 5e - suitable as a cable for intercom over short distances of 10-15 meters. To connect using Utp 2 pairs cat. 5e or Utp 4 pairs cat. 5e. The disadvantage of twisted pair cables is low noise immunity when interference sources are located close to each other: other cables near the twisted pair, power supplies, etc. In such cases, it is better to use more reliable shielded twisted pair cables such as FTP or STP. Shielded twisted pair cables are capable of transmitting signals up to 50 m.
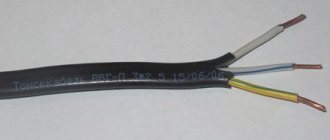
The KSPV cable can be used to connect both audio (KSPV 2x0.5 is needed) and video intercoms (KSPV 4x0.5) over short distances.
Recommended for VIZIT intercoms. Also, the KSPV cable is widely used for connecting intercoms in apartment buildings. KSPV is suitable both for laying along the risers of high-rise buildings, and for connecting pipes directly in apartments. Disadvantages of KSPVZH: Some installers note the rigidity of the wire and the inconvenience of installation. Close analogues of KSPV are flexible wire KSPVG and mounting MKGS.
ShVEV and ShVEP cables are specially designed for use in video intercom systems. This is evidenced by the core for transmitting the video signal, which has a shielding braid. This system helps to increase the distance over which the video image from the intercom camera is reliably transmitted. The remaining cores are used for audio transmission and power supply. The difference between ShVEV and ShVEP is the shell material. In the first case, it is PVC plastic, which is suitable for use only indoors or in cable structures that protect it from exposure to direct sunlight. And the second version has a shell made of light-stabilized polyethylene, which is specially designed for installation in the open air and is not afraid of exposure to solar radiation and precipitation.
Cable KVK-2P (for outdoor installation) and KVK-2V (for indoor installation) is a representative of the family of combined conductors. A single shell encloses a radio frequency cable intended for video transmission in surveillance systems and power cables. This system makes it possible to achieve guaranteed stable video signal transmission over a distance of up to 40 m. RG-6 is a coaxial cable and is most often used in video surveillance systems. RG-6 should be used as an intercom cable if high-quality video images are required over a long distance. An analogue of this cable is RK-75
TRP 2x0.4 wire can be used to lay lines from audio intercoms. In this case, signal loss is not significant. To transmit an audio signal, two parallel-laid copper wires in polyethylene insulation are sufficient. According to the marking, we have conductive cores with a cross section of 0.4 mm. This wire has sufficient flexibility and small dimensions, which makes it convenient for installation. Sources used:
- https://stroy-podskazka.ru/domofony/kabel-dlya-video/
- https://strojdvor.ru/elektrosnabzhenie/kakoj-provod-nuzhen-dlya-ustanovki-audio-ili-videodomofona/
- https://kabel-s.ru/blog/primenenie-kabeley-i-provodov/kabel-dlya-domofona/
Connection in a private house
Installing an intercom in a private home is not a very simple task, but also not a particularly difficult task. If you have at least a little skill in working with electrical equipment, a minimum level of proficiency in construction equipment, everything will work out. An intercom for a private home is not a very complicated thing and connecting it is a little more complicated than connecting a regular electric bell.
This is an intercom with electric lock and remote control
Selection of wire and its cross-section
The intercom calling panel and lock are usually located on the gate, and the handset or control panel is in the house. They are connected using a cable, and the type of cable depends on the distance at which these devices are located from each other:
- up to 15 meters you can use any cable - twisted pair (preferably shielded), KSPV, SHVEV, KVK - core cross-section 0.5 mm²;
- from 15 to 50 m - KVK with a core cross-section of 0.75 mm²;
- from 50 m to 100 m, manufacturers do not guarantee the operation of video intercoms, but you can try using power cables with a core cross-section of 1.5 mm² or an RG-6 cable or coaxial cable with a core of at least 1.5 mm².
The choice of cable type depends on the distance between the gate and the installation location of the main unit (tube)
The number of wires in cables and cords depends on the type of intercom being connected. For those that transmit only speech, a two-wire cable is enough (if you conduct grounding separately), for video intercoms you need four wires (some models require five wires, but this is rare).
How food is supplied
A few words about how power can be supplied to all elements of the system. The intercom handset, or home intercom, is usually powered by a 220 V network and most models have a cord with a plug. That is, this part can simply be connected to the nearest outlet.
If you don’t like the option with hanging wires, lead the cable (power, cross-section 0.33 mm² or larger) from the panel to the installation site of the intercom handset. Then, having removed the back panel, remove the power cord, and connect the extended cable to the free terminals.
But there may be options regarding how power is supplied to the ringing device and the electric lock:
- Power comes from the tube. In this case, the main intercom unit has a built-in converter, which converts the 220 V mains voltage into 12 V and supplies it to the calling device. In this case, a two-pair cable and, better yet, a power cable are laid between these two devices.
If power to the ringing device is supplied from the indoor unit, a four-wire cable is required
There is also such an option
The option with batteries and rechargeable batteries looks more attractive. But at low temperatures, batteries literally “fly”. This problem is so urgent that somewhere nearby they make an insulated pit in which they hide a battery of considerable capacity, and wires are pulled from it to the calling panel.
How to lay connection cables
Installing an intercom in a private house is impossible without laying cables. Wireless devices have not yet been invented, although there are already models that can be controlled via a GPS set-top box. But now we will talk about installing a regular intercom in a private house - with only audio transmission or also with a video signal.
It is much more convenient if the cables along the area - from the house to the gate - are laid in advance. If not, the cable is usually pulled along the path, hidden in a corrugated sleeve and buried to a depth of about 50 cm. In general, there are certain rules for laying electrical cables underground, but in this case, it is not the power supply that carries the wires, but signal currents, and they are not dangerous to humans . The only danger is damaging the wires when digging up the area. If there is such a danger, place the intercom cable in a protective sleeve and place warning tape or something rigid on top to remind you that there is a cable underneath.
When installing an intercom in a private house, you have to run the wires underground and along poles
To ringing device
The calling device is usually placed on a pole next to the gate. It is ideal if during the laying of the pillars the possibility of pulling the cable is provided (the embedded pipe is laid) or the cable itself is laid. The second option is worse, since if the cable is damaged it will be difficult to replace. If not, it is better to route the cable not from above, but by drilling a through hole and inserting a pipe into it. Then we will stretch the wire through it, and mount the calling panel so that it covers the exit hole. Then installing an intercom in a private house will be the most reliable: the wires are more difficult to reach.
This is what it looks like, only the lock is placed from the inside
If for some reason it is not possible to make a through hole, you can try to open the seam in the stone pillars (deepen it), hide the cable there, and then cover it up again. A hole is made in metal poles much larger than the cable, ground until smooth, painted, painted (so as not to start rusting), and the cable is passed through the hole. The second hole is made at the level where the wire needs to be brought out. You can pull it through using a wire hook, but you must be careful not to damage the shell.
If all these methods are not suitable, you will have to pull the cable from above, through the top of the pole, to the installation site of the calling device. To at least somehow protect the wires, they use cable channels (if aesthetics are not so important, you can hide the wires in a metal pipe).
To the castle
Installing an intercom in a private house also involves installing an electric lock and connecting it to a control device (a calling device or the main unit, depending on the model).
The counter part of the lock is also placed on a post or on the frame of the gate, which is attached to this post. Sometimes you need to draw food to it, sometimes you don’t. It depends on the type of lock (electric ones are necessary, electro-mechanical ones are not). If power is needed, make it less noticeable to reduce the likelihood of vandalism or disconnection.
Installing an intercom in a private house: supplying power to the lock
Power is supplied to the second part of the lock from the hinge side. In this case, a flexible connection must be made at the top of the gate. To protect the cable, it is hidden in a corrugated sleeve and it is better if it is plastic (there is less chance that the edges will fray the insulation). When installing the cable, it is run along the second post to the very top of the gate, where they make a loop of such a height that even with the gate fully open, the cable is not stretched, but there is some slack.
The second option is to bring the cord to a certain height along the pole and secure a flexible connection there. This is a spring bent in the form of an arc. A cable is passed into this spring, and its second part is attached to the gate leaf. This way the cable is protected and does not fray.
Audio intercom connection diagrams
First, let's look at the simplest intercom - audio. There is a scheme in which the main node in the intercom is the calling device. A cable goes from it to the unit, which is installed in the house, as well as to the lock.
The simplest do-it-yourself intercom connection diagram
Most often, the installation of an intercom in a private home is implemented on devices in which the calling unit is powered by a separate 12 V power source and it also controls the lock. Then one two-wire signal cable runs from the home unit to the calling unit. A power cable (for example, VVG) is laid between the calling unit and the electric lock, since it supplies power from one device to another (12 V from batteries or accumulator). The minimum cross-section of this cable is 0.33 mm² and it is better if it is in a protective sheath.
Powered by a separate source
If the ringing device and electric lock are powered from a separate power supply (220 V to 12 V converter), the intercom connection diagram looks a little different. A two-pair signal cable is laid between the main unit and the calling panel (KVK 2-0.75 cable is selected in the figure). The phase goes to the electric lock through the calling panel. And power is supplied to it (it opens) only when a signal comes from the control panel. Pay attention to the cross-section of the wires - 1.5 mm² and this is a power cable (VVG is possible). At such a voltage, such a cross-section is redundant, but more is better than less.
Electrical diagram for connecting an audio intercom
If there is a battery instead of a converter, only the part that goes from the power supply to the 220 V network leaves the circuit. Everything else remains unchanged.
Powered by main unit
There are also models in which power to the lock and ringing device is supplied from the main unit. It contains a 220/12 V converter, and 12 V power is supplied to those devices that are located outside. In this case, the connection occurs according to a different scheme (in the figure below).
How to connect an intercom if power is supplied from the main unit
The last option is the most expensive in terms of cable consumption - you will have to run two separate lines from the main unit - one to the calling panel, the second to the lock. But this scheme is more reliable. If, for example, the cable is damaged or the calling panel fails, you will be able to open the gate from home by a mobile phone call, for example. The previous schemes do not provide such an opportunity. If something goes wrong, you will have to go to the gate and force it open.
Connecting a video intercom
When connecting a video intercom, only the number of conductors in the cable changes. There should be two more of them - a separate pair is allocated for video signal transmission. It’s even better if a second cable is installed for video transmission - coaxial.
Connection diagram for a video intercom for a private home
They can be laid at the same time, but coaxial bends worse. But it has less signal attenuation. You can also use twisted pair, but take not a regular one, but a shielded one, where each conductor and each pair has its own shield. This will improve the quality of the video signal at the reception: it will be possible to see with greater clarity who exactly visited you.