Let's say you needed to install a new lamp somewhere, in a place where there is no special wiring for it, and this happens quite often. In such cases, it is enough to connect this lamp to the nearest outlet and install a compact remote control unit connected to the remote control. After which you will be able to use the lamp, controlling its operation with this same remote control.
In addition, using a remote light control system, you can divide existing lighting groups into several, change operating modes of lighting fixtures and much more.
For greater clarity and confirmation of my words, let's look at the process of installing a remote light control system from a remote control in an ordinary apartment .
I will try to describe the installation of light control from the remote control in as much detail as possible, point by point, with connection diagrams, so that you can use this instruction as a step-by-step installation guide.
Popular manufacturers
There are several modifications of contactless sockets and switches on the Russian market. It is advisable to consider products from popular brands.
Feron
Remote switch Feron TM75 23344
The following models are relevant in apartments and private houses:
- TM-75. Plastic switch with adjustable start delay for a 220 V network. Equipped with 20 channels. Included is a remote control.
- TM72. A remote control is used for control; devices are connected to 2 channels with a capacity of up to 1 kW for different light sources. Operation delay – 10-60 seconds.
Both devices have a coverage range of 30 m.
Inted
Several devices are produced:
- 220V. Single-key player with wall mounting (screws or double-sided tape) with a voltage of 20 V. Operating range - 50 m, amplified by a signal receiving unit. The case is plastic.
- 1-CH. Designed for lamps up to 900 W, controls light and alarm. It is made in the form of a key fob that transmits a signal over 100 m. It quickly fails in damp rooms.
The Inted 220V series also includes a model for two receivers with two channels.
BAS
Series of smart switches from BAS-IP
The inductive switch IP SH-74 has two independent channels. Controlled from a smartphone via a branded application. Compatible with incandescent bulbs up to 500 W and fluorescent lamps 200 W.
Z-Wave
8 devices are connected to the radio-controlled gadget. Power comes from two batteries. The maximum operating range is 75 m. The housing is moisture-resistant, with IP30 protection.
Nootechnics
Wireless switch NooLite
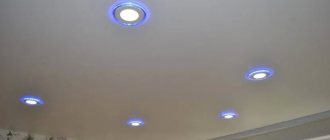
The Belarusian brand Nootekhnika nooLite has a line of products with programmable modes. They are activated using a multi-channel RGB controller. There is a dimmer to adjust the light.
The infrared model Sapphire-2503 is available with a dimmer, but is not suitable for energy-saving lamps. The lighting turns off some time after the user leaves the room. Load limit – from 40 to 400 W.
All devices are compact and easy to install.
Important Features to Select
Before choosing a remote switch, you should decide on the number of groups of lamps served by the device; you can select from 1 to 8 channels.
Low power consumption of push-button and touch radio switches in standby mode 10% - 30% ensures long-term operation of the transmitter without replacing the battery for 2-7 years.
You also need to sum up the connected power of the light sources and select a product with the optimal value of switched load power in the range of 0.2–5.0 kW. It should be taken into account that “remote transmitters” using IR rays operate within the line of sight of the receiver, and radio waves are able to bend around obstacles and penetrate through walls and ceilings in a building. You should not “chase” a transmitter with a maximum permissible radiated power of 10 mW and a coverage area of 100 m, since in a private house a range of 25–30 m is sufficient.
Correct connection
In order to properly mount the switch, you need to know its operating principle, what the device consists of, and how to connect the Wi-fi switch. The connection diagram for this wireless device is very simple.
One of the advantages of a Wi-Fi light switch is its ease of use and connection. If you really want to, you can install the device yourself
It is important to strictly follow the instructions provided by the manufacturer. This installation takes only a few minutes
The connection process consists of only two stages:
- Installing a radio receiver.
- Installation of a light switch (control button).
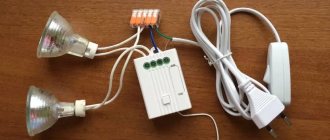
Basically, receivers have from two to four wires. They come out of the device body. To determine the input wire, you must read the instructions. The remaining wires will be output wires, for example, a double switch will have two outputs. To install the receiver, you must open the phase that supplies power to the lighting device and connect it to the circuit, while observing the sequence.
In the case where it is necessary to connect more than one lighting group, proceed as follows:
- zero is supplied to all lighting fixtures;
- the phase is branched in the Wi-fi switch;
- the phase should be supplied separately to each group of lamps.
The control button is installed quite simply; first you need to make a hole in the wall using a hammer drill with a concrete cutter. A regular plastic socket box is inserted into the finished hole, and plaster can be used to secure it. The installation process is absolutely no different from installing a key-type light switch. The only difference is that there is no need to lay wires, you just need to securely fasten the button in the socket.
Finally, we recommend watching a video that clearly shows how to connect a Wi-fi light switch:
Now you know what a Wi-fi light switch is and how lighting is controlled via a smartphone. Wireless electrical accessories are becoming increasingly popular, so if you decide to implement a Smart Home system, we advise you to acquire the devices we have reviewed.
It will be useful to read:
- How does a Wi-Fi socket work?
- Remote lighting control systems
- Heated floor control systems
Classification of remote control devices
Remote lighting control systems are automatic , semi-automatic and manual .
The former manifest themselves most effectively in large-sized residential cottages, buildings and structures, on large plots and large-scale local areas.
Through an intelligent controller they are connected to a computer and programmed to perform tasks of any complexity. They are expensive, but they completely take over the control of lighting at the site.
Using an automatic remote lighting control system, you can provide targeted light to designated areas in areas of any size at strictly defined times.
Semi-automatic systems work well in private households where it is not necessary to control a large number of light sources.
Manual options provide for remote control of one or a group of lighting fixtures using a remote control or controller. Installation of such modules is very simple and does not require the participation of highly specialized specialists.
Let's take a closer look at each of the options.
Type #1 - automatic control equipment
The main task of automatic systems (ACS) is to provide energy-efficient lighting in residential and work buildings.
The hardware and software complex not only controls the timely activation and deactivation of the light flow, but also implements the progressive Daylight .
This allows you to continuously maintain a level of illumination in the premises that corresponds to generally accepted basic standards.
Based on sensor information, the automated control system can independently reduce the brightness of the artificial light flux when a sufficient amount of daylight enters the room. This helps reduce energy consumption
Remote systems designed for automatic control of lighting devices and elements are divided into two main classes:
- local;
- centralized.
Local type equipment controls one group of luminaires. The centralized complex allows the connection of an unlimited number of separately controlled light sources to the communication node.
Local control systems . Local control units are placed in small-sized, compact housings and are mounted directly on the lamp or lamp bulb.
Sensors that record the signal are a single electronic communicator built into the system.
Lighting devices equipped with additional sensors can exchange current data with each other via the electrical network. This function allows you to provide lighting in a certain area of the building even if there is only one person there
Local-type remote devices are divided into two groups according to the scope of control. The first includes control units for certain lighting devices, the second includes complexes that regulate the level of lighting of the entire room as a whole.
Centralized automatic system . The basis of centralized control equipment is microprocessors capable of simultaneously regulating the full operation of several hundred light sources.
Communicators with this configuration not only manage the process of lighting rooms, but also competently interact with telephone networks, fire alarms and other engineering systems (security and safety, ventilation, smoke exhaust, air conditioning and heating).
Additionally, centralized-type complexes pick up signals from local sensors and supply control pulses to lighting fixtures under control.
If a room or building has areas with different levels of natural light, the control system takes this into account. Activation and deactivation of lamps occurs in rows or separate groups, depending on changes in the amount of light entering the room during the day
Processing and transformation of signal information is carried out within a single node.
This opens up wide possibilities for manual control of lighting in buildings of any scale and significantly simplifies making the necessary changes to the basic algorithm of the light supply system.
Type #2 - semi-automatic control option
Semi-automatic control systems are a unit with several toggle switches, built into the distribution board.
They are programmed to activate and deactivate lighting in certain rooms and areas of the local area at a time convenient for the owners. They do not provide for connection to the control system of all residential premises, work buildings and parts of the adjacent area.
Type #3 - manual devices for lighting control
Special remote controls allow you to manually turn the lights on and off remotely.
Based on the type of signal, they are divided into two groups:
- radio controlled;
- infrared (IR).
Radio controlled . Devices using radio waves do not pollute the airwaves during operation and correctly send a signal to a light source located outside the immediate visibility zone.
The basic range of the devices is about 100 m, however, this figure is reduced by 3-4 times if there are natural obstacles in the room or in the adjacent area.
To increase the coverage area of the radio-controlled remote control, you can install additional repeaters. With their help, the signal will reach even the most remote rooms and rarely visited corners of the site
Group of IR devices . The infrared device works reliably and clearly transmits commands, but only in line of sight.
It has a small radius of influence and sends an impulse over a distance not exceeding 12 meters in the presence of a powerful transmitter.
Some manufacturers complete radio remote controls with one or more key fobs configured to control a specific group of devices. This element is convenient to attach to your car keys, so as not to carry the main remote control with you.
Standard infrared-type manipulators have from 5 to 7 buttons programmed for a specific action.
Radio wave devices have 7-10 buttons that can control not just one device, but a configured group. For example, in one click you can activate the lighting in the garage area and at the same time open the gate for a car to enter.
Infrared and radio wave control of light from the remote control
Infrared lighting control using a remote control is used extremely rarely. Basically, such systems operate on the principle of transmitting a signal over a radio channel. To be able to manipulate lighting devices using an IR beam, a remote lighting control unit, for example BM8049M, is connected to the open circuit. It allows you to turn on the lamp switch using a regular TV remote control. To do this, point the remote control at the unit, press any key (which is not used to switch channels), after which the command is recorded in memory and now you can control the switching on of the light without getting up from the couch.
The main disadvantages of using IR remote control lights are the need to accurately point them at the signal receiver, since they only work within line of sight, and the short range of the beam, but in this case repeaters can be used.
Light control systems using a remote control have become much more widespread, in which a signal is transmitted from a control device to a controller that regulates the process of turning on/off the light at a certain radio frequency.
Light control via radio is more in demand for several reasons:
- The ability to control the light not only from the remote control, but also from a computer, smartphone and other devices;
- The signal range is about 100 meters in the absence of obstacles, 15-25 meters in the presence of obstacles;
- Possibility of installing signal amplifiers and repeaters for better transmission of commands from the control device.
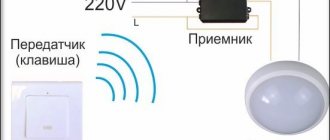
The lighting remote control system via radio using a remote control consists of:
- Remote control;
- Battery;
- Remote control controller connected to the network and load.
Install the controller into the wall or glass of the chandelier (see photo). It can control incandescent lamps, compact and conventional fluorescent, halogen, and LED lamps, and not only individual lamps, but also a group of them.
Receiver switch
The device is a touch or push-button light switch, additionally equipped with a radio signal receiver. Here we are talking about high-quality lighting control: mechanical on/off and control from the remote control do not depend on each other. Similar switches are found in some electronics manufacturers; in general, this is a rather rare solution implemented by any brand.
The range of such devices is small, let’s look at them briefly.
Among simple devices, we can note, for example, Wookee wk-317e - load control up to 500 W, remote control range (according to the seller) 30 meters. The radio frequency of 433.92 MHz is standard for most radio light control devices. The switch is quite bulky and requires a non-standard installation box (socket box). The kit includes a control panel, which apparently cannot be replaced with another device. Unfortunately, there is no information on whether the switch requires a neutral conductor.
Receiver switches from Legrand Celiane series have more advanced options - they can be controlled not only from the remote control. The device has the function of a full-fledged radio relay and can work with various transmitters - remote controls in the form of a regular switch, motion sensors and Internet signal translators. Naturally, all these devices are supplied by the same manufacturer. Some receiver models support dimming. Among the disadvantages, it should be noted that this device is quite difficult to find, and also that the receiver switch requires a neutral wire. The presence of a zero can become a serious obstacle when installing in an already equipped place for a regular switch (after all, a zero is not provided).
During the search process, I managed to find the best solution, in my opinion - a switch from Aliexpress Smart Switch. The switch is mounted instead of the usual one, a neutral conductor is not required! The touch switch is produced in various colors and can have up to three independent control groups. A four-button compact remote control or other device (like Legrand) is purchased for the device. It is worth especially noting that the four buttons on the remote control can control many light groups and several switches; the switch itself is easily programmed to the desired key. There will be a short review about this model soon. The device does not switch on during power outages.
In addition to the Legrand and the “unnamed” Chinese device, there are other manufacturers, for example Brenin Mount Switch. This device can also be used as part of a smart home - with a remote control, various sensors and switches. However, I was unable to get competent technical advice on their supposedly official website. There are suspicions that they do not have a dealer in Russia, and that the site was created by some charlatans.
But on the noolite “Nootekhnika” website it is quite possible to get advice from a competent specialist. But, unfortunately, they do not have a ready-made solution in the form of a switch-receiver. However, there is an SB-1-100 block - it is connected to the lighting circuit break (zero is not needed), like the devices described above, and is also connected to any push-button or conventional type switch. The block itself is mounted in the mounting box under the switch itself. The unit is compatible with all noolite smart home devices - remote controls, sensors and wireless switches. Capable of operating in two modes (selected during installation): relay, when the switch is only on. or off and dimmable, when the brightness of the lamps is smoothly adjusted.
All described devices consume a miniscule current from the circuit even when the lights are off. Therefore, when using energy-saving or LED lamps, chandeliers and lamps must be bypassed with a 0.1 - 0.2 µF capacitor. Otherwise, the lamps may glow dimly or flicker. Read more about glowing and blinking LED lamps
Typically, a bypass capacitor is supplied with the receiver switch.
Using the devices described above, a light control circuit based on the principle of pass-through switches is very simply implemented. The receiver switch is connected instead of a standard switch, and the remaining control points are implemented using remote switches (transmitters). The disadvantage of such a system is that additional control points (transmitters) require batteries. Well, an undeniable advantage is that there is no need to run wiring to the transmitters.
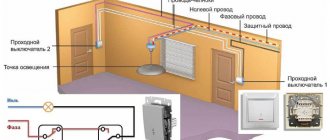
Remote lighting switches. Installation of walk-through wall switches without wires.
There is, and it’s absolutely inexpensive. All costs can cost you between 500-1000 rubles. At the same time, you won’t spend a penny on new wires and won’t cut through a single extra centimeter of the walls.
In fact, you are buying a ready-made solution and installation costs are minimal. They come in single-key, two- and three-key types.
The switches themselves can be mounted on the wall in two ways:
- on the double-sided tape that comes with the kit, directly on top of the wallpaper or tiles
- for self-tapping screws into an existing socket box
The most important component of the remote switch is the power radio module. It is no larger than a matchbox.
Thanks to this, you can place it anywhere - in junction boxes, behind a chandelier cap where the wires are connected, behind a suspended ceiling, etc.
You can also install it inside the old one, taking out all the “gibles” from there.
But most often they are installed in the chandelier cap, since there is plenty of space there.
A voltage of 220 Volts is supplied to the radio module and transmitted to the lamps through its contacts and relays.
You can easily attach several switches to one module - one, two, three, four, it doesn’t matter.
To create such a circuit using simple pass-through switches, you will have to pull a bunch of extra wires, and also buy another type - changeover or crossover. Read more about this in the article – “Pass-through switches. Connection diagram.”
You can also attach a remote control or key fob to the device. And then, to control the lighting in the house, you won’t even need to go to the switches and press them.
You can lie quietly on the bed, put the keychain on the nightstand and turn off the light without getting out of bed.
Since the power of street lamps is many times greater than that of indoor light bulbs.
The switch is very easy to disassemble. It is enough to use a screwdriver to pry out the slots at the junction of the cover and the body. There is no need to unscrew any screws.
Area of application of the devices
The scope of use of wireless devices is very wide. Models are installed in apartments where there is a need to install a changeover switch or to move an old traditional switch, but this is hampered by the structural features of the room, household appliances and furniture.
In case of urgent need, a wireless switch can be installed not only on the wall, but also on a mirror or inside one of the cabinet shelves. Regardless of its location, the module will function efficiently and provide comfortable control of lighting fixtures
To correct the errors of incorrectly made wiring, you no longer need to dismantle the external decoration of the walls and punch new grooved channels. The problem will be instantly solved by installing a wireless switch. It can be placed in any convenient place, forever forgetting about the difficulties associated with the home lighting system.
Installing a wireless device is the least labor-intensive and cheapest way to ensure comfortable control of the lighting system. The switch can be installed even in rooms with high humidity and sudden temperature changes
Lack of free space in a living space is another reason for installing a wireless module. The device can be placed in a minimal area and even built into any piece of furniture.
For wooden buildings, where electrical wiring equipment is associated with increased security measures, wireless elements are more than relevant. Of course, you can organize external wiring, however, this does not always match the interior and often spoils the attractiveness of the room.
In addition, exposed electrical wires are vulnerable to mechanical damage from residents, children and animals. To protect yourself and your home, it is wiser to install wireless modules and no longer worry about a force majeure situation (fire, short circuit, etc.) resulting from wire damage.
Organizing hidden wiring in a wooden building is problematic and unsafe. An overhead wireless switch will be a lifesaver for owners here. You don't need to call an electrician to install it. The work is simple and even an inexperienced home craftsman can handle it.
If the room is divided into locations, each of which requires its own type of lighting, it is not at all necessary to do a huge amount of work and run wiring to all the switches.
It is enough to simply install a wireless device that can control several light sources and use the remote control to turn on or off the lighting fixtures as needed.
When all repair work in a room has been completely completed and the walls are decorated with a finishing coating (wallpaper, fabric, paint, tiles, laminate, etc.), but there is an urgent need to install another switch, there is no point in dismantling the finishing and punching additional groove channels.
It is better to install a practical wireless device. This will take a minimum of time, and the appearance of the room will not be affected in any way.
To control the lighting system in large cottages, conference rooms, long corridors and other large spaces, wireless modules are simply created. They allow you to turn on the light while being at a great distance from the room or even from the street.
If the building has historical value (antique houses, museums, etc.) and making changes to the interior solutions is considered unacceptable, it is worth using wireless switches. They will provide full control of the lighting system and will easily “hide” in pieces of furniture, without giving away their presence and belonging to modern life.
Increasing the comfort of your home is an excellent reason to install a wireless system. It will allow owners to control the lighting of rooms and utility rooms, literally, with one click of a button and adjust the light intensity according to personal needs and preferences.
Methods of automatic control of street lighting
The infrastructure of any settlement requires the presence of powerful lighting devices. Thanks to the time relay, they are able to turn off and start working at the right time.
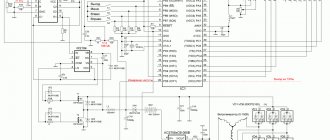
Automated external lighting control system (ASUNO) "Energomera"
Automated operation of lamps is also used in the garden. This consumes significantly less power and adds a motion sensor to the relay.
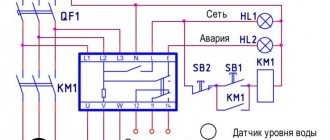
Control cabinet
The control cabinet is the center in which all the circuits are collected, from where the load is distributed and full control over the lighting is carried out. Protection of photo relays of lamps from short circuits and voltage surges is also carried out through this control panel.
Operating diagram of the street lighting control cabinet: 1 - electric meter, 2 - lock, 3 - protection, 4 - cabinet. All information and indicators are transmitted via the Internet
Also, based on the service life, equipment is being updated here - the longer any cable or circuit operates, the greater the chance that the control cabinet will have to be de-energized and worn-out elements replaced for the safety of the site.
Option for assembling a street lighting control cabinet
The cabinet performs the main task: it controls the operation of the desired relay depending on the time of day, provides guidance using the remote control, and regulates the brightness of the lamps after the photo relay is activated.
What to connect?
These can be ordinary street lights with a simple relay, controlled from a remote control through a control box, tiny LED lamps along the paths, pendant lighting and a lamp above the front door. That is, any lighting fixture located outside the home, but falling within the coverage radius of the remote control.
Types of control
The following systems are considered traditional:
- magnetic or induction ballast - lights the lamp with an inrush of current, but power surges often occur, which is why you have to install an additional relay;
- electronic ballast – does not use a starter, there is no noise, no flickering, reduced energy consumption. It distorts the radio transmission, quickly disables the photo relay, the result is that it does not work depending on the time of day;
- option for enterprises - based on the calendar and daily time, controls lighting, starting from the “working/holiday/weekend” scheme.
The simplest and cheapest scheme for controlling street lighting using a photo relay, currently the cost of a photo relay is 300-400 rubles, you can connect all street lighting on the site to it
Street lighting control uses three types of devices:
- A device based on a photo relay that turns the lamp on and off, based on the level of illumination on the street. In theory, a system using a photo relay responds perfectly to weather conditions, and on a cloudy day the device will operate earlier. But in practice there are too many third-party factors, including temperature changes and sensor contamination. Because of this, the operation of the photo relay occurs with errors.
Control option using timers located in the control cabinet; experienced electricians will be able to connect the modules to the overall street lighting circuit and the automation will work according to the specified parameters both in winter and summer
- Timer based system. It works perfectly regardless of the time of day: the machine turns on the lights in the morning and turns them off in the evening, all in accordance with the parameters specified by the program. But due to changes in daylight hours, the device needs frequent adjustments.
- Astro timer. Created on the basis of the previous one, it is a controller interfaced with a watch. The operation scheme is simple: the controller contains a database of the location of the Sun over a given area, and based on this knowledge, the program sends a signal to the lighting control panel. The system requires minimal costs: every 2-3 years the power supply is changed and the time on the clock is adjusted. The error depends only on the degree of perfection of the program installed on the controller.
Control over area lighting
If finances allow you to stretch a separate cable to each lamp with a relay on the site, then one control cabinet will be installed inside the house, and another one at the gate. But such a shield must operate in parallel with the second one, which means that each unit will consume the energy of a full-fledged cable channel.
Remote control of light using infrared and radio switches
Infrared switches are a rarity in the lighting market, as it is smarter to control the light using radio devices. One of the most popular switches is “Sapphire” from Nootekhnika (Belarus). The same company produces many wireless lighting control devices, including those mentioned below. The switch is controlled by any remote control, for example, a television remote control or manually. The signals are received by a receiver located inside the device on the touch panel. The light switch with remote control is shown in the photo.
Radio switches allow you to control lighting manually and from a remote control (you need to link it), and in appearance they are not much different from standard “circuit breakers”. Their interaction with the lamp occurs through power units connected to a 220 volt network and load (see connection diagram). You can connect 220-volt incandescent and halogen lamps, halogen lamps via an electronic or ferromagnetic transformer, as well as fluorescent and compact fluorescent lamps to the power units.
A remote-controlled light switch is placed in any convenient place, power units are placed in a distribution box or chandelier glass.
Radio relay
May have different names, including “power block”. In general, to be as precise as possible, a radio relay can be called any device that can receive a radio signal and switch various loads. All devices described on this page are radio relays. However, it is the devices described below that are most often referred to as such.
They are blocks for installation in a panel, on a DIN rail or other fastening. By and large, these devices resemble receiver switches with wider options. Power units have a large number of controlled channels (number of loads), greater sensitivity to radio signals (not always necessary) and higher load currents (depending on the model).
These units, as a rule, do not turn on spontaneously during power outages, but they have many disadvantages. Firstly, loads can only be controlled from the transmitter. You can solve this problem by installing a wireless switch (transmitter). Secondly, this unit is problematic to put into operation where the electrics were designed without taking radio control into account - after all, the device needs a shield, and therefore all light lines must come directly to the shield. This greatly complicates the installation of electrics already taking into account this element.
Among other things, these units are the most expensive of all radio-controlled devices. It remains a mystery to me what the manufacturer is counting on when selling a not very functional device for such money. But here, of course, everything depends on the specific case; perhaps in some situations this is the only acceptable solution.
Advantages and disadvantages of remote control devices
Devices that allow you to control lighting using a remote control have certain pros and cons. The most important advantage is the ease of installation and ease of connection: installation of the device does not require special knowledge.
The ease of use and the ability to smoothly adjust the lighting fixtures attract attention. Some models also have a device programming function, with which you can set the “presence effect”
In this case, the device will turn on/off automatically at a certain time, which can be useful if the apartment is empty.
As a rule, manufacturers produce a set of equipment necessary to enable remote adjustment of lighting fixtures. The power unit must be connected to an existing electrical network
The use of remote control devices helps reduce electricity consumption, as well as extend the service life of various types of lamps. In addition, the remote switch makes it possible to simultaneously control several light sources or even other devices from one remote control.
The disadvantages of such devices include the occasional false or spontaneous operation; a weak radio signal that may not pass through an obstacle; possible effects on pacemakers or hearing aids.
Switches located outdoors may not operate correctly due to precipitation. In addition, the batteries on the control panel may run out at the most inopportune moment.
Equipment for the control complex
The lighting control complex is a multifunctional communication unit with wide optional capabilities.
It combines lighting devices, sensors, photocells and other auxiliary devices into a single intelligent system.
The lighting control system is controlled not only through a touch screen or remote control, but also through advanced mobile applications and web interfaces for computers, smartphones and tablets
If necessary, the network operates completely independently in the established mode and does not require constant user participation.
Additionally, the complex may include:
- automatic switches with the option of self-activation and deactivation;
- dimmers that can automatically adjust the power level of light flux in enclosed spaces and open locations;
- lamps with extensive functionality - automatic switching on and off, increasing or decreasing power, changing the color temperature and shade of the supplied light;
- LED strips with additional options and RGB-type control controllers;
- sensors for motion , light, presence in the room, opening of doors and windows;
- remote switches.
Properly configured control equipment operates reliably and interacts correctly with fire alarms, HVAC and other systems present in the premises.
Control units are communication nodes with buttons on the body panel and correctly turn on and off lighting fixtures.
Some models control the intensity of the light flow and its brightness, and have the ability to receive and process remote control signals. The block buttons are independently programmed for specific actions.
The communication unit can not only control the switching on and off of lights, but also remotely control various automatic electronic systems, such as garage doors or blinds.
Controllers are simplified elements for remote control of lighting networks.
They are manufactured in a wall-mounted design and are usually mounted at the entrance to the room. Remotely activate and deactivate lighting devices according to the established program.
Initially, the module is configured by the manufacturer for a standard operating algorithm. You can make changes to the operating mode through the connected LCD display and keyboard.
The program begins to operate by receiving a signal from sensors, timers, the remote control, or by manually pressing buttons on the controller body itself.
RGB-type controllers are used for remote control of LED strips.
They have wider functionality and regulate parameters such as:
- on/off;
- lighting brightness;
- glow range.
Using these control elements, you can change the tone of the light flow, adjusting it to the situation or mood.
Sensors belong to the auxiliary elements of the control system and respond to changes in certain parameters.
Families with small children should equip their premises with motion sensors. This ensures that the child is never left indoors without lighting.
Motion-detecting modules activate the lights when a user enters the room and turn off the lights when the room is empty. This makes it possible to use energy resources efficiently and not pay a lot of money on utility bills.
Light level sensors are most useful in outdoor systems. They promptly turn on the lights in the local area when it gets dark outside, and promptly turn them off when the sun rises.
This method of remote control allows you to save energy and reduce the operational load on street lighting devices.
Time relays and timers make it possible to control lighting according to a specific schedule. The user can set the required interval for turning on and off the equipment independently.
Read on to learn how to connect a time relay.
Some device models are equipped with a microprocessor and are subject to programming for specific tasks.
There are control buttons on the body of electronic time relays. By pressing, the user can set the required range for switching system operating modes
Photocells control the natural light in a room or open area.
When the light flux level decreases, the artificial light supply is activated and its intensity is increased as needed. They do not react to sudden bright flashes and take into account only the general background illumination.
Connecting remote switches
The installation diagram of such devices often depends on the light bulbs with which the device will work, as well as on other factors, so before starting assembly you should carefully study the instructions included with the model.
As a rule, products are designed for a standard voltage of 220 volts, however, with the specific requirements of the lamp, this figure may be underestimated.
When connecting any model of switch with a remote control, you must follow safety rules. Do not touch exposed wires without turning off the power
If the system includes a voltage-reducing device, the control unit must first be installed, and only then the transformer. When you press a button on the remote control, the power unit supplies power either directly to the light bulb or to a step-down transformer (depending on the light source). Most often, a similar scheme is used when lighting rooms with LEDs.
Depending on the model, the power unit may have one or more channels: the latter option allows you to simultaneously control several devices at once.
Experts recommend connecting the remote device through a traditional mechanical switch, which can be used if the remote-controlled device fails.
How to choose an execution unit
Communication between devices of various modifications can be carried out using different protocols. The joint operation of the radio switch and the remote control is only possible if they are compatible, which depends on the manufacturer and series of the product.
Load
The selection of the power unit is made depending on the nature of the load. The power of the device, indicated as maximum, corresponds to the load from incandescent and halogen light bulbs at 220 V. For light sources connected via a transformer, a reduction factor is used:
- 0.7 - for low-voltage halogens;
- 0.5 - for fluorescent lamps.
It is more difficult to determine the real load from energy-saving lamps, due to their high starting current. A simple method that does not exclude overload and sintering of contacts is to make a threefold power reserve. A guaranteed way to protect against trouble is to use a special module designed to work with LED and energy-saving lamps, or with the ability to connect an external power relay.
Accommodation
The permissible switching power of the blocks is related to their dimensions. A radio relay for a load of 200–300 W can easily fit into many lamps - it is no larger in size than a matchbox. Modules designed for 3–5 kW are equipped with cooling radiators and are much larger in size, but have a flat layout and are easily hidden in the space behind the panels.
Certain series of devices are produced in REG housings for mounting on DIN rails with the possible connection of an external antenna. Receiving units with increased protection (IP65) are designed for operation in wet conditions.
In addition to commands from remote controls, power modules are capable of operating from signals from lighting and motion sensors equipped with a radio channel. Manufacturers of equipment for remote lighting control also offer ready-made kits with standard solutions that simplify the selection of suitable devices. The most basic option is a radio adapter that plugs into an outlet and requires no installation at all.
Remote control system for light in an apartment
Light control scheme via the Internet
Light control in an apartment can be carried out by switches with a range of up to 100 m or less, depending on the area of the room. If there are load-bearing walls or iron reinforcement in the walls along the signal path, there are radio signal repeaters that allow you to bypass obstacles and increase the power of the transmitting device.
You can install 2 light control systems in your apartment:
- Local, if one lighting source is connected to one switch.
- Global. In this case, all lamps and spot groups will be connected to a single control panel. The scheme may include air conditioners, ventilation systems and other electrical devices, for example, automatic blinds or roller shutters.
In large apartments it is possible to combine the operation of sensors and a remote switch. This is necessary for temporary lighting of passage areas. The sensor is installed in the direction of travel and is triggered if a person enters a certain area, then turns off.
The device can operate in several modes:
- Temporary. When you press the button, the light turns on for a certain time, then goes out on its own.
- On/Off. When the button is pressed once, the devices are either turned on or off.
- In monostable mode, holding down the button will keep the light on. If you let go, it will go out.
- Bistable mode is a cyclic change in the operating state of the device.
The more modes, the more expensive the equipment.
Modern methods of remote control of street lighting
Street lighting control. Modern methods.
Control cabinet
The heart of the lighting automation system is the control cabinet. Circuits are installed here that are responsible for monitoring loads, for power distribution, for protecting lamp relays from voltage surges and from short circuits. This is a kind of automated control panel.
Control cabinet equipment must be maintained and updated from time to time to ensure safe and reliable operation of cables and circuits. During routine maintenance, the cabinet is de-energized and those parts that are time to be updated are replaced.
The task of the control cabinet is mainly to control the operation of the correct relay depending on the current situation (depending on the time of day, on lighting conditions, on the state of the presence sensor). In addition, the control cabinet allows a person, using a remote control, to quickly adjust the intensity of the lights during their operation, after the photo relay has already worked.
You can basically connect anything to the cabinet.
Starting with street lamps on poles, which will be activated by means of a photo relay or from a remote control, continuing with LEDs along the garden paths that light up at dusk, ending with garlands on the facade of the house and a lamp above the main entrance to the house. In principle, there are no restrictions; a sufficient condition is that this or that lighting device on the street falls within the range of action of the cabinet and remote control.
Power and control circuits
In lamp power supply circuits in combination with relays, magnetic or induction ballasts are traditionally used. Less commonly, electronic ballasts (since they distort the radio signal and produce unstable operation).
Most often - timers for control by calendar and time of day (including holidays and weekends).
One way or another, three types of automated street lighting control devices can be distinguished: a photo relay for controlling the level of illumination, a system with a timer, and a system based on an astro-timer.
Turning lighting devices on and off based on the level of current illumination is the principle of operation of devices based only on photo relays.
In theory, this approach allows you to ideally control outdoor lighting depending on weather conditions and the time of day: in cloudy weather the light will turn on earlier than on a clear day.
But in reality, many external factors influence such a system, for example, dirt getting on the sensor or a change in the temperature of the circuit - this is how errors arise in the normal, as a person would like, operation of the relay.
Triggering at a certain time is the principle of devices exclusively based on a timer.
It doesn’t matter what the weather is like, whether it’s raining or snowing - the night illumination light will be turned off in the morning, and will be turned on in the evening - in accordance with the user-specified parameters of the customizable timer.
But what about the fact that daylight remains in the summer, but decreases by winter? This is the disadvantage of circuits that are simply on a timer; adjustments will need to be made from time to time.
A more flexible system is the astro timer. This type of controller is a timer coupled with a program for tracking the theoretical movement of the sun along the horizon.
A database regarding the dynamics of the position of the Sun over the terrain with your coordinates is loaded into the controller, and the more advanced the program, the more accurate the operation of the automation system.
The user will only have to change the system’s power supply once every 3 years and adjust the clock to the controller.
- Examples of street and outdoor lighting control:
- Using a photo relay for lighting
- Using a floodlight with a motion and light sensor
- Automated site lighting
If you need to automate the lighting of your garden plot, then, with certain financial resources, you can lay a separate cable with its own photo relay to each of the lighting devices. Install control cabinets inside the house and near the gate. The shield will work in such a way that the consumption of each block will be proportional to the number of cable channels.
In order to optimize the system, one of the control cabinets is placed near the gate, and devices with a photo relay and a presence sensor are connected to it, so that its controller controls, say, only the lighting along the garden path. The second cabinet (for remote control) is installed inside the house. The scheme turns out to be simpler: the lamp channels come to the control unit, and control is carried out from the remote control.
Units with many optional features are popular, such as remote control of a photo relay or when commands are issued from the switchboard, such as “de-energize the perimeter.” A standard cabinet may simply have 6 channels, of which not all can be used, but as many as needed, for example 2 or 5.
In the process of setting up the system, first the cables are pulled from the lighting fixtures to the control cabinet. Then the system can be improved. The first step of improvement is to equip each flashlight with a battery-powered controller for remote control via radio from a remote control. Another option for remote control is to install sensors to receive the radio waves from the remote control.
One of the most popular solutions is garden lights on solar panels. No cables or control cabinets are required here; it is enough to install sensors for the remote control. Lighting zones may differ in control frequencies, but together will be able to cover the entire area.
Methods for remote control of street lighting
Remote control of site lighting is often associated with the mandatory installation of a distribution board. The transmission of the controller signal can be organized in various ways, and not just in an automated digital way, but also:
- RF signal via cable to a separate device with an individual relay;
- by controlling from a smartphone via GSM, especially over a large area;
- finally a radio signal.
In any case, the circuit in a hierarchical sense is built on the basis of the following algorithm: a panel for controlling a group of lights or relays, then a control cabinet for a certain area, and finally the main panel for controlling the smart lighting network of the area.
Andrey Povny
Overview of remote switches
Among the most well-known models on the market, we especially highlight the IR remote light switch of the Sapphire-2503 type, produced in Belarus, as well as a system with a radio-controlled channel of the Nootekhnika Noolight brand. The product of the first of these companies can be seen in the photo below.
Remote control type "Sapphire-2503"
Another type of wireless switches and switching devices for lighting equipment over a radio channel is produced by the well-known. These include such common models as AWST-8800, AWST-8801, as well as the portable key fob “CoCo” AKCT-510 and the built-in transmitter AWMT-230.
Models from the last two manufacturers of remote control systems are more practical and convenient than similar switches with signal transmission via an IR channel. With their help, it is possible to simultaneously control all lighting equipment in the house from almost any point (from the most remote rooms). The presence of special dimmers in the set of these devices significantly expands the capabilities of the system and allows you to adjust the illumination of internal spaces.
The portable control panels included in their composition allow the possibility of choosing one or another scenario of actions leading to the connection of light. More “advanced” products from the considered manufacturers may contain a special RGB controller capable of performing a number of operations, namely:
- Turn on lighting at a given address or in the entire house at once;
- Adjust the brightness level of the lamps;
- In accordance with the given program, set the desired ratio of different color gamuts with LED backlighting and sort through them sequentially.
Due to the fairly compact size of the electronic part of these devices, the remote switch can be placed inside the glass of a chandelier or lamp. When controlled from a remote control, it can be switched over a radio channel from a distance of about 30 meters.
Most of the considered control system samples are capable of working with household consumers designed for power up to 3.5 kW. To connect them yourself, you must perform the following mandatory operations:
- First, a load with a suitable operating power for the device is selected;
- After this, the voltage from the house or apartment is removed automatically by the introductory machine;
- At the final stage of the work, a power unit responsible for turning off the light is installed into the break in the supply line.
All details of connecting the final execution device can be found in the next section.
How an infrared remote control works: personal experience
IR sensors have long been used to wirelessly transmit commands from the remote control to various actuators.
Initially, they began to be introduced for convenient viewing of television programs, and then they were used in other areas of our activity.
A simplified block diagram of the remote control shows the principles of its operation.
At the center of the remote control logic circuit is a programmable controller - a microprocessor, which is usually powered by AAA batteries.
According to a pre-planned algorithm, it generates a strictly defined sequence of electrical impulses used as a unique command for each button.
The encoded signal from the microprocessor is sent to an infrared transmitter and pulsed with light flux is emitted into the surrounding space.
It must be accurately aimed at the IR receiver. Then the command will be received and processed by the remote microprocessor. The decrypted information, after verification, will be sent to the receiver's actuator.
Light switches: overview of possibilities
All IR modules operate according to the principle described above. For example, the BM8049M electronic unit, made in the form of a regular board, can be embedded into a gap in an existing electrical lighting circuit. After installation, it is convenient to isolate it from external circuits with a heat-shrinkable tube.
To configure its operation, you can use the remote control of your TV, interactive television set-top box, or other device. The main condition is that it has a button that you do not need to use for other purposes.
Agree that there are quite a lot of them: in normal work, a few are enough, and we don’t even remember the purpose of others. This useless button is configured to work with the BM8049M switch.
The more modern MP3328 relay module from Master Kit has the ability to control from one to eight separate lighting fixtures located in different places in the house or cottage.
The distance that an infrared signal can normally travel from the remote control to the IR receiver can be up to 15 meters. In a home or apartment, this is quite enough.
But it is necessary to create direct visibility between the sensors: the signal does not pass through obstacles.
The BM8049M switch is equipped with the function of automatically turning off the light after 10–14 hours of operation, which is useful for forgetful people. Its switching capacity is limited to a load of 1.5 kW.
Set of LED RGB lamps with remote control Magic Lidhting: a simple ceiling chandelier for the living room
LED RGB lamps use a rather unique light switch. It is built inside the control module directly in the base of the bulb, created for a regular E27 cartridge.
Therefore, it is enough to screw RGB lamps into any socket, for example, an old Soviet-era chandelier. No further installation steps are required. The remote lighting circuit will work.
My Magic Lidhting remote looks like this.
The transmitter's infrared beam exits in the middle of the top bar, where the Magic Lidhting inscription is located.
The control buttons are arranged in four vertical columns, and for user convenience they are meaningfully combined into groups indicated by dark gray areas.
I marked them all with white numbers and compiled them into a table that allows you to understand the principle of controlling LED lamps.
| Button number | What happens when you press | Notes |
| Turning lights off or on | ||
| 1 | ON - The lamp turns on | |
| 2 | OFF - The lamp turns off | |
| Lamp brightness control | ||
| 3 | Brightness decreases (down arrow) | Use buttons 3 and 4 to adjust the blinking dynamics |
| 4 | Brightness increases (up arrow) | |
| White Light Setting | ||
| 5 | W - Static white color | |
| Color design of the left column of shades R | ||
| 8 | Red color | |
| 11 | Orange | |
| 14 | Light orange | |
| 17 | Dark yellow | |
| 20 | Citric | |
| Color design of the middle column of shades G | ||
| 7 | Green color | |
| 10 | Turquoise | |
| 13 | Dark turquoise | |
| 16 | Blue | |
| 19 | Light blue | |
| Color design of the right column of shades B | ||
| 6 | Blue color | |
| 9 | Blue-violet | |
| 12 | Violet | |
| 15 | Lilac | |
| 18 | Light blue | |
| Flashing Characteristics Settings | ||
| 21 | Smooth change of 7 primary colors in flashing mode | |
| 22 | Flashing mode of the selected color | |
| 23 | Adjusting the brightness of the selected color | |
| 24 | Flashing mode of three primary RGB colors with adjustable frequency | |
This manufacturer, by the way, also produces a separate RGB controller for LED lamps with a total power of 72 watts and a supply voltage of 12 volts. The current of their total load can reach six amperes.
A remote control with a large number of commands was created for it - 44. It has a more complex design that requires connection through a separate power supply. I haven't checked it.
Using sensors to control lighting
Various motion sensors for remote control of lighting are widely represented on the lighting market. The most common of them are infrared. They are devices that close or open the lighting circuit when the level of infrared radiation increases in their “visibility” zone. As soon as a person or animal whose body temperature is higher than the background temperature enters the sensor’s field of action, the light turns on. As soon as a person leaves the sensor’s coverage area or remains in a stationary position for several seconds, the light turns off. Motion sensors are most often installed in entrances, above the front door, and less often - inside the apartment.
Design and principle of operation of a wireless switch
A wireless remote switch (WRS) consists of a transmitter that converts the control signal into a radio signal from a master oscillator. This happens after pressing the switch key, touching the touchpad, or sending a signal from the phone via WI-FI. In the transmitter's coverage area there is a receiver (actuator) that “closes ↔ opens” the contacts of the power relay connected to the power circuit break at the moment the radio signal is received. In addition to the radio frequency of 315 MHz or 433.92 MHz, infrared waves are also used for signal transmission.
Operating principle and design
Receiver and Remote Switch
Structurally, the remote lighting switching device consists of a receiver and a signal transmitter.
More details about these devices:
- Receiver. The element is made in the form of a radio relay controlled via a remote control. You can turn the light off and on from a mobile device connected to a Wi-Fi network, as well as from a wired switch. As a result of receiving a signal, the relay is activated and closes the contact elements or opens them. It is advisable to install the device in close proximity to the lighting fixture or inside it, if dimensions allow. In the case of spotlights, the device must be installed in the distribution panel or in the free space between the suspended and main ceilings.
- Transmitter or remote control. The device structurally consists of a generator that generates electricity after activating a button on the remote control. Generation occurs after touching the sensor or transmitting signals from a mobile gadget. Electrically, the signal is converted into a radio pulse, which is picked up by the receiver. The transmitter can be installed in the wall or not installed at all, but carried with you. There is a power source inside the remote control, so there is no need to connect it to an electrical line.
Infrared control
Lighting devices are controlled by exposure to infrared radiation. To do this, the processor control module must be connected to the lighting circuit break. The action can be performed using the TV remote control. The device is pointed at the processor module, after which a button is pressed, which does not switch television channels. This leads to commands being written to the device’s memory, and then the lighting is controlled from the pressed key. The main disadvantage of this control method is the need to ensure line of sight at a short distance.
Radio wave control
This control option is more common. Signals are transmitted to the radio switch from the remote control to the processor module. which is tuned to operate in a specific frequency range. Packet data is exchanged using special codes. High reliability of signal transmission from the remote control to the radio switch itself is ensured by creating the required level of pulses and repeating them in a certain sequence. The signals are repeated several times. To prevent a situation where the lighting is triggered by a neighbor's remote control, each switch is assigned its own unique address.
Radio-controlled devices often use non-volatile controllers, which allows them to be used without connecting to a household network.
There is a button on the switch that can be used to turn off the remote control and switch the lighting manually. Such devices may be equipped with a search key, by clicking on which you can find a lost remote control. The device will report its location using sound signals. Lighting control is possible using a mobile device or computer. To do this, you must first download the program to the device and configure specific commands.
Radio-controlled switches are divided among themselves according to the power used, which can reach several kilowatts. It is possible to configure devices to work with individual lighting fixtures or entire lighting systems. The best option would be to control different groups of lamps from a common transmitter.
Mr. Borisych spoke about the principle of operation of wireless radio switches.
Operating principles of remote devices
Modern devices that turn on/off light at a distance usually operate on the basis of emitting/detecting waves of a certain frequency (sound, infrared, ultrasonic, etc.).
Such devices usually consist of two parts:
- A receiver on microcircuits, which is installed near a lighting fixture or mechanical switch connected by power wires.
- Remote control (remote control).
Let's take a closer look at the most common types of such devices.
Infrared controlled switch
This category of devices operates on the basis of an infrared wave emitter, which is remotely controlled from a special unit connected to an open circuit. This makes it possible to turn the lamp on/off using the remote control.
The main disadvantage of such devices is the need for precise guidance of the infrared signal, which must necessarily be within the user’s visibility range
A number of manufacturers (BJC, Duwi, Simon, Steinel) have found a way to avoid this problem. The models manufactured by these enterprises are equipped with controllers that convert infrared radiation into a radio signal, which allows you to increase the range and overcome obstacles encountered along the way.
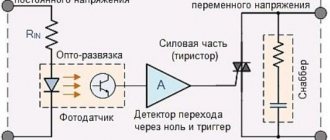
Detailed installation diagram of the remote switch. When carrying out work, remember that copper wires should not be attached directly to aluminum parts - this operation must be carried out through terminal or special connectors
In some cases, commands transformed into radio frequencies are converted back to IR at the output, which is necessary to control certain types of devices (air conditioners). Another disadvantage is the insufficient range of infrared waves (up to 20 meters), which can be overcome by using repeaters.
Devices for controlling light via radio channel
Such devices are often included in Smart Home systems, but can be used independently. In radio frequency remote switches, the command transmission process is carried out using a remote control, the signal of which is transmitted to the controller responsible for controlling the light.
A special range of radio frequencies is allocated for the passage of information (usually 315, 433, 868 MHz). The power of radio transmitters for such devices is 10 milliwatts, which is regulated by law.
Appearance of a standard remote control used for devices operating via a radio channel. By pressing the command button, you can use up to 30 channels simultaneously, but only one will work, which receives its address in the message
Despite the small indicator, the operating radius of the devices is quite extensive: in open areas it reaches up to 100 meters, and in spaces with obstacles – up to 25 meters.
Such a range of the device (it can be enhanced by repeaters and other devices), as well as the ability to overcome obstacles, are the main reasons for the prevalence of radio switches, which are used both in everyday life and in industrial and administrative institutions.
Scheme of operation of radio frequency devices
To transmit a radio signal, the following set of equipment is required:
- battery (regular batteries);
- remote controller connected to the load and network;
- a remote control that resembles a remote control for a video or television device. There are pocket mini remote controls or key fob devices with 2-6 buttons; Such devices are used to control a small group of devices.
The remote control controller is mounted in a wall, lighting fixture (chandelier glass) or under a suspended ceiling.
Such a device is compatible with various types of lamps: incandescent, halogen, fluorescent (regular and compact), conventional and linear LED, regardless of whether they are arranged singly or in groups.
In addition to conventional remote controls, there are also wall-mounted radio transmitters that have compact parameters and a limited number of command buttons. Such devices are attached to vertical surfaces with special holders or even tape
With radio control, the signal is transmitted in the form of a packet of information: it contains a command, the address of the device to which the instruction is intended, as well as a checksum. Radio waves are received by all receiving devices at once, but due to the indication of the address, only the device for which the command is intended responds.
The transmitted checksum is used to verify information: the amount sent by the transmitter must match the number counted by the receiver. If the results are different, the device does not work.
For stable, error-free operation, each command is transmitted to the transmitters repeatedly (at least three times), which somewhat slows down the efficiency of the system. Radio switches usually also have a button that allows you to turn off the remote control and control the device manually.
Control by mobile phones or via the Internet
Modern devices may provide a function for adjusting lighting using a smartphone or mobile phone. In this case, control is carried out via the Internet using special applications that are installed on a smartphone or computer. Typically, the software is part of the kit included with the device upon purchase.
A simplified scheme for controlling light sources using modern mobile devices. This option can only be used if the Internet is available.
Such devices have a large, almost unlimited range, but require Wi-Fi or other access to the worldwide network. Using phones and smartphones, you can turn the light on/off, adjust its intensity, and set special modes for devices (standard, custom).
Devices for turning off lights, equipped with remote controls, may also have additional functions, which include:
- possibility of adjusting the level of lighting intensity;
- a specially installed stationary button that allows you to find a lost remote control;
- equipped with a timer, light or motion sensor.
It is only important to remember that each additional option increases the cost of the device.
Pros and cons
No need to chip walls
Devices that remotely control lighting have advantages and disadvantages. The advantages of their use include:
- ease of self-installation;
- no need for wall slitting or cable laying;
- convenient control of all lighting systems using a remote control or from a smartphone;
- large range of signal transmission and reception;
- no risk of electric shock;
- safety for children.
Among the disadvantages of wireless modules are their high cost compared to wired modifications, dependence on the stability of Wi-Fi, and the impossibility of using them with a low battery.
Self-installation rules
Local and centralized remote control systems are integrated into the existing electrical wiring on site. In this case, powering the circuits with working resources from lines supplying electricity to lighting devices is permitted.
The role of current circuit breakers is played by switches that react to the receipt of a signal.
“Sophisticated” control modules have expanded functionality and have the ability to change internal network parameters, turn off certain zones from lighting and leave lighting at the optimal level only in those rooms where it is appropriate at a particular moment.
All the elements necessary for independently setting up a lighting control system at a distance can be purchased in specialized stores or ordered online
Self-installation of the remote control complex at home is acceptable.
But for this you need to follow the basic fire safety rules and take the following steps in the specified sequence:
- De-energize the wiring in the room through the panel and install a sign warning about the work in progress.
- Carefully remove outdated push-button switches using a profile tool.
- In the vacant spaces, place multifunctional electronic devices equipped with a receiver, signal decoder and disconnector.
- Securely insulate the contact area between the network wires and the working board of the remote control unit.
- Activate the electrical current supply and carefully test all elements of the control system for serviceability and functionality.
- If no problems are identified, proceed to operation.
If you do not have practical experience working with electrical devices, you should not take on the task yourself. It is better to use the services of professionals and entrust them with the installation of control equipment.
Connecting switches
There is nothing complicated about connecting remote switches. If you wish, you can easily install the device yourself. The receiver has two or four wires coming out of it, depending on how many groups of lights it controls.
One of the wires is the input, the others are the output. To install such a device, the master needs to break the phase that supplies power to the lighting device, and simply connect it in series to the circuit.
When a wireless device is installed, everything becomes even easier. There are no wires needed here at all, the master simply attaches the button to the box, and you’re done. As you can see, it's not all that complicated. To install remote switches, in-depth knowledge of electrical engineering is not required. You just need to know a little about the flow of current in a circuit.
Checking the functionality of the device
After the main installation is completed, it is necessary to ensure the correctness and quality of the actions performed. However, it is worth remembering that intermediate checks of the reliability of the fastenings, the correspondence of the color markings of the conductors, the absence of bends, fractures, and twists are recommended to be done at each stage of work.
The control check consists of a visual inspection of the installation site and then turning on the electricity. The absence of sparks, unpleasant odor and triggered machine and the presence of a bright, non-flashing light indicates strict compliance with all instructions.
With the help of these step-by-step photographs of the entire process of installing a switch, every person can independently repair or adjust the lighting system in the house. The main thing is to carefully follow the algorithm and remember safety precautions.
Controlling lighting from your phone
At first, touch control of light was used only in conjunction with the construction of a smart home, however, nowadays you can find a special photo relay in any room. Automatic lighting can make a person's life easier. A multi-channel switchboard is capable of turning on the lighting of all rooms from one point.
Experts highlight the following advantages of a remote lighting control system:
- Control using radio waves can increase the security of the apartment. You can control the light from your phone, personal computer or using a timer. This will protect the apartment from intruders in the absence of the owners.
- Great savings in necessary materials. To run cables to the switches you need a lot of expensive wire. It will also need to be replaced over time. The electronic control system needs a small amount of wire.
- There is no dependence on the electrical power supply network. The multi-channel cabinet and circuit breakers are connected using radio waves, and all light control is carried out without connecting to a local network.
Such a control system is most convenient when it is necessary to control the lighting level in many places at the same time. It can be combined with a dimmer, which will provide the most comfortable lighting in the room.
Main advantages of control systems
Initially, the ability to remotely control lighting was only available in expensive and advanced smart home systems. Now the situation has changed and the function has begun to be implemented in simpler control complexes and blocks.
One of the main advantages of the control system is the ability to control groups of devices or individual light sources from a single client interface
Remote equipment has many useful qualities and advantages.
Among the main advantages are the following important positions:
- Ensuring the security of the premises in the absence of owners . System control is available through any modern gadget with Internet access. Property owners, when going on a business trip or vacation, can program the lights to automatically turn on/off, simulating the presence of residents in the house or apartment.
- Saving money and materials during installation . To install the simplest remote control system, you do not need to buy a cable, hire workers to groove the walls, and spend additional money in the future on replacing wires.
- Independence from voltage surges and emergency power outages. In many advanced control systems, the cabinet, automatic machine and touch switch with the remote control are in contact via radio waves and do not require the presence of an energy resource in the network.
- Financial feasibility . Remote control units allow you to use electricity as efficiently as possible and illuminate only the necessary objects, rooms and territories at any given moment. With this approach, the efficiency of the lighting system increases, and energy consumption decreases without compromising the comfort of property owners.
These parameters make the systems a relevant and popular technical solution for remote control of lighting equipment.