Today it is popular to decorate houses, shops, and industrial facilities using garlands. This decorative element has long been known in the domestic market as an integral attribute of the New Year holidays. And with the development of technical means, the New Year’s garland has become accessible to other areas of human activity. But due to the low quality of Chinese garlands that have flooded the market, and simply out of curiosity, many ordinary people are wondering how to make a garland from light bulbs and LEDs with their own hands.
What do you need to know about the garland?
Factory models are presented in a wide range, but the quality of many garlands leaves much to be desired. By making it yourself, you can choose all the component materials, in addition to saving on manufacturing and delivery costs.
Before making a Christmas tree garland or other lighting decoration, you need to decide on the following parameters:
- Type of light bulbs - there are LED, incandescent, fluorescent, and halogen bulbs.
- The method of connecting light bulbs is through parallel or serial connection in a circuit.
- Supply voltage - depending on the type of lighting fixture, a voltage of 220V, 24V, 12V, 3V or other ratings can be used for the garland.
- Current collection method - depending on the design of the light bulb, it can be done through a base, plug, soldering or connector.
In view of the fact that all points determine the operating parameters of the finished garland, they need to be thought through at the stage of purchasing or procuring materials. Let's look at these points in more detail.
Bulb type
Incandescent light bulbs are a fairly common type for creating lighting effects, but this characteristic is due to their relative cheapness and unpretentiousness. Incandescent light bulbs have a relatively low ratio of the luminous flux produced to the power consumed from the network. The design itself is quite fragile and is susceptible to mechanical stress; due to depressurization of the bulb, the light bulb immediately fails.
LED light bulbs - such lighting elements are the most modern and are increasingly crowding out all other types of equipment from the market. Such popularity of LED lamps is due to their significantly greater reliability and benefits for the garland. The glow of the LEDs in the light bulb produces the most favorable luminous flux in relation to the power consumed in comparison with other types of lamps, but they significantly react to the mains voltage parameters. Along with light bulbs for LED garlands, separately installed LEDs or strips with already assembled elements are used.
Fluorescent light bulbs are much more efficient in terms of the ratio of the generated luminous flux to the power consumption; they are superior to the glow of incandescent lamps, but are significantly inferior to LED lamps. But their operation is ensured by vapors of mercury and other gases, which, when depressurized, evaporate from the flask and can be harmful to health. In addition, such light bulbs require a certain time to warm up and fail at low temperatures, so they are not used for outdoor garlands operating in winter.
Halogen light bulbs are a convenient low-power option for making garlands. But, they have a relatively low ratio of lamp glow to power consumed from the network. But, unlike all the above-mentioned light bulbs, they are afraid of touching with hands; this model of garland can only be taken through a special glove or must be placed in a tube.
The most popular options for garlands are incandescent and LED bulbs. The element parameters are selected in accordance with the connection method.
Connection method
According to the method of connecting light bulbs, there are serial and parallel connections. Each of the schemes has its own characteristics in the power supply, which must be taken into account at the stage of designing the garland.
The serial connection of light bulbs in an electric garland is a connection in which the end of one element is connected to the beginning of the next. In this case, the current flowing through the garland will be the same for all light bulbs.
An example of a diagram of such a garland is shown in the figure below:
Rice. 1. Series connection of light bulbs
Here, mains voltage is applied to the garland, but each individual bulb experiences a voltage drop proportional to its resistance. Accordingly, it is necessary to calculate the voltage value for each element. If the applied voltage exceeds the rated voltage, a resistor is soldered into the circuit. If the voltage is less than the rated voltage, less current will flow through the network, resulting in a decrease in the glow intensity.
A parallel connection is the connection of the same terminals of LEDs or light bulbs to one point.
Rice. 2. parallel connection of light bulbs
Look at Figure 2 for an example of a parallel circuit. A feature of this connection option is the application of input voltage to each element, but the current flowing through the light bulb will depend on its resistance.
For both connection schemes, the power of the power source plays a role. For example, a garland for a New Year tree, powered from an electrical network, is limited only by the rating of the machine at the input. And the power supply that receives from the power supply will be limited by its factory capacity.
It should be noted that when connecting the legs of diodes or light bulbs in series, the burnout of one of the elements will lead to failure of the entire garland. But in a parallel circuit there is no such problem; if one light bulb burns out, the rest in the garland will continue to light.
Garlands with mixed (series-parallel) lamps
3.1. Multi-circuit ring type garland
The mixed (series-parallel) connection of lamps to mains voltage allows you to increase the number of lamps in one garland without using a powerful power source and without increasing the thickness of the wires. Such garlands contain several consecutive circuits connected in parallel (Fig. 4):
As you can see, additional circuits allow you to increase the number of lamps in one garland almost unlimitedly. In addition, if you install a lamp with a breaker (“blinking”) in each of the circuits, you can get a very beautiful decorative effect of their chaotic winking. It was on this principle that the Soviet double-circuit New Year’s electric garland “Salyut” was built (Fig. 9):
Foreign models using a similar principle can contain up to 5 circuits and up to 200 or more lamps in one garland. It would not be an exaggeration to say that the vast majority of modern garlands with direct power supply from mains voltage and a lighting effects controller are built according to this scheme (in this case, each of the circuits is powered by its own controller channel). Such garlands can have several typical configurations, which we will consider in more detail.
3.2. Multi-circuit thread garland
The series-parallel circuit for switching on lamps is the basis for constructing almost all multi-circuit garlands with a lighting effects controller. However, the easiest way to understand the principle of its operation is with garlands of the “multi-circuit thread” type, where the number of extraneous branches and other confusing “distracting maneuvers” is minimal (Fig. 10):
The most common options are with 4 and 2 circuits (in the first case, each of the colors in the garland is controlled separately, and in the second, the colors are grouped in pairs, most often “red-yellow” and “blue-green”). To control them, 4- and 2-channel controllers are used, respectively (they are NOT interchangeable!)
3.3. "Grid" type garland
With the advent of the mixed scheme, the number of garlands built on its basis began to grow by leaps and bounds. The second very popular option is commonly known as a “mesh”, as it has the appropriate configuration (Fig. 12):
In fact, this is still the same “multi-channel thread” laid in a certain way (Fig. 13):
Please note that the “grid” necessarily contains “extra” wires that perform exclusively a load-bearing function (they are shown in the figure as a gray dotted line).
3.4. Garland type "curtain"
This is another popular form factor of New Year's garlands, primarily intended for decorating large vertical surfaces - windows, showcases, walls, etc. In fact, it is the same “multi-channel thread”, but divided into parts connected by a common horizontal wire (Fig. 14):
In Figure 14, the gray dotted line shows the boundaries between the “threads” of the curtain (all wires within one thread are tied into one bundle).
3.5. Icicle type garland
In fact, this is a slightly modified (and slightly simplified) version of the previous “curtain” type garland. It differs in that different threads contain different numbers of lamps, as well as the lack of order in the controlled colors. Most often, garlands of this type are generally one-color, and may not contain a controller at all (Fig. 15):
Electrical circuit calculation
For example, you use a pair of AA batteries to connect, which supply 3 V to the electrical circuit of the garland. For such a voltage, it is advantageous to use a parallel connection of LEDs. For example, a model will be installed that consumes 0.02 A, with a current supplied from the source of 1 A. To calculate the maximum allowable quantity for the load, you need: 1/0.02 = 50 pcs.
Based on this, you can install no more than 50 LEDs in a garland; if the distance between them is 5 cm, then the total length will be: 50 * 5 = 250 cm.
If you need to make it longer or install more bulbs to increase power, you must use a different power supply. For a series electrical circuit, the calculation is made according to the same principle, only based on the magnitude of the applied voltage.
Connecting a garland in the forest
If you need to connect a garland in the forest, when choosing a product, the same principle is used as discussed above. The main difficulty is finding a suitable power source. If you are far from electrical outlets, it is better to use a rechargeable battery or AA batteries. We will look at how to connect a garland using them below.
Another option that is suitable not only for forests is shown below.
Idea N1. The simplest DIY garland
The simplest option for a garland is lighting made from LED strips. They are suitable both as New Year's decorations and for highlighting the outline of a showcase or interior elements. Their advantage is their flexible design, so you don’t need to solder anything, just glue them to a supporting surface or structure. But moving it like the classic option won’t work.
The simplest models are 220 V - for them you need to solder an electrical plug and install it in the right place. Most often they are used for outdoor installation.
To illuminate Christmas tree decorations indoors, 12 V LED strips are used. These are safer models, but a power supply must be used to connect them.
It is much more difficult to make a garland from RGB tape, since connecting it requires the use of a large number of mechanisms.
The process will include the following steps:
- Calculate the total length of the garland, since the length of the ribbon cannot exceed 5 m. Everything above 5m must be connected from a separate power supply system.
- Install the power supply - it is necessary to lower the voltage to 12V.
- Connect the controller for the RGB strip to the power supply - this device will allow you to select the color of the glow and operating mode.
- If the length is more than 5 m, install the amplifier on the next tape or supply power from another power supply / controller set.
- Attach the RGB strip to the surface and connect to the controller.
You can find out more about the principles of connecting an RGB strip in the corresponding article -
Where did the light garlands come from?
Garlands began to be used to frame city streets on holidays a little over 100 years ago; people first saw such festive lighting on the New Year tree near the White House in America. Nowadays it is difficult to imagine evening streets on a holiday without thousands of small lights along the roads, on trees, shop windows, windows and on houses. Modern garlands with LEDs have many advantages: longer service life, low energy consumption, bright glow, animation, etc.
Electric garlands and light cords for outdoor lighting are gaining popularity every year and are becoming an integral attribute not only for festive nights, but also for the everyday design of signs or advertising banners, city streets, and architectural lighting. Every year, this decoration becomes a detail of design and landscape solutions.
In addition to street lamps, lighting of the area near the house can be supplemented with outdoor LED garlands and LED strips. This gives the country house a festive atmosphere.
Street staircase lighting with fringe garland
Idea N2. Flashing LED strip garland
Direct connection of a white LED strip is a little-used garland option, since there is only one glow mode. But with a certain addition, it can be significantly upgraded by changing the mode from the usual light bulb to flashing. To do this, you will need an LED strip, an RGB controller, a remote control for the controller, and a power supply.
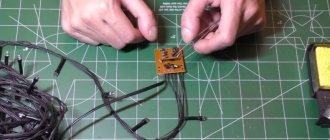
- Divide the LED strip into three sections (they will blink in different sequences). The minimum area is the distance between the markings for the cut. Separation of sections is carried out along the negative bus in specially designated areas, as shown in the figure:
Rice. 3: Cut out the pad - Repeat the same procedure with the remaining two sections. In this example, each section includes three LEDs. When cutting out the pad, it is important to break the electrical connection between the LED legs.
Rice. 4: tape divided into three sections - Take four different colored wires, strip the ends and tin them.
Rice. 5: Tin the ends of the wires - Apply tin to the contacts of the tape as shown in the picture.
Rice. 6: apply tin to the contacts of the tape - Using a soldering iron, solder wires to the contacts of the tape.
Rice. 7. Solder the wires to the contacts on the tape - Tie the wires from the contact pads and from the edge behind the tape; in addition, they can be organized with tape or adhesive tape.
Rice. 8: Organize your wires - Strip the wires and connect the tape leads to the RGB controller using a terminal block.
Rice. 9: Connect the ribbon to the controller
The garland is ready, connect it to the network via the power supply and you can enjoy the flashing lights. Using the controller's remote control, you can switch the garland to different modes (blinking, alternating blinking of sections and other options).
Ready-made LED strip with running lights
How to choose the right garland for a Christmas tree: what are there, which is better, what to pay attention to
- Before purchasing a garland, check the integrity of the product
: high-load areas - areas near the mode switches, the connection of the wire with the light bulbs and the plug. Look to see if the cord insulation is damaged and check that all light bulbs are working. - Read the information on the packaging
- the manufacturer, the purpose of the product and the permissible power and voltage figures. The lamp voltage should not exceed 25 volts, and the power of the garland should not exceed 55-65 watts to avoid overheating and the risk of fire. - Garlands for outdoor use must have a wire made of rubber or silicone
; for home models, a PVC cord is allowed, and the IP protection level is 23 and higher. - Pay attention to the build quality of the structure
: the lamps must be securely held in the connectors, and the controller and transformer must be made of durable plastic. If the mode switching unit bends when you press on it with your finger, change the garland. - Decide on the length of the electric garland
at home by taking a tape measure and measuring the required number of meters - then you won’t have to make a decision spontaneously in the store. - Do not use garland for home use to decorate the street
- this can cause short circuits and fire.
Idea N4. Garland of LEDs
To do this, you will need a soldering iron, solder, rosin, LEDs, connecting wires (even thin power cords will do), plug or battery, power supply, button or switch. In this example, we will consider making a battery-powered garland.
- Solder the power wires to the contacts in the power supply housing for the batteries.
- Solder the LEDs to the wires, but be sure to keep in mind that the voltage applied to one LED should not exceed its rated voltage, so when connecting diodes in series, a resistor must be included in the LED power circuit.
Figure 11: LED connection
The resistance of the resistor is calculated in such a way as to reduce the voltage drop across the LED to the nominal value.
- Repeat the same procedure with the remaining LEDs.
- Solder the switch to the battery power supply.
Rice. 12: Solder the switch - Connect the LEDs to the power supply and insert the batteries into the block. If they do not hold, you can wrap the battery with tape or secure it with an elastic band, the garland is ready.
Ready-made LED garland
How to connect a duralight garland bypassing the controller control circuit
If there is no technical capability or time to repair the controller, but the garlands are in good working order, then you can turn them on directly, bypassing the controller’s control circuit. In this case, the duralight or Christmas tree garland will glow constantly, without dynamic light effects.
Connecting a Christmas tree garland made from incandescent light bulbs directly
If incandescent light bulbs are assembled in series and are designed for a supply voltage of 220 V, then the wires going to the garlands can be soldered directly to the wires coming from the power cord. The polarity of the connection does not matter. You can even remove the controller completely and solder the wires of the garland and the power cord together in pairs.
If you look at the photo below, the yellow wire needs to be soldered to the blue or brown one coming from the power cord, and both brown ones together to the remaining free wire of the power cord.
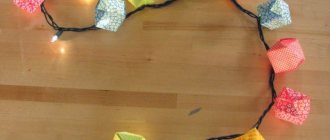
Idea N5. Retro garland
Retro garlands are popular when decorating photo zones, terraces, gazebos, shop windows and other objects. And it is not at all necessary to purchase a finished product, since anyone can assemble it. To do this, you will need: a connecting wire (it’s a good idea to get wires in fabric insulation), sockets (the most convenient models with clamps for wires), the incandescent light bulbs themselves (you can also take LED ones), a plug and a switch. In this example, we will consider a series connection of light bulbs; we will use some sockets with a built-in switch.
- Cut the wires into pieces of the required length - they will determine the distance between the glow points.
Rice. 13: cut the wires into pieces - Strip the insulation of the wires at the ends; in these places they will be connected to the cartridge, so the length of the core must be appropriate.
Rice. 14: Strip the ends of the wires - If you are using a wire with fabric insulation, then its edge must be fixed with electrical tape so that the fabric does not fray further.
Rice. 15. Secure the insulation with electrical tape - Disassemble the cartridge itself and thread the wires into the cartridge cover.
Rice. 16: insert the wires into the socket cover - Connect the ends of the wires to the contacts of the cartridge
Rice. 17: Connect the wires to the socket - Assemble the cartridge body; the excess length of wires from under the cover should be carefully pulled out, avoiding excessive force, so as not to loosen the contact.
Rice. 18: Assemble the chuck body - Repeat the same procedure with the remaining sockets, after which you can fix the light bulbs in them.
- Cut the wire from the last light bulb; you will need one core from it, which you need to connect to the switch gap.
Rice. 19: Connect the switch - Connect the edges of the wire to the plug; to do this, they must be inserted into the groove of each contact and clamped with a screwdriver. Arrange the rest of the wire so that it does not protrude; the plug body should close normally.
Rice. 20: connect the edges of the wire to the plug
The retro garland is ready for use - plug in and enjoy. If you wish, you can complement the garland’s surroundings with a darkened wire or socket - they can be painted in the appropriate color. For greater gloss, the wires are painted with gold or bronze paint.
Ready-made retro-style garland of light bulbs
One or more colors do not light up
One of the most time-consuming breakdowns is the case when one or two colors in an electric garland do not work, for example, only red or yellow and blue, as in the photo below. This indicates that, most likely, the light bulbs in the corresponding section have burned out.
To begin with, we still recommend disassembling the switch cover, also known as the control unit, and checking the reliability of all connections - contacts soldered to the board. We immediately suggest watching a video lesson from a young master, which clearly shows what to do if the wire from the controller board breaks:
As a result, you will be able to determine which light bulb is not working and replace it. We draw your attention to the fact that this repair method is advisable to use if the electric garland is non-removable, as a rule, Chinese.
To quickly repair a garland with your own hands, you can take a tester and attach needles to its ends instead of probes. Using needles, pierce each section of the circuit sequentially so that the needle passes to the current-carrying core, and look for where the resistance of the section differs significantly. In this way, you can find a breakdown and repair it with less effort.
Another way to fix a broken electric garland is to check the integrity of the common wire. On one side of the board you will see 5 soldered wires: 4 for the glow of each color and one common. Now, if the common wire breaks, you just need to solder it.
Expert opinion
Viktor Pavlovich Strebizh, lighting and electrical expert
Any questions ask me, I will help!
20 rows of LEDs switch according to a single algorithm, except for one when the entire curtain of LEDs slowly goes out from one end to the other and also slowly turns on. If there is something you don’t understand, write to me!
Typical frequently asked questions from readers
On the Chinese garland, two of the four channels stopped working. The lights rang, everything is normal. As I understand it, the fault is in the control board itself. Is there a way to repair it yourself or do you need to buy a new garland?
Everything the Chinese have done can, theoretically, be repaired. Most likely, the diagram of your garland control board is similar to the one shown in the figure.
Since two of the four lines are working, there is a high probability that two control thyristors (VS1-VS4) have failed. All you need to do is check the thyristors and replace the burned out ones. You can read about how thyristors are diagnosed in the article:
Appearance of garlands
There are many options for making New Year's garlands. Before choosing an electric garland, it is worth considering some of them.
- Threads
. This is a more traditional type of decoration, which is a cord with light bulbs located on it. - Grids
. These are garlands of perpendicularly crossed threads that form square glasses, at the corners of which there are light bulbs. Walls, roofs, and other surfaces are decorated with such electric garlands. - Curtains, curtains, light rain
. Vertical auxiliary threads are attached to the main horizontal, longest wire. The entire structure forms a decoration in the form of a curtain. Curtains are used to decorate windows, roofs, facades, and shop windows. One of the varieties is fringe, where the vertical threads are uneven in shape and of different lengths. Icicles are the same principle of connecting wires, only short ones - no more than 50 cm. - Duralight
. A garland in the form of a cord, with lamps or LEDs placed directly in it. The cord is flexible, resistant to the external environment and temperatures, it can be used for both interior decoration and outdoor design. - Belt-light
. Loops of two to five cores with multi-colored LED lamps: white, yellow. blue and other shades. These electric garlands are used only for decorating large outdoor objects: buildings, parks, bridges. - Clip-light
. A garland of several thin cords with LEDs looks very impressive on trees when they shimmer with multi-colored lights.
In addition to such electric garlands, which have already gained popularity, you can consider original options - for example, static-dynamic ones, the blinking of which resembles fireworks; musical ones, where the lights flash along with the chords of a Christmas song. There are models whose light bulbs imitate the glow of a candle, falling stars, snowflakes, etc.
Which garland to choose depends on your preferences!
Main causes of malfunctions
The microcircuit, which is the main working element, rarely burns out. The most common breakdowns include:
The Chinese garland circuit with light bulbs may use cheap, low-quality components that will have to be replaced.
Poor soldering
To ensure a reliable connection, the contact points must be filled with a thick layer of hot-melt adhesive.
LED burned out
First of all, the garland must be disconnected from the electrical network. The test begins with the last diode, since it is to it that the power wire from the control unit is directly routed.
The LEDs are soldered, so you can’t just pull them out like a regular light bulb. To check, you will have to pierce the insulation until copper wires appear. The multimeter must be switched to dialing mode. Afterwards, you need to sequentially pierce the power wires next to each suspicious LED along the entire length of the circuit.
Chaotic blinking light bulbs
When blinking chaotically, the problem lies in the electrolytic capacitor. When you turn on the garland, you may experience a situation where the diodes light up chaotically with different brightnesses. This flickering is not related to operating modes and factory effect, but is caused precisely by problems in the garland itself.
The probable reason for this effect is a breakdown of the electrolytic capacitor. It may swell, and this will be clearly visible to the naked eye. A broken component must be replaced with a similar one. The capacitance value is indicated on the element body.
If replacing the capacitor did not help, the resistor may have burned out. To check it you will need a tester. From the marking you need to find out the nominal resistance, and then compare it with the measured value. If the parameters do not match, the resistor must be replaced with a new one. After replacement, the lights should stop flashing.
Part of the garland does not light up
Old Christmas garlands
In the USSR there were “cunning” cartridges with a long tongue in the middle. When the garland burned out, each bulb had to be unscrewed 1.5-2 turns and the tongue would close.
If the garland starts to shine, then you have found a faulty light bulb. If not, the cartridge was screwed back in and the search continued.
Imagine that two lamps burn out at the same time - you will be tortured by turning the sockets.
There have also been attempts to produce special cartridges with a rubber base. Additional contacts were built into the bottom of the cartridge, which could be closed by simply squeezing your fingers.
In this way, they tried to make it easier to find the faulty element.
However, the question of replacing the lamp still remained relevant. Many people still advise to immediately buy a spare one along with one garland and use its bulbs for replacement.
The advice, by the way, is so stupid. Models change from year to year and in a couple of years you simply won’t be able to find the right light bulb on sale.
And with a donor garland, the New Year's lighting will serve both you and your children. And yet there is a more sophisticated solution to the problem.
Soviet style garlands
Garlands produced in Soviet times are reliable. Another feature is that they can be repaired, while not all Chinese-made products can be repaired. Modern devices and tools make it possible to identify faults and carry out repair work.
Required set of tools and materials:
- soldering iron;
- indicator screwdriver;
- insulating material;
- pliers.
The garland uses a serial connection circuit. In other words, if one light bulb burns out, the entire system stops functioning.
We check the lamps for integrity. If the light sources are not damaged, check how they are screwed into the sockets. If necessary, screw the lamp into the socket until the end.
Advice! If you need to replace a colored light bulb, but a replacement is not available, it is recommended to paint the light source with tsapon varnish.
If the steps described above do not give a positive result, take an indicator screwdriver and look for the area where the contact is interrupted in the conductor. The broken contact is not necessarily located in the wire, so we also check the cartridge. If the problem is a broken contact, we restore its functionality using a soldering iron. If necessary, we connect the conductors directly.
The device of a light bulb with a shunt
Not many people know, but back in the 50s, engineers came up with the so-called “eternal” garland, in which a burnt-out light bulb “repairs” itself and the entire backlight continues to burn without your intervention in its insides.
A similar invention was originally used in the subway on old cars. There, the lighting in the car is also made according to a sequential scheme.
A thin wire is additionally wound onto the “antennae” of the light bulb, where the tungsten spiral is attached.
At the same time, it does not initially come into contact with the legs of the electrodes while the light bulb is alive and has not burned out.
How does this all work in an emergency? Some people mistakenly believe that when tungsten burns out, the legs of the “antennae” spring back and thereby close the contacts on the wire. This is wrong.
Even if the legs were initially spring-loaded, the tungsten filament would not be strong enough to hold them. They do not move anywhere even if the thread burns out.
It's all about clever use of the chemical properties of materials.
Initially, the shunt resistance is several times greater than that of a tungsten light bulb, so all the current flows through the coil. The shunt itself is made of aluminum and covered with an oxide layer.
The oxide acts as a kind of insulator.
In normal mode, the voltage on the light bulb is small, but as soon as the coil burns out, the current through the light bulb stops flowing, and it rises to mains 220V.
At this moment, the breakdown of the oxide layer occurs. The current begins to flow through the shunt.
Thus, a burnt-out light bulb becomes an ordinary jumper in a common circuit.
Yes, of course, it itself stops shining, but this has practically no effect on the operation of the garland. It just increases the brightness a little.