Home » Household appliances » Connecting equipment » Connecting the refrigerator to the electrical network
In this article, the All-Electricity website decided to provide you with information on how to connect a refrigerator. This device is in every home and helps save food. Connecting the refrigerator is an important step and therefore you need to know how to do it.
You can simply install a simple refrigerator and connect the power supply. Many may wonder what to do if there is an ice maker in the refrigerator. Connecting a refrigerator that has additional functions takes longer. In this article we will tell you in detail how to connect a refrigerator with additional functions.
Connecting the washing machine to electricity
Any household appliance must not only be correctly selected and installed, but also correctly connected to the electrical network. In order to connect the washing machine to electricity correctly, you need to know some important points of this process. Any slightest error in the wiring connection can lead to a serious accident that is unsafe for the health of the user and others. In this article we will tell you how to properly install the washing unit yourself without the help of specialists.
Which RCD should I put on my washing machine?
A residual current device (RCD) will make the washing machine outlet safe. It stops the flow of current when it leaks. The RCD can be either combined with a residual current circuit breaker (difavtomat) or separate. Also, the device can be immediately built into an outlet.
In any case, this detail is very important when connecting the washing machine to electricity, especially if it occurs in a room with high humidity.
Important! The RCD is intended for reusable use. There is no need to change it after an electrical leak occurs, as is the case with fuses
The device consists of the following elements:
- frame;
- transformer;
- a mechanism that breaks the electrical circuit;
- a mechanism that performs self-testing;
- The newest devices also have electromagnetic cut-off.
An RCD is installed in front of the machine.
Important! To safely connect the washing machine to electricity, it is recommended to choose a residual current device with a cut-off current of 10 mA. The operating current of the RCD must definitely be greater than the current of the input circuit breaker
Remember that in any case, after connecting, you must follow all the rules of the test operating mode. Read a separate article about the first launch of the washing machine.
Which machine should I put on my washing machine?
In addition to the RCD, it is also necessary to install a separate circuit breaker for residual current. This device will protect your unit and wiring from short circuits
To understand which machine is needed for a washing machine, you should pay attention to the following criteria:
- It is imperative to take into account the network load, that is, find out how many devices will be powered simultaneously from one outlet.
- The cable cross-section must also be included in the calculation.
Important! For a unit of this purpose with correctly selected wiring, socket and RCD, a 16 mA machine is suitable. This will ensure the safety of using all connected devices
After you have finally determined which machine is best to install on your washing machine, you can move on to directly connecting the unit itself. If your home frequently experiences voltage surges, it would not be a superfluous measure to also install surge protectors for household appliances.
material
By applying the useful recommendations from this article, you can connect your washing machine to electricity without any problems. But if you have never worked with electrical wiring yourself, then it would be safer to invite a master electrician to your house. Remember, in such matters, the safety and quality of the work performed play an important role, and not only the duration of operation of household appliances, but also the lives of all residents of the house depend on this.
Instructions for correct installation
Usually, household appliances come with instructions with detailed rules for transportation, installation, first use and maintenance. If you don't have it at hand, follow the rules:
- If the refrigerator was transported horizontally, wait two to three hours before using it for the first time.
- The recommended distance from the wall to the rear panel of the unit is 10 cm. 5 cm is possible, but air microcirculation will worsen.
- Provide free access - the door should open freely to the maximum angle.
- To prevent slipping, use silicone or plastic stickers on the floor - the unit will make less noise and will not “run” around the kitchen.
- There should be no sofa or kitchen corner near the appliance. If it is not possible to change the layout of the furniture, it is recommended to position the refrigerator so that the distance between it and the interior items is at least 10 cm.
If you follow these rules, the risk of overheating of the mechanism, loss of power, failure of the defrost timer or other components is reduced.
How to move or relocate correctly
The refrigerator can be rolled around the kitchen using a pair of rear wheels. We tilt it back a little and pull the lower part towards us.
Avoid sharp tilts - the device can be dropped onto the floor with its radiator. After such a fall, not all units continue to work; repairs are often required.
Secure the power cord to the grille on the back of the device. If the wire drags along the floor, it is easy to break it, break it, or damage the insulation. For fixation, fasteners are used - plastic clamps.
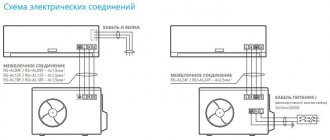
Electricity and cables
To ensure safe operation of the device, connect it to the electrical panel via a circuit breaker (RCD). Ideally, allocate a separate outlet for the refrigerator. As a last resort, use an extension cord - but only one.
If you cannot connect the unit to a separate outlet, use a surge protector - it will ensure the safety of equipment of any brand (AEG, Beko, Electrolux, LG, Indesit, Samsung, Whirlpool, Bosch, etc.). If there is a voltage drop, the external fuse will burn instead of the delicate electronics.
Alignment by level
Install the refrigerator in the chosen place so that it stands motionless and level, otherwise it will beat, “jump” and “walk” around the kitchen. The fact is that during operation of the compressor the device vibrates, so on an uneven surface it constantly moves. This negatively affects the main nodes.
Adjusting the front legs
Adjust the position of the front legs so that the refrigerator doors close automatically under their own weight. The legs are two plastic washers with bolts located at the bottom front. They allow you to change the angle of inclination of the unit by 1–2 degrees. The magnetic seal will do its job and seal the chamber.
If the floor is flat, without drops (for example, self-leveling or industrial), simply place the equipment in the right place and adjust the position of the front legs. If the floor is uneven, check the slope using a building level.
- Tilt the device back slightly so that your feet are in the air.
- Manually rotate them clockwise (to decrease the height) or counterclockwise to achieve the optimal position.
- Carefully lower the equipment and check the bubble at the construction level.
The final stage
- As a final step, install the shelves in the upper compartment and the drawers in the freezer.
- Change the position of the thermostat by selecting medium temperature mode.
- Perform the first startup of the device, plug the plug into the socket.
Standards
We are guided by the following regulatory documents:
- GOST 7397.0-89 (installation of switches);
- GOST 7396.1-89 (installation of sockets);
- GOST 8594-80 (boxes for installing switches and sockets);
- SNiP 3.05.06-85 (technical requirements).
Photo - Socket layout
Sockets, as you know, are indispensable in any room of the house. With their help, we power various electrical appliances. Most of the equipment in the kitchen that needs power must be constantly plugged in: refrigerators, electric stoves, ovens, less often kettles, etc.
Before you start installing sockets, you need to draw a plan on which you will mark all electrical appliances.
There are certain standards for installing sockets in the kitchen:
- The height of sockets in the kitchen should be two centimeters from the baseboard (a standard diagram is presented below) for rooms with a standard base. If you have a European-quality renovation, then this will not cause any difficulties, especially since these are the safety standards for each room, except for the bathroom and toilet;
- If you mainly have built-in furniture, say, a kitchen wall or a corner, then it is much more convenient to use internal sockets. They are mounted in the middle of the drawers and are completely invisible, this does not spoil the interior of the room and improves safety;
- Switches are often installed for outlets in the kitchen. They are located at a height of at least half a meter from the floor. If necessary, you can also combine these switches with a hood (for example, if this outlet is responsible for the operation of an electric stove);
- Calculate the location of the sockets so that they are within a meter in diameter from the device that will be connected to them;
- In addition to the main sources, which depend on the amount of equipment, it is also necessary to consider the number of spare ones. There can be three or four of them for a small kitchen, and in the future they can be used by you to charge your phone, operate a vacuum cleaner, blender, etc.
The socket for the electric hood is located at the very top of the kitchen - under the ceiling, above the hanging drawer or directly behind the hood. This is a very sensitive topic, because the electrical power source should not be in contact with the gas outlet, it should not be covered with corrugation, and it should be placed at least half a meter from the window.
It is very convenient to place electrical outlets in furniture. This visually creates the appearance of their absence. In addition, in this way you can hide power sources under the worktop or dining table.
The location of outlets in the kitchen has the same standards as in almost any other room with minor additions:
- Do not install sockets near the sink or near the gas stove;
- You need to install sources only after consultation with a specialist, or even entrust this matter to professionals;
- Calculate the distance so that electrical appliances and power sources are out of reach of children;
- As in bathtubs, during installation you need to take care that the wires and contacts are waterproof. Perhaps in a hurry you will turn on something with wet hands, and this will save your life;
- The transfer of any socket is carried out only after inspection of the premises by an electrician;
- During installation, avoid interfering with the central water supply, gas duct and ventilation;
- Also install additional sockets at the entrance to the kitchen.
Video: location of sockets in the kitchen
Preparatory work
Having identified the outlet pipe from the compressor, it is better to mark it immediately, because the oil filter will need to be attached to it. To ensure that the used compressor in a new device does not overheat and fail prematurely, it is better to install a new relay to it, ideally if the relay is original, corresponding to the brand of the old refrigerator. To correctly connect the relay, you need to study the refrigerator diagram and make the connection in exactly the same order that was in the refrigerator and which the diagram shows. If the documents for the refrigerator have not been preserved, the circuit diagram can be found on the Internet.
Also, the new device will have to be equipped with a receiver, which you can buy in a store or make yourself. For assembly, you will also need a plastic bottle, through the holes in the lid of which the inlet and outlet tubes will pass. After inserting the tubes, the bottle should be filled with epoxy resin, and the bottle should remain with the lid down until the resin hardens. After the resin has hardened, the tubes and cap will be tightly mounted into the bottle.
To connect the air pumping unit to some device, you will need windshield washer hoses, which, like the relay, can be bought at any car store. During operation of the device, you should carefully monitor the oil level, which prevents overheating. You should also remember that the compressor from an old refrigerator should not run for more than 45 minutes.
Which sockets are best to use?
The choice of sockets depends not only on the design and layout of the kitchen, but also on the features of their use. In the cooking room, special products with an increased level of moisture protection are appropriate - with silicone membranes (IP 44) that protect the contacts in the installation box itself. Such products come with lids or curtains, thanks to which debris and splashes do not get inside. Conventional overhead sockets are rarely used.
If you need additional sockets in an already renovated kitchen, but don’t want to spoil the walls or backsplash, you can purchase special retractable blocks and hide them in the countertop. When lightly pressed, a protective part comes out, allowing access to the network. Another option is a surface-mounted corner electrical socket or corner surge protector, which are installed under the kitchen cabinet.
Products built into the countertop look great and are almost invisible, but are inconvenient for constant use. Such devices are useful when you need to connect an appliance for a short time (blender, food processor or mixer), but for an electric kettle this option will not be so advantageous.
The photo shows a convenient tee that opens if necessary. When not in use, the lid remains closed.
Where to begin?
Before proceeding directly with installation, you must read the attached instructions. As a rule, some modern models may have additional requirements that must be met. Devices that support the latest features (such as smart refrigerators) require additional installation conditions to optimize their performance. Even before purchasing, it is worth studying the requirements for the place of their installation.
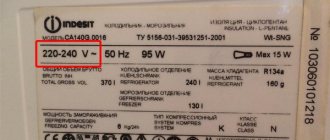
Before directly installing the refrigerator, you should definitely check the power cable for manufacturing defects and damage. If deep scratches or other defects are noticed, it is recommended not to use it but to replace it immediately. This will prevent a power failure that could cause serious damage. The refrigerator is installed in a pre-prepared place. The most important thing is that it is even (to avoid skew).
Direct socket connection
Decorative elements are removed from the socket body, leaving only the terminal block. The fastening bolts at the terminals are loosened, with the help of which the bare ends of the connected wires will be fixed.
Stripping cable ends from insulation
For ease of connection, the insulation of the supplied wires is made in different colors. The ground wire is painted in green-yellow insulation, the phase wire is presented in a red or brown sheath, and the neutral wire is in a light blue or blue sheath.
The ends of the wires removed from the socket box are brought to the contacts and inserted into the terminals. The phase and neutral wires are connected to the current-carrying terminals: phase on the right, neutral on the left. The grounding conductor is connected to the terminal designated by the abbreviation “PE”.
Connecting the socket
Under no circumstances connect “zero” to the ground terminal. Otherwise, if the working “zero” in the shield burns out, the reverse “phase” will break through on the body of the machine connected to the network.
The socket body with connected contacts is fixed to the socket box with screws or spacer tabs. After fixing the block, check the quality of the contact connections and the tightness of the bolts on the terminal blocks. At the final stage, a decorative cover is installed.
Work related to electrical wiring belongs to the high-risk category
And they should be performed with the utmost caution. Therefore, if you are not able to correctly assess the situation and are not confident in your own abilities, you should not experiment
It is better to entrust the solution to this complex task to professionals.
How to put a microwave on top and is it worth it?
In small apartments, a microwave oven is often placed on top of the refrigerator. This makes sense if the unit is small and you will only heat and defrost food in the oven. Other microwave functions—long cooking, grilling, multicooking, and others—will quickly lead to overheating of the device.
Consider other rules:
- the distance from the wall to the microwave is the same as that of the refrigerator: 10–15 cm;
- Lay plywood or plexiglass between electrical appliances. Film, oilcloth and other flammable materials - under no circumstances;
- The microwave should be equipped with legs so that the gap between the units helps to increase air circulation.
Is it possible to turn on a washing machine through an extension cord - Construction, repair, arrangement
Scientists note that compared to the last century, the activity of society has increased significantly, and therefore almost all of us have begun to feel a total lack of time to solve everyday issues.
In order to reduce the burden on a person and provide him with a comfortable everyday life, special devices were created that, in a relatively short period of time, have already been able to win the hearts of many consumers and continue to be in demand to this day.
As a rule, household equipment that we use constantly, for example, air conditioners, boilers, multicookers and microwaves, run on electricity. The washing machine occupies a leading position among acquisitions due to the presence of certain advantages:
- minimizing human labor;
- a large selection of actions to be performed, the presence of many programs;
- beautiful external component.
However, in order to use the equipment, you need to know how to connect the washing machine to the water supply and sewer systems, and position the product so that during operation it does not wobble or “jump” around the room.
Whether you turn to specialists for help or carry out the installation of the device yourself is up to you. However, we note that independently carried out manipulations for installing a washing machine will be a good help for further study of the installation features of other types of household appliances.
Deciding on the location
Let's say you have already selected a suitable model of washing machine in the store that suits you in terms of quality, cost and set of built-in programs. It's time to think about where to install the unit, because changing the location of the product will no longer be possible.
Traditionally, washing machines are installed in bathrooms; this is the most convenient option, because the necessary pipes for connection pass through here, and the drain is also located. However, if the bathroom is limited in space, the device is by default moved to the kitchen or hallway. A small cabinet designed to match the overall design of the room will help hide equipment from prying eyes.
Tags: , lan, automatic, boiler, sconce, view, choice, house, , grounding, insulation, cable, like, , magnet, installation, power, neutral, nominal, transfer, connection, rule, wire, start, vacuum cleaner, , work, calculation, repair, socket, row, garden, network, system, resistance, term, circuit, ten, current, transformer, , phase, filter, photo, shield
Installation of a built-in refrigerator
The main rule when installing refrigeration equipment is to leave gaps for air circulation. This will help avoid overheating. If the unit is built into a cabinet, there should be gaps of at least a few centimeters on all sides. The cabinet where the built-in refrigerator is located should not be completely closed - take a cabinet with a missing back wall.
There is a shelf at the bottom of the furniture cabinet, with ventilation holes underneath it. A gap of up to 10 cm is left above the equipment.
All other installation rules (closer to outlets, further from heat and water, at a distance from furniture) also apply. Decide in advance how you will connect the cable - from above or below the device.
Instructions for installing the unit inside the cabinet:
- Check the dimensions of the device and the kitchen cabinet. Check if there are gaps on all sides.
- Place the device in the pencil case.
- Attach the front and doors.
- Install decorative and protective elements.
- Connect to the network.
External door
If you want to completely integrate the refrigerator into the cabinet of the kitchen unit, choose the method of fastening the door:
Possible options:
- installation of runners on the cabinet door;
- the door remains motionless relative to the cabinet door.
In the first case, when opening, the door smoothly slides along one or two guides (the exact number is determined by the height of the cabinet). There is no need to fix the door - it will move itself when opened. To do this, a metal corner connected to the guide is fixed on the door.
More details in the video from YouTube:
If you plan to build in the “refrigerator” incompletely, a door is not needed - the refrigeration unit will be located in an open cabinet without doors or separately from the unit.
To ensure that the installation does not stand out from the overall design of the room, we recommend:
- paint to match the kitchen unit, kitchen walls, electric stove;
- cover with polymer film;
- cover the outer wall with a chalk board.
Sockets for electrical appliances and household appliances must be located in an open area.
Electrical connection
The main rule at this stage is to ensure free access to the outlet.
When connecting the refrigerator, remember:
- you cannot close the socket, because of this you will not be able to pull out the plug in time in the event of a short circuit or breakdown, you will have to move the device away from the wall;
- a limited amount of equipment is connected to the extension cord (no more than 2 units), since otherwise the load on the cable increases;
- the socket should be located under the tabletop, above or on the side;
- do not forget about working grounding.
Run the extension cord along the baseboard behind the kitchen unit - this will increase the safety of the electrical appliance and reduce the risk of injury if a person catches their foot on the cable.
The presence of a circuit breaker in the refrigerator connection circuit allows you to prevent equipment breakdowns during voltage surges, thunderstorms, flooding and other emergency situations.
Video
We offer a visual video lesson on how to connect and maintain a refrigerator with an ice maker.
Competition in the household appliances market and increasing customer demands are forcing manufacturers of household appliances to improve their products. New functions appear and management is simplified. There is a tendency to combine different types of technology in one device. This is how a refrigerator combined with an ice maker appeared. Next, we will tell you what an ice maker in a refrigerator is, what are the advantages of using it and what is the principle of operation.
Main types of ice makers for home
Depending on the model, two types of ice makers can be installed in the refrigerator.
Refrigerator with ice maker with water connection
This type of refrigerator is called automatic. It requires virtually no intervention in the ice making process. When installing, you only need to connect it to the water supply and press a button on the touch control panel.
A filter flask with replaceable cartridges is attached to the back wall of such a refrigerator. A select tap is installed into the water network. A copper pipe or soft hose made of food-grade polymer goes directly to the ice maker.
Important! When starting to connect the system, measure the distance to the water supply and purchase additional adapters and hoses if necessary (in the basic configuration, the length of the hoses is usually only 1.5 m).
Refrigerator with ice maker without water connection
Many manufacturers produce refrigerators with an ice maker that does not have a water connection. The design of the device is much simpler, and the price is more affordable. In a separate compartment there are special forms that are manually filled with water. The freezing process takes approximately 2 hours. To remove the cubes, special handles are turned and the ice falls into the container.
Purpose and capabilities of built-in ice generators
Initially, ice makers were intended only for bars and restaurants, since that is where a large amount of ice is used. Now at home, tea cubes are cooled, thrown into alcohol for dilution, iced lemonade is prepared, and frozen herbal compositions are used for cosmetic and medicinal purposes.
Some ice makers are equipped with a set of additional functions:
- supply of clean chilled water;
- the Crushed Ice function crushes ice - after crushing, the product is located in a removable or pull-out compartment;
- continuous freezing system – the ice is periodically renewed to maintain freshness;
- touch control panel is installed on refrigerators in the above-average price category;
- function of automatically preparing a new batch when the container is empty;
- dispenser, thanks to which the glass is filled with cubes or cool water without opening the door;
- filters – a system for purifying water from harmful impurities and foreign odors with a filter service life of about a year.