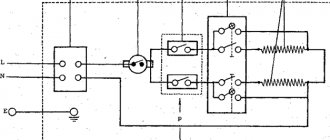
Methods for electrically connecting a water heater Selecting and laying a cable for a water heater Examples of the characteristics of power cables Aluminum or copper? How should I lay the cable for a water heater? Requirements for connecting Polaris water heaters
Even the most economical water heater will have quite a lot of power. To make its electrical connection safely, it is important to select the correct cable cross-section, as well as take into account several additional requirements. Find out how to determine what wire cross-section is needed for a water heater and how to connect it to the network in our article.
Examples of power cable characteristics
| Equipment | Power | Cable cross-section | Load current for cable | Rated and maximum current of the machine |
| Polaris PF 30VR | Up to 4.1kW | 1,5 | 19 A | 10/16 A |
| Polaris AQUA IMF 30V, ORION 3.5 S | Up to 5.9 kW | 2,5 | 27 A | 16/25 A |
| Polaris ORION 5.5 S | Up to 8.3 kW | 4 | 38 A | 25/32 A |
| Equipment groups | Up to 10.1 kW | 6 | 46 A | 32/40 A |
| Equipment groups | Up to 15.4 kW | 10 | 70 A | 50/63 A |
When determining what wire cross-section is needed for a water heater, take into account the maximum possible load. It is better to choose a cross-section “with a margin” so that the cable is guaranteed to withstand the expected long-term current and not overheat.
The wire must be three-core - only in this case can grounding be done. If there is no grounding, you cannot use a boiler or instantaneous heater - it is unsafe.
Aluminum or copper?
To connect the water heater you need a copper cable. Aluminum is rarely used for several reasons:
- its electrical conductivity is lower;
- oxidizes faster;
- is more brittle;
- thermal conductivity is lower (heats up more).
When connecting a water heater, you can determine which cable is already installed in the house by simply inspecting it. The aluminum core will be silver and the copper core will be reddish-golden. If the wiring in the house is old and made of aluminum wires, when connecting them to copper, you cannot perform conventional twisting. Only twisting and soldering are allowed, but it is better to use terminal clamps or perform crimping.
Recommendations for operation and maintenance
If there is no hot centralized supply, put the flow device into working condition. Close the DHW valve, open the mixer so that the cold liquid passes through the body and expels all the air. Only after this the electricity supply is turned on.
Each model of instantaneous water heater has nuances of use. To organize effective work , study the instructions and user manual . The device heats water when disassembled when a flow flows through it. The rest of the time it is in standby mode, so it is not advisable to move indicators and click buttons.
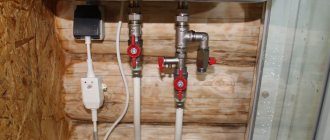
Connection to hot and cold water pipes
After the cable, we move on to the plumbing shut-off valves.
The water heater has two outlets with ½ inch (G1/2) threads. Here, unlike the previously considered option, it is necessary to install a valve of the appropriate size on the cold and hot outlets.
It is better to make all threaded connections using aerobic sealant. This is much faster and more reliable, plus it does not require any special plumbing skills from you, as when working with flax or tow.
Treat the thread with an alcohol-containing liquid, remove all dust and debris, apply a small layer of sealant and tighten the fittings.
This assembly must be left for some time for the sealant to set and “stand up” (see the drying time on the tube).
Where should a powerful instantaneous water heater be installed for the whole house? The best place is near the collector group, where all the plumbing is installed.
To do this, you will have to install a tee at the end of the collector. Mount it on the DHW and cold water pipes.
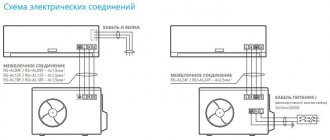
The cable should also come to the same place from the switchboard. Although, as we discussed earlier, sometimes zero is not needed, it is better to run a five-core cable (for a 3-phase device) VVGng-Ls 5*4mm2 or VVGng-Ls 5*6mm2.
An empty unused core will be a reserve, which is called just in case.
To mark the fastening points, many kits come with a special template. If you don't have one, use a ruler.
Mistake #6
At the same time, maintain minimum distances to nearby objects.
This is especially true for the bottom edge. Leave little space, and in the future you will encounter problems connecting the bottom line.
After installing the housing, adjust the tubes and fittings from the manifold to the valves on the flow duct. It doesn’t matter what it will be - copper or cheap polypropylene.
After fitting and fitting, crimp and solder all fittings.
When you don’t want to bother with a soldering iron or a press, you can get by with a flexible liner.
This is the most inexpensive and fastest option for connecting a flow device. This way you can connect almost anywhere.
Make a branch on the main pipes through a T-shaped tee and connect the device with reinforced flexible hoses.
Safety regulations
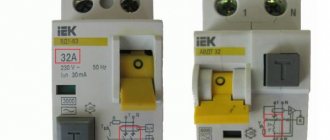
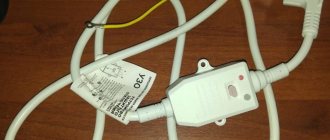
Immediately after installing the boiler, it is recommended to install an RCD of the wet group of electrical wiring. This is a special device that can save your life in the event of an electric current breakdown through the heating element to the water and through the water to you or your family members.
Attention! The boiler may not come with a cord and plug, this is a normal situation! Such devices are powered directly to the network. This is indirectly done so that your boiler is connected by an electrician, who will simultaneously evaluate the throughput of your wiring and conclude whether it is even intended for such loads!
Preparation of tools and materials
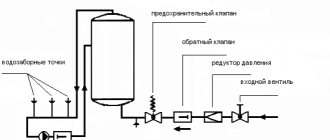
Purchase a safety valve, flexible water hoses for connection (2 pcs.) More often they use a standard length of about two meters, but the characteristics depend on the distance to the point of connection into the cold water supply system. It is better to use metal braided hoses, since rubber ones are less durable.
Can be connected using rigid polypropylene pipes. Usually they are embedded in the wall, but they can also be done outside. You will need corner connectors and connecting sleeves.
For hanging, dowels are used, the ends of which have hooks. Buy FUM tape or tow and check for rubber or plastic gaskets.
To work you will need tools:
- tape measure, level, pencil;
- a hammer drill with a Pobedit drill for the diameter of a plastic dowel (usually 8 mm), in some materials an impact drill is used;
- screwdriver, hammer, pliers, construction knife;
- adjustable gas wrench or set of open-end wrenches;
- electric screwdriver probe;
- plumbing soldering iron.
Elements are being prepared for assembling a circuit for connecting an instantaneous water heater to electricity. They buy a circuit breaker, an RCD, and a grounding socket. Prepare a PVS cable (to the outlet) or a VVGng wire (to the panel). For the wire, purchase a protective corrugation or cable duct if the wiring is done outside the wall.
Connecting powerful water heating to the entire apartment
Those who want a complete hot water replacement will have to buy something more powerful.
We are talking here about models from 10 kW and above. For example, the popular brands Thermex and Clage. Most often they buy 12-15 kW, and for three phases.
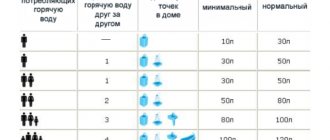
According to factory parameters, such things can withstand a maximum pressure of up to 10 bar (1 MPa) and will easily handle the entire hot water system in the house. The pressure standard for a high-rise building is from 0.3 (minimum) to 6 atmospheres (0.6 MPa).
The flow rate of the device is from 6 to 9 l/min, with an increase in temperature from the initial (delta) by 25C.
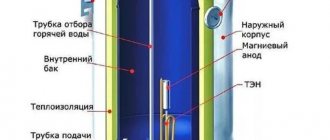
Preparatory work again begins with disassembling the water heater.
Unscrew the screws at the bottom of the case and carefully remove the protective cover.
Be careful, there is a cable of wires from the digital display to the control board, do not break it.
This cable is easily disconnected via a plug.
A wall heater often comes with a short piece of standard cable, which can rarely be adapted anywhere.
How should I lay the cable for a water heater?
When laying a line from the machine to a boiler or instantaneous heater, make sure that no other consumers are connected to it. If they exist, then which cable is needed to connect the water heater is determined by the total power of the consumers powered on its line. Groups of powerful equipment are usually connected using three-core cables with a cross-section of one core of 4-10 mm. At the same time, the maximum load of the machine is also increased to 40-63 A. When connecting socket blocks, make sure that their maximum load also corresponds to the power of the consumers, and the moisture protection class corresponds to the location and conditions of installation.
Wiring can be done in two ways:
- inside the walls (hidden);
- along the walls (open).
The installation method also affects how the cable heats up. With hidden wiring, heat is dissipated less well, and if the load is too high, the insulation may melt. When the wiring is open, the wires heat up less, but even taking this into account, their cross-section must be sufficient to withstand the load.
What is it for
Why is this even needed? For your own safety and convenience. After all, if you lay an electrical cable in your apartment, the cross-section of which does not correspond to future operational loads, you will put your home at risk of fire.
The result will be more than sad: firstly, burnt electrical appliances and equipment, secondly, damage to all other property... And sometimes such carelessness and negligence can even lead to human casualties... Why risk your health and acquired property if all the troubles can be prevented by calculating the cable cross-section in advance and choosing the best option that will withstand all subsequent loads.
Anyone can calculate the wire cross-section
Calculation of wire cross-section is a very important component of high-quality and reliable
electrical wiring.
After all, these calculations include the power consumption of electrical equipment and the long-term permissible currents that the wire can withstand in normal operating mode. In addition, we all want to have a guarantee and be confident in the electrical and fire safety of electrical wiring, which is why calculating the wire cross-section is so important.
Let's see what the wrong choice of wire cross-section can lead to.
In most cases, electricians currently working on the market in this service sector do not bother themselves with performing any calculations at all, but simply overestimate or underestimate the cross-section of the wire. This is usually due to the fact that, after a long time after graduating from educational institutions, they do not remember how to do this, since the acquired knowledge was not consolidated in practice in a timely manner. For the most part, this knowledge is possessed by a certain portion of power engineers and chief engineers, and this is due to the fact that their knowledge is exploited in this direction every day.