For a comfortable life in an apartment or country house, as well as for productive work in industrial premises and offices, it is necessary that the microclimate correspond to optimal values. For these purposes, various air conditioning systems are used, the most popular of which are split systems.
Installation of air conditioning systems is a rather complex task, requiring special skills and equipment. A standard split system consists of indoor and outdoor units connected to each other by special pipes for refrigerant circulation and an electrical cable for connection to the power supply.
Schematic view of a split system
Since the installation of the air conditioner is carried out in difficult conditions, and the external unit is often installed in a hard-to-reach place, it is necessary to use high-quality and durable materials, including the cable for the air conditioner. It must be designed for the load and have technical characteristics appropriate for the operating conditions.
It’s better to choose a cable or mat
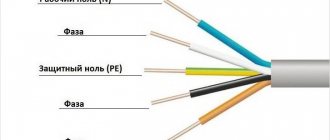
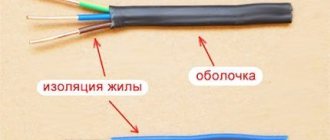
The cable consists of one or more cores with insulation and an outer sheath.
Installation of such a wire will be carried out in a tie, the thickness of which is 3–5 cm. It is recommended to install the cable under:
ceramic tiles, porcelain stoneware, natural stone, self-leveling flooring, laminate, parquet boards, PVC tiles, linoleum, carpet.
This floor can be called almost universal.
There are two types of mats on the market – convection and infrared. This cable is thinner and is fixed at the correct distance on a mesh base. Mats take up less space; a smaller screed thickness of up to 5-10 mm is required. Installation is simple and does not increase the planned height.
Simple installation often determines the choice in favor of a mat. The film is laid lengthwise on a thin layer of thermal insulation, and the floor covering is installed on top. Unlike the first option, you do not have to make a screed and fill the floor with cement. This approach allows you to use mats on a vertical surface. Having assessed the advantages of the presented materials, many prefer the latter. Such efficiency and ease of installation captivates many users, which is why the popularity of mate flooring is growing every day. It's worth watching the video once to learn the editing technology.
Warm floors are the key to comfort for home residents. It can be an auxiliary element of the heating system or replace it. The main advantage is ease of installation and significant savings in resources. But for the system to function correctly, you need to select the right cable. The selection criteria are very diverse - from the cross-section to the expected load. Be sure to decide on the functionality to be assigned to the heated floor. Then the cable selection process can be greatly simplified.
You can make a warm floor yourself using simple panels that can be installed even without pouring cement. It is worth carrying out installation procedures to evaluate the benefits of heated floors in action.
Requirements for safe operation of electrical wiring
According to the PUE, a bathroom is defined as a room with high humidity, which places special demands on electrical wiring. This is due to the increased risk for people in the room to be exposed to electricity.
Electrical panels, switches, and switching connections must not be placed in the bathroom. Sockets must comply with a protection level of at least IP44 with high-quality grounding, an RCD or a potential equalization device. The cross-section of the grounding wire must be no less than the wire having the largest cross-section in the room. It is not allowed to lay wiring in an iron braid without insulation, as well as in metal hoses and pipes.
It is necessary to use a three-core wire for a washing machine with a cross-section corresponding to the power consumption of the device, according to the above calculation. It is a priority to use solid copper cable, as it is more durable in comparison with aluminum and requires a smaller cross-sectional size for the same load.
All actions related to electrical installation to connect the washing machine must be carried out with the wiring de-energized.
Isolation is an integral part of safety
Each single or multi-core cable has an insulating sheath. Most often they are made of standard type or low flammability PVC plastic. In some cases, polyethylene or polymers are used.
How thick the insulation of current-carrying conductors should be is determined by GOSTs. Wires for installing wiring in an apartment must be insulated with a layer of 0.44 mm or higher. Anything less is already a violation.
The core shell also has a standard thickness. For single-core cables the norm is 1.4 mm, for multi-core cables – 1.8 mm.
Double insulation ensures greater safety and protection of the cable from external damage.
Determining the wire cross-section for an electric stove
So, the network in the house can be single-phase or three-phase. If you live in a new house, you can safely choose a wire for a three-phase network. You can also determine the type of wiring visually, just look at the wire that goes to the electric stove. If the cable has only three cores, the wiring is single-phase. If you see 5 wires, the network is three-phase.
The choice of wire for an electric stove also depends on whether the wiring is open or closed. The table shows cable cross-section values for different materials and different types of wiring.
Table of cable cross-section depending on the type of wiring
| Cable cross-section, mm² | Wiring with copper core | Wiring with aluminum core | ||||
| Current, A | Power, kW for single-phase network | Power, kW with three-phase network | Current, A | Power, kW for single-phase network | Power, kW with three-phase network | |
| 0,5 | 11 | 2,4 | – | – | – | – |
| 0,75 | 15 | 3,3 | – | – | – | – |
| 1,0 | 17 | 3,7 | 6,4 | – | – | – |
| 1,5 | 23 | 5,0 | 8,7 | – | – | – |
| 2,0 | 26 | 5,7 | 9,8 | 21 | 4,6 | 7,9 |
| 2,5 | 30 | 6,6 | 11,0 | 24 | 5,2 | 9,1 |
| 4,0 | 41 | 9,0 | 15,0 | 32 | 7,0 | 12,0 |
| 6,0 | 50 | 11,0 | 19,0 | 39 | 8,5 | 14,0 |
| 10,0 | 80 | 17,0 | 30,0 | 60 | 13,0 | 22,0 |
| 16,0 | 100 | 22,0 | 38,0 | 75 | 16,0 | 28,0 |
| 25,0 | 140 | 30,0 | 53,0 | 100 | 23,0 | 39,0 |
Power Line Requirement
Requirements for a separate power supply line:
- availability of a machine on the line
- presence of grounding
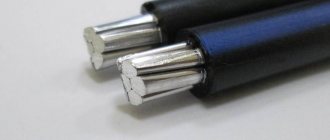
- only copper cables
- wire cross-section from 3 X 2.5 and above
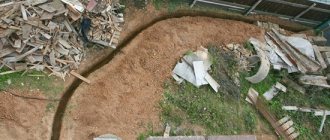
It is also necessary to conduct power supply from the internal unit of the air conditioner to the external one. if possible, the cable can be laid together with the freon interconnect route.
When connecting the air conditioner, you must follow the operating instructions, which, among other things, indicate exactly how to connect the electrical wires. The instructions also provide a detailed wiring diagram for this specific model.
The second solution to obtain information for installing a specific air conditioner is the electrical diagram presented on the inside of the cover of the air conditioner units, or on the units themselves. It details how it is necessary to connect the air conditioner units to each other and how to connect the split system to the existing electrical network.
Let's look at the most common sequence for connecting a home air conditioner.
We connect the power wire to the mounting block. In the air conditioner mounting block, connect the power wire strictly according to the diagram on the cover.
The black wire that comes from the machine is connected to terminal L
Blue wire connects to terminal N
The yellow-green wire is connected to the ground of the air conditioner
The connection of the outdoor unit must be carried out following the user manual or the diagram located on the air conditioner. The split system units are connected to each other using a power cable with a cross-section no less than that indicated on the cover.
The cross-section of wires recommended for use with air conditioner power up to 4.6 kW is 3 X 2.5. Install a 20A machine. To connect the air conditioner, you must use only copper cables.
Carry out the electrical installation slowly and strictly adhere to the diagram. Lay electrical cables in grooves and decorative boxes, not openly; use a corrugated pipe of a suitable diameter. This will allow you to remove or replace the wires if necessary. If you place the drainage together with the cable, do not neglect to hide the cable in a corrugated tube.
Connecting the air conditioner to the network
Before connecting the split system to the electrical network, you should familiarize yourself with the diagrams and specifications for the device components and analyze the composition of the walls. Then you need to inspect the existing power supply system, measure the cross-section of the incoming cables and test the selected route with a special detector.
There are several ways to connect an air conditioner to the electrical network. If the wiring line for a powerful electrical appliance was not provided in advance, you will have to lay networks and install sockets after a major overhaul.
It is most convenient to connect the outlet in the distribution box of the room. But this becomes possible only if the electrical wiring running from this box to the electrical panel of an apartment or private house can withstand the maximum possible load of all connected electrical appliances.
Another method involves laying new electrical wiring lines. In this case, you need to groove the wall, lay a new cable in a plastic corrugated pipe and connect it to the junction box. If the depth of the groove is more than 2 cm, the cable can be hidden in the wall without a corrugated pipe.
Corrugated pipe (corrugated pipe) is a pipe with a variable cross-section, in which there are thick-walled and thin-walled sections, giving it rigidity and flexibility at the same time
The groove can run horizontally or vertically, but it cannot be located diagonally. This is contrary to basic building regulations.
Based on the line arrangement project, it is possible to determine in advance the locations of the electrical network, incl. and for climate control equipment. If it is not possible to groove the wall, the electrical wiring can be laid openly.
In this case, the wires are hidden in a special plastic cable channel, which is fixed to the wall with screws. This method is the least labor-intensive and expensive, but the plastic channel can disrupt the appearance of the room.
You can hide the cord running from a household air conditioner to a power outlet in a plastic box of any color and shape, depending on the interior design of the room.
If none of these methods work, you can connect the device via a cable to an outlet that powers equipment with less power. In this case, the cable stretches from the socket next to the air conditioner to the very point of power supply. But you need to check the capabilities of the outlet. If the network cannot cope with the load, the wires will burn out.
Connecting the split system to the power supply using a plug and a previously installed socket is the easiest way. This does not require any electrical work, so anyone can make this connection.
This installation option is chosen for:
- low power split systems (up to 4 kW);
- air conditioners built into the window;
- air conditioners that were installed in the room for a short time.
But it’s better to work out the location of climate control equipment and sockets for it in advance. This will allow you to lay more reliable wires to those outlets from which the air conditioner will be powered in the future.
What types of air conditioners are there?
Today there are several types of air conditioners. The most common are:
- Window;
- Mobile;
- Split system;
- Multizone system;
Split system
The window air conditioner crashes into the window opening. This type of climate control technology was common more than 10 years ago, but now its popularity has decreased significantly. Such devices have more disadvantages than advantages. The advantages of such air conditioners are:
- Low cost;
- Ease of installation.
The disadvantages of such systems include:
- Low power, such a device cannot effectively cool the room, especially if it is of non-standard shape. And if the window is closed with thick curtains or curtains, then cold air will not enter the room at all;
- The noise level is too high due to the fact that the compressor is located in the middle of the room;
- Reducing the illumination of the room - the air conditioner blocks part of the window and reduces the access of sunlight to the room.
Mobile air conditioners are perfect for those people who often change their place of residence. They have also proven themselves excellent in country houses. To electrically connect such a device, a regular outlet is sufficient. To remove hot air, you need to remove a flexible pipe into a window or a special hole in the wall. The advantages of such devices include:
- Ease of movement;
- Ease of installation.
Mobile air conditioning system
The disadvantages of such air conditioning systems are many times greater, including:
- High cost - sometimes comparable to the cost of a stationary split system;
- Increased noise level due to the compressor indoors;
- Low power, such a device will not be able to efficiently cool a large area.
Split systems are the most popular today. They are presented in a large assortment in household and HVAC stores. You can choose based on design and performance characteristics. The advantages of such systems are:
- Large selection, making it easy to choose the desired design;
- Low noise level; the compressor in such systems is located outside.
Such split systems have only one drawback - they require the involvement of specialists in installation. Although there are home craftsmen who, without any problems, independently connect split systems in private houses and apartments located on the lower floors.
Multizone systems are more often used in office premises. With the help of one such air conditioning system, up to 30 rooms can be efficiently serviced. Moreover, for each of the rooms an individual indoor unit of a suitable design is installed. The advantages of such systems are:
- Possibility of servicing a large number of rooms without changing quality;
- Long service life, maintaining all technical characteristics at the entire stage of operation;
- Maintaining a comfortable temperature in each individual room.
Multizone system
There are only two disadvantages of multizone systems:
- High cost, which is not affordable for everyone;
- Difficult to install.
The type of air conditioning system must be selected based on the area of the room and its purpose. It will be important to familiarize yourself in advance with the technical characteristics of the purchased air conditioner and the intricacies of its connection.
Where is the best place to install the outlet?
Air conditioning cords can reach a meter in length, and therefore you need to plan the location of the outlet in such a way as to eliminate the possibility of sagging wires. If, when installing an air conditioner, there are no plans for electrical installation work, you will have to dodge: spoil the decoration of the room or try to use existing connectors.
The electrical outlet for a household air conditioner has standard dimensions, but its location in a residential or commercial space must be determined in advance
When installing a simple household air conditioner in an ordinary apartment, few people think about the location of the outlet for the split system. The device is connected to the nearest 220V outlet through an adapter, with a wire extension, or directly (depending on the location of the power outlet point).
But such a connection is only suitable for non-inverter models with a performance of less than 4 kW. Also, if a certain phase orientation is observed, low-power inverter-type climate control systems can be connected using this method.
It is best to install a new outlet for the air conditioner. Even if the existing outlet can perfectly cope with the load from an electrical appliance, hanging wires will look unaesthetic, although apartments do not have network outlet points under the ceiling.
Dangling wires from a household air conditioner can ruin the entire interior of a living space, because they make the room look untidy
When designing and installing climate control equipment, it is worth “hiding” the outlet between the air conditioner housing and the nearest wall so that it looks as harmonious as possible.
If this is not possible, it can be installed under or to the side of the device (not on the side of an adjacent wall). There is no need to mount the socket above the equipment, because in this case you will have to hang the air conditioner slightly lower.
Selecting a location
The presence of two or more units of climate control equipment requires a choice of location for each of them. Before starting installation work, you will need accompanying documentation.
Do I need permission to install an air conditioner?
Structurally, the air conditioner is a system with an indoor and outdoor unit, which is mounted on the facade.
Multi-storey building, on the basis of Art. 246 of the Civil Code is common property with the right of disposal by all owners. Installation of equipment without approval is a violation:
- the device makes noise, buzzes, disturbing the peace of the neighbors;
- condensation can damage the façade of the building or get onto the balcony below;
- the overall block blocks the view or view and windows;
- There are risks of wall cracking, wiring shorting and fire.
Based on paragraph 1 of Art. 25 LCD installation of a split system is considered as a reconstruction or re-equipment of the premises. Clause 3.5.8 of Resolution No. 170 states that it is prohibited to install an air conditioner without permission from the management company and neighbors. Consent or refusal can only be obtained after a meeting of the residents of the house.
Important! Residents of private homes can begin installation immediately after purchasing the device. Permission is required if:
Permission is required if:
- installation work is carried out on the front part of the high-rise building;
- the user lives in a house that is valuable from a historical and cultural point of view;
- the split system is located above the pedestrian paths;
- There are no special fences on the window opening where the block is located.
Important! The management company does not have the right to remove air conditioners. Art. 330 of the Criminal Code considers such actions as arbitrariness
Dismantling of devices is carried out only by court order.
Choosing a location for the indoor unit
Installation of the internal air conditioner module is carried out with your own hands so that cold air flows do not cause discomfort. It can be placed above the head of the sofa, on the side and behind the workplace. Construction regulations define the order of location of the indoor unit:
- from the structure to the ceiling - at least 15 cm;
- from the module to the right or left wall - at least 30 cm;
- from the block to the floor - 280 cm, but for apartments on the ground floor, the external block is mounted at the same level or lower than the internal one;
- from obstacles to the movement of air flows - no less than 150 cm;
Advice! In a room with a sofa and TV, it is better to place the air conditioner above the sofa.
Where to locate the outdoor unit?
The outdoor module is placed near a window opening or on an open loggia. If the balcony is glazed, the block is placed on a fence with good load-bearing capacity or on the facade. Residents of the 1-2 floors need to determine a place for the outdoor module as far as possible from passers-by. On the 3rd or more floors, it is allowed to place the device under a window or on the side.
In a private house, the outdoor unit is placed on a wall with high load-bearing capacity. On ventilated facades, a special fastening is organized or the block is placed on the plinth.
Determining the distance between blocks
The maximum length of the intermodule route is 6 m; if it is exceeded, additional freon injection will be required. If the external and internal modules are placed at a distance of 1 m, the route should not exceed 5 m. The excess of the system is formed into a ring and placed behind the block.
Interesting to know! Manufacturers indicate different maximum distances between blocks. For Daikin equipment it is 1.5-2.5 m, for Panasonic - 3 m.
Choosing a section
When deciding how to choose the desired thickness of cable cores, it is necessary to assume that the available equipment will certainly change over time, so when purchasing wires for internal wiring, you need to take into account the power reserve. That is, approximately a third of the value must be added to the calculated value of the expected load.
The easiest way in such a situation is to be proactive and install electrical cables with larger cross-section cores in the apartment. This will save you from possible wiring alterations in the future.
To select a cable with the required bandwidth, you need to pay attention to the marking - the tag must contain all the necessary data on the cross-section of the cores
If you simply do the wiring with a reserve, without delving into the calculations of which wire cross-section is better to choose, you can be guided by the following values:
- 1.5 mm² for lighting.
- 2.5 mm² for regular sockets.
- 4-6 mm² for sockets to which powerful electrical consumers will be connected - ovens, electric stoves, etc.
It should be taken into account that manufacturers, when marking capacity, can indicate calculated, rather than real data, taking advantage of the fact that some error is included in specifications or GOSTs and small discrepancies are quite acceptable. Here it is better not to take risks and, to be on the safe side, purchase electrical wires with a nominal value higher than what is actually needed.
For more information about choosing a wire cross-section, watch this video:
How to calculate cable cross-sections by power
If the cable cross-section is sufficient, the electric current will pass to the consumer without causing heating. Why does heating occur? We will try to explain as clearly as possible. For example, a kettle with a power consumption of 2 kilowatts is plugged into the outlet, but the wire going to the outlet can only transmit a current of 1 kilowatt for it. The carrying capacity of a cable is related to the resistance of the conductor - the greater it is, the less current can be transmitted through the wire. As a result of high resistance in the wiring, the cable heats up, gradually destroying the insulation.
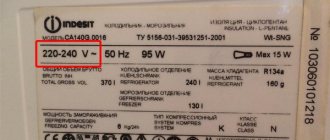
With the appropriate cross-section, the electric current reaches the consumer in full, and the wire does not heat up. Therefore, when designing electrical wiring, you should take into account the power consumption of each electrical device. This value can be found from the technical data sheet for the electrical device or from the label affixed to it. By summing the maximum values and using a simple formula:
and get the value of the total current.
Pn denotes the power of the electrical appliance indicated in the passport, 220 is the rated voltage.
For a three-phase system (380 V), the formula looks like this:
The resulting I value is measured in Amperes, and based on it, the appropriate cable cross-section is selected.
It is known that the throughput of a copper cable is 10 A/mm; for an aluminum cable the throughput is 8 A/mm.
In order to calculate the cable cross-section, you need to divide the current value by 8 or 10, depending on the type of cable. The result obtained will be the size of the cable cross-section.
For example, let’s calculate the cable cross-section for connecting a washing machine, the power consumption of which is 2400 W.
I=2400 W/220 V=10.91 A, rounding up we get 11 A.
Further, in order to increase the safety margin, according to the “five amperes” rule, you need to add another 5 A to the obtained current value:
11 A+5 A=16 A.
If you take into account that three-core cables are used in apartments and look at the table, then the value close to 16 A is 19 A, so to install a washing machine you will need a wire with a cross-section of at least 2 mm².
Table of cable cross-sections relative to current values
Cross-section of current-carrying conductor (mm2) Current (A), for wires laid
| Open | in one pipe | |||||
| two single-core | three single-core | four single-core | one two-wire | one three-wire | ||
| 0,5 | 11 | – | – | – | – | – |
| 0,75 | 15 | – | – | – | – | – |
| 1 | 17 | 16 | 15 | 14 | 15 | 14 |
| 1,2 | 20 | 18 | 16 | 15 | 16 | 14,5 |
| 1,5 | 23 | 19 | 17 | 16 | 18 | 15 |
| 2 | 26 | 24 | 22 | 20 | 23 | 19 |
| 2,5 | 30 | 27 | 25 | 25 | 25 | 21 |
| 3 | 34 | 32 | 28 | 26 | 28 | 24 |
| 4 | 41 | 38 | 35 | 30 | 32 | 27 |
| 5 | 46 | 42 | 39 | 34 | 37 | 31 |
| 6 | 50 | 46 | 42 | 40 | 40 | 34 |
| 8 | 62 | 54 | 51 | 46 | 48 | 43 |
| 10 | 80 | 70 | 60 | 50 | 55 | 50 |
| 16 | 100 | 85 | 80 | 75 | 80 | 70 |
| 25 | 140 | 115 | 100 | 90 | 100 | 85 |
| 35 | 170 | 135 | 125 | 115 | 125 | 100 |
| 50 | 215 | 185 | 170 | 150 | 160 | 135 |
| 70 | 270 | 225 | 210 | 185 | 195 | 175 |
| 95 | 330 | 275 | 255 | 225 | 245 | 215 |
| 120 | 385 | 315 | 290 | 260 | 295 | 250 |
| 150 | 440 | 360 | 330 | – | – | – |
| 185 | 510 | – | – | – | – | – |
| 240 | 605 | – | – | – | – | – |
| 300 | 695 | – | – | – | – | – |
| 400 | 830 | – | – | – | – | – |
What is an RCD in electrical engineering: types, principle of operation Connecting a two-key switch: diagrams, tips, instructions
How to connect an oven
If the equipment is installed complete with a hob, the total power of the equipment is taken into account. If it is less than 3.5 kW, the use of an outlet is acceptable. The connection of functional parts is carried out according to the manufacturer’s diagram with subsequent connection to a common power line.
The cabinet is installed horizontally in cabinet furniture. Level the level using screw supports. For control, use a building level. Leave ventilation gaps of 4-8 cm.
Connection to the power supply is carried out according to the points in the official instructions. The procedure is similar to the installation of an electric furnace discussed above. As in the previous option, it is recommended to use a separate machine and RCD for reliable protection of users and equipment.
Installation procedure and features of the work
There is nothing super complicated about installing a split system yourself, but there are a lot of nuances that can affect the durability and quality of operation of the equipment. First of all, before starting work, you should carefully read the installation and operating instructions that come with the equipment. You will compensate for the time spent by knowing exactly what and how to do with your air conditioner, because there are some nuances.
To make it easier to hang the indoor unit, practice hooking it onto the plate before starting installation
Getting started - installing the blocks
Before starting all work, it is worth looking for hidden wiring or heating pipes in the intended installation location. Getting caught in them while working is very no fun. Next comes the actual installation of the air conditioner yourself. You need to start with installing the indoor unit. At the selected location we place a plate for its fastening. The block must hang strictly horizontally without the slightest deviation. Therefore, we approach marking and fastening carefully.
We apply the plate, level it, and mark the places for fastening. We drill holes, insert plastic plugs under the dowels, hang the plate and secure it with dowels. We especially carefully fasten the lower part of the plate - there are latches that hold the block, so they must be firmly fixed. No backlash. Then we check the horizontality again.
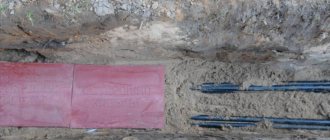
We drill a hole for the route to install the air conditioner with our own hands
Having estimated where the route will be located (it must slope at least 1 cm per meter for normal drainage installation), we begin to drill a hole in the outer wall. We also drill the hole with a slope - again, so that condensation drains normally (the angle can be greater than that of the route).
The minimum diameter of the hole is 5 cm. If there is no drill of this size, you can make several holes of a smaller diameter, bringing out not a common bundle of communications, but each tube/cable separately. In any case, it is better to drill two holes - one for the copper and electrical cable, the second for the drainage pipe. It must be laid lower than the others so that it does not leak into communications in an emergency.
If two blocks are mounted back to back, the hole must be strictly aligned (measure on your own block where the connection ports are located)
Then we install the brackets for the outdoor unit. If we are talking about a high-rise building, you will need climbing equipment and skills to work at heights. This block must also hang strictly horizontally, so when marking the holes we also use a level. When installing brackets, we install fasteners in each hole, no matter how many there are - this is a prerequisite. Standard fasteners are 10*100 mm anchors. More is possible, less is highly undesirable.
Sometimes you can't do without mistakes
After the brackets are secured, the outdoor unit is installed. We also attach the block to all the fastenings that are available. This is the only way to guarantee that it will remain in place under any conditions.
Laying communications
The two blocks are connected by an electrical wire and two copper tubes. There is also a drainage pipe leading through the wall. All these communications must be correctly selected, connected, laid and secured.
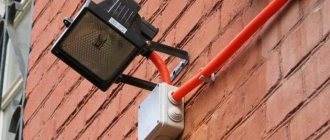
This is what the connected outdoor unit looks like
Copper tubes
We start with copper pipes. One is larger in diameter, the other is smaller. The dimensions are indicated in the instructions for the air conditioner. We cut off a piece of the required length with a pipe cutter, remove burrs from the edges with a special tool, straightening and leveling the cut. It is undesirable to use a regular saw, as well as a file to remove burrs - there will definitely be sawdust inside the pipe, which will get into the system and quickly destroy the compressor.
Heat-insulating tubes are placed on the prepared pipes. Moreover, the thermal insulation must be continuous and extend inside the wall as well. The joints of pieces of thermal insulation must be glued with metallized tape, ensuring a very tight fit of the edges. The quality of thermal insulation is important, since condensation will form on uninsulated sections of the pipes, and it can drain inside the wall, causing frozen streaks, destroying the wall.
Thermal insulation is put on the copper tubes, they are joined very tightly and the joint is sealed with metallized (aluminum) tape.
Copper tubes wrapped in thermal insulation must be passed through the hole in the wall. Before doing this, be sure to carefully seal the edge that will be inserted into the wall so that dust does not get inside the pipe (or better yet, securely plug both ends immediately after cutting and leave the plugs until the connection begins). This is a very important point, since dust will quickly damage the compressor.
Cable and drainage
The situation is simpler with an electrical cable. Each wire is terminated with special lugs, installing them on conductors stripped of insulation and crimping them with pliers. The prepared cable is connected according to the diagram in the instructions.
On the indoor and outdoor units, above the ports for connecting copper pipes, there is a removable plate, under which there are connectors for connecting cables. Before you start installing the split system yourself, remove the plates, consider what will need to be connected and where - it will be easier to work with later. Especially with an external unit.
This is what the port for connecting the electrical cable looks like
Connecting the drainage tube is generally simple: it is connected to the corresponding terminal on the indoor unit and brought out through the wall. The length of this tube should be such that it ends at a distance of 60-80 cm from the wall. The drainage pipe must be laid with a slope towards the exit to the street. The slope is at least 1 cm per meter of length. More is possible, less is not possible.
The tube must be fixed every meter so that there is no sagging in it. Condensation then accumulates in them, which may end up on your floor or furniture. When you pass the tube through a hole in the wall, it is also better to plug it with something.
What the route looks like from the street side (the pipes are insulated in the wall too)
Indoors, pipes and cables are usually wrapped with metallized tape into a single bundle. Then they are fixed to the wall in several places, and a plastic box is attached on top. Usually it is taken white or a color matching the finish.
If you wish, you can hide all the tubes in the wall - cut a route in the wall, lay it there and, after checking its functionality, wall it up. But this is a rather risky option, since in order to repair something you will need to dismantle the wall.
Which cable is best to choose for underfloor heating: characteristics
When choosing, it is important to consider the following nuances:
- The price of the product should not be very low, because such a cable can quickly fail. Therefore, it is better not to skimp, but to take a trusted manufacturer that will last longer.
- Consider installation costs. The resistive option requires additional investment in the purchase of a temperature controller. When choosing a self-regulating option, purchasing such a regulator is not required. For a large room, it is recommended to select a resistive type wire. If in the future a rug will be placed on the floor, then it is worth purchasing a self-regulating wire to prevent local overheating.
- To decide on a cable for a heated floor, it is worth considering the functionality that will be assigned to it. For direct heating, a two-core or single-core cable or a heat mat is suitable. Before installing the floor covering, such products are laid in a thin layer of screed. This approach allows you to warm up the room in a short time. If the function is to accumulate heat, then it is worth using a self-regulating or two-core resistive cable. In this case, the system can cope with heating concrete with a thickness of 5 cm.
When choosing a cable, it is important to take into account many nuances, because this is the only way to achieve high-quality system operation
Two-core
One core is used to generate heat, the second to provide electric current. The installation process does not require installing the two ends of the cable at one point. The two-core model has a return core and an additional insulating coating, which guarantees safety during cable operation.
The main difference between a two-core and a single-core wire is that the latter will have to be returned to the thermostat.
Single core cables
Provides heat transfer along the entire length. The disadvantage of such a cable is a possible overheating point. Some areas of the flooring will be too hot. When installing, you must ensure that both ends are at the same point.
Formula for calculation
The following formula is suitable here - Icalc = P / Unom where:
- Icalc—calculated current;
- P—total power of devices;
- Unom - standard voltage 220 V.
Example (wire cross-section for 3 kW power):
- 3 kW = 3000 W;
- 3000 / 220 = 13,6363;
- if you round it up - 14 A.
The standard correction factor for household equipment is 5 A. It is added to the result: 14 +5 = 19 A.
The resulting figure is inserted into the table, from which it can be seen that a copper wire for a given current strength should be selected with a cross-section of 2 mm², aluminum - 4 mm².
Then what wire cross-section is needed for 6 kW? For a line with such power, the cross-section of the aluminum wire is 6 mm², and the copper wire is 4 mm².
What kind of socket is needed for an air conditioner?
The main selection parameter is the rated load when connecting. It is recommended to buy a model with a power reserve of at least 10%. Rated voltage 220 V, 16 A. According to the installation method, models can be external, overhead or hidden. The first ones are mounted on the wall surface. They are rarely used if it is not possible to make grooves.
Overheads are similar in design, but are designed to connect to wiring coming out of the wall. Can be used as temporary or when it is impossible to form a recess for hidden installation.
Hidden - the most common models. Most of the body is located in a wall niche, the front part protrudes slightly flush. Installation is more complicated than the two described above, but these models have a better design and fit into the interior of an office or apartment.
Additional characteristics:
- must be connected to grounding;
- protection class – IP54;
- connection type – F or C.
The last parameter depends on the design of the plug (plug). If the air conditioner was produced for the countries of America, Asia, Great Britain or Switzerland, it is recommended to replace the plug with a standard European one. An alternative is to purchase adapters for your specific model.
Type “C” models are gradually going out of sale because they do not have a grounding function. To power a split unit, you need to buy “F” type models.
Selecting a machine by rated current
The considered formulas are widely used in calculations of the input circuit breaker. Using one of them - I = P/209 with a load P of 1 kW, the current strength for a single-phase network is 1000 W/209 = 4.78 A. The result can be rounded up to 5 A, since the actual voltage in the network is not always corresponds to 220 V.
Thus, the current strength was 5 A per 1 kW load. That is, a device with a power of more than 1 kW cannot be connected, for example, to an extension cord marked 5 A, since it is not designed for higher currents. Circuit breakers have their own current rating. Based on this, it is easy to determine the load that they can withstand. There is a table to simplify the calculations. A machine rated 6 A corresponds to a power of 1.2 kW, 8 A – 1.6 kW, 10 A – 2 kW, 16 A – 3.2 kW, 20 A – 4 kW, 25 A – 5 kW, 32 A – 6, 4 kW, 40 A – 8 kW, 50 A – 10 kW, 63 A – 12.6 kW, 80 A – 16 kW, 100 A – 20 kW. Based on the same ratings, calculations are made for the machine's power at 380V.
The 5 A per 1 kW method can also be used to determine the current strength that appears in the network when any household appliances and equipment are connected to it. In calculations, you need to use the maximum power consumption during peak loads. For this purpose, the technical characteristics of the equipment taken from the passport data are used. If they are absent, you can take the approximate parameters of standard electrical appliances.
The lighting group is calculated separately. As a rule, the power of lighting devices is estimated at 1.5-2 kW, so a separate machine with a rating of 10 A will be sufficient for them.
If you add up all the available capacities, you get a fairly high total figure. However, in practice, the full power is never used, since there are restrictions on the allocated electrical power for each apartment. In a modern residential building, if there are electric stoves, it ranges from 10 to 12 kW. Therefore, a machine with a rated current of 50 A is installed at the input. The power of three-phase machines is calculated in the same way.
The resulting 12 kW is distributed throughout the apartment, taking into account the placement of powerful and ordinary consumers
Particular attention should be paid to the kitchen and bathroom, where electric stoves, water heaters, washing machines and other energy-intensive equipment are installed. As a rule, they are connected to separate circuit breakers of the appropriate rating, and the cable cross-section for connection is also calculated individually
Powerful household units are connected not only to automatic machines, but also to residual current devices. Part of the total power should be reserved for lighting and sockets installed in the premises. Correctly performed calculations will allow you to install the wiring efficiently and select the desired switch. In this case, the operation of the equipment will be safe and durable.
Air conditioner installation steps
At each stage you will need tools and certain knowledge. Each split system comes with detailed instructions on how to connect the installation. You can look at it like a cheat sheet.
Stage one – electrical connection of the split system. Electrical wiring should always be separate; it is also better to allocate a separate circuit breaker for it in the electrical panel room. Any air conditioner is a fairly powerful device, so there is no 100% guarantee that old electrical wiring will cope.
Installation of an external air conditioner unit
In houses that are more than 20 years old, it is better to immediately change all the wiring, since previously laid wires were not initially designed for increased load.
Stage two – installation of the external unit of the split system. It is necessary to make holes for fixing the metal clamps. If the external unit is planned to be located on an unglazed balcony, then standard bolts are sufficient. If the balcony is closed or there is a desire to attach the device to the wall, then brackets will be needed. All experts note that this fastening device is capable of fixing and reliably holding weight greater than the weight of the air conditioning device. If the living space is on the top floor, the system can be installed on the roof.
If the home is on the ground floor, then it is better to hang it at a height of at least 2 meters and place it in a grid. Otherwise, unscrupulous people may steal it. It is also necessary to install a metal canopy. It will save the device from snow or falling icicles.
There are some points when installing an external unit, it is recommended to pay special attention to them:
- The supporting wall must be sufficiently solid and smooth;
- When installing, it is not advisable to bend the drainage pipes; freon operates through them. Otherwise, the compressor will stop pumping it.
Installation of the indoor unit of the air conditioner
Stage three - installation of the indoor unit of the split system. If the system is mounted on a wall, it is attached to the wall with screws; if it is ceiling-mounted, then you will need to first install the brackets into the wall, then fix the unit. We check the strength of the installation.
The case with a floor-standing indoor unit is the simplest. It does not require additional means of fixation. You just need to choose the right location for it so that it doesn’t blow too much and doesn’t get in the way. After completing all work with communications, it is not advisable to move it, so as not to disrupt the functioning process.
Places where the indoor unit cannot be located:
- Above the heat source, most often a battery. Otherwise, the air conditioning device will constantly function and cool, and therefore may quickly break down. In addition, the heat constantly rising from the thermal fluid means that the plastic casing may melt;
- In a room where work is carried out using devices emitting high-frequency vibrations. They disrupt the work of the processor running in the block;
- Above the bed, table or work area. A strong draft can lead to constant colds;
- In places where air circulation is difficult. The standard distance to any large objects should be at least 3 meters. If the distance is smaller, then the cooled air will be reflected from the obstacle and return back with the same initial temperature;
- If you have decided to connect the split system yourself, then you need to be very careful that the device “stands up” smoothly so that the water located there does not leak out.
Stage four - punching holes in the floor or wall. Immediately before starting the process of connecting the system to the electrical network, you need to make ceiling or wall holes to connect freon tubes and electrical wires.
If there is no desire or opportunity to ditch, then you can disguise the wires under the baseboard or place them in a decorative box.
Stage five - checking the correct connection of the split system using a testing program. To do this, the air conditioning device is switched on to test program mode. While she is checking the condition of the device, you need to carefully listen to extraneous sounds and see if the case is shaking.
Tools for work
If you need to connect a wire for an electric stove, you will need to acquire some tools for future installation.
These include:
thirty-two ampere circuit breaker, two poles;
cable cleats;
wire connector;
electric drill (here you need to get a wide range of drills with different diameters);
screwdrivers, pliers (if you are unable to work with pliers, use a hacksaw);
hammer and headlamp;
directly the cable itself with the required cross-sectional diameter (the cross-section of the 9 kW electric stove wire is selected independently);
coating with an anti-corrosion effect (if you are using a copper cable, such a coating is not needed).
If you do not have any of the tools listed above or you are not confident in your abilities, it is better to use the services of a specialist.
In what sequence does preparation for installation of the air conditioner “route” take place?
This sequence will be relevant for both apartment owners and installers:
First, the installation location of the air conditioner is determined (the location of the indoor unit in the room).- Next, select the cooling power of the device.
- Then it is advisable to decide on the type of “conder” (inverter or on/off) and choose the future model. Now, when laying the “route”, the dimensions and pipes of this model will be taken into account. When the time comes to purchase an air conditioner, you can choose either the model in question or any other (but you will ALWAYS need to take into account the dimensions and diameter of the tubes for the new device).
- We agree on the exact indents to the internal block:
- indentation from the ceiling and baguette;
- indentation from curtains or walls.
A “route” with the required pipe diameter is laid. I will write more about this process below.
- The customer connects the power cable to the air conditioner and continues finishing work (“the route” is plastered).
- After finishing, the blocks are hung on the walls and connected to the installed communications. The system is evacuated and started up.