SHARE ON SOCIAL NETWORKS
FacebookTwitterOkGoogle+PinterestVk
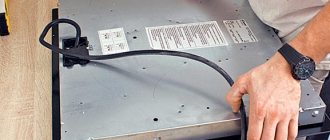
Panels that are integrated into countertops are gradually being replaced by free-standing counterparts. This is due to the fact that they have a wide range of functions and are more economical. You can connect the hob to the electrical network yourself using the appropriate instructions. Before proceeding with the installation of the device, it is recommended that you familiarize yourself with the safety rules and the main nuances of operation.
To easily install the hob, you need to familiarize yourself with the basic safety rules
Features of connecting the hob to the electrical network
It’s worth mentioning right away that the power of integrated panels is comparable to that of traditional electric stoves. It follows from this that to install the hob, a 380 V power line is required. For these purposes, it is necessary to extend a separate cable from the distribution panel. However, there are certain rules (PUE) that must be followed.
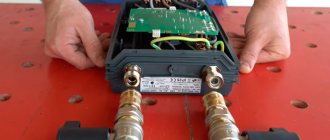
It is best to entrust the connection of an induction cooker to specialists, since the likelihood of mistakes is very high
For example, if the network is single-phase, then a hob cable made of copper material with a cross-section of 6 mm² is used. In turn, for a three-phase network, wires with a minimum cross-section of 2.5 mm² can be used.
Note! It is very important to ensure that the device is connected to the line correctly. Under no circumstances should you connect several household appliances to the same line, as this may cause an overload in the network.
It is worth noting that when using a separate line to connect the hob, the installation of a circuit breaker (RCD) is required. For these purposes, 32 or 40 A devices are best suited.
Features of the process of connecting a gas hob entirely depend on the type of device. Currently, dependent and independent built-in slabs can be found on sale. The first of them are installed together with the oven, and the second - as an independent device. Independent devices are connected to the electrical network through a special box, which is mounted at the input. Through it, wiring is made to the heating zones.
The process of connecting the hob depends entirely on the type of device
You should know that there are integrated stoves containing rapid-type heaters. In this case, you will need to perform electrical wiring for each element separately.
Another common type of integrated hob is induction. Such models are the most complex in terms of self-installation. It is best to entrust the connection of an induction cooker to qualified specialists, since the likelihood of errors in this case is the highest. In city apartments, gas or combined appliances are most often installed.
RCD and automatic
The rules for operating powerful kitchen appliances require the use of a device such as a residual current device (RCD) and an automatic machine in the network. This will prevent accidents in case of possible violation of the integrity of the conductors and protect against electric shock.
The machine is selected according to the type of hob. If the equipment is characterized by average power, a single-phase 20 A circuit breaker is installed in the network. If the equipment consumes from 4 kW per hour, then a voltage cut-off device must be purchased at 32 A. In this case, the RCD must be selected one point higher than the rating of the machine. If the switch, for example, is rated at 32 A, then the residual current device must be purchased with parameters of 40 A.
Only an electrician should select equipment and connection elements for the kitchen equipment presented. Dealing with such issues on your own, without even having basic knowledge about such things, is life-threatening.
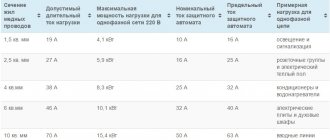
How to choose the right cable for an electric stove: recommendations
Proper cable selection is an essential point that should not be ignored. There are two main parameters that you should pay attention to when choosing a wire for the hob:
- number of cores;
- thickness.
Options for choosing a cable for connecting the hob
The number of cores in the cable is selected depending on the number of contacts in the terminal block of the connected electrical appliance. Cooking surfaces, as a rule, have only two connection options - to 3 or 4 wires. A stove cable containing 3 cores is usually used when it is necessary to connect a cooking surface to a single-phase network. In such a system the voltage is 200 V.
If the distribution box contains 2 or 3 phases, which correspond to a voltage of 380 V, then it is recommended to install the device according to other rules. The best option in this situation would be to connect the device according to a diagram that takes into account 4 wires. An additional wire allows you to reduce the voltage in the line, which will increase its efficiency.
After determining the number of cores located inside the wire for the hob, you need to select its optimal thickness. The choice of this indicator is made taking into account the power of the panel for cooking. The most common cross-section options today are 2 and 4 mm².
It is worth noting that cables with a thickness of 6 mm² are not suitable for low-power devices. When choosing a wire, it is also recommended to pay attention to its type and design features. Both hard and soft wires can be purchased on the market. Both of these options are suitable for connecting a cooking device.
The number of cores in the cable is selected depending on the number of contacts located in the terminal block of the connected electrical device
Note! When installing the hob yourself, in addition to the connection wire, you will need to purchase a separate network cable. Such elements are not sold complete with slabs, since there is no way to know in advance the number of phases in a particular building.
Experts recommend cables that have good resistance to open flames. There are several types of wires that are most suitable for connecting the hob and oven. As a rule, all of them are characterized by increased safety. The following brands are most widely used in the domestic market:
- NYM;
- VVGNG;
- VVGNG-LS.
Experienced experts recommend using soft wires. This is quite simple to explain, since such cables are less susceptible to heat than their rigid counterparts. In addition, they are more flexible, which greatly simplifies their installation.
Experts recommend cables that have good resistance to open flames
Examine the quality of electrical wiring
After the selected model has been purchased and delivered to your home, you need to analyze the quality of the electrical wiring. If it is very old, in most cases it will not be able to handle the same load as an electric oven. No extension cords will help.
What to do in such a situation? Experienced specialists strongly recommend replacing the old wiring to turn on the oven with hob.
If this is not possible at the moment, you can purchase a separate power machine. Such a power unit will respond quickly in unforeseen circumstances.
If there are no problems with the electrical wiring, then you can proceed to choosing an outlet for the purchased oven with hob.
Hob connection diagrams: selection of stove models
Modern slab models that are integrated into the countertop are most often compatible with all types of phases. In Russia there are two strictly defined network standards:
- single-phase – 220 V;
- three-phase – 380 V.
Separately, it should be said that in some houses a 220 V network may have two phases. Before starting work on connecting the hob, you need to study the features of each type of network in order to understand the nuances of the work. Each type of system has its own characteristic differences.
Single-phase. Most often, this network option can be found in residential buildings that were built quite a long time ago. Single-phase networks are divided into two types: two-wire and three-wire. In old-style houses, single-phase systems have a voltage of 220 V.
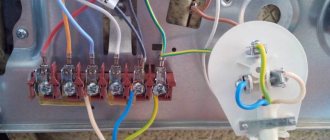
Connection diagram of the hob using a terminal block
First of all, you need to understand the two-wire network. It is worth noting that its distinctive feature is the wires of the same color. Phase detection in this case is carried out using a probe (screwdriver equipped with an LED) or a special tester.
Three-wire single-phase networks include multi-colored wires. The following shades correspond to a certain electric line:
- phase – red, brown;
- zero – blue, light blue;
- earth – yellow-green.
Single-phase switching circuit is quite common. In rare cases, such a network may have wires of the same color. In such a situation, it is recommended to use a tester, which will allow you to more accurately determine the purpose of each wire.
Connection diagram for hob and oven
A two-phase network, which has a standard voltage of 220 V, is extremely rare. As a rule, such communication can be seen in new buildings. In this case, the color black (less often brown) is used to indicate the phase. Zero has the usual blue tint, ground is determined by a yellow-green wire.
The last connection diagram is three-phase. In such a system, zero and ground have standard colors. In turn, the wire corresponding to the phase can be indicated in yellow, red or green.
Helpful information! According to another shade scale, the colors of the phases can be as follows: white, black or brown.
Connecting the hob to the electrical network: single-phase and two-phase options
The greatest number of questions arise if it is necessary to connect the cooking surface to a network whose voltage is 220 V. Situations are especially problematic when the number of panel wires does not match the number of cables in the network. As an example, we can take the Hansa electric stove. Such a device is connected via 6 wires.
Hob connection diagram - single-phase version
If the network includes 3 lines, then the problem of connecting such a panel can be solved quite simply. For connection in this case, special jumpers are used, which are quite easy to purchase at any specialized store. Sometimes they are sold complete with the device. If necessary, you can do them yourself.
How to connect the stove in this case? Before connecting the device to the power supply, it is recommended to carefully study the instructions. The step-by-step process for connecting a panel to a single-phase system is as follows. The first thing to do is to find the lid on the back of the cooking surface. Next you need to open it. To do this, you can use a regular screwdriver. The terminals are located under the cover.
In the event that there are 6 terminals, and there are only 3 cables in the apartment, it is necessary to connect the contacts. To perform this operation, you will need to connect 3 wires that correspond to the phases with each other. Next, one neutral cable is connected to another. There is no need to touch the earth. The result is 3 lines.
In some models, the device already has jumpers. In such a situation, it is easiest to connect the hob. You just need to connect the network wires and the contacts of the electrical appliance. Video materials on this topic will help you answer the question of how to connect an electric stove yourself.
Two-phase connection diagram for a 380 V electric stove
Note! Single-phase networks can consist of only two wires. In this case, you need to act differently. In such a situation, a mandatory item is to purchase a separate circuit that will be used for grounding. If you ignore the ground connection, then the device can quickly fail.
Two-phase slabs are very rare. Often, when installing such a device on their own, people encounter difficulties. However, there is nothing complicated about it. When connecting such devices to a three-phase network, one of the cables is insulated.
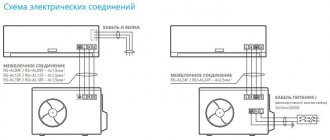
How to connect the hob to a three-phase power supply (380 V)
Before connecting the cooking device to a three-phase electrical network, you must prepare a special cable. It should contain 5 copper conductors. The cross-section of each element in this case is 2.5 mm². Moreover, it is not so important what kind of cable it is. Both single-core and multi-core options are suitable for this.
Related article:
Sockets in the kitchen: location, diagrams and design features
How many sockets are needed? Placement rules, diagrams, norms and recommendations. Features of installing sockets for various devices.
Before connecting the hob and oven, you must check the network for the absence of current. In this case, the jumper is used only for two wires, which are zeros. These cables are designated by the Latin letters N. Thus, the jumper is used for wires N1 and N2. It is worth noting that some models of hobs have digital line designations. In this situation, the zeros correspond to the numbers 4 and 5.
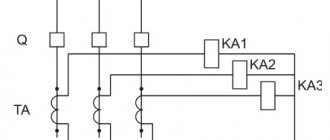
As for the phase wires, they must be connected to each phase (one at a time). The diagrams in the pictures help you understand how to connect an electric stove. It is also recommended to study the relevant video materials. As mentioned above, the color of phase wires may vary depending on the standard. The most common cables are red, yellow and green. When connecting, you should be careful, as there is a possibility of incorrectly connecting the wires to the plug.
With a three-phase network, the neutral (zero) is connected at the top, and the ground, on the contrary, at the bottom. In turn, the wires indicating the phases are located in the middle. This order must also be followed at the outlet.
Connecting the device to a three-phase 380 V network
Grounding Plug Assembly
If this is your first time assembling a plug, try doing everything wirelessly first. This will make it clearer how individual details should match. In general, the following principles should be followed:
- The wire must be secured with a clamp. Without this, he will come off.
- The grounding yellow-green conductor must be connected even if there is no grounding in the apartment. This operation is useless, but its implementation is required by safety rules.
- It is advisable to solder the rings before tightening them to the screws. The resulting contact will become more reliable.
- Make sure that the screw holding the plug halves together does not touch the live wire under any circumstances. You can check with a multimeter.
Connecting the Electrolux hob (4 wires) to a three-phase power supply
Most models of hobs manufactured by Electrolux are sold complete with a cord. However, this is not always an advantage, since many people get confused when connecting the device to a three-phase electrical network. This is due to the fact that the cord contains 4 wires: neutral, ground, and two phase lines. Before starting installation, you need to study all the nuances of the work.
Connecting the Electrolux hob should begin by opening the cover, which is located on the back of the device. This will allow you to access the terminals. At the next stage, you will need to find the “ground” exit, which has a traditional yellow-green color. In close proximity to it there should be a jumper with 2 inputs.
Note! The instructions that come with the device will help you answer the question of how to connect an Electrolux hob.
Then, using the jumper that was discovered earlier, you need to combine the two outputs for the phases. They are designated by the Latin letters L1 and L2 (black and brown). It is important to remember that only the brown cable is used to connect the plug. In turn, the black line will need to be carefully insulated.
Before installing the Electrolux hob, you need to study all the nuances of the work.
Socket box
When deciding which outlet to choose for the hob, you need to decide on the choice of its additional elements. This is a socket box and an RCD. The box for wall mounting can be surface-mounted or built-in. In the first case, communications are connected externally, and in the second, they are hidden in the thickness of the wall.
The characteristics of the socket box must match the type of installation itself. For internal installation, a special box is also needed.
If the socket is designed for 20 A power, the socket box must be with the same marking. Preference should be given to more expensive, but high-quality products. After all, the health and life of home owners depends on it.
Features of connecting an electric hob
All modern hobs are divided into types depending on the principle of operation. According to this indicator, electric, induction and gas appliances are distinguished. Connecting each of these types of equipment has its own characteristics. Panels operating from the mains require mandatory grounding for any number of phases.
When installing such a panel yourself, minimal knowledge in the field of electrical engineering will be useful. It will be much more difficult for a beginner who does not have such experience. You will need to study the design features of the device in detail and follow the instructions for connecting the electric hob. Typically, electronic models have all the parts needed to get the job done.
It is important to remember that when working with electrical equipment, you should remember the safety rules. Before starting the connection, it is necessary to turn off the power to the apartment (disconnection is performed on the panel). All work must be done carefully. Checking the final result allows you to avoid many problems.
Connecting Bosch hobs to the electrical network, as well as other modern devices, is usually done using a four-core cable. It is worth noting that electric models are gradually fading into the background. They have been replaced by more functional induction devices. Their peculiarity is that they do not heat up themselves, but act directly on the dishes.
For correct installation and connection, it is necessary to study the passport for the product being installed, as well as the manufacturer’s recommendations for installation and maintenance
Let's sum it up
What to do if you are terribly far from electricians, like the Decembrists from the people? And do you understand ampere-watts like a grandmother with a cell phone? Come to us!
We will consult, understand the situation, select the necessary devices and cables. At least on a domestic scale, at least on an industrial scale, if necessary. We have been working with electricians for a long time, we know the subtleties and secrets that we will generously share with you.
READ MORE: Advantages and disadvantages of sandwich panels
Call and ask!
Phone or ask an electrician.
There is an opinion that a plug and a block for an electric stove are not needed, they only take up space and interfere with work. Instead, the wiring from the distribution board is sealed with the cable coming from the electric stove. In fact, installing an additional connector is a prerequisite and guarantee of safe operation of the electric stove, which must be periodically de-energized if it is not in use or problems arise.
How to connect an induction hob: algorithm of actions
Connecting an induction hob is similar to a similar process involving an electrical panel. However, there are some nuances that require consideration. First of all, you need to prepare the tools and materials necessary to install the device.
Connecting an induction device begins with wiring an independent power line from the junction box. Next, you should install the socket box. Correct selection of height is very important here.
Helpful information! The distance from the floor to the electrical appliance should not exceed 90 cm. There are two ways to route the cable to this device: hidden and in a mounting box fixed to the wall.
The next step in connecting an induction hob is connecting the cable from the device to the panel. The connection is made to a separate circuit breaker. Do not also forget about the grounding loop, which is very important in this case.
To seal, you need to glue the seal supplied by the manufacturer
After the socket box is installed, it is necessary to strip the ends of the cables. Next, they need to be inserted into the socket terminals and secured in this position using special clamps. Then you need to install the power socket for the hob in the socket box. The plug of the integrated brewing unit is connected using a similar method.
For a single-phase network, the voltage of which is only 220 V, copper jumpers are used. As an alternative, parts made of brass are suitable. Before connecting the device, it is recommended to draw your own diagram that meets specific conditions. Maintaining paired cables is a mandatory rule when connecting an induction hob. How is the connection process completed?
The three phase lines are connected to each other. The same must be done with the two wires corresponding to zero. After connecting all the cables, you can close the terminal box. It is very important to check the device after finishing work.
Laying and fixing the corrugation with wire in the groove
- We select a container for alabaster and a narrow spatula from the tools prepared in advance.
- We have already supplied the wires for the socket, so we drag them into the corrugation. First cut the corrugation to the required length.
- At the point where the corrugation transitions from the floor to the wall, we rigidly fix the corrugation in the groove using a clamp, dowel and screw.
Related article: Installing electrical wiring in the kitchen
Place the corrugation with the wire in the groove. The distance from the corrugation to the wall surface must be at least 5 mm.
- At the same time, fix the corrugation with the wire using nails or self-tapping screws, if the density of the wall allows.
- If the wall is concrete, you will have to freeze the corrugation in short sections, holding it with your hands, or make spacers from available slats.
Moisten the curtain with water.
Fix the corrugation in the groove using thinned alabaster.
Wait about 10 minutes
Scrape off excess grout using a metal spatula.
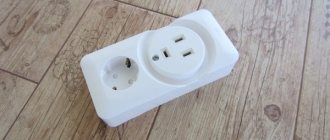
Choosing the right socket for the hob
In order to correctly connect the cooking surface to the electrical network, you need to select a suitable outlet. Today you can find a huge variety of different types on sale. It is recommended to pay attention to special devices called power devices. They are made of durable plastic material and are most often designed for current strengths exceeding 10 A.
Sockets for connecting an electric stove
Such sockets for hobs and ovens are divided into two types: two-pin and three-pin. The connection process is carried out using the power plug and the socket itself. There is another connection option, which takes into account the direct connection of the hob to the terminal block of the distribution box.
If necessary, you can purchase a regular block and a separate installation box. In order to connect cables in such a terminal block, you must first strip the end of the copper wire. Then rings are made from it into which screws with plates must be inserted.
At the next stage, the prepared wire is fixed in the socket under the hob. The oven can be connected using the same circuit. You need to purchase a separate outlet for it.
Note! It is possible to connect two electrical appliances to one outlet.
To connect the oven use a separate socket
The cable fixed in the socket must be tightened using a screwdriver. The best option for installing a socket when installing an oven is to fix it below the level of the box. However, the electrical appliance should not be too close to the floor, as this may lead to a short circuit if the water supply leaks.
Connecting the hob and oven to the electrical network is carried out taking into account safety precautions. It is very important to strictly follow the installation algorithm. Any deviations from the instructions may lead to device failure.
Power plug for the hob: tips for choosing
The reliability of connecting the cooking device to the electrical network depends on the choice of power plug. The choice of this element is made taking into account several nuances. The appearance of this part plays a secondary role.
It is worth noting that it is not recommended to use ordinary plugs when connecting a hob for cooking. This is due to the fact that over time their technical characteristics deteriorate. Experts advise using only power parts for such purposes.
The reliability of connecting the cooking device to the electrical network depends on the choice of power plug.
The main requirement for plugs for electric stoves is reliability. The part must be made of high-quality, heat-resistant material. To connect the stove and electrical communications, it is very desirable to equip a separate line, which will include a special-purpose socket.
A common mistake is connecting the wires to the plug incorrectly. When performing this operation, you need to check the correct connection several times.
It is worth noting that, if desired, you can connect the hob and oven to the same outlet. As a rule, at this stage, inexperienced people encounter problems. If you do not have special knowledge, then it is recommended to choose the simplest general connection option - installing a paired socket.
Step-by-step instruction
Consider connecting a single-phase power plug to the cord of an electric stove or hob:
- The plug is disassembled (to do this, unscrew the fastening screw in the center of the body). The plug consists of 2 parts - the back cover and the base, on which the terminals for connecting wires are located.
- A wire is laid into the connector mechanism. Clamp it with a bracket, tightening 2 screws on the front panel.
- Prepare the wires by removing the outer insulation and stripping the wires to about 10 mm.
- Attach the wires in accordance with the connection diagram to the plug terminals. The cores are crimped with NShVI lugs. If it is not possible to crimp the wires, connect them by twisting the conductor cores so that they do not come out of the terminals.
- Now that the wires are securely tightened in the terminals, assemble the plug body and tighten the central mounting bolt.
This completes the connection of the plug. If the second end of the wire is already connected to the hob, it is plugged into the outlet.
Expert advice on connecting hobs and ovens
Before installing and connecting the cooking surface, it is recommended that you read the advice of specialists. During installation, it is necessary to use a special sealant that is applied to all joints. It is very important that the composition has good resistance to high temperatures.
Its service life depends on the intensity of care of the hob.
The correct socket must match the power of the hob. Only in this case will the operation of the device be safe. The socket under the hob should also be made of high-quality materials. It is not recommended to purchase the cheapest options, as they are most often sold with defective elements.
Note! Its service life depends on the intensity of care of the hob. Preventative cleaning helps extend this time and also helps prevent various problems.
To connect such equipment, it is strongly recommended to install a separate power line from the panel. In order to check how correctly the equipment is connected, you need to use a special device – a multimeter.
If desired, you can connect the hob and oven to one outlet. For this purpose, a special electrical device is used, which has two inputs for power plugs.
To check how correctly the panel connection is made, you need to use a special device - a multimeter
It is not recommended to combine devices from different manufacturers yourself. This is due to the fact that a beginner may make a mistake when choosing conductors. For independent connection, it is best to choose equipment manufactured by one company.
Installation location and rules
Before installing sockets, you should analyze the space in the kitchen, since there should not be a sink, drain or water pipes nearby. You cannot make a socket right behind the wall of the oven (where it can heat up), or mount it above the countertop level. According to European standards, a height of 15 cm above floor level is optimal. However, you should not take this recommendation literally. Usually they start from existing conditions and goals. The best location is considered to be the wall area below the working surface, if there is normal access to it. They also try to place the outlet away from the refrigerator and stove. Such measures reduce the risk of short circuit.
Some electricians suggest not installing separate power outlets, but instead powering the oven or panel using an extension cord. Do not follow such advice as it may create a fire hazard. The well-being of all family members depends on how correctly electrical equipment is connected.
Common mistakes when connecting the hob to the power supply yourself
In some cases, miscalculations made when connecting the cooker to the network can lead to serious consequences. The stove may simply fail or cause a fire. In order to eliminate the possibility of making mistakes when installing the stove yourself, it is recommended to pay attention to common omissions.
Quite often, people who do not understand electricity have difficulties when choosing an outlet for the hob. It is important to remember that it is strictly forbidden to connect induction cookers with a power exceeding 3.5 kW with standard 16 A plugs and sockets. The power of the hob is a mandatory factor that should be taken into account when connecting the device yourself.
Quite often, users of such panels complain that the devices turn on and off on their own. As a rule, this behavior of the device is regarded as a wiring error, but this is not always the case. The most likely reason in this case is the operation of a program included in the feature set of a particular model. For example, when you press a large number of buttons, the child lock mode may be triggered.
The power of the hob is a mandatory factor that should be taken into account when connecting the device yourself
To connect a Bosch hob (or any other) with a power exceeding 7 kW, you cannot use wires with a cross-section of 2.5 mm². If the panel does not turn on, it is recommended to check the terminals. In this case, one of them may not have a phase jumper.
Another common mistake is single-phase connection of three-phase devices. This error is identified quite simply. In this case, when the stove is turned on, only half of the burners are functioning. In order to solve this problem, you must carefully study the instructions that come with the specific device. To repair the plate, you will need to reconnect the terminal blocks.
A few words about safety
The above instructions are enough for a person with at least some knowledge of electrical engineering or who wants to figure out what to do and how to do it to connect the electric stove. Otherwise, it is better to include in the purchase budget the funds to invite a professional for this purpose, especially if you need to carry out grounding or cut grooves in the wall for cable supply.
Despite the fact that installing a socket for a kitchen tile or oven can be compared to assembling a construction set, you should remember that electricity never forgives mistakes and requires not only respect, but also sufficient skills when handling it.