It is difficult to imagine your life without household appliances. There are devices that we could do without, and there are those without which the arrangement of a living space is quite rightly considered incomplete. One of these vital items is the refrigerator. Do you agree?
Do-it-yourself repair of household appliances is a good help for the family budget. If desired, you can master many repair operations. For example, replacing a refrigerator thermostat is not that difficult. You just have to understand the design features and operating principles of the device.
We will tell you how to detect a faulty thermostat. The article we have proposed describes in detail how it is replaced during the repair of a Stinol brand refrigerator. The information is accompanied by a thematic selection of photo and video materials with expert advice.
Concept of temperature controllers
Products in this category are used to solve various problems. Based on the appropriate temperature threshold setting, power is supplied (turned off):
- heating in the cellar;
- heating the soldering station;
- boiler circulation pump.
From the examples given, the basic requirements for accuracy that a suitable thermostat circuit must provide are clear. In some situations it is necessary to maintain a given level no lower than ±1C°. To monitor operating parameters, an operational indication is needed. Load capacity is essential.
The listed features explain the purpose of typical functional units:
- the temperature value is recorded with a specialized sensor (resistor, thermocouple);
- the readings are analyzed by a microcontroller or other device;
- the actuator signal is sent to an electronic (mechanical) switch.
For your information. In addition to the parts discussed, the thermal relay circuit may contain additional components to supply power to an electric heater or other powerful load.
Tips from repair experts
Before replacing the relay (removing panels, casing and housing, disconnecting wires and other operations), remember, write down the sequence of actions or photograph each stage of dismantling - this will be useful when assembling a household appliance. Be extremely careful and careful when handling the bellows tube: this part is easy to damage, and incorrect position of the element or kinks will lead to incorrect operation of the refrigerator. It is unacceptable to solder relay wires to the terminals - this can lead to failure of the element, breakdown of insulation, or short circuit to the metal body of the household appliance.
The operating mode of the refrigerator compressor depends on the correct operation of the thermostat. A malfunction of the temperature relay leads to rapid failure of the equipment, so at the first sign of a breakdown of a functional unit, it must be repaired or replaced.
Kinds
DIY metal detector
In the simplest version (refrigerator relay), a mechanical switch is used. For more precise adjustment (engine speed), not only microelectronics are used, but also specialized software.
Three element thermostat
To make a simple thermostat with your own hands, the circuit for the power supply of a personal computer is better than other options.
Fan controller for computer power supply
The thermistor measures the temperature at the control point. The potentiometer sets the optimal value for turning on the fan. This circuit is not capable of changing speed. Connects an inductive load MOSFET transistor. It is acceptable to use an analogue with suitable power characteristics.
Thermostats for heating boilers
You can make your own temperature controller as part of a project to modernize an old boiler. The type of fuel does not matter, although it is easier to ensure good results using gas equipment.
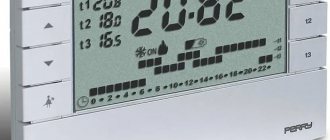
Thermostat diagram with indication of readings on the LCD screen
Digital thermostat
In this example, the developers created a device for maintaining temperature conditions in a fruit (vegetable) storage facility. To analyze incoming data, a chip with the following blocks was selected:
- timers;
- generator;
- two comparators;
- modules for data exchange, comparison and transfer.
When the switches are positioned appropriately, the LED matrix displays the current temperature value or control level. Using the buttons in step-by-step mode, set the desired response threshold.
Circuit with hysteresis adjustment
DIY electronic thermostat, device diagram
As I already said, the circuit is very simple and contains a minimum of inexpensive and common radio components. Typically, thermostats are built on a comparator microcircuit. Because of this, the device becomes more complicated. This homemade product is built on an adjustable zener diode TL431:
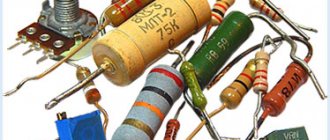
Now let's talk in more detail about the parts that I used.
Device details:
- 12 volt step down transformer
- Diodes; IN4007, or others with similar characteristics 6 pcs.
- Electrolytic capacitors; 1000 microns, 2000 microns, 47 microns
- Stabilizer chip; 7805 or another 5 volt
- Transistor; KT 814A, or other pnp with a collector current of at least 0.3 A
- Adjustable zener diode; TL431 or Soviet KR142EN19A
- Resistors; 4.7 Kohm, 160 Kohm, 150 Ohm, 910 Ohm
- Variable resistor; 150 Kom
- Thermistor as a sensor; about 50 Kohm with negative TCS
- Light-emitting diode; any with the lowest current consumption
- Electromagnetic relay; any 12 volt with a current consumption of 100 mA or less
- Button or toggle switch; for manual control
Homemade temperature controller
DIY soldering iron
Creating a functional thermostat with your own hands is not too difficult. However, you need to be realistic about your own capabilities. The following instructions will help you make the right decision.
The simplest scheme
To eliminate unnecessary difficulties, use a circuit with a power supply without a transformer. To rectify the supply voltage, a conventional diode bridge is used. The required level of the constant component is maintained by a zener diode. The capacitor eliminates surges.
A typical divider is suitable for voltage control. A resistor is installed in one arm, which responds to temperature changes. A relay is suitable to control the actuator.
Indoor device
This device can be used to maintain temperature conditions in a mini-greenhouse or other limited volume. The main element is an operational amplifier chip, which is turned on in voltage comparison mode. Fine and coarse adjustment of the response threshold is performed using resistors R5 and R4, respectively.
Thermostat for incubator
On the LM 311 chip
This option is intended for connecting electric heated floors and other powerful loads. You should pay attention to the increased reliability of the product, which is ensured by galvanic isolation of circuits with weak and strong currents.
Scheme for connecting a powerful load
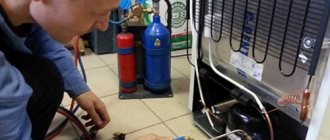
Rules for dismantling the thermal relay
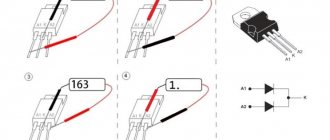
If the refrigerator does not turn on at all, it will be impossible to carry out the diagnostics described above. The probable cause of the breakdown is an electrical failure of this element.
But a problem can also be a compressor malfunction, for example, a burnt out motor winding. To determine whether the thermostat needs to be replaced, it will have to be removed from the refrigerator for examination.
Typically, the thermostat is located next to the control knob, which is used to set the air temperature in the refrigerator compartment. Double-chamber models are equipped with a set of two such handles
First you need to unplug the refrigerator. Now you should find the place where it is located, as described earlier. Usually you need to remove the adjustment knob, remove the fasteners and remove the protective elements.
Then you need to carefully inspect the device, paying close attention to the wires through which the power is supplied.
All of them have different color markings depending on their purpose. Typically, a yellow wire with a green stripe is used for grounding. This cable should be left alone, but all the others should be disconnected and shorted together.
Now the refrigerator is plugged in again. If the device still does not turn on, the thermostat is probably working properly, but there are serious problems with the compressor.
If the refrigerator does not turn on at all, the cause may be not only a malfunction of the thermostat, but also a breakdown of the compressor, for example, a burnt-out motor winding
If the engine starts working, we can clearly conclude that the relay needs to be replaced. Before starting work, it doesn’t hurt to arm yourself with a smartphone or camera in order to consistently record all operations. When installing a new thermostat, these pictures can be very helpful, especially for beginners.
You need to clearly remember which cable core was used for what purpose. Typically, a black, orange or red wire is used to connect the thermal relay to the electric motor. A brown wire leads to zero, a yellow-green wire provides grounding, and a pure yellow, white or green wire is connected to an indicator light.
To connect the thermal relay, wires with different color markings are used; you need to remember the purpose of each wire so as not to get confused during reassembly
Sometimes removing a damaged regulator can be difficult, especially when it is placed outdoors. For example, in some Atlant refrigerator models you have to completely remove the chamber door from its hinges. To do this, you need to remove the trim that is installed above the top hinge and unscrew the bolts hidden under it.
Before removing the adjustment knob, you also have to remove the plugs and unscrew the fasteners. All these operations must be done carefully. It is better to store fasteners and linings in a small container so that they do not get lost. The thermostat itself is usually screwed to the bracket; it must be carefully removed, unfastened and removed.
If the thermostat is located inside the refrigerator compartment, it is usually hidden under a plastic casing, where a lamp for illumination can also be mounted
A new thermostat is installed in its place, following the reverse assembly order. Sometimes the breakdown of the thermostat is associated with a malfunction of the so-called capillary tube or bellows. If you replace only this element, the relay can be left.
To perform this procedure, you will have to remove the thermal relay, following the method described above. The bellows must be disconnected from the evaporator and carefully removed from the device body. Now a new capillary tube is installed, connected to the evaporator, and the relay is mounted in its original place, and the disconnected wires are connected.
Required materials and tools
In some situations, you will need the skills to make a complex printed circuit board. The simplest circuits are assembled in a few minutes using a soldering iron and surface-mounting technology. Before performing work operations, you must purchase:
- components;
- Consumables;
- measuring equipment.
The shopping list is compiled based on the selected electrical circuit. To protect the device from adverse external influences and improve its appearance, an appropriate housing is created.
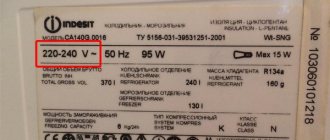
Design features
The thermostat is a relay with a sealed tube filled with freon at one end. The reverse side is connected to the compressor using electrical contacts. The number of contacts varies from two to six. The gas tube has a length from 80 cm to 2.5 m. This depends on the set of tasks assigned to the thermal relay.
The type of thermostats used depends on the design of the refrigerator - single-compartment, two-compartment, dual-motor two-compartment or freezer. Thermostats differ in temperature indicators, as well as in design. Some refrigerator thermostats have a special locking bar, while others do not. The diameter of the handle rod and bellows tube may be different.
How to install correctly
To extend the life of the thermostat, use the following recommendations:
- do not install electronics without additional protection outdoors or in rooms with high humidity levels;
- if necessary, remove the control sensor into an unfavorable environment;
- exclude the placement of the regulator opposite heat guns or other “generators” of cold or heat;
- To increase accuracy, choose a location without active convection currents.
Where to find a refrigerator thermostat
To repair the thermostat, you first need to determine its location. The location of the device depends on the refrigerator model.
Inside
The thermostat is located in a small plastic box, which is located on one of the panels when you open the refrigerator. In order to see how the thermostat works, you need to unscrew the housing.
The principle is the same - the device is always located together with the handle responsible for switching temperatures.
Outside
As for the new models, the thermostats are not located in the refrigerator compartment. They are often located above the door, but may be elsewhere.
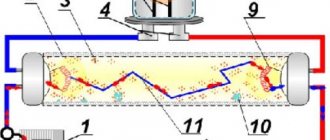
Operating principle of the mechanism
The operating principle of the thermostat is simple. One side of the tube is located within the cooling zone and is attached to the evaporator. While cooling, the lever of the operating thermal relay opens the contacts. When the temperature inside the chamber rises, the thermostat used for the refrigerator closes the electrical circuit. A small spring, to which a temperature adjustment handle is attached, is responsible for moving the contacts. Changing the position of the lever adjusts the spring tension level. This is reflected in the pressure in the freon tube and the reaction of the electrical contacts.
An electronic refrigerator thermostat works differently, although the principle is the same. The required temperature values are achieved by heating or cooling the capillary tube. Modern refrigerators are equipped with electric modules that simultaneously issue commands to a group of sensors. The diagram of the device is shown in the picture below.
Malfunctions
Thermostats indicate a breakdown with the following signs:
- The freezer compartment or refrigerator area is not freezing or is overcooling food.
- The compressor starts up randomly. This is followed by a failure in temperature readings. If the refrigerator is equipped with an alarm, it will inform the user of a malfunction.
- One or all cameras are not working. In refrigerators equipped with several regulators, the operation of the compartment whose temperature sensor has failed will stop. If there is only one thermostat in the refrigerator, the operation of the entire unit will be disrupted, while the backlight will be active. An electrically controlled household appliance will display an error on the screen.
- Refrigerator compressor does not turn on or turn off. In this case, the refrigerator does not reach the required temperature readings. When entering “sleep mode,” the unit no longer starts. If the compressor does not deactivate, the freezer compartment becomes covered with a crust of ice, and the back surface of the chamber becomes thick with frost.
If at least one of the above symptoms is present, the thermostat will need to be replaced.