Household appliances help automate routine household work. Among the variety of technical innovations, drying machines are gaining popularity. Depending on the installation methods, manufacturers offer various modifications. After choosing a model, you only need to correctly connect the dryer to the ventilation, sewerage and electrical systems. Installing a dryer is a simple process, so you can do it yourself.
Clothes dryer: its functions
Almost all types of electric dryers perform several drying functions:
Any model of electric dryer has several drying options:
- Temporary – The drying process starts at a certain moment and for any user-specified period of time.
- Humidity Focused – The drying process will stop when the user-specified humidity percentage is reached.
- Fabric-Based – Drying is based on the user-specified load material
- Focused on the type of clothing - The machine dries similar items, taking into account their characteristics.
Most dryers have the basic functions listed above. To get additional features, owners will have to fork out more. Note that before purchasing a drying machine, the user needs to understand what he wants from this machine, for what tasks he will need it.
On what principle does it work?
There are several types of electric dryers, each of which differs in its operating principle.
Drums
Electric drum dryers are currently considered the most popular in the markets. Their compactness, moderate cost and good capabilities cause the greatest demand among consumers. Such machines can be ventilation, have a heat pump, or condenser. The difference between these types appears only in the method of moisture removal.
Reel machines operate according to the following principle. The air purified by fluff filters is supplied through the drum to the heating element. In this case, the temperature rises to 63-70 degrees. Then, using a fan, air flows are distilled into a tank filled with laundry. At the moment of evaporation, air filled with moisture is transferred to a heat exchanger, from which it is redirected to the heater.
Some models of electric drum dryers differ in their operating principle. Therefore, the operation of all electric drum dryers is described below.
Ventilation
This type of electric drum dryer is no longer produced. Previously, this type was too unpopular due to its design features. When installing it, additional installation work was required. Moisture was removed using a flexible hose.
Condensation
The most practical option for automatic clothes dryers are electric condensation dryers. Machines with such designs can be installed in any location. You don’t have to worry about evaporation, since all the moisture from the laundry is in the condensation compartment, which, by the way, must be emptied often. In such machines, an additional feature (available for an additional fee) is a drainage system that transfers condensate to the sewer.
With heat pump
Electric dryers of this type have a circuit with a cooler, the presence of which contributes to the intensity of the temperature decrease, as well as the rapid conversion of moisture into condensate, which shortens the operating time. Please note that electric dryers with a heat pump cannot be placed between the cabinet and the washing machine to avoid overheating of the device.
Ventilation
Models of dryers with ventilated moisture removal are considered obsolete. Although their design, compared to the other two types, is simpler.
Thanks to the heated air, the “humidity” is quickly removed from the car. In principle, this is the simplest type of drying. But for this you need to have good ventilation near the device. Otherwise, the surrounding area will be filled with excess moisture.
The industry also produces models equipped with additional parts. Infrared lamps are installed in the drying cabinet for disinfecting laundry. Thanks to the air ionizer, things become safe for human health. The listed elements are considered secondary. They only make the dryer more comfortable.
Condensation
Condensation type machines are more practical. They do not require a special installation location, since moisture accumulates in a special container during the drying process. This container must be periodically emptied of water in order for the device to function properly.
Accommodation
Of course, there are many options for placing a dryer in your home. It all depends on the models, on the availability of space in the house, on the number of electrical appliances, etc. But mainly in apartments and private houses the following methods are used:
- on or above the washing machine;
- near;
- in a specially equipped place (niche, closet, corner, etc.);
- under the table.
The most popular option is to place the clothes dryer directly on the washing machine, of course, if its model allows this. For example, if the lid for throwing clothes is located on top, it is better not to place a dryer above it, as this will lead to additional inconvenience.
This type of installation is called “in a column” and in small apartments it helps to save space. The dryers come with special fasteners that allow you to mount such an installation above the washing machine.
Important! Under no circumstances should you just put a dryer on top of a washer. There are special fasteners for this
With the usual installation of a dryer on a washing machine, we will lead to breakdown of both one and the other. The additional vibration that the devices will emit will cause parts to break on both machines, since they are not designed to withstand external vibration. In addition, as a result of vibration, the dryer can simply fall from the washing machine onto the floor and break.
Therefore, in this case there are two ways to secure the dryer:
- using those elements that come with the dryer;
- Place the dryer on a self-assembled shelf made from scrap materials.
Of course, the easiest installation method is to place the devices side by side. But, as stated above, the area of an apartment, especially if it is one-room, does not always allow this.
Installation "over"
- The first step is to install a washing machine, above which we will install a dryer.
- We install the stand on which the new unit will stand.
- It is recommended to place a rubber pad between the top of the washing machine and the stand. This will help reduce vibration and therefore reduce the impact of one machine on another.
- After installing the rubber lining, attach the drying stand.
- Place the dryer on a fixed stand.
- Then we glue, paint over, cover all the grooves, fasteners, etc.
After this, you can use both the dryer and washing machines.
Important! Try not to turn on two devices at the same time. This is the most difficult option
It is important to understand that it is impossible to place one machine on top of another without the use of fasteners.
This is the most difficult option
It is important to understand that it is impossible to place one machine on top of another without the use of fasteners.
Other placement methods, installation nearby, in a niche, in the bathroom, etc.
does not require such complexity and the use of additional precautions. However, each of them has its own pros and cons
Subsequence
The sequence of actions when working with electric dryers is quite simple and differs little between different models. Below is the general principle of working with machines of any model.
- Things are loaded into the dryer. Please note that all laundry should be damp, but in no case wet. Therefore, before loading, all items must be wrung out in the spin mode of the washing machine.
- Select the desired drying mode. You need to decide whether to choose timed drying or drying items of a certain type of fabric.
- After drying, you need to determine the moisture level of the items. If drying is poor, you need to load the items again (after 40 minutes, not earlier) and select the drying mode. You may need to dry things in a different mode.
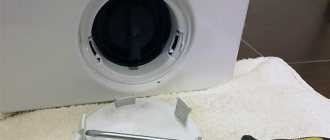
- Clean the fluff filters. Otherwise, there may be poor air supply and, as a result, poor drying.
- Empty the moisture collector.
Video
After watching the video, you can learn more about how to connect a dishwasher yourself:
About the author:
Electronic engineer with many years of experience. For several years he was involved in organizing the repair of household appliances, including washing machines. Loves sport fishing, water tourism and travel.
Found a mistake? Select it and click the buttons:
Ctrl + Enter
Interesting!
Astronauts, while in Earth orbit, solve the problem of dirty things using an original method. Clothes are dropped from the spacecraft and burn up in the upper atmosphere.
Advantages
After reading the entire article, we can come to a conclusion: is it necessary to purchase an electric dryer or can you get by with a classic clothes dryer?
Drying in a machine differs from classic drying of clothes in a number of advantages:
- An accelerated process.
- The ability to stop the drying process at a certain level of humidity, which is convenient for subsequent ironing of some fabrics;
- Evaporating moisture smoothes simple products during operation of the device;
- Various modes make it possible to dry things taking into account the requirements for any type of fabric or type of clothing.
Drying machines also have disadvantages: first of all, the high price and the fact that the drying machine takes up a lot of space in the apartment. For this reason, many people living in one-room apartments have to be content with the classic drying of clothes on a small balcony.
Product installation instructions
The correct choice of model is a guarantee of accurate fastening of the structure. When purchasing a product, you should pay attention to:
- Dimensions of the place where the item will be installed.
- The amount of laundry that can be hung on tubes.
- Material. It is best to choose steel fasteners. Their use guarantees the absence of possible staining of the laundry.
- It is better to purchase products made domestically or in Europe. Constructions in other countries are made from low-quality materials and will not last.
If you adhere to all the rules described above when choosing a product, then you can assemble the dryer without any difficulties.
Choosing a mounting location
The ceiling device, depending on the type of model, has a different type of fastening and size. These features are taken into account to ensure that the design fits seamlessly into the interior.
The quality of installation of the product is influenced by the design features of the room and the size of the room. Mandatory conditions for installing dryers:
- presence of sunlight;
- warm air;
- good ventilation.
After installation, the structure should not touch the heads of residents. Windows and doors that are located near the device must open and close without any obstructions. “Liana” is suitable for drying clothes on the balcony, kitchen or loggia.
Required Tools
Most modern manufacturers include with the device a set of tools necessary for connection. However, they are often not enough - the connection procedure largely depends not only on the model, but also on the specific location and installation conditions. To correctly connect the dryer to the communications with your own hands, you need to prepare certain tools and devices.
- Construction knife - needed for cutting water or air outlet hoses.
- Clamps for fixing corrugations . If you connect a soft corrugated hose for air outlet, it is better to use plastic clamps.
- Screwdriver and pliers for fastening and clamping clamps. It is not recommended to use other improvised means, especially when tightening a metal clamp. You can seriously injure your hand if a tool not intended for this purpose comes off the clamping head.
Installing two devices in a column correctly
There are three ways to install devices in a column, each of them differs in the nuances of fastening:
- The first option involves the use of an anti-tip kit, which is applied to the surface of the underlying device; the stability of the structure can only be ensured by standard fasteners recommended by the manufacturer.
- The second one rests on the rack fastener for the dryer; it is fixed on the wall above the level of the washing machine; in this case, the strength of the supporting wall will need to be taken into account.
- The third allows you to build both devices into a niche, which is assembled from load-resistant plasterboard or other high-strength materials.
The choice of the preferred method of installing a washing machine and dryer on top of each other or in a column depends on the layout, design, design features of the units, and other factors. In any case, the machines must be installed in compliance with certain rules:
- The recommendation remains unchanged to choose models from the same manufacturer that are similar in overall dimensions.
- If it is not possible to choose this option, you need to focus on the dimensions, which must match.
- The dryer is always placed above the washing unit, it is lighter in weight, its vibration is not so intense, which provides the necessary level of safety.
- The area for placing the equipment must be level, the lower unit should be placed level so that the column is strictly horizontal.
- It is undesirable to place the units on wooden or other soft floors, they increase vibration; the floors must be hard and prevent slipping during operation.
- The recommended distance between the devices and adjacent walls should be strictly observed, especially when choosing installation in a niche and on the rear side, where at least 2 to 3 cm of free space should be left.
It is important to remember that fixing devices without a reliable fastening strip and following other rules is fraught with loss of stability and the column falling. Breakdown of expensive equipment is not the only consequence of such negligence; it can pose a threat to the health of family members and especially children
How to connect a dryer to communications with your own hands
After completing the installation of the drying unit, it is worth starting to connect it to the ventilation system or drain pipe, taking into account the principle of operation of the device.
Ventilation
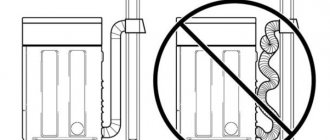
The solution to the ventilation problem is quite simple. There is a ventilation opening on the body of the unit, to which a soft air duct must be attached. The connection is ensured using a special clamp included in the kit. The opposite end of the corrugated pipe is led into a ventilation shaft or window - in the absence of a ventilation hole. Bends of the corrugation by 90° are not desirable, since then the efficiency of the hood will be lower. We must try to connect the air duct with a minimum of bends and turns.
It is worth paying attention to one more important point. If you plan to install the dryer in a room with a high temperature, you should not route the corrugation along the top, as this will lead to the accumulation of condensation and the formation of an obstruction to the air outlet. Under such circumstances, it is worth considering another method, for example, making a hole in the wall at the level of the exit from the machine so that the corrugation section is located horizontally.
Before connecting the dryer, make sure that the length of the hose corresponds to the distance from the installation location of the unit to the outlet hole in the wall. If a corrugated pipe is used, it should not be in a tense state.
Connection process.
- Using a clamp, attach a flexible air exhaust hose to the dryer vent - in most models it is included in the kit and has a standard length. It is more convenient to tighten the clamp with a screwdriver, and at the end, tighten it all the way with pliers so that when you pull the hose, it does not fly off.
- Connect the second end of the hose to the air duct outlet pipe and also secure the attachment point with a clamp . The hose must be laid or tensioned so that there are no kinks or folds.
Preparatory stage
When starting a renovation in the bathroom or kitchen, be sure to include in the plan the laying of electrical communications, taking into account the connection of the washing machine. Having done this once and correctly, you will not have to subsequently spoil the interior decoration, curtain the walls for wires, and then cover and seal everything, spending extra money. What components do we need to prepare electrical communications?
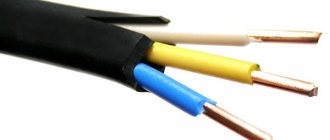
- Wires. You absolutely cannot skimp on wires. Based on the average power of an automatic washing machine, you will need a copper wire with three cores with a cross-section of 2-3 mm and high-quality insulation. For more information about the characteristics of the wires, see our table.
- Emergency shutdown devices. They are also called residual current switches. Designed to protect your washing machine from power surges and your home from fire. Such a device will save the electrical circuit if, for example, water gets on exposed wires.
- Circuit breaker. Protects the washing machine from short circuits and unacceptable voltage drops. In combination with an emergency shutdown device, the circuit breaker will protect your machine from all electrical risks.
- Additional components - terminals, cable ducts, clamps, etc.
Having purchased everything you need, you need to carefully study the rules for connecting the washing machine. So that there are no problems later. In general, experts recommend not to do such work with your own hands; if you do not have experience “dealing with electricity,” it is better to invite a qualified electrician. So, the connection rules.
- Use only reliable washing machine connection diagrams developed by specialists.
- Do not twist copper or aluminum wires.
- For wiring, use only electrical wires of suitable cross-section (preferably copper).
- Do not ground the electrical circuit using water pipes, radiators, etc.
- Use durable sockets with ceramic bases.
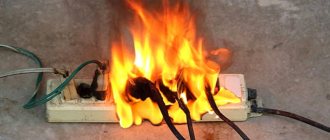
- Do not attempt to connect your washing machine to distant outlets using an extension cord. You also cannot use adapters (from Euro plugs to Russian sockets).
- Do not connect the neutral wire to the ground wire.
- Before laying electrical communications, calculate the number and rated power of electrical appliances that will be connected to it except the washing machine.
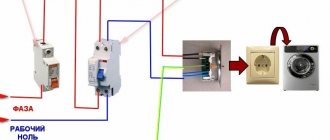
Diagram of electrical communications for a washing machine
Now let's move on to considering a high-quality connection diagram for a washing machine. How to properly connect a Samsung washing machine and any other to protect it from most risks? First of all, you need to run a separate cable with the appropriate cross-section directly from the electrical distribution panel, including a circuit breaker, an emergency shutdown device and grounding in the circuit.
If gating the walls from the electrical panel itself, which is located either in the corridor or in the entrance, is not an option, then you can make it simpler and connect to the electric stove outlet (if there is one). The electric stove's connection will easily withstand the additional load. We remove the three-wire wire from the outlet.
Next, as in the previous case, we connect the circuit breaker and emergency shutdown device according to the diagram, not forgetting to throw in a grounding wire. As a result, the three wire strands should converge in a Euro socket with a ceramic base and the ability to connect a ground wire. Here is a schematic diagram.
Try to hide the wires as much as possible in cable ducts, and the circuit breaker and emergency shutdown device in plastic and aluminum boxes. Firstly, it looks much more aesthetically pleasing, and secondly, there is less chance that wires closed in this way will come into contact with moisture, which is by no means desirable.
The above connection diagram can be simplified a little if you correctly use a machine with a built-in emergency shutdown system. This will eliminate one device, however, there are still few high-quality machines of a similar design on the CIS market, but as they say, everything is ahead.
When arranging electrical communications, pay special attention to the outlet to which the washing machine will be directly connected. Be sure to choose a high-quality socket that is protected from moisture, for example, the Legrand electrical socket is perfect. Next, you can connect the washing machine to the water supply and sewerage system; for information on how best to do this, read the article about installing a washing machine
Next, you can connect the washing machine to the water supply and sewerage system; for information on how best to do this, read the article about installing a washing machine.
Common mistakes when installing a dryer
Errors during installation of the product can lead to deformation of its parts. Avoiding possible errors that occur during installation will help to properly prepare the product for work:
- Not very thorough measurement of the required parameters. Incorrect measurements will result in too strong or, conversely, weak tension on the rods.
- Failure to comply with the diameter of the hole and fasteners. The parts must be exactly the same diameter as the drill; when installing the product, they must be completely adjacent to the wall of the hole, otherwise it will not be possible to hang the ceiling dryer correctly.
- Use of dowel nails. These fastening elements are unreliable and the structure may collapse after the first use.
If all of the above points are observed, the installation of a ceiling-mounted clothes dryer will follow all the rules and will not cause any inconvenience.
Sources
- https://homeasking.com/kak-rabotaet-sushilnaya-mashina-dlya-belya/
- https://cosmo-frost.ru/sushilnye-mashiny/vybor-sushilnyx-mashin/princip-raboty-i-ustrojstvo-sushilnoj-mashiny/
- https://uborka-v-dome.ru/odezhda/liana-dlya-sushki-belya-na-balkone.html
- https://stroy-podskazka.ru/sushilnye-mashiny/kak-podklyuchit/
- https://TechnoSova.ru/dlja-chistoty-i-porjadka/sushilnaja-mashina/podkljuchenie-svoimi-rukami/
Selecting a socket and wire to connect the washing machine
To initially connect the washing machine, you should first purchase all the necessary electrical installation equipment. The reliability and durability of the circuit depends on this. Therefore, this aspect cannot be neglected.
Choosing a socket for a washing machine
First of all, let's focus on choosing an outlet. After all, the wrong choice of socket leads to its burnout, poor contact and possible damage to the washing machine. Here we are primarily interested in the type of outlet and its rated current.
The photo shows a socket with a built-in RCD circuit breaker
So:
- First of all, let's look at the rated current of the sockets. It must correspond to the nominal parameters of the washing machine. The operating instructions or the machine's passport will help you find out.
- It may happen that the rated current is not indicated in the passport. But the power of the machine will definitely be indicated. In this case, we use the formula. In this formula, I is the desired rated current, P is the rated power of the washing machine, U is the rated voltage of the supply network for us, which is 220V. Of course, this is not a complete formula, but in our case it is quite enough.
- Modern washing machines and the socket for them are usually not particularly demanding. After all, for a machine with a power of up to 1.3 kW, a regular 6A socket is quite enough. But there are washing machines with a rated power of up to 3 kW. For such equipment you already need to choose 16A sockets.
- In general, the rated current of sockets can be 6, 10, 16, 25 and 32A. The latter type is presented quite rarely and is mainly for three-phase sockets. Based on our rated current, we select the nearest larger value.
- Now regarding the type of outlet. First of all, they must have a protective grounding, which must ensure advanced closure of the grounding contacts.
- Another aspect that should definitely be taken into account is the dust and moisture resistance class of the outlet. According to clause 7.1.47 of the PUE (Electrical Installation Rules), the bathroom belongs to zone three. In these rooms, all sockets must have a moisture protection level of at least 5. Therefore, the socket and washing machines must be IP45 or higher.
Choosing a wire for a washing machine
The correct choice of wire cross-section for connecting a washing machine is also decisive for the longevity of the circuit. After all, if you install a wire with a smaller cross-section, at best it will simply burn out, and at worst it will even lead to a fire.
So:
The choice of wire is also carried out based on the rated current of the washing machine and it is quite possible to do this yourself. This is done according to the table. 1.3.4 or 1.3.5 PUE depending on the wire material.
Selecting the wire cross-section for connecting the washing machine
- In our case, it will be a three-core wire laid in a hidden way. Indeed, according to 12.22 VSN 59 - 88, wiring in bathrooms must be done in a hidden way without the use of metal pipes or ducts.
- But no matter what wire cross-section values you get, according to the table. 7.1.1 PUE it in any case cannot be less than 1.5 mm2 of copper wire. That is, if when choosing, you get a cross-section of, say, 1 mm2, then you should still install a 1.5 mm2 conductor.