What height should sockets be in the kitchen?
The optimal height above the floor for sockets for built-in household appliances is 5-10 cm. If it is less, it may shorten if the floor is flooded with water. If it is higher, the bottom of the cabinet will not allow you to insert the plug into the socket. If the socket is attached to the wall and the furniture does not interfere, its height can be 25-30 cm.
Interesting materials:
How to log into gmail email? How to log into the D Link DIR 620 router? How to access the taxpayer's website? How to enter BIOS Acer Nitro? How to enter BIOS Asus vivobook? How to enter the BIOS command line? How to enter the BIOS of Lenovo Ideapad s145? How to enter the BIOS of Lenovo IdeaPad? How to enter the ThinkPad BIOS? How to enter the Boot Menu on Lenovo?
How to choose and install a dishwasher outlet
When you have a dishwasher in your kitchen, you can breathe a sigh of relief - the dishes will be washed quickly. Even after the feast there is nothing to worry about. Good, smart appliances like a dishwasher, for example, make life carefree. But sometimes in the kitchen there is no suitable outlet. Is it safe to connect via an extension cord? If there is an outlet, is it suitable? The plug of modern household appliances and their power always raise suspicions.
Dishwasher socket
Location of the electrical outlet for the PMM
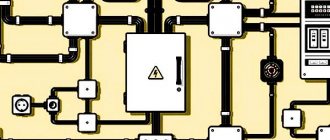
To avoid short circuit or fire, place the socket:
- At a height of at least 50 cm from the baseboard.
- Away from pipes, sources of water and heat.
- To the right or left of the device.
- With free access so that the plug can be removed quickly and easily.
- When installing free-standing and built-in models, please note that the cord length is only 1.5 meters, and using extension cords and tees in the kitchen is inconvenient and dangerous. For a dishwasher built into a cabinet, you will need to make special holes for the cord, drain hoses, and water intake. Usually the kit comes with stencils to make it clear where to make the cuts.
- Do not connect the PMM to a socket for an electric stove.
Wiring cable
After solving the power issue, you need to select a cable for wiring. The selection rules are simple:
- for device loads up to 3.5 kW - copper cable VVGng-Ls 3*2.5mm2;
- for device loads up to 5.5 kW - copper cable VVGng-Ls 3*4mm2;
- with a total load of all devices up to 10 kW - copper cable VVGng-Ls 3*6mm2;
- with a total load of all devices up to 15 kW - copper cable VVGng-Ls 3*10mm2.
It is recommended to do the wiring with a three-core cable; this will greatly facilitate the work in the future, in case of cable replacement work.
Self-installation
If you have a certain desire, after a detailed study of video materials on the Internet, as well as current norms and regulations, it will be quite possible to install the sockets yourself. It is recommended to carry out the work taking into account the following algorithm of actions:
- A detailed diagram is drawn up.
- The points and lines specified in the project are transferred to the walls of the room.
- Holes are drilled for installing electrical boxes and grooves are made for laying wires (a grinder, a hammer drill, or a milling cutter may be required).
- Using plaster and plastic fasteners, socket boxes and cables are fixed to the wall.
- The laid line is checked and communications are connected to the apartment switchboard.
This technology is standard and may vary depending on various factors.
The grooves are usually sealed with a plaster mixture and are made strictly vertically so that, for example, when placing cabinets, their location can be predicted. The length of the protruding end of the cable must be at least 10 cm, which is necessary for normal connection of the fittings. Installing the outlet couldn't be easier. The main thing is to adhere to polarity and remember about grounding.
When planning the placement of a block of sockets, do not forget about choosing the correct center distance between adjacent mounting boxes. It must be strictly 71 cm, since, otherwise, it will not be possible to install fittings with a standard common frame. Ideally, it is recommended to install a residual current device on each line (group of lines), which will protect you and your household from electric shock in the event of emergency situations.
In this case, all equipment is de-energized, with the exception of the refrigerator (possibly also the router, emergency light and other consumers connected to a separate, non-disconnected line).
Important Design Points
To prevent emergency situations, you need to take into account a number of rules:
- The power of the lines supplying electrical outlets brought into the room should be twice the demand of all connected devices. To determine this, we divide the room into sections, each of which has one outlet group. We calculate its power and double the result. Add up the resulting values.
- We distribute energy consumers so that the total power of equipment connected to one source does not exceed the permissible values.
- It is better to power high-power electrical equipment through separate lines with automatic protection. Therefore, it is worth bringing the required number of such lines to the room from the distribution panel. To make it easier to understand the wiring, each machine can be signed.
Instagram mikuhni.ru
For household appliances in a metal case, grounding is required. Therefore, the socket blocks intended for it must be correctly connected through RCDs or differential circuit breakers
The best option would be to calculate the approximate consumption of all devices. To do this, you can use the following average values:
- lighting 150-200 W;
- refrigerator 100 W;
- kettle 2000 W;
- microwave oven 2000 W;
- hob 3000-7500 W;
- oven 2000 W;
- dishwasher 1000-2000 W.
It is necessary to calculate the total power of the equipment. It should be in the range from 10 to 15 kW. All equipment will not turn on at the same time, so it is not worth calculating the wiring for such values. However, it is necessary to determine the maximum possible power when several pantographs are switched on. If it exceeds 7 kW, it is worth considering connecting a 380 V line and distributing the load in phases.
- Security and home automation
How to choose and install sockets and switches in wet rooms
Do-it-yourself wiring - main installation steps
Do-it-yourself wiring is carried out only according to a project created in advance and after all the necessary materials have been purchased.
The posting is created in the following sequence:
- The walls are tiled so that the wires are hidden inside the wall and masked by the finishing. To do this you will need a drill, a special wall chaser or a chisel. Before creating the grooves, markings are made, marking on the walls the places where the wiring will pass. The length of the grooves should be minimal. If there is a need to make a turn, then it is performed at 90°;
Important! When chipping, be sure to use goggles and a respirator for protection.
The necessary grooves are made according to the markings, and after that the nests are laid under the socket boxes or built-in sockets. If you plan to install sockets in the countertop, then the sockets are not made; Wires are laid in grooves using corrugated pipes. To do this, drill holes in the groove every 30 cm - with their help the corrugation will be secured to the dowel brackets. After the wiring is completed and all the wires are laid, the grooves are covered with mortar; Wiring involves installing sockets and switches - this is the final stage of work. Plastic socket boxes are installed in pre-prepared recesses. Wires are routed into them, where switches and sockets will then be connected. The socket box is leveled and securely fixed in the wall using screws and mortar
Important! Installation of sockets is carried out only after finishing work is completed (even if the sockets are built-in): the wires coming out of the walls are connected to the terminals, then the mechanism is fixed in the socket box, and then plastic covers are put on; At the last stage, the wiring is connected to the network. Wires from outlets, lighting points and switches in the junction box are connected to the main wire
All connections must be insulated - for this they use PPE or electrical tape.
Creating wiring in the kitchen with your own hands requires special knowledge and skills, since working with electrical connections is considered dangerous. By the way, in the kitchen it is also possible to create open, that is, external wiring. This method involves the use of protective boxes into which the wires will be laid. The use of boxes is advisable if there is a need to replace wiring in an already renovated room.
- How to arrange sockets in the kitchen: step-by-step instructions
- Basic rules for connecting kitchen appliances to the electrical network
- LED lighting for the kitchen from A to Z
What do you need to know when drawing up a layout of sockets?
First of all, what quantity will be optimal specifically for your kitchen. Blindly following neighbors' advice in this regard is obviously a losing proposition, because the success of installation is determined by the context, and not by some single solution for everyone.
This figure depends on how many household appliances you have in your kitchen and how much power they require, as well as on the configuration of the unit and the room as a whole.
Number of electrical appliances
Usually the main group of stationary household appliances is called stationary. This includes a refrigerator (built-in or free-standing), extractor hood, oven, hob, washing machine and dishwasher. Accordingly, each of the listed devices requires a separate outlet.
Add to this the auxiliary and temporary electrical appliances: they often move and are shifted from place to place. This is a kettle, blender, multicooker. As well as lamps that also require power from the network.
Add up all the units and add 2-3 more rosettes to the resulting number. This will be the right amount of them in the kitchen.
Total power of main equipment
The main load on the network comes from the largest household appliances. You can clarify the required values for consumed kilowatts using the documentation attached to it.
If you are too lazy to look, use our table, which shows the average indicators. This is quite enough to draw up the diagram correctly.
| Device | Power, W) |
| Boiler | 2 000 |
| Microwave | 2 000 |
| Fridge | 100 |
| Washing machine | 2 500 |
| Electric kettle | 2 000 |
| Electric stove | 5 000 — 15 000 |
| Dishwasher | 1 500 — 2000 |
| Lamps | 200 |
To avoid overloads and short circuits, calculate the electrical wiring for approximately 20 kW of power. This is more than you need even if your kitchen is extremely stuffed with household appliances. Often 15 kW is enough, because they almost never all work at the same time.
Location
We have already discussed simple arithmetic above: each piece of household appliance needs its own socket. To this number, add 2-3 more sockets along the left and right edges of the tabletop and at least one near the dining set. It would be nice to place another additional one at the entrance - next to the switch.
Be guided by convenience and official rules when determining the installation location. Of course, the law of scale works here: the larger the area you have, the greater the number of outlets should be within the accessibility zone.
Distance between cables and pipelines, gas pipelines according to PUE: electrical cables in the ground
The distance from pipelines to cables is a variable indicator, mainly regulated by PUE standards. Rules for the construction of electrical installations (PUE) are a collection of mandatory requirements, which are periodically amended. The need to maintain the distance from the cable to the pipeline is due to the emergence of new building and insulating materials, types of buildings, and safety requirements for the structures being built. The competence of the compilers and editors of the PUE standards includes determining what the distance should be between types of structures for supplying energy.
PUE and regulatory documents
To date, the seventh edition of the PUE has been developed. However, in everyday practice, the version SO 153-34.20.120-2003 is used, which combines the 6th and 7th editions.
In addition to the State Construction Committee of the Russian Federation, other authorized organizations also participated in the approval of the document - the Ministry of Energy, Gosenergonadzor and even the Main Directorate of the State Fire Service of the Ministry of Internal Affairs.
The introduction invariably states that all clauses of this set of rules are mandatory, regardless of whether the construction is carried out by an individual or a legal entity. It also does not matter whether there is ownership of the structure or the type of organization.
Electrical wires can be laid to provide energy to residential and public buildings, street lighting, advertising structures and entertainment events. This does not change the security requirements.
Whoever is involved in laying, repairing and replacing the electrical cable - RSU, private or public firms and companies, no matter what installation work is performed, the distance is determined according to the PUE.
This document provides all the necessary details.
The distance between cables and pipelines according to the PUE is determined according to the table of minimum distances required for a specific type of engineering structures. So, for example, when it comes to gas pipelines, the electrical cable is laid at a distance that should ensure the safety of the structure, taking into account its specifics.
Rules for laying cables and pipelines in accordance with standards
A gas pipeline is not a unified structure. There are several types of laying, pressure, isolation and branching methods, technical equipment and even laying location.
In this case, in addition to the PUE, the gas pipe and electrical cable are distanced taking into account regulatory documents. They regulate the types and design of each type used. These requirements can be found in the following documents:
- SNiP 42-01-2002 “Gas distribution systems”. More precisely, its amended and revised version is SP 62.13330.2011, to which is attached a table of minimum clearances from cables and communications. It was not invented on someone’s whim, but was developed in accordance with the safety standards for handling blue fuel given in the set of rules and regulations.
- PB or FNiP, adopted after consideration by experts back in 2013. They contain requirements for ensuring safety at industrial enterprises or facilities that use liquefied fuel in their activities.
- If we are talking about the implementation of electricity and gas supply to residential and public buildings, the Decree of the Government of the Russian Federation No. 878 of November 20, 2000 is used. Here, the essence of the instructions on what should be the safe distance between laid electrical cables and pipelines comes down to ensuring trouble-free operation of electrical and gas networks .
However, in general, PUE and SNiP (SP) for gas pipelines or pipes that ensure delivery of fuel to the destination must be used taking into account numerous nuances. It is difficult to imagine them for a person who does not have special knowledge and experience in laying communication and energy networks.
To determine what the distance from the pipeline to the electrical cable should be according to the standards, you need to study the requirements of the PUE and the nuances of placement, regulated depending on the type of parallel laid communications.
What determines the distance from the cable?
The term “pipeline” does not only mean gas pipes. This could be heating pipes, cable Internet or television, and hot water heated centrally or in close proximity to the consumer.
In each case, it is necessary that the design of the laying of pipelines, as well as cables, be carried out by a specialist, because the distance standards depend on many conditions.
The gas pipeline is distanced taking into account the security zone of the gas pipes themselves and the same requirement for electrical installations. The minimum distance from an above-ground structure is set at 2 m. On the ground or underground, the distance from pipelines is necessary to maintain the safety of both communication networks.
There are no definite statistics on the mutual reinforcement and mutual influence of parallel networks of gas pipes and electric cables. However, one cannot ignore their pressure or voltage, the quality of the insulation with which they are provided.
When it comes to laying an underground gas pipeline, the main criterion for determining the distance is the pressure with which the blue fuel will be supplied.
The minimum gas pipe distances can be seen in the table below.
| Feed type | Distance to power cable | Distance from water supply and heating pipes | Setback from buildings and structures | Indentations from transport communications |
| High pressure, up to 6 units. | 1m | 1.5 m (2 m if the pressure is over 0.6 MPa) | 9 m | 3 m – tram, 7 m – railway rails |
| Low pressure | 1m | 1m | 2 m | 2 m – tram, 3 m – railway rails |
| Average gas pressure in the pipe | 1m | 1m | 5 m | 2 m – tram, 4 m – railway rails |
| Highest pressure | 2 m with parallel installation | 5 m (heating network is standardized depending on the type of shell) | 15 m | 3.8 and 10 m |
Overhead gas pipelines, pipelines, communication cable lines and electrical wires must be kept at a minimum distance from each other. It is defined in building codes and regulations.
They also indicate what exactly the electrical cables and pipes for supplying gas to the utility room are intended for. For example, in the kitchen for cooking or in the basement for heating a private home.
If the electrical circuit is damaged, the wire or socket may spark. Therefore, in a residential building they are recommended to be laid at a distance of at least half a meter.
The nuances of placing cables and pipelines, gas pipelines
The need to consult a specialist is due to the difficulty of making constructive decisions. Also, the best option would be to involve him in the design of networks and communications, even if we are talking about building a private house, where no special difficulties in combining and breeding are required.
There are many nuances and rules that require constant consideration:
- in the gas pipe, underground and above-ground placement, degree of protection against corrosion, pressure of supplied fuel, minimum distance from the main pipeline or thin pipe for supplying residential and public buildings are taken into account;
- in electrical wiring - type of cable, voltage, underground or overhead line, additional provision of safety devices when the device is located underground and the security zone of the power line, if we are not talking about laying in a building (here everything depends on the dimensions of the support);
- SNiP 21-01-97 contains fire safety standards, and if they are not observed when installing a branched system in a building, this may become an obstacle to safe operation;
- in any underground network, what matters is the distance to other objects, the voltage class and compliance with GOST, which contains standards regarding the degrees of protection that special cable sheaths provide.
Related discussions
We need help in decorating the interior after the “redevelopment” of a Euro-room apartment.
Two-room apartment for three family members
Design project for a small two-room apartment
designer for apartment
Mikhail Litvinenko
In Ikea they give leaflets with the placement of sockets. Maybe the website has this information too.
tankurdi
In the kitchen appliance manufacturer's instructions, if you don't use IKEA ones, you'll use them. Be careful with the dishwasher; only IKEA is suitable for an IKEA kitchen, but it is not ideal in terms of convenience, after Bosch. Everything else can be selected from other manufacturers.
MultiJaysoon.
https://www.houzz.ru/user/tankurdi I think not quite so. There are simply 2 types of dishwashers: classic standard, with a high base and 72 doors, and high capacity, with a low base and high door. for IKEA you need to take the second type, it is usually more expensive.
As for the questions in the topic, you can give a clear, unambiguous answer to everything - above the base in the perimeter of a particular base and where it is convenient for you, but taking into account the length of the supply cable. For example, it may be more convenient to power a dishwasher into the network in the adjacent washing compartment. The fact is that IKEA has increased the depth of the modules relative to the standard ones, and this minimizes unnecessary nuance.
look carefully at how the hood body is designed so that the socket for it is not visible and does not interfere with the installation of the device itself. This is essentially the only visible outlet.
Design studio "Instiller"
: « Be careful with the dishwasher, only IKEA is suitable for an IKEA kitchen
«
Not necessarily IKEA. Requires a door slider mechanism. Either it is on the dishwasher itself (like Ikea Electroluxes), or you can buy it separately in the same Ikea (called BHELPLIG) - and with it you can put a “foreign” dishwasher in the Ikea cabinet.
But you have to ask, because... they themselves do not offer it (obviously, they prefer to sell their dishwashers rather than attachments to others)))
Have you made a renovation and don’t know which kitchen is best to choose? We will help you choose the most attractive and practical option. From this article you will learn what nuances should be taken into account when planning and purchasing.
Errors and rules
1Connect the dishwasher in the 220V panel from the machine.
Remember that all equipment and devices in your house and apartment that are interconnected with water and electricity - a boiler, instantaneous water heater, washing machine, including a dishwasher - must be connected through:
- automatic combination + RCD
- or automatic differential
There shouldn’t be any simple modular machines, much less traffic jams, here. Reliability of protection and your safety in the event of an electrical breakdown of the wiring should come first.
2Installation of the dishwasher very close to the wall.
As a result, the supply or drain hoses may become pinched, impairing water circulation. An error will constantly appear on the display.
And you won’t even guess why. Therefore, the minimum distance from the wall should be at least 5cm.
3The machine must be on a level surface.
If the installation is uneven, you will have problems with the quality of washing dishes. There may even be a water leak.
For example, Electrolux models allow a deviation from the horizontal of no more than 2 degrees. This whole thing is checked at the building level.
And it is regulated by twisting and twisting the legs.
The back leg of most models is adjustable from the front. Using a special screw in the lower central part.
When adjusting the legs, according to the instructions, the machine must be raised to the maximum so that there are no gaps left between it and the table top.
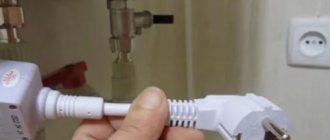
4Installation of a 220V socket under the sink.
Although this may seem like the closest and most convenient place to connect the power plug, try to avoid this type of connection.
The slightest blockage and subsequent leakage guarantees a short circuit and fire. For the same reason, it is not recommended to place the extension cord directly behind the dishwasher.
If the factory cord is not enough to reach a stationary outlet, then connect the carrier away from the hoses, at the greatest possible distance.
5 Connection to hot water.
Remember that not every PMM can be connected to a hot water supply system. Be sure to read the instructions, otherwise the device will fail much earlier than its warranty period.
In addition, the water temperature in this system may be higher than that for which the sink is designed (usually no more than 60 degrees). Even if it supports such a connection.
Also keep in mind that the hot water in our pipes is dirtier than cold water. Therefore, experts recommend connecting to cold water. It makes sense to connect to a hot one only if you have your own heating and a gas boiler. Otherwise, it will be a penny saving on electricity, which will ruin an expensive dishwasher.
6 Extending the water supply hose.
It may well happen that the factory hose, which has a standard length of no more than 1.5 meters, is not enough for you. Therefore, you will have to buy more footage.
The most important thing is not to bite off, unscrew or throw away the main one. It can come with leak protection.
Wires are hidden inside it and when a break occurs, a short circuit occurs and the valve installed at the end automatically shuts off the supply.
Therefore, when lengthening, simply extend the existing one.
7 Flax for thread sealing
If you are not a plumber and do not know how to properly and in what quantity flax is wound to seal threaded connections, then it is better for you not to use it.
You may encounter this when reworking the connection of the dishwasher to the siphon and installing a tee for the cold water supply.
If used in excess, the flax will eventually swell and the flimsy union nut may burst, ultimately leading to a flood.
In such places it is better to use a factory rubber gasket or fum tape.
https://youtube.com/watch?v=WQxrVFI___E%3Ffeature%3Doembed%26wmode%3Dopaque
Dishwasher Cord Length
How to use existing connectors
You should know that the temperature conditions of the dishwashing process are set by heaters. Their power is measured in kilowatts, just like in a washing machine. This is at least two kilowatts. Power consumption is always indicated in the technical documentation. And in some models - right on the nameplate, in a visible place.
The socket used to connect the dishwasher to the network must be designed for these parameters. The location of the outlet is also important. It must be easily accessible for safe and quick removal and insertion of the plug, and located above the top edge of the kitchen furniture.
- If the outlet is located lower, closer to the floor, it should be easily accessible.
Typical dishwasher layout:
2 – zone of connection to the electrical network;
4 – drain into the sewer
Important connection details
In addition to the above, the electrical connection should not be located closer than half a meter to the kitchen sink. Water, and especially soap splashes, are not allowed to enter electrical connections. The dishwasher must use a socket with a grounding contact. If the outlet with the listed characteristics is ready, you can begin connecting the equipment. This requires a grounding-type plug that is compatible with your outlet. A 16 A connection is recommended.
- Never use an outlet located under a sink.
Even with a model from a well-known brand, an accident can occur due to non-compliance with operating rules. And if it's anything like what's shown below, an extension cord on the floor could be deadly.
You will also need a flexible wire with three stranded copper cores with a core diameter of 2.5 square meters. mm.
Electrical connection
To connect the dishwasher to a 220V network, you will not need many materials:
- three-core copper cable VVGnG-Ls 3*2.5mm2
- 16A socket “Schuko” type with grounding contact
- RCD or diffavtomat 16A with leakage current 30mA
A dishwasher (DMM) is not a particularly powerful consumer of electricity, such as a hob (from 7 kW and above). Its power usually does not exceed 2.0-2.5 kW.
Modern energy consumption models correspond to class “A” or “A+”. That is, in a year, approximately 220 kW will run on your meter.
Despite this, it is still advisable to connect the PMM at the repair stage to lay an independent cable line in a separate groove.
If your renovation has been completed a long time ago, and after purchasing the equipment you don’t feel like scratching the walls again and ruining the wallpaper, then you can make do with the existing outlet. Just be sure to make sure that it is protected by an RCD.
Connecting a dishwasher through a simple modular machine is extremely dangerous.
The socket should be placed at a convenient height - up to 90cm from the floor level.
At the same time, place it on the right or left side of the washing machine, but not behind it.
Please also take into account the fact that the total length of the cord with plug for this equipment rarely exceeds 1.0-1.5 m. Based on this, choose a place for the outlet so that you don’t have to use an extension cord later.
The outlet itself must, of course, be grounded. But not everyone has this same grounding. Especially in apartments in old high-rise buildings. Therefore, many people use regular ones, and everything seems to work fine. However, the level of protection will no longer be sufficient.
Roughly speaking, if there is a grounding contact and there is a current leak, then you will not even be able to turn on the RCD. The consequences of these leaks, even small ones, can be quite lethal.
With a simple socket, the shutdown will occur only at the moment when you touch the body, which is already energized.
And you will still feel this electric shock, at least at the initial moment.
Connection to water supply and sewerage
Connecting the dishwasher to the water supply can be done in two ways.
The first is when you are at the stage of construction or major renovation, and you can afford to lay separate pipes, trench walls, etc.