How to extend the antenna cable for a TV: what is needed to extend the antenna cable, extension by twisting, through a splitter, using an adapter.. Extension of a TV cable and types of its connections.
Reading time: 20 min Category: Photos and videos
- How to connect a cable to a plug
- FAQ
- Connecting the cable by soldering without an adapter
- How to connect an antenna to a TV
- Step by step antenna cable assembly
- Preparation and tools
- Which one is better to choose?
- Typical connection errors
- Choosing a cable for your needs
- When to connect the wire
- Cable device
- Selecting a television cable for the TV and its labeling
- How to connect different types of antennas to your TV
- When cable connections are required
How to connect a cable to a plug
You can connect the plug to the cable yourself, especially since the TV signal voltage is too low to cause any harm to health. Even an unplugged cable can be cut without fear of electric shock. A short circuit between the braid and the main conductor also does not cause any harm.
Different plugs are produced for different cable sizes, therefore, when selecting a cable, you need to pay attention to its diameter. The most commonly used F-plugs
First you need to cut the cable, which can be done in two ways:
- with braid bend;
- without inversion.
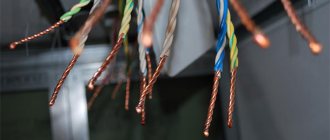
The most reliable method is considered to be cutting with a twist, but if it is not possible to install the plug, then the second method is used. The cable is cut with a scalpel or a sharp knife: the outer sheath is carefully cut to length without damaging the screen. Once the cut is complete, the insulation is folded back and removed.
Step-by-step diagram of crimping a television cable with bending the braid and releasing the main core by 3-5 mm
The copper braid and shielding foil are wrapped. In general, three types of shielding can be used in TV cables:
- aluminium foil;
- copper braid;
- aluminum foil with copper braid.
Aluminum foil is often coated with polyethylene on the inside for strengthening purposes. It is unlikely that it will be possible to clean the film without damaging the foil, so to improve the contact of the screw-on plug with the foil, the bent part of it is slightly wrapped back so that the uninsulated piece of foil faces outward. If the cable diameter is too small, the end entering the plug is wrapped with electrical tape.
The insulation from the main core is removed in a manner familiar to many, similar to removing insulation from electrical wires, without damaging the core itself. Then the plug is screwed onto the foil, and the excess main core is bitten off with wire cutters or cut off with a knife, leaving a length of approximately 3 mm on the outside.
What you need to connect
Regardless of the type of connector, you cannot do without a cable. For our purposes, we will need a coaxial cable with a resistance of 75 Ohms, preferably the following brands:
These types of cable are suitable for outdoor and indoor installation. The specified marking is applied on the side surface of the braid, along with an indication of the manufacturer, product quality, wave resistance and meterage mark. The TV, splitters and amplifiers are designed for a resistance of 75 Ohms, so this parameter is fundamentally important.
You will also need a plug to connect to the TV. Its installation does not require any special skills or permission to work with high voltages - electric shock from the antenna cable is excluded, since it uses high-frequency currents of very low voltage.
Connection instructions
Most modern television equipment provides for the connection of a so-called F-plug. There are three main sizes of plugs, depending on the cable cross-section. Before purchasing, you should make sure that the components you purchase are compatible.
There are two ways of wrapping - with and without a fold of the shielding braid. The first method is more reliable, but the second is used if the plug cannot be screwed over the braid.
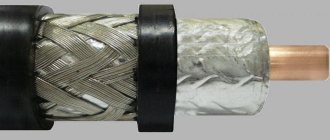
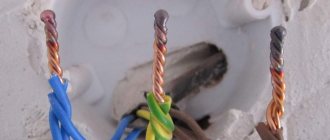
The first step is to carefully remove the top PVC braid using a sharp knife so as not to damage the cable shield. The incision is made a few centimeters. Then the braid is folded to the side and cut off. Carefully release a small section of the inner copper wire.
It should be noted that the foil with which the cable is wrapped and is a conductor is often covered on the inside with a layer of polyethylene for strength. During installation, this point cannot be missed - polyethylene insulates the current, therefore contact must be between the connector and the side of the foil where the PET layer is missing.
Attention! If the cable cross-section is too thin for a given plug, apply electrical tape under the foil several turns.
After installation of the part of the plug intended for winding onto the cable is completed, the internal copper wire is shortened so as to leave no more than 3-4 mm of core. After this, screw the second part of the F-plug tightly, and the connection is ready for use via the receiver.
Connecting cable with old antenna plug
Before the advent of F-plugs, products of a slightly different design were used, which also did not require soldering. When installing Soviet connectors, it was impossible to do without a soldering iron. Since they have already become a rarity and cable is not connected this way, there is no point in considering them within the scope of the article.
What you will need
For installation you will need the same cable as described above. In addition, you will need an old-style plastic plug. You will also need a sharp knife and pliers or wire cutters.
Instructions
The process begins with disassembling the plug. To do this, by rotating counterclockwise, the plastic case and its metal part are separated. The housing fits onto the cable. Then about a centimeter of PVC braiding is removed in the manner described above, and about 5 mm of shielding foil is trimmed.
When inserting the cable into the plug, pay attention to the absence of contact between the screen and the central core. Using pliers, crimp the foil with the petals of the connector. You should not squeeze too hard to avoid damaging the structure; it is enough to achieve good contact between the surfaces. After crimping, tighten the screw intended for fastening the central copper core until it stops.
The final stage is to screw the plastic case onto the metal part, after which you can connect the connector to the TV.
FAQ
Question No. 1. Is the F-plug suitable for digital TV signal transmission, or only for analogue?
Despite the fact that this type of plug has been used for quite a long time, both its connector and characteristics allow you to fully enjoy not only analog (by the way, broadcasting will cease forever in the near future) television, but also digital and satellite television signals.
Question No. 2. What to do and what to do if the diameter of the cable is slightly smaller than the diameter of the internal thread of the plug? After all, in this case, reliable compression will not work.
In this case, it is recommended to screw the required number of layers of electrical tape onto the cable in order to adjust the diameter of the cable close to the inner diameter of the plug.
Question No. 3. When installing the plug into the corresponding socket, the TV cannot be placed close to the wall. What is the way out of this situation?
In this case, you should use an angled plug, which can be purchased at almost any store that sells electrical household appliances.
Question No. 4. In old Soviet-made TVs, the cable was connected to the plug by soldering. How to connect a modern type of cable to it?
If the signal quality deteriorates or the cable needs to be replaced due to poor contact, the plug and cable can be connected, as before, by soldering.
Question No. 5. How can you connect several TVs to an antenna or cable television network at once?
To connect several television receivers, you can use a special device - a splitter, also called a “divider” or “splitter”.
Using splitters to connect several TVs to one TV cable
Connecting to a splitter
Nowadays, no one can be surprised by the presence of a TV in every room. A small problem is supplying a TV signal to all receivers, since in most cases there is only one signal source. The solution to this problem is to use an antenna splitter. The picture quality when connecting TV receivers through a splitter may deteriorate somewhat, but the connection process itself is not difficult and is completed in just a few minutes.
The connection diagram can be presented step by step as follows:
- choosing a location for the splitter and securing it there;
- removing plugs from used connectors;
- cutting and connecting TV cable.
Connecting the cable by soldering without an adapter
The algorithm described below is suitable even for connecting wires of different designs. The method is high quality and quite simple. You just need to know how to use a soldering iron.
- Using a sharp knife, cut the shell lengthwise by 5-6 cm.
- Bend the insulation along with the shielding back.
- Cut the inner dielectric layer along with the core by 2 cm. This is done so that there is a reserve of braid when connecting. The braid of one wire will overlap the braid of the other.
- Make a cross cut about 2 cm across the central dielectric and remove the insulating material so that only half remains.
- To solder the wires, make a bend of approximately 45°. It will be more convenient to solder if you make the angle between the copper core and the dielectric about 90°.
- Tin the vein.
- Repeat the above steps from all points on the second antenna cable.
- Both wires lean against each other along the entire length.
To prevent the strands from diverging during soldering, you can wrap them with thin tinned wire. Alternatively, use braided thread after tinning it first. In order for one sheath to tuck into the other at the last stage, when the wires touch, the initial cuts must face each other. - Solder the wires. Tin should cover the vein evenly along the entire length. It is advisable not to form an extra thick layer of solder. If this has formed, or there are sharp protrusions, grind them off with sandpaper or a file.
- Align the cable so that both halves of the dielectric fit tightly. Carefully trim off excess protrusions, maintaining minimal gaps.
- For reliability, you can wrap the dielectric with electrical tape.
- Return the foil (aluminum) screen to its original position. At the junction, one layer should overlap the other by about 20 cm. But the inside of the material is not conductive. Therefore, it is necessary to unfold the approaching layer from above so that there is contact between the conductive surfaces.
- Attach the braid in the same way. Additionally, you can solder the threads.
- Thread the sheath from the first wire first. And cover the second material on top of the first shell.
- The last step is to prevent the shells from coming apart, wrap the entire connection with electrical tape.
Anti-interference by installing a ferrite ring on the antenna cable
Sometimes, after connecting to cable television or the antenna of several TVs using a crab, interference may appear on some channels in the form of chaotically appearing white or black dots, traveling waves or a grid across the screen. When receiving digital television, image and sound may periodically disappear or be completely absent.
This may occur due to high-frequency interference from a local oscillator, parallel connected TVs, or other sources of interference entering the antenna input of the TV. It is possible that interference can also come from televisions connected in neighboring apartments.
The level of this kind of interference can be significantly reduced or even eliminated completely by installing a ferrite ring on the cable.
The effectiveness of interference suppression by a ferrite filter depends on the cross-sectional area of the ring: the larger its area, the greater the inductance of the inductor made. A ferrite ring placed on the antenna cable forms a choke and, together with the linear capacitance of the antenna cable, forms a U-shaped high-frequency filter. Maximum interference suppression will be achieved by installing two rings on the antenna cable at its ends.
Ferrite rings are sold in stores and come in two types: solid and consisting of two halves, pressed into a plastic case with latches. But you can do it without extra costs. If you look closely at the interface wires running from the computer system unit to the printer, scanner, monitor and other peripheral equipment, you can see thickening of the cylindrical cables. These are ferrite filters.
You probably have an old CRT monitor collecting dust or have unnecessary interface cables. It is enough to cut the plastic with a knife, remove the ferrite ring and install it on the antenna cable. After installing the ferrite ring, interference on the TV screen will no longer interfere with watching TV programs.
How to connect an antenna to a TV
Many people still have old versions of TVs, on the back panel of which you may not find a connector for the F-connector. If you have a suitable plug, great, just below we will tell you how to install it on the cable in order to properly connect the TV.
To the common house antenna
In apartment buildings, you often need to connect to a common building antenna or to a collective antenna in the entrance. What does it mean? A group of antennas is installed on the building. Most often this is a “dish” and one or two terrestrial antennas, depending on how many channels are broadcast in the region and from which directions.
Each apartment has a television outlet. The antennas are connected to a distribution box, from which the cables extend to the sockets in the apartments. The TV or decoder is connected to a socket in the apartment, and not to the antenna on the roof.
The TV signal from a professional, well-designed antenna equipment installation is strong and stable, and interference may be minor.
Individual passive antenna
Even a child can be trusted to connect a passive television antenna (it’s safe). All you need to do is insert the cable into the socket of your TV or digital tuner. Another thing is if the signal is to be divided, then connect the splitter first.
Individual active antenna
In active antennas, current is supplied to the amplifier through the same cable through which the TV signal comes from the antenna. They often use almost identical power supplies. Their design includes a separator - a special television plug in which the TV signal is separated from the supply voltage for the amplifier. Therefore, connecting an active antenna comes down to bringing the coaxial inside the separator and securing it using an SWA type clamp, and connecting the separator connector to the antenna input on the TV.
TV signal amplifier
If after installing the crab the image becomes unsatisfactory, you will have to additionally install a television amplifier in front of it. The amplifier is designed in the same way as the crab, but its body additionally contains active elements (transistors or a microcircuit) that amplify the video signal. A television amplifier will additionally require a supply voltage, and this must be taken into account when choosing its installation location.
The television amplifier must be installed as close as possible to the source of the television signal, since the amplifier amplifies noise along with the useful television signal. The photo shows the TERRA HA123 television amplifier, designed for operation in a home television network that has one output, with the ability to adjust the gain from 8 to 28 dB. If possible, the ideal option is to place the amplifier directly in the box of the main signal splitter for apartments.
If the televisions are located not far from the television amplifier, then it is more advisable to install only one television signal amplifier with several outputs instead of a television amplifier and a crab. For example, a television amplifier-splitter model Televes 5523 (Spain), which has a gain of 16 dB and five outputs, which makes it possible to connect up to 5 TVs to it.
If the signal is taken from an individual antenna, then there are amplifiers that are designed to be installed directly on the antenna instead of a matching loop. Antenna amplifiers provide high-quality reception at a distance of up to 100 km from the transmitting antenna.
The photo shows the SWA-555/LUX television signal antenna amplifier, which is available with different gains, from 10 to 15 dB in the meter range and from 34 to 43 dB in the decimeter range. You can find out how to properly connect the power supply to a television cable to supply voltage to a television antenna amplifier on the website page “How to connect a television antenna amplifier to a power supply.”
The antenna amplifier, depending on the signal level at the antenna installation point, must be selected according to the gain for each specific case. The supply voltage for such amplifiers is supplied via a coaxial cable.
Step by step antenna cable assembly
The coaxial cable is connected to the F-plug in the following sequence:
Connecting a cable to an old Soviet-style plug, or a new, compression one, most often goes like this:
- Disassemble the plug by unscrewing the contact from the body itself.
- Place the housing on the cable.
- Cut 1 cm of the outer part of the wire, remove the insulating material.
- Cut the braid by 5 mm.
- Where there is free space after trimming the braid, strip the insulation to expose the main core.
- Insert the wire into the socket located in the metal half of the plug.
- Use pliers to pinch the stripping material around the sheath so that nothing touches the center core.
- Tighten the fastening screw.
- Screw a plastic tip onto the metal part.
Antenna plug selection
When you have selected the desired option, connect the antenna cable correctly. You can do this in the following ways:
- Soldering. Only suitable for installing homemade TV antennas. We don't recommend it.
- F-plug. Suitable for connecting antennas for both digital and analogue television. Structurally, it is a washer that is screwed onto the end of the cable, where the outer insulation has been stripped and the braid and screen have been bent. The plug crimps the bent shielding elements, and the exposed central core is connected to the signal slot. We recommend!
- Old style plug. They were produced back in Soviet times. It differs from the F-plug in that it requires complete disassembly for installation. It has greater rigidity, and when assembled correctly, the strength is higher than modern ones. It is permissible to use.
Preparation and tools
As for the tools, you and I will need ordinary side cutters and a construction knife (instead of a construction knife, a stationery knife can also do). To connect the ends of a television cable, you need special coaxial cable connectors. They are also called F-connectors.
More specifically, we need two FS-5 threaded F connectors and one straight F reducer. They are usually quite inexpensive!
If you need to extend the antenna cable when moving a TV or antenna, you must also buy a cable. To do this, before going to the store, carefully inspect your wire and rewrite the markings, or better yet, cut off a small piece from it and go to the store with it.
Getting to know the product
The antenna cable is a multilayer wire, which has shielding properties, which ensure stable signal transmission. This way the TV will only show with an antenna connected. Especially for this purpose, it was equipped with a special connector for connection, which is mainly called an antenna socket. The other part of the connection has space for a plug. The home craftsman will have to install the latter on a cable, which can be connected to an antenna, satellite dish or television distribution box.
Which one is better to choose?
Please pay special attention: despite the fact that in general the level of the output signal when using a splitter remains quite high, it is nevertheless attenuated. If the antenna gives a signal to two TV receivers, it will weaken by half
If the splitter has output to three repeaters, then each will receive only a third of the original cable television or antenna signal.
When the signal is initially quite high, this is quite acceptable. But very often, with such a connection, the signals entering the TV monitor lose quality, and the video and sound have serious interference.
That is why when choosing a splitter it is very important to pay special attention to its operating parameters. If the signal level is low, it is best to use an active antenna TV splitter, and it should be installed near the antenna itself. Such a circuit will provide an optimal signal-to-noise ratio and thus provide the highest possible image quality
Such a circuit will provide an optimal signal-to-noise ratio and thus provide the highest possible image quality
If the signal level is low, it is best to use an active antenna TV splitter, and it should be installed near the antenna itself. Such a scheme will provide an optimal signal-to-noise ratio and thus provide the highest possible image quality.
An active antenna splitter will also be good in the case when the level of the incoming signal gives good quality audio and video on one TV receiver, but when connecting a passive splitter the signal becomes noticeably worse.
Before choosing one or another splitter option, you need to decide on the following factors:
- specify their operating frequency range, as well as channels;
- calculate how many TVs you plan to combine into a single network;
- measure the cable cross-section.
Let's look at the sequence of actions for connecting a splitter.
You need to go to the TV menu and select a tab in it indicating the frequencies of all channels received by the receiver. The highest one must be included in the frequency range at which the splitter operates.
Next, you need to calculate the number of receivers that you are going to connect and provide several outputs for the future - and then select a splitter with the required number of outputs.
Pay attention to the signal attenuation pattern. Evaluate the appearance of the device
Please note that the “crab” will be in full view of household members and house guests, so make sure that it has a decent design. If you plan to place it inside a cable duct, then calculate its dimensions so that the device fits inside without any obstruction
Evaluate the appearance of the device. Please note that the “crab” will be in full view of household members and house guests, so make sure that it has a decent design. If you plan to place it inside a cable duct, then calculate its dimensions so that the device fits inside without any obstruction.
Look at the fasteners. As a rule, the TV body has holes for fixing the device. Under no circumstances should the splitter dangle freely - this is not only unsightly, but also causes bending and chafing of the wiring. Accordingly, the device fails.
Think about what method you will use to connect the “crab”. When making a decision, users rely on the characteristics of the cables used.
If you doubt your ability to connect a pair of wires, as well as perform high-quality soldering, then it is better to buy splitters with a screw-type connection. For people who have some skills in working with technology and electronics, you can purchase models with coaxial connectors. They work with cables of all diameters, but the most important part of the job in this case will be the soldering to connect the antenna plug.
And, of course, try not to make a mistake in your choice. Buy a splitter, and not any other similar device in configuration for a completely different purpose. Before going to the store, be sure to look at the manufacturer’s website to see what it should look like and consult with a sales consultant.
Antenna amplifier: in what cases is it needed?
In order for the digital tuner of a TV or receiver to extract information from the signal received from the antenna, it must have sufficient power.
To correct this situation, you just need an amplifier. The device is connected in the area between the antenna and the TV and increases the signal strength.
An amplifier is needed in the following situations:
- reception is carried out using a passive antenna;
- it is not possible to use power from an active antenna (for example, the signal to TVs goes through a regular splitter);
- The reception conditions are such that the signal received from the antenna is too weak. This happens due to distance, interference, obstacles in the signal path, etc.
Typical connection errors
- Not everyone knows that some manufacturers coat the inside of the cable with polyethylene, which cannot be cleaned even with a scalpel. Plastic, even with the best cable stripping, will prevent the creation of high-quality contact with the plug. To avoid signal distortion, it is recommended to turn part of the turned-off foil in the opposite direction so that the conductive side is on the outside.
- A typical mistake is getting the thinnest braided wires onto the main core of the cable when crimping it. This may result in poor quality or intermittent signal dropouts. A common mistake when installing and laying cables is placing them in the same baseboard as the electrical wiring. This cannot be done, otherwise the interference created can significantly spoil the mood when watching TV shows.
Rate the quality of the article:
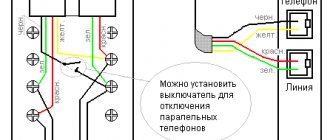
- Connecting a telephone socket: options, diagrams, features
Connecting the cable in the panel
When laying or connecting the cable, it is not allowed to twist it into knots and coils, bends or sharp bends, which sharply worsen the quality of the received television signal.
Tip No. 2: The section of cable that goes first from the panel to the apartment should be placed in a wide cable channel.
In the case when the cable connection in a staircase box must be performed by soldering, the length of unshielded sections should be minimized, since their presence and length directly affects the quality of the signal and image. After soldering is completed, it is recommended to cover each contact under a layer of varnish - it can prevent the occurrence of pockets of corrosion damage and the ingress of dust particles between the contacts. Dust sticking between the contacts causes the signal to deteriorate when air humidity increases: the image reproduced by an analog TV will become very snowy, and when transmitting a digital signal, the image will simply disintegrate into pixels with an unpleasant squeaking sound.
Connecting a television cable in the entrance panel is not difficult
Choosing a cable for your needs
Let's look at each popular television cable for digital television. Which one will be better for your needs is up to you to determine.
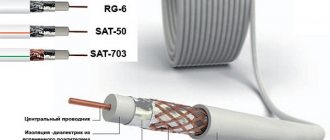
RG-6U
This is the optimal cable in terms of price/quality ratio. It has a steel conductor with a cross-section from 0.724 mm2 to 0.816 mm2 (depending on the manufacturer), coated with copper. The external insulation is made of PVC, and the internal dielectric is made of polyurethane with a thickness of up to 4.7 mm. The total cable diameter averages 6.6 - 6.8 mm.
Note that the RG-6U cable has good flexibility, so it is convenient for them to perform angular turns. It also has a relatively low signal attenuation rate of around 9.2 dB per 100 m of cable - this is better than its younger predecessor RG-59, although they are approximately the same price.
The only drawback is the low density of external PVC insulation, which deteriorates quite quickly under the influence of environmental factors. That is why it is better to use the cable for laying inside the house.
Average cost: 9 – 20 rubles per 1 m.
RK-75
This is the Russian analogue of the RG-6U cable. It has a huge number of varieties in terms of conductor cross-section, braiding and insulation. The core cross-section ranges from 0.75 mm2 to 1.63 mm2. To connect a TV to an antenna at a distance of up to 30 m, a cable with a cross-section of 0.75 - 0.9 mm2 is quite suitable. A thicker cable is only worth taking for satellite TV.
The outer insulation is made of polyvinyl chloride, and the braiding is made of tinned copper wire. Note that all types of RK-75 are able to withstand temperatures from -60°C to +60°C, and cope well with the influence of moisture and ultraviolet radiation, so it can be used for outdoor installation. The amount of bends should be at least 30 mm - this is enough to pass most corners.
Average cost: 13 – 30 rubles per 1 m.
SAT-50
The creation of the Italian company Cavel perfectly transmits high-frequency video and audio signals. The cross-section of the copper core of the conductor is 1 mm2, which allows the cable to be used for both digital and satellite television. The wire has a screen in the form of 64 aluminum threads with a cross-section of 0.12 mm2 and a double layer of foil. The screen perfectly blocks interference and improves signal transmission.
The signal improvement factor here is 60 dB, and the total wire thickness is 6.6 mm. The external insulation perfectly withstands UV rays and precipitation, so you can install the cable outside the window. The manufacturer claims that the cable has a service life of 15 years, but in fact it all depends on the operating conditions.
Average cost: 30 – 50 rubles per 1 m.
SAT-703
This is the older brother of the SAT-50 and is designed for laying over long distances (from 50 m). It has an increased copper core cross-section of 1.13 mm2 and a high-quality shielding system consisting of tinned copper wire and a double layer of foil. The signal amplification factor is 80 dB, which allows for virtually no loss of signal quality even with large sections of cable between the antenna and the receiver. They can connect several TVs to one antenna via a splitter.
Thanks to the foamed dielectric, the cable has low attenuation. It weighs 3.95 kg at 100 m - about 0.5 kg more than the SAT-50. The bends of SAT-703 must be at least 43 mm. For the most part, it is designed for installation in extreme conditions outside the window. It is not practical to install it indoors for reasons of economy.
Average cost: 35 – 60 rubles per 1m.
DG-113
The cable is manufactured by Cavel and is designed for connecting digital, cable and satellite television. It is considered the best in signal transmission, since the gain here is 90 dB thanks to the improved screen design made of tinned copper and double foil. The diameter of the copper core here is the same as that of the SAT-703 - 1.13 mm2. Note that the foamed dielectric is coated on top with a thin hydrocarbon layer (PIB), which improves moisture-proof properties. The outer insulation is resistant to ultraviolet radiation and does not crack over time.
The overall cable thickness is 6.6mm, so it fits standard 6mm F connectors. The manufacturer claims a product service life of at least 15 years. Cable DG-113, like SAT-703, is better to use for outdoor installation, and for indoor use another cheaper one
Laying such a wire over long distances will cost a considerable amount, so if you want to save money, it is better to pay attention to cheaper analogues
Average cost: 55 – 70 rubles per 1 m.
Features of coaxial TV conductor design
In a power cable, the potential moves throughout the entire volume of the conductor, and the strip potential tends to the surface of the wire. The more often he repeats it, the faster he moves closer to her. Penetrating into the body of the conductor, the amplitude of oscillations of electromagnetic waves decreases. The amount of signal attenuation can be determined only after connecting the signal receiving and transmitting cable.
Product components:
- main copper, copper-plated steel conductor;
- impermeable shell;
- aluminum foil, which serves as a secondary material that conducts electric current;
- a screen that counteracts electromagnetic fields;
- plastic external insulation that protects the contents from external influences and atmospheric phenomena.
A selected product consisting of several insulated conductors, coated optical fibers, must be connected to the TV. The simplicity of the operation and its safety make it possible for each owner of a television device to independently decide how to connect the antenna cable to the plug. Low, microvolt voltage allows you to cut the cable without disconnecting its second end from the TV. Electrical contact of network points does not create a danger as a result of contact between the conductor and the interlacing of metal strands protecting the contents.
An entertainment and information unit is connected to a multilayer cord by connecting the latter to the F-connector.
Before connecting, check the quality of the wire used.
Selection conditions:
- familiarize yourself with the special barcode attached to the product shell indicating its characteristics and properties. It is preferable to choose a copper or copper-plated steel core located in the center, which is an excellent medium for the passage of electric current and counteracts temperature changes;
- choose a rigid shell that will not break when bent. Rubber has a short lifespan;
- take into account the density of the existing braid. The insulation screen affects full-color, digital image and sound transmission, and performs various functions: protective, insulating, transit.
Calculate the cable length and indicate the operating frequency of television channels to check the level of signal attenuation (the lower it is, the better the device works). An indicator of 70% indicates the end of the service life of the insulated cord.
When to connect the wire
There are three common situations where a coaxial cable connection is needed.
- Complete break or partial damage to the cable antenna line. The wire transmits an ethereal signal, which is very sensitive and can be attenuated by the slightest factors. Therefore, if you see some very vulnerable spot on the line, where the wire is barely holding on, it is better to cut it and connect it again.
- It is necessary to extend the antenna cable for the TV. It often happens when television equipment is moved to another place in the room. Accordingly, the previously laid wire may not be enough. Then you have to lengthen the wire. A second piece is connected to the end of the previous cable to reach its destination.
- Connecting an existing wire to another television receiver. Instead of installing a separate antenna for each TV, you can connect to an already working one. Then a wire is drawn from the new TV, which connects to the line running to the apartment or house.
Twist
The simplicity of this, outdated today, method of connecting the ends of the cable does not compensate for the signal losses that will inevitably occur with any deformation of the joint. In addition, twisting by itself will not be enough. If you have already decided on this type of merging of coaxial cables, then stock up on at least a soldering iron and electrical tape. Solder the connection of the central cores to each other and, separately, solder the braids. Then carefully insulate everything.
Twisted antenna cable connection
Although this applies to general rules for handling cables, it is especially relevant for joints made by twisting and soldering:
- do not drop objects on the television cable and protect it from shock;
- do not bend the joint - it is fragile;
- Do not allow the spliced wire to “dangle” in the wind.
Cable device
Sometimes you have to make adjustments to an already installed home TV network. This happens when rearranging furniture, or if an additional television receiver “starts up” in your home, or a section of the coaxial cord is simply damaged and requires an insertion. Then you are faced with the task: how to extend the television cable or how to increase the damaged section to the required length? Before you get serious about the solution, learn how to properly connect the antenna cable, because any inaccurate connection of the TV cable is fraught with loss of reception quality. Here it would be nice to remember the cable structure.
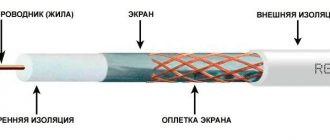
Coaxial cable is a telecommunications wire for transmitting low-power signals, consisting of two conductors that are separated from each other by a dielectric material. The conductor in the center and the outer metal layer form concentric cylinders with a common axis. The conductor in the center of the coaxial is a solid or seven-core wire. It is usually made of copper, silver or copper-plated aluminum, copper-plated steel, etc. A braided metal fabric acts as an external conductor - a shielding braid. Most often this is copper braid or aluminum braid. Many products use an additional shell of insulating foil film, which precedes the woven layer - an aluminum screen.
Now do you understand that connecting two pieces of such a cable is not at all as simple as tying your shoelaces? Fortunately, more than one way to do this reliably and quickly has long been invented.
How to connect correctly
When answering the question of how to properly connect a television cable to each other, it is worth pointing out that you can fix the antenna cable docking station using regular twisting. This method should be used only if you need to quickly supply a signal to the TV screen if you don’t have a connector or a special soldering iron at hand. Regardless of the quality of work, the twisting method will cause interference during operation, which will inevitably lead to a loss of image quality, so experts recommend extending wires in this way only in the absence of factory adapters.
The twisting method resembles standard soldering of wire cores without the use of thermal effects. Two bare cores are laid parallel to each other on the work surface. First of all, the foil mesh is insulated using PVC tape, after which the metal parts are twisted together, creating an inextricable connection.
You might be interested in: Features of cable corrugations
Correct connection of the antenna cable
Selecting a television cable for the TV and its labeling
The first thing you need to pay attention to is the quality of the television cable. It will depend on it how confidently, clearly and without interference or loss the signal is transmitted. If it is an ordinary wire, then after 2-3 meters there will be nothing left of your useful signal, but there will be so much interference
All this is due to the peculiarity of the propagation of high-frequency waves, with the help of which the television signal is actually transmitted. A feature of the propagation of such a signal is the manifestation of the skin effect, when the signal propagates over the surface of the conductor. But this is a voluminous and separate topic, so it deserves a separate article, but that’s not about that now. Well, the second thing is the correct connection of all the plugs, which we have already discussed. So let's go back to the first one. What does a “correct” television cable mean? This is a cable for which the wave impedance at the operating frequency (up to 2.15 GHz) is 75 Ohms. Most often, such cables are labeled as COAXIL CABLE 75 OHM. Thus, cables of the following brands can be used for a TV: RG 6U (index possible), SAT 50, SAT 703B and DG 113. The names of the cable brands are given in accordance with the improvement of their performance characteristics. Usually the cable has a manufacturer's marking, the name of the cable, its resistance, meterage and year of production. Now that the cable has been selected, let's proceed directly to the process of connecting it to the TV.
If it is an ordinary wire, then after 2-3 meters there will be nothing left of your useful signal, but there will be a lot of interference. All this is due to the peculiarity of the propagation of high-frequency waves, with the help of which the television signal is actually transmitted. A feature of the propagation of such a signal is the manifestation of the skin effect, when the signal propagates over the surface of the conductor. But this is a voluminous and separate topic, so it deserves a separate article, but that’s not about that now. Well, the second thing is the correct connection of all the plugs, which we have already discussed. So let's go back to the first one. What does a “correct” television cable mean? This is a cable for which the wave impedance at the operating frequency (up to 2.15 GHz) is 75 Ohms. Most often, such cables are labeled as COAXIL CABLE 75 OHM. Thus, cables of the following brands can be used for a TV: RG 6U (index possible), SAT 50, SAT 703B and DG 113. The names of cable brands are given in accordance with the improvement of their performance characteristics. Usually the cable has a manufacturer's marking, the name of the cable, its resistance, meterage and year of production. Now that the cable has been selected, let's proceed directly to the process of connecting it to the TV.
How to extend the wire: 3 options
It is very inconvenient to use the Internet when you cannot move freely. Many people install network cables to make using the Internet more comfortable. There are several simple ways to extend the cable.
When purchasing, it is important to pay attention to the appearance of the joyner, as it is very similar to a telephone adapter. It will not be difficult to distinguish a twisted pair, since the adapter has 8 contacts, while the telephone adapter has only 7. A computer network card is inserted into the patch cord, the other end of the cord is connected to the network cable
A computer network card is inserted into the patch cord, and the other end of the cord is connected to the network cable.
Internet cable extension options:
- Router.
Convenient and reliable extension option. The router has a couple of sockets to which you can connect a network cable. A router is a “splitter” of the Internet. It allows you not only to extend the cable, but also to connect additional devices to the channel. You can skip the cable altogether if you buy a Wi-Fi router. - Purchasing a new cable.
The old cable can be replaced with a new one by simply measuring its length first. This method is time-consuming because you will have to call a technician to reconnect. But if we are not talking about a multi-storey building, but about a private one, then the method is quite suitable. - Performing twisting.
Masters do not recommend using this method. It involves cutting the cable and then inserting an additional piece of the required length into it. The two pieces need to be connected with electrical tape.
Twisting can lead to short circuits, which will lead to poor connection speed or a complete lack of Internet access. The most reliable and modern way to extend the cable is to use a router. If you are not sure that the attempt to extend it yourself will be successful, you can always turn to your Internet provider for help.
It often happens that the technician interrupted the wiring while performing repair work. While working with an angle grinder or other tools, some people may accidentally cut the electrical wire laid in the wall. Damage is indicated by sparks, power cuts, or knocked out plugs.
The wires located in the installation box may also break. Often there is not enough length to connect them correctly. It should be noted that experts advise not to repair one wire, but to replace the entire damaged section. Of course, this method is suitable for those who are not afraid of damage to finishing materials and are ready to make new repairs.
How to extend an aluminum cable:
- Twist the ends of the cable if they are long enough. The twist must be wrapped with electrical tape. This method is the most unreliable, because the twist may break again, which will return the problem.
- A special heat-shrinkable tube can be attached to the ends of the wires. This method is suitable for connecting and extending any cable. In order to carry out the plantings correctly, the tube must be heated.
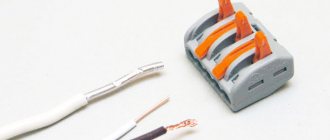
- All types of wires (copper and aluminum) can be extended using a block. The ends of the cable must be stripped, and then the block must be selected.
- If the wires have broken off, they can be repaired using a coil. It is screwed onto the ends of the wires. After the required density has been achieved, you need to insulate the wires.
Extending twisted pair cables does not require special qualifications, and if done correctly can even be reliable. When twisting wires, you need to follow the one level rule and insulate each individual connection. An interesting method is the displacement of joints made by twisting or soldering.
How to connect different types of antennas to your TV
The method of connecting an antenna to a TV directly depends on its type. Satellite is the most difficult to connect, followed by outdoor ones, and indoor ones are the easiest to connect.
Features of connecting a satellite dish
A satellite TV system consists of the following components:
- the antenna itself;
- receiver;
- tuning cable;
- converter
The first step is to install the “plate” itself on an adjustable mount. Experts calculate for each area the direction in which the satellite is located and the angle of inclination of the antenna, determined by its height. The connector is not tightened too much, since a special adjustment cable will be used, which will then be replaced with a permanent one.
Then the receiver is prepared. It needs to be flashed to work with a specific satellite, and a list of channels must be “uploaded” into it. In the future, if the number of channels steadily decreases, this procedure must be repeated. The receiver is connected to the TV via an AV cable (“tulip”) or HDMI.
Connection via a splitter
Twisting three or more cables together is not the best solution. If you need to watch more than one TV receiver from one terrestrial DVB-T2 antenna, you should connect through a splitter.
To connect, use the instructions above about using a coupling (adapter). The splitter uses threads of the same diameter, so the connection principle is no different.
The only thing is that the nests must match. The crab's input is signed IN, ANT IN. This is the input for connecting the cable that leads from the antenna. Each output is signed OUT with a number. There can be up to 8 of the latter on one device. The quantity depends on the splitter.
If the antenna is active, then the same divider is needed. The ability to pass power from an external unit or set-top box through a splitter is required. Typically the divider will have a "Power Pass" designation on it.
When cable connections are required
Connecting antenna lines is necessary in the following cases:
- If the cable sheath is damaged, pinched or completely torn, it can be replaced with a new one. However, for those who want to save time and money, it is easier to connect it. Sometimes, if the outer shell is damaged, the screen and the main core are not affected, you can insulate the wire. When there are gusts, both ends are stripped and connected in a convenient way.
- Extending the antenna cable also involves connecting it. Most often this is due to a rearrangement, a change of residence or a change in the location of the TV. Sometimes a coaxial cable is bought end-to-end, without taking into account updating the contacts, and over time it becomes short.
- Connecting a second TV to the same antenna. This is often done when there are children in the family or disputes arise over watching TV channels. This is not entirely convenient, but it is cheap - you don’t have to buy a receiver and a new antenna.
Sometimes during repairs, owners try to hide the TV line by laying the cable along a longer path.
Connection of plug and socket
Antenna cable connection via connector
This method is suitable for you if you already have a “destination” to which you need to direct and then connect the antenna cord. This can be the F-type receiving socket of a TV or set-top box; you can also connect a coaxial cable with a plug to the nearest antenna socket and connect it to the F-socket of the extension cable. For such connections it is convenient to use corner terminals.
What can such an antenna do?
It is quite difficult to implement a high-quality unidirectional antenna without special tools and skills, so the antenna will be classified as low-power. Homemade products can be useful in the following cases:
- Short range to the repeater. The distance limit to the radio station is 15-20 km.
- There are no obstacles in the direct line of sight to the repeater in the form of buildings or forest belts.
- The signal itself is picked up by the receiver. The main thing is that the latter is not in the dead zone.
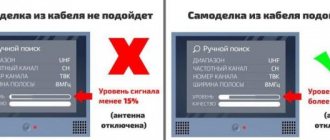
You can check the signal level using various methods. The easiest way is to use the options of advanced digital TVs.
The test usually proceeds according to the principle:
- Turn on your TV and open Settings instead of video. An antenna is not needed at this stage.
- Find the signal strength indicator in the parameters.
- This indicator should indicate the signal strength. If it is more than 15%, digital TV can be caught on homemade TV. If less, then you need to connect a more powerful device.
Extension of TV cable using F-connectors
This option for connecting the wire involves visiting a store where you need to purchase two F-plugs (for each of the 2 ends of the cable) and one adapter - F-socket. It is recommended to take a piece of TV cable with you, since components are sold for different diameters. The tools you will need are a regular or construction (segment) knife and wire cutters.
Building up an antenna cable begins with preparing its sections:
Make a careful cut into the outer shell. For ease of operation, the length of the cut should be greater than the length of the F-plug body. In the future, it can be adjusted by removing the excess part of the central core. Fold the casing in the opposite direction and remove it completely. Turn the copper shield and the foil underneath towards the remaining outer shell. To perform the procedure, they can be slightly incised
At this stage, pay attention to the possible presence of a coating of a thin layer of polyethylene or lavsan on the inside of the foil. These materials greatly impair the transfer of contact to the F-plug housing
To solve the problem, screw back half of the wrapped foil. This way the side with poor current transmission will be on the inside. Using a sharp knife, cut the insulation of the central core. Try not to leave notches on it, as they reduce strength and can lead to breakage. Take the F-plug and screw it onto the cable. It must fit snugly, since the fixation is achieved only by clamping force. Trim off any excess center core. Its edge should protrude 3-5 mm beyond the F-plug body.
If the diameter of the cable is smaller than the internal diameter of the F-plug, then before turning off the screen with foil, wrap electrical tape around the outer sheath.
This completes the preparation of the two ends of the cable. Now take the F-socket and connect the first and second plug to it. Fixation is ensured by screwing the movable head of the F-connector onto the thread of the adapter. The result will be a neat and reliable connection. In its place, you can also install a splitter, which will be discussed later.
Application of passive antenna
A homemade antenna extender can be used in conjunction with a laptop, access point or Wi-Fi modem
It is important to understand that after such manipulations the result may not always be positive, and in the event of a breakdown, it will be impossible to repair the equipment under warranty
Updating network adapters to match your router
If not, look up your model number online to see its exact specifications. Of course, depending on what devices you own, find out what wireless standard they can use.
Buy or build a high gain antenna
Most wireless routers and wireless adapters with external antennas come with cheap omnidirectional antennas.
Turn your cable or electrical outlets into wireless access points
If you want to double or even triple your wireless range, you can try adding additional wireless access points to your network. However, this performance hit may be acceptable if you plan to do basic web browsing on these computers; You won't really enjoy transferring large files or streaming video between computers on a network.
Additional wireless access points
A router is basically a network controller, and it connects to or is integrated with your internet modem.
If you decide to connect the antenna to the modem, then you need to study the features of the process. The fact is that inside the modem there is a small antenna, to which a homemade antenna is attached. To complete this process, you will have to disassemble the modem flash drive. You can remove the cover using a scalpel, screwdriver or utility knife (pull towards the top from the USB connector, do not press too hard, otherwise the case will break).
When a signal passes through any cable, it loses strength. Thus, the shorter the cable, the less loss. Less is more in this situation, and the correct cable length is important to maintain signal quality. All cell phone signal boosters are complete kits and come with the appropriate cable type and length to maintain reasonable dB gain
But there are times when you need a little more reach, so it's important to figure out how much length you can afford before the signal loss offsets any signal gain
Opening the modem, you will see two connectors covered with paper. Follow these instructions:
- remove the protective layer from the modem elements;
- connect the antenna you assembled yourself to the left connector (the hole you need will be on the left side if the device itself is positioned with the USB connector facing you);
- use a coaxial cable that is not too long, otherwise the result will not be much different from using a modem without an extension cord.
There are three types of cables for home cell phone signal boosters. As mentioned earlier, as the cable length increases, more signal loss occurs. Signal gain and loss are measured in decibels. And decibels are measured exponentially.
And as always, you can convert your cable installation. Think of the signal as the drink and the cables as the straws. 75 ohm cables are your typical soda straws, and 50 ohm cables are the big straws of the carlav's throat. Nothing is more frustrating than trying to install a new TV on a cable or satellite system and discovering that the existing coaxial cable is not long enough to fit it into the desired viewing location. Coaxial cable, often called "coaxial cable", can become expensive in length, so replacing the entire cable may be out of a consumer's budget.