So, let's figure out why we are building technology in the first place? Firstly , the correct placement of built-in appliances in the kitchen means cleanliness and silence in the house. Because there are no gaps between the hob and the facades, and there is usually a “treasury” of fat, dried foods and cockroaches. And the equipment itself works much quieter and does not disturb the children’s sleep, because it is tightly closed with facades!
Secondly , built-in appliances are compact, which saves work space in the kitchen. However, to the detriment of the capacity of some household appliances. But for small rooms this is very important, because every centimeter counts.
And thirdly , what is most important is the appearance, where the technology does not destroy the interior, but is hidden behind the facades.
In this article we will talk about how to place built-in equipment safely and functionally, while maintaining a single style of headset!
Origins of the problem
Often in the kitchen of an apartment or private house there is only one electrical outlet at the equipment connection point. This is how the living space was designed, especially for old houses.
At the same time, we are faced with the task of ensuring the connection of two independent loads simultaneously, each of which has its own electrical input.
This situation becomes critical when the electrical equipment:
- has high power, which does not allow solving the problem through a multi-socket extension cord or tee;
- due to its purpose, it was not initially designed for frequent connections and disconnections.
An additional complicating factor is that the electrical appliances located at a given load point, in our case the oven and hob, must function simultaneously, and the problem cannot be solved by alternatively connecting one of the devices to another point.
Advantages and disadvantages
Arranging a kitchen space with the help of integrated furniture has a number of positive qualities:
- Built-in headsets are characterized by ergonomics. At the design stage, you can provide for all the nuances and make the furniture as comfortable as possible.
- The final product has an attractive and harmonious appearance. All kitchen cabinets and built-in appliances are matched to the overall design of the room.
- All items are selected based on your own needs and taste preferences. You can make furniture of any kind, color, style and choose the components you want.
- It is possible to manufacture furniture in the traditional classic style and kitchens in modern modernist trends (high-tech, techno, etc.).
- Furniture is produced according to the dimensions of the room, which allows you to make maximum use of the entire area. There are no empty or unused spaces left. The functionality of this layout is much higher.
- All furniture modules are connected to each other with furniture ties, so there are no cracks or joints where debris could get in. Cleaning such furniture is much easier.
The disadvantages include the following:
- Dismantling a built-in kitchen is somewhat difficult. It is not recommended to transport such furniture to other premises, since it is designed and manufactured to individual sizes.
- The cost of such furniture sets is higher than standard sets.
- You can replace faulty fittings or equipment yourself. But performing such work requires some knowledge and skills, so it’s better not to take risks. Only a professional furniture assembler will be able to properly disassemble a built-in kitchen if necessary.
- If there are errors in the layout, it is extremely rarely possible to swap any elements.
Built-in furniture is especially convenient for rooms with a small area. Even a small kitchen in a Khrushchev can be made convenient, ergonomic and comfortable.
Justification for separate connection
The PUE states that to power household loads whose power exceeds 3.5 kW, a dedicated cable with a separate circuit breaker must be used. This means that for power supply a radial circuit must be implemented.
In our case, the hob often has a power that is higher than one kilowatt. Despite the fact that the oven is a less powerful device, there are models that consume one and a half kilowatts or more.
Therefore, these two devices can be considered as a single whole not only from the point of view of functional purpose: cooking, but also load.
The nuances of electricity distribution in the kitchen
The kitchen space is a room where powerful consumers of electricity are concentrated, so the electrical wiring in the kitchen must be thought out taking into account all the nuances. Among them:
- It is recommended to supply powerful consumers with power through a separate network with a circuit breaker.
- It is better to run the socket and lighting lines separately, with protective disconnecting elements.
- Protective grounding must be installed for sockets. This will not only improve the safety of using kitchen appliances, but also extend their service life.
- To supply electricity to the kitchen, it is better to use several distribution boxes. When using only one, it is recommended to lay a three-core cable line with a cross-section of 4 mm².
Connecting kitchen equipment
Preliminary remarks
When connecting the oven and hob, a number of requirements must be met regarding wiring and circuit breaker:
These include:
- the wire is known to be in good condition;
- withstands prolonged maximum load;
- contains the required number of working conductors, neutral and grounding;
- complies with all safety standards.
When choosing a machine, it makes sense to be guided by the values of 25 A with a total load power of up to 5 kW and 32 A with a higher power (see table below).
Table. Limit parameters of 220-volt single-phase wiring for cables with a core cross-section of 4 mm2.
| Exposed wiring or box | Closed wiring (in a groove) | |||
| Core material | Copper | Aluminum | Copper | Aluminum |
| Current, A | 41 | 32 | 27 | 21 |
| Power. kW | 9 | 7 | 5,9 | 4,6 |
Types of kitchens according to materials used
The most popular and common material from which built-in kitchen furniture is made is laminated chipboard (laminated chipboard). The material is obtained by pressing sawdust using phenol-formaldehyde resins as a binding element. Inexpensive and practical, it comes in many colors that imitate stone, wood, leather, etc. Laminate is durable, moisture-resistant and resistant to chemicals.
Kitchen sets made of MDF (finely dispersed fraction) are in demand. The manufacturing technology of MDF boards consists of pressing highly ground sawdust at high temperatures and under high pressure. Synthetic resins do not participate in this, because when heated, the chips release a natural binder - lignin. The material is milled well, allowing products to be given various shapes. As a protective coating, enamel or PVC film is used, which has many types, colors and textures.
Selection of household appliances based on the possibility of existing wiring
Let's go a little deeper into the topic so that everything is clear.
If you are just planning to buy an oven and hob, then it is important to understand whether the existing wiring will withstand the total power of both devices, and not a short-term, but a long-term load.
To do this, you need to find out what cross-section of wires the wires have and based on this, make calculations or use ready-made tables.
To measure the cross-section of the wire, use a caliper. An ordinary ruler will not work, as the measurements will have a large error.
Do the following:
- Disconnect the cable.
- Strip the insulation of one core to at least 1 cm.
- Take measurements using a compass.
Next, use the formula from the school course: S=π×d²÷4.
Where:
- S is the required cross-sectional area.
- D – measured diameter.
- Π = 3.14.
For example, measurements showed a core diameter of 2.4 mm. We carry out the calculation: 3.14x2.42÷4=4.52mm2. The recommended value is from 4 to 6 square millimeters.
In new houses built after 2001, the conductors are usually copper, in old ones they are mainly aluminum.
Further, using the table below, you can find out how much power this cable can withstand.
About the demand coefficient
The demand coefficient is calculated using the formula Ks = Рр/Рн, where:
- Рр – design power.
- Рн is the total power of electrical consumers, in our case the oven and hob.
In simple words, if the demand coefficient is 1, this means that it is possible to simultaneously use all electrical appliances on one network at maximum capacity. But in practice this rarely happens.
For example, 0.7 indicates that electrical appliances are used separately or simultaneously, but not at maximum loads, provided that they are connected to one point.
Below is a table for calculating the power consumption of an apartment taking into account the demand coefficient.
What do we mean by this? And the fact is that if with a wire with a cross-section of 4 mm2 and a load it can withstand of 5.9 kW, you can purchase electrical appliances that in total consume more power.
For example, you liked certain oven and hob models that consume a total of 8 kW at maximum load. But you do not plan to use these electrical appliances in this mode.
We multiply 8 kW by the demand factor of 0.7 (you can take less, but this figure is the most optimal), we get 5.6 kW, which suits you quite well.
Fitted kitchen styles
Custom-made kitchens are matched to any style and interior design. The choice depends on the personal preferences of the owners. Each style has certain characteristic individual traits.
The following styles are most often used in kitchen design:
| Classic. | Classic trends never go out of style. This type of furniture is distinguished by reliability and solidity. This style looks better in large rooms, when it is possible to use different decorative elements (carvings, pilasters, columns, cornices). Kitchens with a bar counter or island look impressive. |
| High tech. | It stands out with a lot of metal and glass. The main emphasis in such kitchens with built-in appliances is not on furniture, which is rather a complement to the overall style of the room, but on the design of household appliances. Involves the use of a bright dominant color. |
| Minimalism. | This style direction is characterized by an almost complete absence of decorative details, correct forms, maximum clarity and purity of lines, as well as monochromatic color schemes. Shiny and smooth surfaces, straight and precise shapes, an abundance of lighting fixtures - all this is designed to create the illusion of a large space. The built-in retractable kitchen table will emphasize the laconic design. |
| Japanese style. | A movement akin to minimalism, which involves the use of only natural materials (wood, bamboo, wicker, fabric, etc.), natural lighting and a small amount of decor. |
| Country style. | Predominant light furniture, an abundance of stained glass, and floral patterns are features inherent in the Provence style. The lightness, elegance and sophistication of this design create a special atmosphere of harmony and comfort in the house. |
| Art Deco. | Luxurious and expensive style, using a large number of decorative elements (columns, pilasters, portals, etc.) and a variety of materials (leather, ivory, expensive wood, etc.). A bright and rich color scheme (black, white, purple) with an abundance of gold, silver or bronze finishes is welcome. |
Connection options
You can connect electrical appliances to the network using detachable and permanent methods.
Options for connecting the panel and cabinet to the electrical network
A detachable connection is based on the use of a plug and socket, which are pre-mounted on the cable: the connected equipment and wiring, respectively. It's convenient and practical.
Permanent connections are made through the terminal block. The advantages of this connection method are a strong and reliable connection of contact pairs and lower cost.
Connection via socket
In practice, the following main versions of sockets are used, which are shown schematically in the figure below:
- assembly of two single sockets with a separate cable for each of them;
- assembly of two single sockets with a common cable;
- monoblock socket with two seats for plugs.
Options for the end section of wiring for connecting the hob and cabinet, from top to bottom:
- with individual cable and circuit breaker for each socket;
- with the installation of a monoblock double socket and a common circuit breaker;
- using a daisy chain connection of two sockets and a common circuit breaker.
Taking into account the high power of electricity consumed, monoblock sockets with three or more seats are not used in this connection method.
The type of socket used is significantly limited if the panel and/or oven cable is reinforced with a plug. You cannot change it for another one, since in this case, at a minimum, the factory warranty will expire.
When connecting, it is advisable to use socket modules with different form factors, which are also available in a double monoblock version.
Dual power socket with different form factors and the option of lateral cable supply to it in a brick wall groove
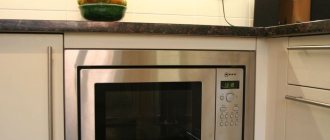
How to place a dishwasher?
Usually it is installed at the edge of the set closer to the sewer risers for water supply and drainage. It is not allowed to be built under the hob for the following reasons:
- proximity of dishwasher control devices to the hob (controls are located on top)
- the steam generated from the dishwasher rises up to the hob, acting on it from below
Connection via terminal block
This connection is made in two cases:
- if the connecting cable of the hob or oven does not have a plug;
- if a terminal block is installed on the device itself as an element of connection to the network.
Figure 4 shows both of these cases in schematic form.
Options for connecting the cable to the panel and oven
In the latter case, to connect, connect two terminal blocks with a cable: the device itself and the linear one, and the cable itself is not included in the delivery package of the device and must be purchased separately.
This option is labor-intensive to implement, but does not limit the distance between the cabinet/hob and the power cable exit point, and also allows you to very accurately select the length of the connection cable and avoid the formation of loops.
Most often, the functions of a linear terminal block are performed by a so-called barrier block.
One of the barrier block options
This type of terminal block got its name due to the presence of a protrusion-barrier separating the fastening components of the input and output sides of the device.
The block can be installed openly on the wall or mounted inside a cutting box, for which it is provided with appropriate mounting holes for screws or screws.
Installation
Installation of electrical equipment should only be carried out by a qualified specialist . Laying cables and installing electrical outlets is no exception.
Work procedure:
- Marking on the wall where electrical outlets will be installed according to the approved diagram.
- Wall cutting for cable laying.
- Cabling.
- Installing sockets and connecting them to the power line.
- Checking the functionality of the power supply line.
- Sealing the grooves.
- Finishing the walls and installing the front panels of the sockets.
- Connecting built-in household appliances.
Electrical wiring in the kitchens of residential buildings is laid in a hidden way using a three-core VVG copper cable in a protective sheath . Cable cross-sections are determined based on the total load of all electrical appliances used in the room.
Important! According to the Electrical Installation Rules (PUE), open cable routing (in electrical baseboards or boxes) in kitchens is not allowed!
Features of connecting the panel and cabinet to the barrier block
There are two things to consider during the connection process.
The first of them is that the connection of the panel and cabinet to the linear terminal block, regardless of the design of the connection block of the device itself, is always performed according to a star circuit, which is shown in schematic form on the left side of the figure.
Connection diagram of line terminal block, hob and cabinet
The use of a loop circuit on the right side of the figure is not recommended due to the fact that the fixing elements of the hob terminal block are not initially designed to connect two wires to it.
The second feature is that, given the large currents flowing through the socket, it is necessary to ensure low contact resistance in the area where the panel/oven cables connect to the terminal block.
To achieve this effect do:
- reinforcement of individual cable wires with lugs (an example of such a component is shown in the figure below);
- the use of a special crimping tool for their installation.
Fork-type tubular cable crimp lug
The correct connection is additionally checked by the color of the insulation of the individual cable cores, their purpose is additionally controlled by the accompanying documentation of the device.
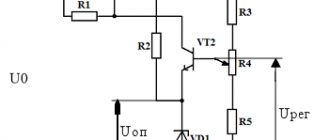
Connection diagram to the machine.
Connecting a Gorenje electric hob
Before starting work, be sure to study the technical characteristics of the selected model with the connection diagram.
Make sure there are jumpers.
Install jumpers between pins 1 - 2, 4 - 5.
Unscrew the cable clamp, pry it with a screwdriver and remove it.
We connect the wires according to the diagram.
We fix the cable with a clamp.
Next, pump up the hob using the methods described above.