It's no secret that the most common malfunction of any headphones (plugs, earbuds or large over-ear ones) is a broken wire near the plug. In this situation, there is nothing left to do except change the plug on the headphones. This is easy and can be done by anyone who has ever held a soldering iron in their hands. The only thing that would be desirable is to understand the intricacy of the wires (in some headphones there are as many as 6 wires under the cable insulation!)
Today we’ll talk about how to solder headphones to a plug without making any mistakes.
You don't need to think about anything, just follow the step-by-step instructions provided and you can easily repair your favorite headphones.
1. Ruthlessly bite off the plug: 2. How to replace the plug on headphones? For this we will use the old connector. Let's gut it using a sharp stationery knife, ripping it right along the seam. This method allows you to disassemble almost any plug: Open the plastic shell and take out the insides. Do you see a group of contacts with pieces of wire soldered to them? We remember the pinout of the headphone wires (or better yet, write down on a piece of paper which wire was soldered to which contact). Here is the standard wiring of headphone wires by color:
- green wire is the left channel;
- the red wire is the right channel;
- yellow (copper) wire is common.
You will find more detailed information about which wire in the headphones is responsible for what later in this article (scroll to the very end).
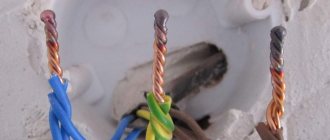
3. Now you need to clean up the headphone wires a little. What the result should look like: we connect the common wires (which are in colorless varnish) together and tin the very ends: A few words about how to re-solder the plug on the headphones. It will be bad to pick, because... the wires are covered with varnish insulation. To make the process easier, you can lightly burn the very ends with a lighter.
How to tin wires from headphones using an aspirin tablet, as shown in this video:
Personally, I made do with an ordinary knife, which I used to carefully clean off the enamel coating from the wires. And after that I tinned it in the usual way - with solder and rosin.
4. Now we find an old unnecessary pen somewhere:
and separate the very tip from it: This will be the body of our new plug.
5. Prepare a piece of heat shrink that will protect the wires from sharp bends at the exit from the plug: 6. It's time to solder the headphone wires to the plug. You need to solder in full accordance with the colors of the wires in the headphones (we remember where which color was soldered or look for our piece of paper where everything is written down):
7. Make sure everything works. To do this, turn the multimeter into dialing mode, plug the headphones into your ears and alternately touch the probes to different contacts. All sorts of rustling and clicking noises should be heard in different channels.
Or you can try to plug this unfinished plug into your phone or MP3 player and start playing music. In the latter case, it is important to make sure that the right and left channels work independently of each other (use the balance adjustment).
8. If everything sounds as it should , we shrink the heat shrink using a hair dryer or a regular lighter: 9. Apply a couple of drops of epoxy glue: glue everything together and leave for several hours until complete polymerization.
10. We are happy with how we fixed the headphone plug!
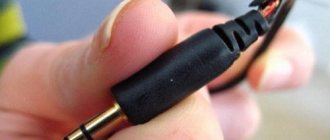
Look at the photo of how I managed to solder the new plug to the headphones:
In my opinion, this is the easiest way to fix a headphone plug of all those proposed on the Internet. Despite the fact that the result is quite decent. If you don’t look closely, it’s not even clear that it’s homemade.
By the way, at first I had the idea to make a paste from baking soda and superglue to use it instead of epoxy resin. But it turned out that this mixture hardens so quickly (almost instantly!) that this option had to be discarded as unsuitable.
That's all. Now you know how to make headphones if the plug is broken and which wire in the headphones is responsible for what. Always try to figure out how everything works, how to repair the plug on your headphones with your own hands, save your money!
Additionally about the colors of wires in headphones
How to properly solder wires to a headphone plug is out of the question if you are not familiar with the colors of wires in headphones and their meaning (for example, do you know what the green wire is responsible for?)
A different number of wires may come to the headphone plug:
- 2 wires (for mono headphones);
- 3 wires (for mono or stereo headphones depending on the connection diagram);
- 4 wires (for stereo headphones);
- 5 or 6 wires (for stereo headset with microphone).
2 wires
I don’t think anyone needs to explain how to repair a headphone plug if they only have two wires. It is basically impossible to confuse anything here.
3 wires
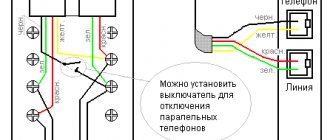
There are always two wires coming from each ear - plus and minus, but sometimes the manufacturer combines the minuses of both speakers together and it turns out that only three wires come to the plug. To make it clearer, here is a soldering diagram for a headphone plug:
This picture explains even more clearly where to solder the wires to the headphone plug:
Most often, the wires are coated with varnish of different colors:
- red – right channel;
- green, blue or white wire – left channel;
- colorless varnish – common wire (ground).
Of course, there are no strict standards and colors may vary. Here's what it looks like in real life:
Let's see how to properly solder a wire to the headphones (3 wires):
4 wires
If your plug has 4 wires, then there may be options.
Option one: you have regular headphones without a microphone and without buttons (the plug has only 3 contacts). Then these four wires are simply two pairs of wires from each of the speakers. Their disadvantages are the same color (copper), and their advantages are different (usually blue and red or green and red):
Read also: Mat cable what is it
In this case, common wires (those of the same color) are connected together and soldered to the common contact of the plug. You should immediately understand how to solder 4 wires from the headphones to the plug from the figure:
Here's how to solder headphones to such a jack:
Option two: you have a full-fledged headset (i.e., headphones with a microphone) and the plug has 4 contacts. Then, most likely, these four wires are one wire from each speaker, one signal wire from the microphone, and one common wire for all.
Schematically, this can be indicated as follows:
And here's how to make a plug on the headphones (correct soldering of headphones when there are 4 wires):
Most often, a microphone wire only looks like one wire, but in reality it is two wires: a thin wire in white PVC insulation completely wrapped in enameled copper wire (in colorless enamel). Something like this: And in this case it would be more correct to say that the headphones have not 4 wires, but all 5.
5, 6 or more wires
Depending on the implementation option, there may be 5 or more wires inside the cable from the headset. Up to 10! Be that as it may, they always try to make the signal wire from the microphone in its own “ground” braid.
In short, if you gutted your cable and it looks something like this:
or even this: no one will immediately tell you how to properly solder the plug to such headphones. There can only be one piece of advice here: take a tester and test all the wires until you determine where the right ear is and where the left is. The remaining wires are to the microphone.
Determine by color which wires may be common and connect them all together. Solder all signal signals according to the connector pinout (see pictures above).
Then test the headphones and microphone. If something is wrong, look for the reason. No one will really tell you anything here; proceed using the scientific dildo method.
Quite often a person in life is haunted by various kinds of troubles associated with broken wires. In this case, it is worth thinking about connecting them together.
This is done quite simply. However, if we are talking about connecting small wires, for example, headphone wires or a telephone line, then the task becomes a little more complicated.
Standard plugs
According to Wikipedia, there are the following types of jacks:
- TS/TRS 6.3mm diameter (for microphones, electric guitars, mixing consoles, old professional headphones, etc.)
- TS // with a diameter of 3.5 mm (the most common, used for modern microphones, acoustics, flashes, etc.)
- TS/TRS/TRRS with a diameter of 2.5 mm (for mobile phone headsets, webcams, flashes, etc.)
There is also a type of TRRRS connector, which is used to transmit not only audio, but also video signals.
By the way, this designation is adopted according to the principle: T - Trip (latch), R- Ring (ring), S - Sleeve (sleeve).
How to properly solder a new plug to the headphones, observing the pinout of the wires
To properly solder a headphone or headset plug, you need to know the pinout. It is shown in the table below and taken from the website.
Such pinouts of 2- and 3-pin plugs are available for speakers and microphones.
Plugs and their pinouts for more specialized devices (video cameras, headsets) by manufacturer (Nokia, Samsung, Sony, Panasonic) are shown in the following table.
How does a three-pin jack work?
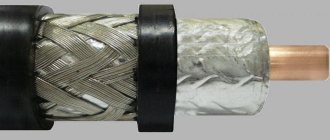
A regular three-pin stereo jack is designed according to the coaxial principle. Each contact is located in a dielectric sleeve (bushing) and is located inside another sleeve.
The plug contacts are separated from each other by plastic bushings. So this plastic is afraid of overheating, it begins to melt and the contacts will dangle. So if you want to solder a plug for, then you should remember about overheating of the contacts.
How to connect an internet cable
Many people now have access to the Internet in their homes. Everyone knows that the wires of the so-called twisted pair are quite easy to break, since they are quite thin. In this case, they will need to be connected to each other. In fact, the technology is not that complicated.
If a twisted pair wire breaks, you should immediately select all the wires by color. This is done quite easily. There are no wires of the same color in a bundle.
After all the wires have been selected, you need to connect them. Of course, you can crimp them and install a new adapter plug.
However, you can simply solder all the wires together according to color. In this case, it is worth using special cambrics to isolate the conductors from each other.
They are sold today in almost any electrical store. They are first put on the conductor, and then soldering is done. After its completion, the cambric is pulled over the junction of the conductors.
Identification of the rupture zone
. to detect a breakdown - this is the easiest way. You need to connect the headphones to the sound source, start the music and begin to carefully bend the wire in the direction from the plug to the speakers, without missing a single centimeter. If in some place the music begins to be interrupted, a crackling sound or other noise appears - this is the place where the wire breaks.
Read also: Gray-blue living room interior (photo)
Using a multimeter is a professional and more accurate way to detect cable damage. It is necessary to turn on the measuring device, set the sound diagnostic mode, and then connect the probes correctly: black to the COM connector, red to mA. Now you need to carefully make notches near the plug and the earphone itself, and then install the probes in them. If the device beeps, this means that the wire is intact, and the problem needs to be looked for elsewhere. If the multimeter is silent, you need to make a cut in the middle, and then check both halves of the cable one by one. Where the wire is intact, the device will beep. The tester is silent on the damaged part of the cable. In this area you also need to find the middle and make a cut again. In this way, you should check the cable until there remains a faulty section a couple of centimeters in size.
Important! The best way to reconnect damaged wires is to use a soldering iron. If the user does not have such a device or experience working with it, it is allowed to twist or connect the torn wires with solder or solder paste.
How to connect headphone wires
If we are talking about headphones, then the situation is even more complicated, since connecting such wires is not so simple. They have a fairly small diameter, which makes the work much more difficult.
Yes, of course, you can use the most common twisting method, and then apply a thermal insulator to the wire. However, in this case it is not a fact that the wire will last long. The slightest extra movement can tear it apart without any problems.
Here it is worth using a solder connection. This method will be much more effective. Moreover, most of the wires in headphones are made of copper, and this material can be soldered quite easily.
The wire must be stripped and then tinned at both ends. After this, you can connect the wires to each other. As you can see, this process is quite simple, so anyone can do the work.
Today, this method is often used to connect two wires with a small diameter. At the same time, it is also necessary to insulate the conductors after soldering so that they do not come into contact with neighboring ones, and also so that they do not come into contact with the body.
Cleaning off the varnish with a lighter
The headphone wires are intertwined with nylon thread. And nylon, as you know, burns well. It is possible, by the way, that the varnish also burns.
For a split second we bring the end of the wire into the fire. It quickly flares up and lights up slightly. When 1-1.5 centimeters have burned, extinguish it with your fingers.
Varnish and nylon leave a small residue, which can be easily removed with a fingernail. As a result, we have undamaged wiring cleared of varnish.
The main thing is not to keep the wires on fire for too long - they can simply burn and fall off ((Some may find the option with a knife more convenient.
How to connect telephone wires
The telephone wire is also quite fragile. It is easy to tear and damage. Of course, it needs to be connected. This is not so difficult to do.
If the wires used for the telephone connection have the same colors, then you first need to find out which wire is which.
This can be done using a tester. Dialing is its standard function. It is quite simple to produce it.
After the wires have been found, they can begin to be connected to each other. This procedure can be done by connecting by soldering.
It is this method that is rational in this case. If you don’t want to solder wires, you can purchase an additional adapter for a telephone cable.
Tips in the article “How to properly connect electrical wires?” Here.
It can also be used to make a connection. However, it is worth remembering that in this case, special crimps for conductors must be used for the connection. Fortunately, these days it’s quite easy to find them.
Of course, you will need two special terminal blocks in this case, which will be connected from different sides of the adapter.
All electrical engineering, since the time of Faraday, uses wires. And for as many years as wires have been used, electricians have been faced with the problem of connecting them. This article explains what methods there are for connecting conductors, and the advantages and disadvantages of these methods.
Twist connection
The easiest way to connect wires is twisting. Previously, this was the most common method, especially when wiring in a residential building. Now, according to the PUE, connecting wires in this way is prohibited. The twist must be soldered, welded or crimped. However, these methods of connecting wires begin with twisting.
In order to perform high-quality twisting, the connected wires must be cleared of insulation to the required length. It ranges from 5 mm when connecting wires for headphones to 50 mm if it is necessary to connect wires with a cross-section of 2.5 mm². Thicker wires are usually not twisted together due to their high rigidity.
Read also: Requirements for the condition of a turner’s work clothes
The wires are stripped with a sharp knife, insulation stripping pliers (ISR) or, after heating with a soldering iron or lighter, the insulation is easily removed with pliers or side cutters. For better contact, bare areas are cleaned with sandpaper. If the twist is supposed to be soldered, then it is better to tin the wires. Wires are tinned only with rosin and similar fluxes. This cannot be done with acid - it corrodes the wire and it begins to break at the soldering site. Even washing the soldering area in a soda solution doesn’t help. Acid vapors penetrate under the insulation and destroy the metal.
The stripped ends are folded parallel into one bundle. The ends are aligned together, the isolated part is held firmly with your hand, and the entire bundle is twisted with pliers. After this, the twist is soldered or welded.
If there is a need to connect the wires to increase the total length, then they are folded opposite each other. The cleaned areas are placed crosswise on top of each other, twisted together by hand and tightened tightly with two pliers.
You can only twist wire made of the same metal (copper with copper, and aluminum with aluminum) and of the same cross-section. Twisting wires of different sections will turn out uneven and will not provide good contact and mechanical strength. Even if it is soldered or crimped, these types of wire connections will not ensure good contact.
How to connect electrical wires by soldering
Connecting electrical wires by soldering is very reliable. You can solder untwisted wires, but such soldering will be fragile due to the fact that the solder is a very soft metal. In addition, it is very difficult to lay two conductors parallel to each other, especially when suspended. And if you solder on some kind of base, the rosin will stick the soldering area to it.
A layer of rosin is applied to the pre-tinned and twisted conductors with a soldering iron. If another flux is used, it is applied in the appropriate manner. The power of the soldering iron is selected based on the cross-section of the wire - from 15 W when soldering headphones to 100 W when soldering twisted wires with a cross-section of 2.5 mm². After applying the flux, tin is applied to the twist with a soldering iron and heated until the solder completely melts and flows into the twist.
After the soldering has cooled, it is insulated with electrical tape or a piece of heat-shrinkable tubing is put on it and heated with a hairdryer, lighter or soldering iron. When using a lighter or soldering iron, be careful not to overheat the heat shrink.
This method reliably connects wires, but is only suitable for thin wires, no more than 0.5 mm², or flexible ones up to 2.5 mm².
Determining the location of the rupture
A multimeter helps to cope with this task well. This is an affordable tool and can be purchased at any electronics store. Before use, the device requires preparation:
- Switch it to the continuity test mode (as a rule, it is indicated by the “) ) )” icon or something similar).
- The black probe must be connected to the connector marked “COM”, and the red probe to the connector marked “mA” or “) ) )”.
Before you repair headphones without a soldering iron, you need to check. If there is no gap, the multimeter will produce a beep. The check is performed in the following sequence:
- Make cuts near the plug and the earphone itself; the insulation must be removed from the wire.
- Connect the probes to the prepared wires.
- If you hear sound, then everything is fine with the wire itself, but the device does not work either because of the plug or because of the speaker itself. If there is no signal, gradually checking the wires, you need to determine the location of the break.
How to connect headphone wires
Sometimes the cable near the plug breaks off in working headphones, but there is a plug from faulty headphones. There are also other situations in which it is necessary to connect the wires in the headphones.
To do this you need:
- cut off a broken plug or an unevenly torn cable;
- strip the external insulation by 15–20 mm;
- determine which of the internal wires is common and check the integrity of all conductors;
- cut the internal wiring according to the principle: leave one alone, common by 5 mm and the second by 10 mm. This is done to reduce the thickness of the connection. There can be two common conductors - each earphone has its own. In this case they are twisted together. Sometimes a screen is used as a common conductor;
- strip the ends of the wires. If varnish is used as insulation, it will burn off during the tinning process;
- tin the ends to a length of 5 mm;
- put a piece of heat-shrink tubing on the wire 30 mm longer than the expected length of the connection;
- put pieces of thinner heat-shrinkable tube 10 mm long on the long ends, do not put on the middle (general) ends;
- twist the wires (long with short, and middle with middle);
- solder the twists;
- bend the soldered twists outward to the unprotected edges, slide pieces of thin heat-shrinkable tubing onto them and heat it with a hairdryer or lighter;
- Slide a larger diameter heat-shrinkable tube onto the joint and warm it up.
If everything was done carefully and the color of the tube was matched to the color of the cable, then the connection will be invisible and the headphones will work no worse than new ones.
Causes of headphone malfunction: what is it connected with
Suddenly broken headphones will, of course, ruin the mood of any music lover. The reason may lie both in the device on which the sound is listened to, and in the parts of the playback device. Let's look at common reasons:
- Broken wire at the plug or speaker. In this case, the sound through the headphones is not reproduced at all, or appears partially, or is distorted. In some cases, you may hear a crackling sound in the membrane.
- Plug contacts sticking. This occurs due to frequent use of the device. For example, if moisture or dust accidentally gets on the plug and is not cleaned, it may cause problems with hearing the speakers. Clogged contacts do not allow sound to pass through themselves, so there may be a complete absence of sound from the headphones.
- The connector of the device being reproduced is clogged. If the headphone output of a player or phone is dusty or oxidized, there can be no talk of transmitting sound to the membrane.
- Cable bend. This can happen anywhere in the headphones: both in the middle of the wire and at the sockets. Often this problem occurs due to improper use of electronics. So think about how you treated him before.
- The volume control is broken. If there is such a lever directly on your headphones, switching it frequently can lead to problems with sound reproduction. The fact is that if this unit malfunctions, the contact between the headphones and the sound playback device is broken.
- Malfunction of the membrane (speaker element). This happens rarely and often due to dust, moisture, corrosion or mechanical damage. Therefore, keep the device clean regularly.
HELPFUL INFORMATION! Earwax can get into the headphone speaker, causing it to malfunction, resulting in intermittent or no sound. In most cases, repairing headsets and headphones without a soldering iron is impossible
How to brew twist
For good contact, the twist can be welded with a graphite electrode or a gas torch. Torch welding has not become widespread due to the complexity and the need to use gas and oxygen cylinders, so this article only talks about electric welding.
Electric welding is performed using a graphite or carbon electrode. Graphite electrode is preferable. It is cheaper and provides better welding quality. Instead of a purchased electrode, you can use a rod from a battery or a brush from an electric motor. It is better not to use copper electrodes. They often get stuck.
For welding, you first need to make a twist 100 mm long, so that the finished one turns out to be about 50. The protruding wires need to be trimmed. For welding, it is best to use an inverter welding machine with adjustable current. If this is not the case, then you can take a regular transformer with a power of at least 600 W and a voltage of 12–24 V.
Near the insulation, “ground” or “minus” is connected using a thick copper clamp. If you simply wrap a wire around a twist, the twist will overheat and melt the insulation.
Before starting welding, it is necessary to select the current. The required current varies depending on the number and thickness of the wire that makes up the twist. The welding duration should be no more than 2 seconds. If necessary, welding can be repeated. If everything was done correctly, then a neat ball will appear at the end of the twist, soldered to all the wires.
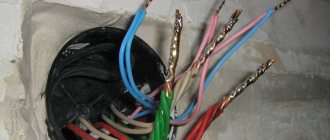
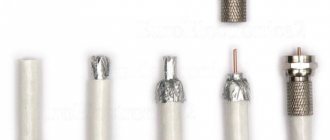
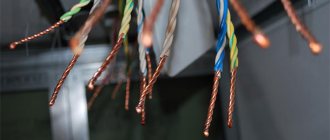
Now let's remove the rubber braid:
Especially for this article, the dumbest knife was found in order to try everything for yourself). So, it’s most convenient to cut the braid exactly as in the photo. You don't need to press the blade too hard. Thanks to bending, the braid itself will diverge. We turn the wire, making cuts and, when we have gone through the circle, remove the braid. If it doesn't work, we cut it further.
I exposed about 2 centimeters of the wires, it will be easier and the contact area will be larger. Which will increase reliability.
The wiring is covered with varnish that needs to be cleaned off. First there was an attempt to clean the varnish with a knife.
Not the best way. The wires are very thin and with such rough mechanical action they come off along with the varnish. The dullness of the knife contributes well to this.
Comrades! We'll go the other way! You will need a lighter. Or at least matches.
How to connect wires by crimping
Another way to connect wires is crimping. This is a method in which a copper or aluminum sleeve is placed on the wires or cables to be connected, and then crimped with a special crimper. For thin sleeves, a manual crimper is used, and for thick ones, a hydraulic one is used. This method can even connect copper and aluminum wires, which is unacceptable with a bolted connection.
To connect using this method, the cable is stripped to a length greater than the length of the sleeve, so that after putting on the sleeve, the wire sticks out 10–15 mm. If thin conductors are connected by crimping, then twisting can be done first. If the cable has a large cross-section, then, on the contrary, in the stripped areas it is necessary to align the wire, fold all the cables together and give them a round shape. Depending on local conditions, the cables can be folded with the ends in one direction or in the opposite direction. This does not affect the reliability of the connection.
A sleeve is tightly placed on the prepared cables or, when laid in opposite directions, the wires are inserted into the sleeve from both sides. If there is still free space in the sleeve, it is filled with pieces of copper or aluminum wire. And if the cables do not fit in the sleeve, then a few wires (5–7%) can be cut off with side cutters. If you do not have a sleeve of the required size, you can take a cable lug by sawing off a flat part from it.
Read also: Resistivity of nickel wire
The sleeve is pressed 2–3 times along its length. The crimping points should not be located at the edges of the sleeve. It is necessary to retreat 7–10 mm from them so as not to crush the wire during crimping.
The advantage of this method is that it allows you to connect wires of different sections and from different materials, which is difficult with other connection methods.
Bolted connection
A fairly common connection method is a bolted connection. For this type you need a bolt, at least two washers and a nut. The diameter of the bolt depends on the thickness of the wire. It should be such that a ring can be made from the wire. If wires of different sections are connected, then the bolt is selected according to the largest one.
To make a bolted connection, the end is cleared of insulation. The length of the stripped part should be such as to make a ring that fits onto the bolt using round pliers. If the wire is stranded (flexible), then the length should allow, after making the ring, to wrap the free end around the wire near the insulation.
In this way, you can connect only two identical wires. If there are more of them, or they are different in cross-section, rigidity and materials (copper and aluminum), then it is necessary to install conductive, usually steel washers. If you take a bolt of sufficient length, you can connect any number of wires.
Terminal block connection
A development of the bolted connection is the terminal connection. Terminal blocks come in two types - with a rectangular pressure washer and with a round one. When using a terminal block with a pressure washer, the insulation is removed to a length equal to half the width of the terminal block. The bolt is released, the wire is slipped under the washer and the bolt is clamped again. On one side, you can connect only two wires, preferably of the same cross-section and only flexible or only single-core.
Connecting to a terminal block with a round washer is no different from using a bolted connection.
The connection of the wires is reliable, but cumbersome. When connecting wires with a cross-section of more than 16 mm², the connection is unreliable or the use of lugs is necessary.
Speaker failure
The speaker winding burns out if the power supplied to it is exceeded. The severity of the breakdown is determined using an ammeter or multimeter. The resistance of the windings of working speakers will be almost the same (plus or minus about 10%) and varies in the range of 16–100 ohms.
Wheezing in headphones is usually caused by problems with the membrane or winding
If the speaker produces sound, but wheezing is mixed in with it, this indicates a problem with the winding or membrane. The winding becomes unstuck from the membrane due to a strong impact, displacement of the magnet, or exceeding the maximum permissible power. It happens that the coil moves away from the membrane due to mechanical damage.
For repairs you will need superglue, a toothpick (sharp match) and accuracy. Be careful, because after gluing it takes time for the parts to take the correct position.
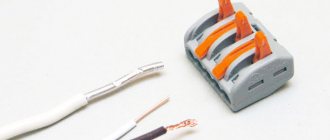
Self-clamping terminal blocks WAGO
In addition to terminal blocks with bolts, there are also terminal blocks with clamps. They are more expensive than usual, but they allow the connection to be made much faster, especially in connection with the new requirements of the PUE and the ban on twisting.
The most famous manufacturer of such terminal blocks is WAGO. Each terminal is a separate device with several holes for connecting wires, each of which is inserted into a separate wire. Depending on the version, it connects from 2 to 8 conductors. Some types are filled inside with conductive paste for better contact.
They are available for both detachable and permanent connections.
The stripped wire is simply inserted into the terminals for a permanent connection and spring tendrils fix the wire inside. Only hard (single-core) wire can be used.
In plug-in terminals, the wire is clamped using a folding lever and a spring clamp, making it easy to connect and disconnect wires.
Since the wires do not touch each other, the terminals allow you to connect wires of different sections, single-core to stranded, copper to aluminum.
This method of connecting conductors has proven to work best at low currents and is most widespread in lighting networks. These terminals are small in size and easily fit into adapter boxes.
How to connect electrical wires with lugs
Another way is to use tips. The tip looks like a piece of tube, cut and turned flat on one side. A hole for a bolt is drilled in the flat part. The lugs allow you to connect cables of any diameter in any combination. If it is necessary to connect a copper cable to an aluminum cable, special lugs are used, in which one part is copper and the other is aluminum. It is also possible to place a washer, brass or tinned copper, between the tips.
The ferrule is pressed onto the cable using a crimper, similar to how wires are connected using crimping.
Soldering tips
Another way to use the tip is to solder it. To do this you need:
- stripped copper cable;
- tip designed for soldering. It is distinguished by a hole near the flat part and a thinner wall;
- bath of molten tin;
- a jar of phosphoric acid;
- a jar of soda solution.
Carefully! Wear protective glasses and gloves!
In order to solder the tip, the cable is cleared of insulation along the length of the tubular part and inserted into the tip. Then the tip is successively immersed in orthophosphoric acid, in molten tin for a time sufficient for the acid to boil away and the solder to flow into the tip. This is checked by periodically briefly removing it from the solder. After impregnating the tip and cable with solder, the tip is dipped in a soda solution. This is done to neutralize acid residues. The cooled tip is washed with clean water and is ready for further work. Such a tip can be connected to aluminum busbars and lugs without the use of adapter washers.
Connectors for cables and wires
Cables can also be connected using special connectors. These are sections of pipe in which threads are cut and bolts are screwed in. There are detachable connectors, in which the bolts are unscrewed, and permanent ones. In permanent connectors, the bolt heads break off after clamping. There are also connectors designed to connect wires and cables of different sections. The cables are inserted end-to-end into the connectors, facing each other.
Connectors used on overhead power lines consist of two halves connected by bolts. The wires are laid in special grooves towards each other, parallel to each other, after which both halves are clamped with bolts.
READY!
This is the long-awaited result of all our efforts.