Aerated concrete is currently very popular in private construction. First of all, this is due to its lightness and large volume of blocks. The second advantage is the foam structure of the material - thanks to it, it perfectly retains heat indoors. Communications are laid inside the finished building, and some of them, especially electrical wiring, are almost always installed in the wall. To make a groove, you need a special tool, and a wall chaser is best for this. In this material we will understand what a wall chaser for aerated concrete is, what types of this device there are, and how to make a wall chaser for aerated concrete with your own hands.
Types and features of furrow machines
There are two types of such tools: electric and manual. Using an electric device, making grooves is much more convenient and faster, but due to its high price and narrow focus, it is almost never bought for home needs. It makes sense for a person who is professionally involved in electrical installation work to purchase an electric furrower. To cut grooves yourself, you usually use a manual wall chaser for aerated concrete, the cost of which is several times lower.
Features of manual wall chasers
Such a device, as mentioned above, costs much less than an electric one, but working with it requires more time and effort. In addition, this wall chaser is intended only for aerated concrete blocks - it cannot cope with brick, reinforced concrete and other hard materials. Its advantage is noiselessness and low dust formation.
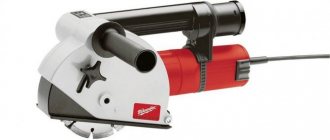
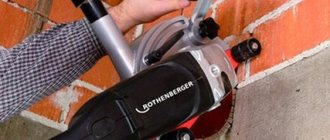
Features of electric wall chasers
Using this equipment, it is possible to make electrical grooves not only in aerated concrete, but also in materials such as reinforced concrete, brick and others with high hardness.
In addition, a vacuum cleaner can be connected to the electric furrower, which will prevent a layer of dust from settling on surrounding objects.
The disadvantage of such devices is the loud noise they make during operation. This has a harmful effect on the worker’s hearing, as well as on the nervous system of neighbors if gating is carried out in an apartment building. When working with an electric wall chaser, you must wear special clothing and also use protective equipment - a respirator and goggles.
Step-by-step instructions for gating
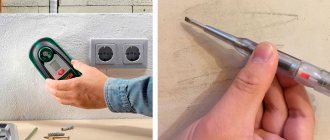
Before you begin any gating for laying electrical communications or pipes, you should ask whether there is hidden wiring in the walls. They call it, draw up a diagram if necessary, and then prepare a new drawing, which should be left in case you plan to drill the walls or carry out other manipulations on them.
Before using a manual or electric wall chaser, the old electrical wiring should be de-energized so that it does not pose a danger to the master. Adjacent rooms must be protected from dust by curtaining the doorways with a damp rag or film.
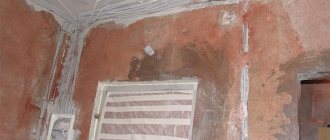
With a wall chaser, you can cut two lines at once and then remove the material between them using mechanical or electrical tools. As soon as the grooves are completed, they are cleaned of fine dust, primed for better adhesion of the materials, and then the installation of communications begins. At the final stage, you can begin to seal the route.
Design and types of manual furrowers
This equipment is a piece of metal pipe to which a metal arc is welded, which acts as a cutting element, and two pressing handles. More expensive models are equipped with a diamond tip.
There are two types of manual wall chasers:
- For gating horizontal surfaces.
- For working with vertical surfaces.
There are no fundamental differences between these devices. They differ from each other only in that the clamping handles are fixed at different angles, and the base tubes are bent differently. The difference in the device is due to the goal of correctly distributing the forces applied to the apparatus when gating both vertical walls and horizontal surfaces.
An example of the operation of a horizontal wall chaser in the video:
Reviews
Experts say that the easiest way is to cut grooves in aerated concrete material. For such a case, a manual gating device is quite sufficient.
When large-scale work is ahead, it is best to use a rented electric tool, as these devices are distinguished by their performance. Rental costs will be fully justified, even if you take a model with a vacuum cleaner. After all, if you wish, everything can be done within one day.
It should be recalled that when working with electric tools, safety precautions must be observed. You will have to check the integrity of the outlet and power cord, and take care of grounding.
In addition, when working with an electric wall chaser, it is recommended to use personal protective equipment - goggles, a respirator, work clothes, as there will be quite a lot of dust.
How to operate a manual wall chaser
Cutting grooves with such a furrow maker is carried out in the following order:
- Mark the surface so that the groove is level.
- Place the cutting part of the device at the beginning of the marking.
- With your right hand, grab the clamping handle, which is located directly above the cutting element, and with your left hand, grab the handle remote from it.
- Slowly pull the device with your left hand along the markings, while simultaneously pressing the other handle with your right hand.
A manual furrower, although it is not very expensive, does not have to be bought in a store. For a small amount of work, a manual wall chaser for aerated concrete can be done independently without much effort.
You can also make a wall chaser for aerated concrete, which can be used in construction. Video example:
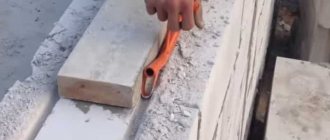
Making a manual furrow machine
Let's move on to the question of how to make a wall chaser for aerated concrete with your own hands. To make a simple device, you will need a piece of durable metal pipe, the diameter of which should be approximately 20 mm. Then, measuring 50-60 mm from one of the edges, use a grinder to make a cut, holding the tool at an angle of 45°. When this is done, bend the top of the pipe at an acute angle. A homemade wall chaser designed for aerated concrete is ready. Most of it serves as a handle, and the second is a cutting element for the foam block.
To make a more complex tool, you will have to spend a lot of effort. In addition, you should have a welding machine at your disposal.
This furrow maker is done as follows:
- Weld two pieces of metal pipe (reinforcement) in a perpendicular position at the central points. For the part that will serve as a handle, it is better to take a thicker piece - it will be more convenient to use such a device.
- The length of the piece from which the working part will be made should be 10-15 cm, and the diameter should be 25-30 mm.
- You need to make a cut at an acute angle from one or both edges of the pipe - this will be the working surface.
- Weld the short side of the tube to the base. The corners of the work element must be on the outside.
To facilitate the assembly of the tool and not make mistakes during manufacture, it is advisable to make a drawing before starting work, indicating the angles and dimensions on it.
Visual step-by-step manufacturing instructions on video:
Cost of the groove
Prices for carrying out the described work vary significantly depending on the region and the qualifications of the team. They are most expensive in Moscow and St. Petersburg. Here is a sample list:
- Strobe in aerated concrete up to 20 mm – 150 RUR. (price per meter);
- Grooves in aerated concrete for reinforcement up to 40 mm – 200 r/m.p.;
- Aerated concrete groove up to 60 mm – 250 r/m.p.;
- Grooving under a glass of an electric point – 150 RUR/pcs.;
- Putty for grooves 20 mm wide - 20 r/m.p.;
- Putty for grooves 40 mm wide - 30 r/m.p.;
- Putty for grooves 60 mm wide - 40 r/m.p.;
- Drilling holes in the wall for plumbing – from 250 rubles.
By adding up the necessary points, you get the full cost of the grooves for wiring in aerated concrete.
Is it possible to make an electric wall chaser yourself?
If desired, such a device can be made at home on the basis of a simple grinder. However, most masters do not recommend doing this for the following reasons:
- The productivity of a tool made from a grinder is quite low; in addition, it has all the disadvantages of factory-made equipment (it makes a lot of noise when cutting blocks and produces a large amount of dust). It must be used together with a powerful vacuum cleaner, otherwise later you will spend more time cleaning the room than making the grooves.
- If attaching two disks to a single axle fails, the groove will have to be cut in two stages, which will generate more dust and increase time.
- It is impossible to adjust the gap between the disks on a homemade wall chaser with high accuracy, as a result of which the groove may turn out uneven.
- A furrow machine assembled by a non-specialist can be dangerous, since established standards and safety precautions are rarely observed during its manufacture.
Based on this, we can say that if large-scale work is not planned, it is advisable to make do with a manual furrow maker.
But, as already mentioned, it is only suitable for aerated concrete blocks - it is not capable of stronger material.
Nuances of processing aerated blocks
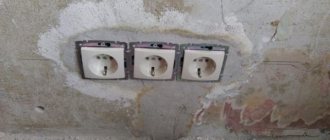
Gas silicate is widely used in construction. The material is easy to process due to its porous structure. A groove in the wall of the house must be made for laying pipes or wiring, after which the wall is covered with screed. The result is a flat surface, and communications are hidden and do not affect the appearance.
Typically, the following tools are used for processing aerated concrete:
- chisel with hammer;
- hammer drill with a special attachment;
- grinder with a disc for concrete.
Some of the above will probably be found in every owner’s workshop. But high-quality processing of gas silicate cannot be performed with these tools, since they are not intended for such work. Problems encountered:
- Large amount of dust. For new buildings it is excusable, but in a residential area increased dust levels are unacceptable.
- High noise level.
- Impact impact on the structure - as a result, the wall is deformed or cracks appear on it.
- Labor intensive.
- Visible unevenness of the groove boundaries, which will have to be carefully hidden with the building mixture.
Handicraft methods of gating have low productivity. The result is low quality of work performed and a lot of wasted time. Careless handling of a chisel can even result in additional repairs to the wall or its complete restoration.
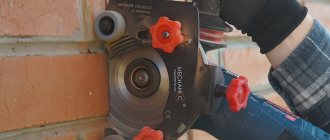
Self-production of an electric wall chaser
If you still need an electric furrower, but don’t have the money to buy one, you can try to make one yourself. A simple grinder is used as a base. Additional materials you will need are a pair of diamond discs for aerated concrete that have the same diameter and an additional fastening nut.
The tool is assembled in two steps:
- Install the first disc and tighten it tightly with the nut.
- Then install the second one on top of the first cutting wheel and also carefully secure it with a nut.
When assembling a wall chaser yourself, you need to be very careful. If the length of the threaded part is not enough to securely fix two cutting wheels, it is better not to use such a tool.
Preparing the base for wall blocks made of expanded clay concrete
Preparatory activities include the following work:
- Ensuring that the supporting surface of the foundation is horizontal.
- Elimination of local defects, sealing of cracks and irregularities.
- Waterproofing the foundation using rolled materials or mastics.
When laying with your own hands, you can also use dry glue; it only needs to be diluted with water, according to the instructions. To protect expanded clay blocks from moisture absorption, the following types of waterproofing are used:
- rolled roofing felt;
- bitumen mastic;
- glass insulation
Two-layer waterproofing provides reliable protection of expanded clay blocks from moisture absorption. A thin layer of cement mortar is laid on the surface of the waterproofing material, on which the first row of blocks rests. Before starting masonry work, the required number of additional blocks should be cut in advance and the block building material should be laid out along the contour of the foundation base.
Operational instructions for laying expanded clay concrete walls
The technology for laying expanded clay concrete blocks does not cause difficulties for novice developers.
Laying walls from expanded clay concrete blocks begins from the corner parts of the foundation and is carried out according to the following algorithm:
- A layer of cement mortar is spread over the waterproofing.
- The first blocks are laid in the corners of the lower tier.
- A string is stretched between the corner foundation blocks.
- The lower row of blocks is being laid.
- The remaining rows of masonry are laid with reinforcement after 3-4 rows.
How to ensure dust removal?
A homemade electric furrow machine, although it has lower performance than a factory-made tool, produces no less dust when grooving. To save the walls of the room and the objects in it from dust, you need to attach a special casing to the equipment, which will provide an outlet for connecting a vacuum cleaner. Such casings are commercially available, but you can make this device at home, saving money.
To make the casing, you can use a metal sheet or a simple plastic bottle. The most important thing is to equip the protection with a tube to which the vacuum cleaner will be connected. It should be located at the top of the protective device and its connection to the suction hose should be tight. Thus, dust generated during operation will be immediately drawn into the vacuum cleaner.