The modern world is actively moving towards wireless technologies and, most likely, in the near future we will completely get rid of the hated wires that cause a lot of inconvenience. But all this awaits us ahead, and at the moment, each of us has dozens of meters of cable laid in our apartment, which gives us access to the World Wide Web. Despite the development of technology, the wired connection type still has several undeniable advantages over the wireless connection type: it is more stable, faster and more widespread. But the main disadvantage of wires is that they are very vulnerable to external influences (they constantly break, get pinched, and so on). Of course, there are types of braids that reliably protect twisted pair cables from physical influences, but they are not intended for home use. If you are asking the question “The Internet cable is broken, how to connect?”, then this material will help you.
How to extend an Internet cable with your own hands
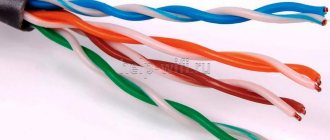
For such a simple process as connecting a cable, it is not necessary to resort to the help of a specialist; you can do everything at home with your own hands. The easiest way is to twist the wires together. Just take two wires, strip the top layer of braid and twist them together according to the colors. We talked in more detail about the color scheme of Internet cables in this article. Then wrap electrical tape around the connected wires for better insulation and a more aesthetic appearance.
This method has a huge advantage over other types of connection: it does not require any skills or additional devices. You don't even need to crimp the cable. However, it is worth noting that with such a connection, signal loss is very likely: the quality of data transmission is greatly reduced. It is not recommended to use this method for very long lines, because such an unreliable connection can become critical for throughput. For the first time - a quick and easy way.
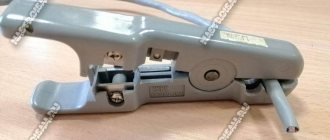
A more advanced version of twisting is the use of the so-called Scotchlock. Scotchlock is a very small cap for wires. The wires are simply inserted into it and the mechanism is snapped into place using pliers. Unlike simple twisting, this method holds the wires more securely, preventing them from coming apart. The pros and cons are absolutely identical to the conventional cable connection. Low stability, signal loss and undemanding tools.
Software connection setup
To set up a PC connection, you need to transfer them to a common workgroup.
Step 1. Press the key combination “Win+R” on the keyboard of the first PC (“Win” is located to the right of “Ctrl”). Type “sysdm.cpl” in the field and click “OK”.
Type the command “sysdm.cpl” into the field and click “OK”
Step 2. In “System Properties”, click on the “Computer Name” tab and click “Change”.
Click on the “Computer name” tab and click “Change”
Step 3. Come up with and type the name of the “working group” in English letters. In the “Computer name” line, you can leave the previous PC name or select any other. Click "OK".
Type the name of the “working group” in English letters in the line, click “OK”
Step 4. Restart your PC for the settings to take effect.
Reboot the computer
Step 5. After reboot, press “Win + R” on the keyboard and type “control” in the field. Click "OK".
Type “control” in the field and click “OK”
Step 6. Click “View Status...” if “Category” is specified, or “Control Center...” if “Icons” is activated.
If the value is “Category” in the “View” mode, click on the link “View status...”
If the “View” mode is set to “Large icons”, click on the “Control Center...” link.
Step 7. Click "Change adapter...".
Click "Change adapter..."
Step 8. Click on “Network connection...” and select “Properties”.
Click on “Network connection...” and select “Properties”
Step 9: Click the Network tab, click TCP/IPv4, and click Properties.
Click the “Network” tab, select “TCP/IPv4”, click “Properties”
Step 10. Specify the IP address 192.168.0.1 (mask 255.255.255.0). Click "OK". The setup of the first PC is complete.
Specify the IP address 192.168.0.1 (mask 255.255.255.0), click “OK”
Step 11. Repeat “ Steps 1-10” on another PC, specifying the same “workgroup” name, but entering the IP address 192.168.0.2 (mask 255.255.255.0).
Data for setting up two connected computers via cable
How to extend the Internet cable using an adapter
One of the most practical and “correct” ways is to use special connectors called “joiners.” They are a small box slightly larger than an RJ-45 connector (such connectors are found on any network equipment for connecting the Internet). There are RJ-45 connectors on both sides. Two crimped cables are inserted into them and the extension process is completed.
It is not difficult to guess that this method has a number of disadvantages. Firstly, these same joyners also need to be found. It is extremely rare to find them on sale; you will have to order them from an online store. By the way, they cost quite a bit. Secondly, crimped cables are required. You can't just shove the wires into the connector to make it work. We talked about how to properly crimp a twisted pair here (this does not necessarily require a special tool).
A significant advantage is that the quality of communication does not suffer in any way from such a connection. And if you have sufficient skills for crimping wires and you have the appropriate tool, then the process will not take much time.
Method No. 2: We make twisting with soldering
This option will, of course, be more reliable than the first. It is performed as follows.
- We do everything the same as in the first option until the moment when it is necessary to insulate each color of the core with electrical tape.
- Having twisted all the wires according to color, take a soldering iron and start soldering. There is nothing complicated about this; even a person who picks up a soldering iron for the first time can cope with it.
- After soldering, we insulate each twist separately with electrical tape, and then all together.
This twist will last much longer, so if you have a soldering iron, we recommend using it. That's all, now you know how you can connect twisted pair cables to each other using a soldering iron.
See also: How to find out if there is bluetooth on a laptop.
How to connect an Internet cable to each other: coupler
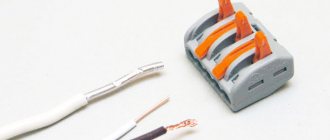
In the world of network maintenance, there is another simple device called a coupler. At its core, this is the same adapter as a joyner, only it allows you to avoid crimping the cable. At its core, it is a small opening box that has 16 blade contacts inside. Using a screwdriver, the wires are clamped into the contacts in accordance with the colors and the box is closed. There is even a special tool for this process called a puncher, which looks like a knife with a V-shaped blade. For an ordinary user, of course, there is no point in buying it to extend or connect two cables once, but technicians use it.
This method has 3 main advantages. Firstly, you can do without a special tool. Secondly, it is very easy to find such a device in any electronics store. And, of course, the quality of communication does not deteriorate in any way. The downside is the high cost compared to all other methods.
What can cause wire extension?
A good reason that forces you to lengthen the network cable is moving a personal computer, laptop or TV (with Smart TV) to a distant room (for various reasons). If the apartment has reinforced concrete walls and the same ceilings (and the majority of such living spaces) the Wi-Fi network does not work satisfactorily. In this case, the only real salvation is a wired connection. And to do this, you first need to make the cable longer.
Another reason is a simple rupture, which requires repair. This especially applies to situations where the twisted pair is not laid hidden (under drywall or in the wall), but lies on the floor, unprotected. Then it’s a matter of time before it’s time to damage the cable and you can simply press it down firmly with a chair leg.
If there are small children in the family, then in a playful impulse they can break the wire. And animals actually love to chew on everything that remains ownerless - cables, cords, etc. Perhaps pets find their interests in this.
Those owners of computer equipment who prefer economical consumption, instead of buying one long “cord”, try to buy several short pieces, which turns out to be cheaper in the end. And then all that remains is to connect them together. For example, from the same three two-meter sections, a full-fledged working 6-meter wire is obtained.
How to extend the internet cable yourself
Note! Even when you simply move the router to a new location, in any case you need to extend the cable that goes from the entrance to the apartment.
How to properly connect the Internet cable
If you do not want to use any additional adapters, then the most reliable way is to solder them together. This is the longest method among all and requires some skills. Before soldering, the cable is prepared. The insulation is stripped with great care so as not to damage the copper conductors. The wires are selected by color and applied to each other. To make it convenient to solder them, you can link them together. After soldering, the joints are insulated with insulating tape so that they have a better aesthetic appearance and better tightness.
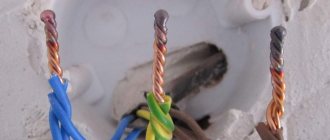
Method No. 1: Twist the wires by hand
For this method you will need electrical tape, a knife and your hands, from the right place. In almost any home these items are always available.
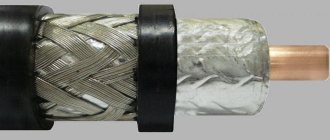
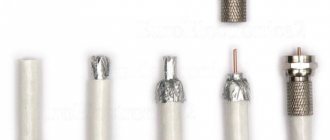
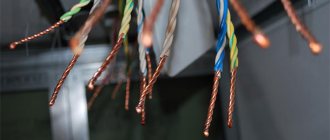
- The first thing to start with is to take both ends and remove the protective outer braid from them.
- Now unwind all the wires individually and remove the insulation from each.
- Twist all the wires strictly according to color. In this action, twisting must begin with the insulation, as in the photo.
- It is advisable to trim the sharp ends of the twisted strands, but not necessary.
- We isolate each color of twist separately, and at the end all together.
Maybe
Setting up PC access
To exchange data between PCs, you need to give permission to access their files and folders.
Step 1. In the “Network and Sharing Center...” (see Steps 5-6 of the previous section), click “Change advanced settings...”.
Click “Change advanced settings...”
Step 2. Expand all network profiles in the drop-down list and enable all permissions to discover, access and manage the PC.
Expand all network profiles in the drop-down list, enable all permissions to detect, access and manage PCs
Step 3. Scroll to the bottom of the list and select disabling password protection. Click “Save Changes”.
Scrolling to the bottom of the list, select disabling password protection, click “Save changes”
Step 4. Complete Steps 1-3 on another PC.
You can now view your connected PCs in the Network category.
Step 1: Double-click the “This PC” icon on your desktop.
Double-click the “This PC” icon on your desktop
Step 2. Click on the “Network” icon on the left.
Click on the “Network” icon on the left
An icon will appear indicating another PC on the network.
The Network window displays an icon indicating another PC on the network
Next, by setting up access to specific folders, you can exchange files between PCs.