Over the past few years, satellite television has not been a luxury for most people in the Russian Federation. That is why it is popular not only in big cities, but also in villages quite remote from them. In order to have a good signal and high-quality picture, it is very important to understand how to properly install a satellite dish and configure it.
Selecting a satellite dish installation location
In order for the satellite signal to be strong and of high quality, there should be no obstacles in its path. That is why experts advise installing the antenna in those places where there are no trees, other buildings, billboards, etc.
It is also worth considering some other factors, such as:
- proximity to TV;
- accessibility for the owner.
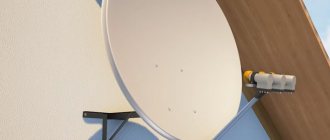
If the satellite dish is located close to the TV in a place accessible to a person, it will be quite easy to install and configure. The roof of the house is best suited for installation. Despite this, the antenna can be mounted on a balcony or the facade of a building. Experts do not recommend installing it inside glazed balconies and in places where there may be intensive precipitation on the structure: rainwater and snow.
Diseqc switch.
We connect the cables from the heads to the diseqc switch. We write down which switch port (the ports are numbered) each satellite corresponds to. For example, we will connect a converter that receives a signal from the Amos satellite to the first port, Sirius to the third, Hot Bird to the fourth.
amos 1/4sirius 3/4hot bird 4/4
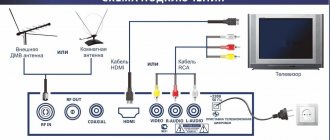
Next, connect one end of the cable to DiSEqC to the “Reseiver” (out, RW) port, and the other to the tuner’s “LNB IN” socket. Connect the receiver to the TV and turn on the receiver.
Assembling the antenna
The antenna assembly process must be carried out in full accordance with its operating instructions. During this process, it is very important to handle the mirror carefully and as thoroughly as possible. Under no circumstances should you cause any mechanical damage to it that could change its geometry. First of all, this applies to mirrors that are made of aluminum. After assembling the antenna, it is imperative to check the tightness of all fasteners without exception.
The most important point of assembly is the installation of a satellite converter ( LNB - low-noise block downconverter). The correctness of its polarization directly affects the quality of the signal that the antenna will ultimately receive. In order to increase it, it is necessary to experimentally manually adjust the heads around their axis. The converter must eventually be secured in the most advantageous position.
Note! If it is not possible to adjust the converter after installing the antenna, this process must be completed in advance. Some additional information about assembly can be obtained from the seller of the fixture.
Before the installation process, experts recommend tying the antenna to safety cables. This way you can prevent it from accidentally falling from a height.
Technical description
Satellite television is a broadcast signal that is transmitted to viewers’ screens using a complex of satellites that orbit the Earth.
Due to the fact that the need for telecommunications is increasing every year, terrestrial broadcasters have ceased to fully cope with their functions.
They are not capable of supporting signal transmission over long distances, and one could completely forget about relaying overseas. An equally important disadvantage of older formats is the instability of image and sound quality. Thus, devices located at a relatively close distance to the source receive the information flow better, as a result of which the level of picture and audio varies greatly. Satellite TV is a great alternative to more outdated broadcast technologies. This way the quality of broadcasting is maintained at a high level.
The main advantage is low energy consumption. So the satellite rotates in orbit following the planet without wasting extra resources, and the power source is solar panels, the power of which is completely sufficient to maintain the operation of space equipment.
The coverage of the territory is quite large; the signal can easily cover up to a quarter of the surface of the entire planet.
Broadcasting can be done in two different ways:
- Direct television broadcasting is the simplest and most accessible. This way the video signal goes directly to the viewer, eliminating intermediaries.
- Retransmission using terrestrial television centers - first the information reaches one specific point, after which it spreads further with the help of antennas until it reaches the consumer.
Coverage of the territory of the Russian Federation with an MTS satellite signal.
The type of broadcasting depends on the operator you initially chose. If you are not satisfied with any of the above options, then you can safely refuse the services of this provider and switch to the type of broadcast that will be convenient for you personally.
Installing the Bracket and Antenna
In order to install the bracket, you will need a hammer drill or a special impact mechanism designed for drilling holes in brick or concrete.
Experts recommend installing the antenna bracket on anchor bolts with a wedging function. When the bolt is tightened inside the wall, its petals diverge in all directions. This way it is possible to create a truly reliable mount.
Be sure to pay attention to the following features of bracket installation:
- If the walls are made of brick, M8 or H10 anchor bolts are best suited.
- When working with brick walls, it is better not to use anchor bolts with a diameter of more than 16 millimeters.
- If the structure is made of high-strength old brick, the use of anchor bolts for holes with a diameter of over 20 millimeters is permitted.
- Experts recommend leaving most of the brick around the hole for the bolts, since the fasteners are held quite poorly in the mortar.
- You should not install the bracket closer than the length of 4 bricks to the corner of the building and the height of 4 bricks to the roof of the structure. This may cause cracks to form.
- It is not recommended to use anchor bolts to mount the antenna on walls made of cinder concrete or low-density blocks.
- Strong tightening of anchor bolts can lead to the formation of high compressive forces, which often leads to partial destruction of the brick.
To install the bracket, it is necessary to mark the wall. After this, you need to drill in the appropriate places. Next, you should stretch the anchor bolts along with the bracket. They must be tightened all the way. Finally, you need to check the fasteners for strength.
Receiver setup.
Now we need to configure the receiver according to our configuration. Since we could use a different number of heads and switches in the receiver settings, this data was not preset. We need to indicate that we are using one switch with four inputs; more precisely, we need to indicate to which switch inputs the heads are connected.
We go to the menu - press “MENU” on the remote control. Depending on the receiver model, there may be minor differences in the menu structure. We recommend using an already configured satellite receiver. Go to “MENU” - “INSTALLATION”, select satellites one by one and set the “DiSEqC” parameter
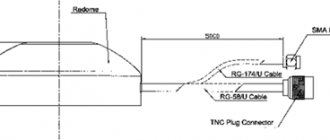
Cable installation
Before installing the cable, you need to select a place where you can make a hole for it. If the antenna will hang on the facade of a building, it is recommended to drill in the following parts of the wall:
- in the corner of the window frame;
- in the wall at floor level.
If the antenna will be on the roof, the cable must be routed along the facade of the building. It must be secured both on the roof and near the window on the wall through the window frame. It is also allowed to run the cable through low-current risers of the structure.
Connecting the F connector
In order to connect coaxial cables, they must be stripped. After this you need to put on the F-connectors . This happens in the following order:
- cutting off the upper cable sheath at a distance of 2 cm without damaging the screen;
- carefully bending the wire onto the sheath;
- removing insulation from the central core protruding 2 mm from the screen;
- screwing on the F-connector;
- shortening the excess stock of the central core, leaving 2-5 mm from the plane of the connector.
The described method of connecting the F-connector is the simplest.
Multiswitch connection diagrams
The choice of a multiswitch should be made based on two important factors: the number of cables and the number of TVs in the house. The following basic connection diagrams for these devices are most often used:
- For the Amos 2/3 4.0w you only need 1 SAT cable. Reception of TV channels: horizontal polarization (H) and lower range (Low) – multiswitch input H, Low.
- The Astra 5.0E satellite requires 2 SAT cables. Reception of TV channels: horizontal polarization (H) and upper range (High) – multiswitch input H, High, vertical polarization (V) and upper range (High) – multiswitch input V, High.
- For the Eutelsat 36.0E , which has NTV+ TV channels, you need 2 SAT cables. Reception of TV channels: horizontal polarization (H) and upper range (High) – multiswitch input H, High, vertical polarization (V) and upper range (High) – multiswitch input V, High.
- For the Eutelsat 36.0E , which has Tricolor TV channels, you need 1 SAT cable. Reception of TV channels: horizontal polarization (H) and upper range (High) – multiswitch input H, High.
TV cable routing: finding the shortest path
To install cables around your home or apartment, you don’t have to be an electrician. You just need to have some knowledge. Of course, you can turn to the experts, but by doing the wiring yourself, you will save a considerable amount of money.
First you need to decide which cable to buy. There is no secret - the higher the price, the better the product. And cable is no exception. This is especially true if the apartment has not one TV, but two or three. Nowadays, it is not uncommon to have televisions in every room, and sometimes in the kitchen. Therefore, let’s look at the signs of a high-quality television cable:
- In order for the cable to bend well, it must have a central conductor made of copper.
- Foamed polyurethane is used as a dielectric.
- The outer braid is rigid polyvinyl chloride or polyethylene.
- A shield is required to protect against interference. It is better if it is made of foil. We are interested in high flexibility and strength of the cable.
- A high-quality cable is dense, its inner layer does not “dangle” under the braid.
- The optimal diameter is at least 6 mm.
Next, we have to determine the shortest path from antennas and dishes to television receivers.
Converters are universal devices that are placed on a satellite dish with one or several independent outputs and are used to receive and convert the signal. Universal converters are capable of receiving satellite signals of two polarizations: right and left with circular polarization of the signal (NTV Plus, Tricolor) or vertical and horizontal with linear polarization of the signal (Continent TV, MTS TV). The converter allows you to receive various satellite channels independently of each other, regardless of polarization.
| converter | converter for 4 outputs |
Splitters and diplexers may be necessary devices for cable routing.
Splitters - signal dividers, TV crabs, for branching an on-air or satellite signal.
| splitter for 2 outputs | splitter for 4 outputs |
Signal dividers, so-called television crabs or splitters, are often used when you need to connect one television cable coming from a satellite or terrestrial antenna to several televisions or receivers at once. This is especially true in multi-room apartments or multi-room country houses.
By the way, if the splitter is turned upside down, it will work as a combiner and with its help you can combine a signal from several over-the-air signal sources into one cable, for example, an over-the-air signal from cable TV and a signal from an over-the-air antenna, or from the RF modulator of the receiver.
Diplexers (Adders) - are designed to combine signals from terrestrial and satellite antennas for transmission over one common cable.
If you decide to install a satellite dish, and at the same time a cable from a regular antenna is connected to your TV, then you do not have to pull a separate cable from the satellite dish. This can really be avoided by installing a diplexer on the roof or wall and connecting both cables from the satellite and terrestrial antenna into it. Next, the signal from the satellite and the terrestrial antenna will go in one cable. To reverse divide the signal indoors, use the same diplexer (adder) which is installed in reverse or a socket with a built-in divider in front of the TV receiver. Both cables with the terrestrial and satellite signals will already come out of it and you can connect them to the TV receivers you need in the house or apartment. DC voltage is supplied to the converter through the “SAT” output
Splitters and diplexers make it possible to combine and distribute signals across several TV receivers.
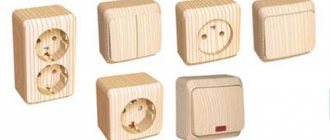
TV sockets. They come in three types:
- Pass-throughs - contain an entrance, an exit and another exit to the next outlet.
- The finished sockets have a characteristic impedance of 75 Ohms.
- Simple - do not have their own resistance.
- SAT-TV (advanced) - for separating satellite (IF) and terrestrial signals from one cable (in the case of using a diplexer) into two or more different TV receivers - a satellite receiver and a TV (or terrestrial digital receiver).
| TV-FM socket 75 ohm | SAT-TV socket |
TV sockets are used for aesthetics and ease of use of the antenna.
IR extenders - devices designed to increase the range of infrared remote controls.
By installing an extension cord, you can freely switch channels for broadcast on the TV, even if the receiving unit is located in another room. The extender transmits the signal using a radio channel.
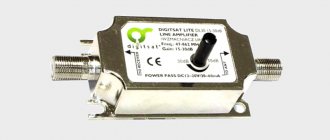
Amplifiers - used to improve the quality of signal reception. This is necessary in cases where there is a significant cable length. Among other things, you need to remember that amplifiers also amplify extraneous noise. Installed by mounting it into the cable anywhere between the converter and the receiver.
Cabling connectors (F-barrel (cable connector), F-connectors)
To install the cable, you will also need connecting fittings, which are used to connect the television cable if it needs to be extended or partially replaced.
| f-connector | f-kick |
Let's try to analyze a practical option for wiring a television cable
Let's assume that our goal is to connect 3 TVs in one house. Two TVs must receive a signal from a satellite dish plus an over-the-air antenna. The third will broadcast terrestrial television plus satellite without an additional receiver.
For this case, there are several wiring options. Let's look at each of them:
- If we use satellite systems operating in the same polarization, we need to use the following scheme. We combine the signal from the satellite and from the over-the-air antenna in one cable with a diplexer, feed it into the house, then distribute it using the same diplexer. Using a splitter, we distribute the signal from the over-the-air antenna to three television receivers. We throw the signal from the satellite dish to the LNB-IN of the first receiver, from where from the LNB-OUT of the same receiver to the LNB-IN input of the second receiver. We get two autonomous independent satellite systems of the same polarity. We feed the third TV the signal from the receiver closest to it. Through a splitter we connect the cable to the over-the-air antenna. To conveniently change channels on a third TV, you will need an infrared remote control extender. If the distance between the TVs is significant and the cable length is long, the signal quality may deteriorate. To prevent signal distortion, we use an amplifier. Let us recall that this scheme only works when satellite channels belong to the same polarization (this option is convenient for the satellite operator Tricolor TV).
- The second scheme differs from the first in that an intermediate frequency divider is used when distributing the signal. We separate the broadcast cable using a splitter. The disadvantage of this option is the fact that it can be used to route a signal received from systems operating in the same polarization.
- The third scheme can be called classic and the most reliable. We lay two separate cables to each TV with a receiver: one terrestrial, the other with a satellite signal. For this we use a TWIN converter with two autonomous outputs. In the case when the antenna receives a signal from several satellites, we run a cable from each converter. Now two TVs, independent of each other, will broadcast satellite channels with different polarizations. The third TV is connected in the same way as the first two options. With such a scheme, there will be a lot of cables in the apartment or house. Old fashioned, but reliable.
- Another diagram for connecting three TVs is as follows. We mix each of the signals from the corresponding satellite converter using a splitter. We add the cable from the over-the-air antenna there too. A mixed signal is supplied to each receiver, where it is separated using a diplexer and supplied to a television receiver or receiver. For this purpose, SAT-TV sockets are often used instead of diplexers. However, when using them, a significant drop in signal quality is observed. Sometimes, to prevent loss of quality, they remove the “stuffing” from the socket and simply pass the cable through it, increasing its length using a “barrel”, and then connect it to the receiver. The third TV in all four versions receives a signal from the satellite through the receiver of another TV, and the terrestrial signal through a splitter. It is worth installing an infrared remote control extender for the second and third TVs in order to be able to switch channels from the satellite receiver of the second TV in another room. This will be acceptable if the second TV is not turned on. This circuit is not recommended for use with a weak signal, use of a cable of questionable quality and a significant length. In any case, for high-quality broadcasting it is necessary to install a signal amplifier.
The presented methods for wiring television cables can also be used for combined satellite systems that operate on several converters. In this case, the signal is combined using a DiSEqC switch into a single cable.
How to set up your TV?
The easiest step in installing a satellite dish is setting up the TV. To do this, you need to test the available channels. In most cases they are arranged in a random order. This is influenced primarily by the broadcast frequency.
The TV can be adjusted using the remote control. Each channel needs to be reviewed. If problems are detected, the equipment should be further adjusted.
Search for satellite and channels
Using the receiver, you can search for satellites and channels without additional equipment. To do this, you need to move the tuner and a small TV to the antenna location. Instead, you can find an assistant who will monitor the signal quality in the room.
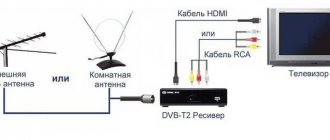
What is included in the satellite TV package
Literally at every thematic forum the idea will be voiced that a kit for receiving satellite TV can be assembled independently from individual components. But the solution to this problem is not for the average user. He simply does not have enough knowledge for this. Today there is an easier way out. It is enough to pay a visit to the nearest satellite television provider. At the provider’s office, you can sign a service agreement, buy a ready-made kit for receiving satellite television, and select the best package of channels for yourself in terms of price and content.
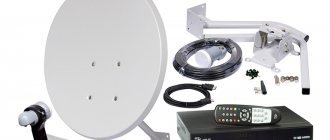
The average kit for receiving satellite TV includes (minimum set) the following components.
- The dish is a deflector, a reflector of radio frequency radiation from the satellite. Today, the provider offers the optimal characteristics of this element for a particular area. That is, 60 cm dishes for good coverage areas, 80, 90 or 120 cm for areas with weak signals.
- A converter needed to convert a high frequency radio signal into electrical energy.
- Mounting kit for fixing the antenna.
- A rod for attaching the converter to the deflector.
- Basic set of cables.
- Receiver for signal conversion and connection of conventional TVs.
The equipment set can be expanded or reduced according to the user's wishes. For example, it will not be difficult to buy only an antenna, its mounting kit and a converter for those whose TVs are immediately equipped with a satellite tuner. Or purchase a more complex receiver instead of the basic version, including one with the ability to organize an in-house signal distribution network or connection to the Internet.
We are searching for channels.
All. Our antenna is set up. Now all that remains is to search for channels on the receiver. To do this, press the “EXIT” button several times until we exit to the “MAIN MENU”.
Go up to the sub-item “SEARCH FOR TRICOLOR TV CHANNELS” and click “OK”. The receiver will search for channels, and when it finishes, you will be asked to save them, which you will, of course, do. Enjoy watching. Good luck!
Thanks to Alyno for the valuable resource https://www.alyno.ru.
Plate material
Today, deflector plates are made from several materials. These are aluminum, steel, plastic, fiberglass. Each of them has its own advantages and disadvantages.
Aluminum
The most common and convenient type of satellite dishes. The deflector weighs little enough that the antenna can be mounted by two or even one person. At the same time, the plate is durable and resists wind and precipitation.
The main disadvantage of aluminum is its oxidation nature. Over time, any aluminum plate peels off its protective coating, which plays not only a decorative role, but also fulfills the task of achieving the desired characteristics of the reflective surface . As a result, over the years of operation, the antenna loses its attractive appearance, and its reception quality deteriorates.
Steel
The deflector is very massive. When installing it, it is recommended to use lifting equipment. You will need powerful brackets and a reliable, durable section of the wall for installation. But the steel deflector is ideal: it itself forms a reflective surface. The applied paint only protects the plate from corrosion.
However, over time, during cleaning, due to moisture, temperature changes and ultraviolet radiation, the outer coating crumbles and peels off. The deflector begins to rust. Not all users provide it with proper care and painting. Therefore, antennas with unaesthetic rusty dishes are not uncommon in the appearance of modern cities.
Plastic
The plastic deflector is extremely lightweight. Mounting it on a wall or roof is not difficult. In this case, it is permitted, subject to careful sealing, to place support posts directly on the inclined slopes of the roofs. The antenna unit is generally inexpensive and does not require maintenance. The plastic retains its appearance without much effort from the owner of the plate.
But this medal has the most unpleasant downside: the deflector is fragile. It plays, deforms under gusts of wind and impacts of rain, and the quality of reception changes greatly. Plastic can be damaged by birds or accidental impacts. With a large windage, a light deflector can be torn off and carried away by the wind. Therefore, antennas of this type are not popular among consumers.
Fiberglass
Fiberglass deflector - perfect without compromise. The material provides:
- average weight of the product;
- the highest rigidity of the plate;
- good adhesion with reflective coating;
- stability under temperature changes and other negative factors;
- mechanical strength;
- extremely high durability while maintaining an ideal appearance.
The main disadvantage of a fiberglass deflector is its price tag and the volume of offers on the market. Products of this class are very expensive. In addition, today none of the brands has launched mass production of plates made of textolite (fiberglass impregnated with polymer resin). Therefore, even if you have money, it is not a fact that you will be able to buy the most convenient and functional fiberglass deflector without any problems.