Electrician in the house
Encyclopedia about electricity from A to Z
Masters catalog
Find the best master or company in your city
Switches and sockets for outdoor installation
External switches and sockets have certain installation features. First of all, this is due to the peculiarities of installing external electrical wiring, which we will also talk about in our article.
In addition, an important factor that influenced the installation features of external installation products is the need for their additional protection from atmospheric influences, which is reflected in their design.
- Features of choosing sockets and switches for outdoor installation
- Rules for installing external electrical wiring
- Connecting sockets and switches Installing a socket
- Switch installation
Features of choosing sockets and switches for outdoor installation
Outdoor sockets and outdoor switches usually have surface or open mounting methods. Products of a hidden type of installation do not have a sufficient level of protection from external influences, therefore they are not used for external installation.
So:
- First of all, let's look at sockets. Typically for outdoor installation they have a rated current of 10 or 16A, but you can find products with a rated current of up to 25A. Here your choice entirely depends on your requirements.
- One of the most important parameters for outdoor sockets is their level of protection. Usually it fluctuates within IP44 or IP. For sockets with a higher degree of protection, the price is significantly higher.
Selecting switches and sockets for outdoor installation
- The abbreviation IP in translation means degree of protection against penetration. The first number after it indicates the degree of protection from dust and other foreign objects. It can range from 0 to 6. The number 4 means the degree of protection against objects with a diameter of less than 1 mm. The number 5 indicates the dust resistance of the product.
- The second number after the abbreviation IP indicates the degree of protection against moisture. This level of protection can range from 0 to 8. The number 4 indicates protection against splashes falling in any direction. And the number 5 indicates protection from jets of water falling on the product.
- Switches for outdoor installation are usually manufactured with a current rating of 6 or 10A. It is very rare to find 16A switches. Moreover, they can be one- or two-key.
- But as for the degree of protection, switches usually have a degree of protection IP44, 54 or 55. More protected products are much less common, and the need for them may arise only in exceptional cases.
Materials
Before starting work, you will need to purchase the following materials:
- 3-core cable with a cross-section of 1.5mm2
For lighting with a consumption of no more than 16A, this section is usually sufficient. But everything may depend on the length of the area and the power of the lamps.
If you are not limited financially, then you can choose an armored cable. In this case, you will not have to use HDPE pipes.
However, cutting it apart both in the panel room and when connecting lamps will not be easy. Therefore, most people use the usual brand VVGnG 3*1.5mm2.
- HDPE pipe
- modular contactor with normally open contacts
- Light sensor or photo relay + twilight relay
- Street lights
- modular machines
- 3 position switch
Rules for installing external electrical wiring
Due to the fact that external electrical wiring and switching devices require additional protection from atmospheric influences, the PUE standards provide for some features of their installation. This is clearly visible even in a store, where external sockets and switches are presented only in the version for open wiring.
- If you install a switch or socket on a surface made of non-combustible materials - concrete, brick, foam concrete, etc., then the installation can be done directly on the surface. In this case, the wire must be protected from mechanical damage by plastic corrugation.
Rules for installing sockets outdoors
- If you install the switching device on a wooden or other combustible surface, then, according to the PUE, you must ensure that the surface is protected from fire. This is done by placing fireproof materials between the surface and the switching device.
Note! According to clause 2.1.49 of the PUE, the lining must protrude beyond the switch or socket by at least 1 cm on all sides.
- It is also worth noting that in all cases of outdoor wiring, the use of metal pipes is prohibited. The same rule applies to metal corrugations.
- Another important aspect that should not be forgotten is that external sockets and switches, according to clause 2.1.75, cannot be placed closer than one meter from a window or balcony. Under the window, wires and switching equipment can be installed at a distance of 50 cm, and above the window - 75 cm.
Device control method: types
Based on the type of control, there are push-button, rope, touch, with built-in remote control, with sensors and other devices.
Keyboards
Used to control room lighting. They began to be installed en masse recently, so they look original in the interior. Pros: service life, price, comfort. They consist of a body and a swinging mechanism with a spring.
Corded
The peak of popularity of such switches occurred in the 70s of the last century. Rarely used today. Such devices are turned on and off by pulling a cord, which is attached to a rotary lever that interacts with a moving contact block.
Retro push-button old style
They work on the principle of a key - the first press closes the contact, and the second opens it. Used in table-top and floor-standing devices, also in wall-mounted models.
Sensory
This is an innovative generation of light control devices. Microcircuits are used for operation, thanks to which the service life is extended and the possibility of a short circuit is eliminated. They work by touch. Also in button or key mode.
With remote control
Using a remote control, the switch is controlled from a distance.
A signal is transmitted via a radio channel from the remote control to the lighting fixture. The switch acts as a signal receiver. The remote control can be made in various cases; for home use it is made in the form of a keychain.
Additionally, the circuit often uses microcontrollers that expand the range: intensity control, timer.
With built-in sensors
Such switches contain detectors that analyze environmental parameters. Motion sensors are used to analyze whether an object is within sight. Signals from the sensor are sent to the controller, processed, and then the switch is triggered. Such devices can be programmed. They are actively used in the “smart home” system.
Pass-through or change-over devices
This is a type of keyboard model. The difference is that they do not close contacts, but switch. Several lighting fixtures are connected to the changeover switches at once.
Connecting sockets and switches
Sockets and switches for external wiring are connected in the same way as their counterparts intended for indoor installation. The only peculiarity is more careful laying of the wire and sealing of the switch itself. But let's look at each of the proposed options separately.
Installing an outlet
If we have an outdoor socket, then regardless of the nature of the other loads in this group, according to clause 7.1.82, we must connect this group through an RCD.
In this case, the rated operating current of the RCD should not exceed 30 mA. Therefore, if you plan to install several groups of outdoor lighting at once, then try to select one socket group and one lighting group.
The photo shows the installation of an outdoor outlet
- If you plan to install the outlet yourself, then first of all you should disassemble it. After that we install the box. If required, then with a lining of fireproof materials between the box and the installation surface.
- Now we lay the cable from the junction box to the outlet. We do this in accordance with the PUE standards. Now you can proceed directly to the connection.
- First of all, we remove the voltage from all the wires running in the junction box. We make sure that it is absent using the indicator. Now we connect the wires according to paragraph 1.1. 29 PUE. Blue is the neutral wire to the neutral busbar of the junction box, yellow-green is the protective wire to the corresponding busbar of the junction box, and the third wire, which can be of any color, is to the phase wire of the junction box.
- Before connecting the wire to the outlet, it should be passed through a special seal. Typically, the role of such a seal is played by an ordinary rubber band at the entrance of the wire into the socket.
- Now we make the connection. We connect the phase and neutral wires to the two power contacts of the socket, and the protective wire to the corresponding terminal on the socket. In this case, the location of the phase and neutral wires on the socket is not important.
Note! Some electrical appliances require a clear location of the phase and neutral wires. Typically, the plugs of such devices are designed accordingly to prevent the plug from being turned over. In this case, the connection should be made as recommended by the manufacturer's instructions.
- Now all that remains is to install the working part of the socket into the cover and secure it. After applying voltage, the socket is ready for use.
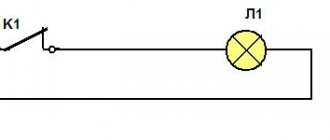
Switch installation
The installation of the switch is also practically indistinguishable and is carried out according to the same rules as the installation of a conventional switch for open wiring. If hidden external wiring is used, then to connect an outdoor switch or socket, a small section of wiring is created, mounted in an open way. But this is a very rare occurrence.
Installing a switch outdoors
So:
- As with the outlet, first install the switch cover. After this, you can lay a wire from the junction box to the switching device and remove the voltage from all the wires running in the box.
- To connect the switch, we need a two-wire wire from the switch to the distribution box and a three-wire wire from the distribution box to the lamp.
- First, we connect the lamp. First, we connect the neutral and protective wires to the corresponding contacts on the lamp. For most modern chandeliers, the location of the phase and neutral wires is of fundamental importance, so they usually have appropriate markings on the terminals.
- We also connect the phase wire to the lamp, but leave it unused in the distribution box for now.
- Now we connect the switch. Before making the connection, you should pass the wire through a special seal. First, we connect the wire to the phase conductor in the distribution box. Then we connect the same wire to the switch input.
- The wire connected to the switch terminal is connected to the currently unused phase wire from the lamp. At this point, the connection operations can be considered complete and after assembling the switch and applying voltage, you can safely test the functionality of our circuit.
Popular manufacturers
The manufacturer plays an important role when choosing a switch.
Famous brands strive to make devices of high quality, stylish and safe, guaranteeing a long service life of the products.
Legrand
A company from France that sells electrical products. One of the top five European brands. The products of the French company are sold under the brands Kontaktor, BTicino, Sarlam, Legrand and others. The products are distinguished by high quality, safety, reliability and long service life. The range is varied: traditional models and unusual modern devices.
The company pays great attention to the quality of parts. The device housings are made of self-extinguishing plastic, which improves the safety of the switch.
ABB
Swedish manufacturer, leader of electrical installation devices. They are distinguished by the highest safety and quality of products. The cases are made of natural impact-resistant materials that are resistant to UV radiation. The products are easy to install and come in different designs. The disadvantage is the high cost of the devices.
Schneider Electric
Another French brand, a leader among electrical installation products. The devices are made of resistant materials with spring bronze contacts. Installation is simple, the design is varied. The cost of devices is high, even for classic standard models.
Russian made
Electrical components are also produced in Russia. Many companies are doing this - the relatively new company LK studio, GUSI Electric, IEK. Domestic devices have a good price/quality ratio, and there are switches with an original and stylish design. The above-mentioned company is one of the largest factories in the electrical industry in Russia and part of the Legrand group of companies.
Human life is impossible without electric lighting and household appliances. Switches are needed to control such devices. Today the range of switches is wide and varied.
Comments:
Victor
I had a Viko like in the picture above, so it shorted out at the first rain. And this is taking into account the fact that it was installed under the visor, i.e. no direct drops fell on it.
Evgen
From my experience I will say that only ABB switches provide real protection against water according to IP 44, all the others only make claims. If you want to equip a large facility with sealed switches, buy one and test it.
Stas
Evgen, how to test them? Build your own laboratory?
Evgen
Stas, why the laboratory? I took the switch, took it apart and stuffed toilet paper inside. After that I watered it from the shower. That's the whole laboratory. Such tests turned out to be enough to understand that ABB (and Legrand) really protect, and the rest only on paper
Leave a comment Cancel reply
Related Posts
Schneider Electric - high-quality sockets from the world leader
How to connect a three-key switch, diagram, instructions, tips.
How do ABB automatic machines differ from their competitors? A socket with a timer is an element of a smart home.