Kitchen: a concentration of pleasant and not so pleasant smells, as well as a place for preparing delicious dishes. One might say, a kind of Mecca for lovers of good food and drink. They not only eat there, but also watch TV with their favorite dish, or have heartfelt conversations with guests. Moreover, in most cases, the kitchen is equipped with comfortable seating areas and a table. The only thing that interferes with internal comfort in this temple of life is the unpleasant smell, fumes and smoke in the air.
This is still a fairly utilitarian room - food is constantly or periodically prepared in it, producing various aromas, and the stove operates. The solution to the problem is ventilation in the form of both passive and active systems, often represented by a hood. This is a fairly simple design and complex schematic device, which, like any equipment, requires some maintenance. But even despite performing all the required operations to support performance, it still sometimes breaks down. And at this moment it’s time to repair the hood.
Often, to carry it out, they turn to specialized specialists. But, in reality, 90% of problems that arise can be solved independently, without investing any money to pay for someone else’s work. And even without practical experience, but only the desire to correct the situation, you can repair almost any household appliance with your own hands.
Built-in device design
The design of built-in hoods is simple. Main details:
- Exhaust fan. One of the main elements of the hood, which sets air masses in motion, moving them to the filters. Powered by an electric motor. There are two main types of fans.
- Axial ones draw the air flow inward, where it rotates along the axis of rotation of the engine.
- Tangential fans have an increased efficiency. Its blades are spade-shaped.
- Speed regulator. Smoothly changes fan speed from low to higher. Control:
- buttons;
slider;
- sensor.
- Filtration element. Each kitchen hood is equipped with a filter that captures soot and grease. It is one of the main cleaning elements and prevents grease from getting onto the internal parts of the hood. The more expensive ones have replaceable carbon cartridges. The filler in them is activated carbon granules. Hoods that operate on the principle of air recirculation are equipped with such filters.
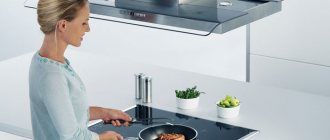
- Lighting system. Built into the body. Available with LED, halogen or incandescent lighting. They are convenient for illuminating the hob surface when cooking.
The first two methods are the most primitive. Buttons or a movable lever create the necessary contacts by applying voltage to the winding of an electric motor. This simplicity gives a high level of reliability of the switches. Repairing them is usually simple.
Expensive models of hoods are often equipped with a touch control system. Repairing the sensor at home is impossible, so the entire control unit is often replaced.
Attention The main structural elements of a built-in hood are the same as those of dome models. It is distinguished by its body design, which allows it to be integrated into pieces of furniture - for example, into a hanging cabinet
There are also vertical models built into a niche.
Do-it-yourself hood repair
Now we will tell you the main reasons that will help you repair your hood yourself. We will list you all the faults one by one and explain what to do with each one. Thanks to these instructions, you can easily repair household hoods yourself. If your remote control is broken, then read how to repair the remote control yourself.
The light doesn't turn on
Very often, many people use a hood simply to illuminate the panel. This approach is considered effective since it is cheaper to use a hood than lamps.
If the hood light does not work, then you should take the following steps to resolve this problem:
- Check the light bulb, as it could simply burn out.
- Turn on the fan on the device and check its operation.
- Check the voltage at the outlet. This can be done using an indicator screwdriver. If the outlet will work, then you should check the electrical cord for visual damage. Then check the RCD and thanks to this elimination method you will find the cause of the malfunction.
The hood pulls weakly
This is the second most common hood malfunction. Here things are much easier. You should check your grease traps for contamination. Most often, the hood does not ventilate well due to clogged filters.
If necessary, you can simply clean the filters. You can do this yourself. Here is a video instruction that will help you perform this process efficiently.
Another reason that the hood does not draw well is the lack of draft in the ventilation ducts. In this case, the draft can be checked using a lighter.
To check, you need to light the lighter and bring it to the exhaust duct. If the flames are not being drawn into the vent, then you should force vent.
The hood doesn't work at all
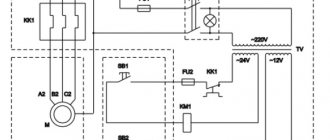
If after turning on the button on the panel nothing happens, then it is necessary to repair kitchen hoods. Repairing a kitchen hood is much more difficult. First you need to check the cord and the RCD. If you do not find any faults, then you need to test the circuit using a multimeter.
Now you need to look at the diagram of your hood and find the fuse. If it doesn't work, then it should be replaced. If the fuse works, then you should check the capacitor. Sometimes it is this that can cause the hood to break down. If your convection oven does not work, then the cause of the breakdown may also be a blown fuse.
The fan is noisy
If the hood makes a lot of noise, then the cause of this breakdown may be a low-quality manufacturer. On the Internet you can find a huge number of articles in which people complain about the high noise level of the hood. If you are confident in the quality of your device, then you should check the quality of its mounting to the wall. Even a small distance that may remain between the wall can cause a lot of noise. To resolve this problem, all fasteners must be tightened.
Doesn't change speed
If the hood does not change speed, then the problem may lie in the control unit button. You should visually inspect your board. Perhaps the contact on it simply burned out.
In addition, the cause of the malfunction may be the starting capacitor. In this case, the capacitor simply needs to be replaced. As you can see, you can repair the hood yourself.
What to do if the control panel is broken
If the motor runs all the time but does not change speed, then in 92% of cases the problem lies in the control panel. It’s better and easier in this case to just buy a new one and replace it; repairing the board yourself is quite difficult.
Now let’s look at possible minor hood malfunctions.
Disassembling the device: step-by-step instructions
Dismantling external ventilation parts
To remove the engine, it is necessary to disassemble the external parts of the kitchen ventilation. In this case, you can gain access to the engine system.
To do this you need to take the necessary tools and materials.
Attention You need to prepare a screwdriver of suitable diameter. In this case, there should be several screwdrivers, since some parts can be voluminous and engaged with large screws, and some elements are microscopic in size and can only be dismantled with special tools designed for careful removal of parts.. When the engine is removed from the device, check its resistance windings
To do this, prepare in advance a bundle of wires that go from the board to the electric motor. In this case, you can simultaneously diagnose faults in the motor and try to repair it without removing it from the hood. The method is less convenient, since a complex of additional work will first be required. It is better to dismantle the engine itself and not touch other parts in the ventilation housing
When the motor is removed from the device, the resistance of its windings is checked. To do this, prepare in advance a bundle of wires that go from the board to the electric motor. In this case, you can simultaneously diagnose faults in the motor and try to repair it without removing it from the hood. The method is less convenient, since a complex of additional work will first be required. It is better to dismantle the engine itself and not touch other parts in the ventilation housing.
Cleaning and checking
- Whatever caused the ventilation motor to break down, remove the dirt and lubricate the bearing with oil.
- The dismantled motor is placed on a horizontal surface and the starting condensate is checked.
- If there is no short circuit, it is returned to its place.
- If the condenser is broken, it is replaced with a similar one in capacity and operating voltage.
After cleaning all the grooves, dry the small parts well. Cleaning can be done with a soft cloth that does not leave streaks or scratch the surface. After cleaning, the serviceability of the engine is checked. The problem of its failure to work could be due to clogging of parts. After cleaning, the structure can become serviceable.
When the motor is installed in place, its performance is checked. If the problem also persists, the ventilation works very poorly, which means the engine needs to be replaced or some of its components are broken. The device is again removed from the fan and its performance is checked in detail.
Testing and assembly
- If a broken electric motor cannot be replaced, then you can try to short-circuit its wires. This testing will help determine the performance of the motor with shorter wires. Repairs to faulty wiring are rarely carried out. Branded hoods are designed in such a way that the motors in them rarely burn out. This means that the operation of the motor cannot be disrupted due to electrical problems. But this only applies to modern technology.
- If we talk about a simple hood with a simple motor, then everything is much more complicated.
You will have to test and assemble such a part in the ventilation several times in a row. It is necessary to apply mains voltage to the working and starting windings. There are situations when the motor hums (this means the electrical network is working properly), but refuses to work. The engine may gain speed when turned on when cranking it manually. This situation indicates a fault in the starting winding. It needs to be removed from the electric motor and replaced. - The hood motor is checked by ringing the windings according to the diagram specified in the operating instructions. If at least one winding does not ring, then the engine must be repaired or sent to a service center. And in the most difficult cases, completely replace it with a working one, which not everyone can do on their own at home.
- Incandescent or halogen lamps are simply replaced. They are simply turned out of the hood and checked for functionality. In this case, the procedure can be performed in any suitable cartridge or base.
- Repairing LED systems will require additional steps.
You will need to remove the lamps and connect them to a low voltage DC source. An adapter-converter is connected to the system, which will help obtain the 3 V voltage required for the LED. The converter adapter is also checked with a tester to ensure it matches the voltage required for operation. When using a standard 220 V LED lamp in the system, repairs only involve cleaning the contacts in the lamp base.
Troubleshooting Methods
Simple breakdowns can be eliminated with a superficial inspection. It is not difficult to repair the hood yourself if you follow a certain scheme, depending on the nature of the malfunction.
If serious damage is detected, you will have to disassemble and remove the hood; for this you need to know the procedure for disassembling it. Some parts, such as a fan, a light bulb, an electric motor, or an electronics board, cannot or are very difficult to repair. Therefore, you will need to replace these elements with new ones. To do this, it is advisable to know the name of the spare part according to the manufacturer's catalog number. Repair algorithm:
- make sure that the fault is in the exhaust device;
- select the faulty node;
- repair the unit or replace it with a new one;
- return the working unit to its place;
- check functionality.
Do not forget that work may involve high voltage of 220 volts, which is life-threatening. Therefore, when doing your own repairs, you must use proper tools and follow electrical safety rules.
The device does not turn on
First of all, you need to make sure that the problem is in the exhaust equipment. If everything is normal with the electricity supply, then check the presence of voltage at the input of the power supply and the functionality of the power button (sensor serviceability). For this you will need a multimeter.
The input voltage should be 220 volts. It is convenient to ring the mechanical button with a multimeter in ringing mode. If everything is in order, the voltage supplied to the control board and motor windings is measured. In this case, you will definitely need to ring the fuses for open circuits. Such breakdowns are typical for Cata hoods, which are not designed for voltage surges. If you replace fuses after they have blown, be sure to check the lines in which they are installed for a short circuit.
Control board failure
When the hood turns on, but the motor does not start, you should start by checking the control board. In this case, the backlights may blink, and the engine may start and run, but not respond to commands.
Breakdowns of the treatment plant and methods for correcting them
Almost all pumping station breakdowns are manifested by an increase in the level of wastewater in the receiving compartment. A rise in the level activates an emergency float, which triggers an alarm - a bell or a light signal. This alerts the user to the danger of flooding the system and releasing untreated wastewater outside the unit.
Flooding of sewage treatment plant
First of all, you need to check whether the drainage channel for purified waste from the device is clogged or frozen. If not, then you need to look for the cause of the station’s flooding based on the type of equipment. It can be with a gravity drainage system or with forced pumping.
In models with forced pumping, the problem may be a broken drain pump or a stuck float switch. To check the operation of the pump, remove it and connect it to another outlet. If the pump is in order, but does not turn on after connecting to the station, then most likely the problem is with the float switch - it needs to be replaced.
The following problems may be common to gravity and forced models. Check whether liquid is pumped from the receiving compartment to the aeration tank. If not, then the culprit is a faulty airlift. The reasons for the breakdown may be the following:
- the airlift tube is damaged;
- the airlift of the main pump is clogged;
- the float switch is faulty;
- The compressor membrane that supplies air to the airlift is damaged.
Breakdowns are eliminated by replacing damaged elements or cleaning clogged areas.
RCD tripping and problems with power supply
If, when starting the station, an RCD (residual current device) is triggered, the reason may lie in damage to the compressor or drain pump, or float switch. It is also necessary to check the electrical wiring and sockets.
Disturbances in the operation of the installation can also be caused by a prolonged power outage, and then there is a possibility of overflowing of the tanks and the occurrence of an unpleasant odor due to the onset of the development of anaerobic microorganisms. If the voltage drops in the network are within 3% of the nominal value, it is necessary to install a stabilizer.
Changing the water level in an idle station
It is not advisable to leave the TOPAS cleaning system idle for a long time. But if this does happen, and it is discovered that the water level in the tank is changing, then possible malfunctions may be the following:
- Failure of plumbing fixtures leading to water leakage. You need to find the source of the leaks and repair or replace them.
- The device casing is damaged. If the problems are minor, then you can try to solder the case; if not, you need to contact professionals for help, and they will replace the damaged area. And it’s good if you can get by with repairs, because replacing the entire body will not be cheap.
- Improper installation and, as a result, flooding with rain or flood water.
- The station tank must be installed so that the lid rises 15 cm above the ground surface.
A problem can also be a poorly organized exit of purified water from the system. The situation of poor outflow can be aggravated by poor soil throughput.
History and design of the hood
Since the beginning of ancient times, people have thought about ventilating indoor spaces. This was especially true in food preparation areas. Initially, all actions were reduced to simple ventilation or such an arrangement of the cooking area that naturally removed combustion products.
With the development of house building, kitchens also changed. They began to use stoves and fireplaces in which chimneys were used to remove combustion products. In the 19th century, the Russian scientist E. H. Land suggested that high-quality ventilation is impossible without artificial air exchange. The production of hoods was mainly developed thanks to the Italian company Faber, which released the first plastic hood in 1958.
Modern hoods fully cope with the tasks assigned to them. Without losing performance, they have become compact and easy to use. Competition between companies leads to constant improvement of product technical characteristics, such as performance, noise reduction, and reliability.
Types and principle of operation
A kitchen hood is a device designed to clean the air from smoke, odors, particles of fat, and moisture that arise during the cooking process. Depending on the operating mode, kitchen hoods are either flow-through or circulation. The first type involves exhaust mode, when the exhaust air is drawn outside from the room, most often into the ventilation shaft. This mode is more preferable than the second. The circulation mode is based on passing air through a filter system and returning it back to the room.
According to their appearance, exhaust devices are divided into the following types:
Despite their appearance, their operating principle and structure are the same. The main part of a kitchen appliance is the motor. The quality of air purification depends on its operation and location. Having an exhaust fan, it ensures the creation of air flows passing through the filter elements.
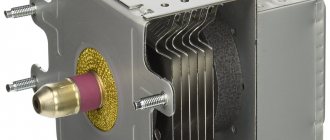
An asynchronous motor is used as a motor. Its axis follows the movements of the pumped or discharged air flow. Such an electric motor consists of a rotor located inside the stator. The distance between them is no more than two millimeters. The stator is a core with slots on which the winding is wound. The rotor, the moving part with the shaft, consists of a core with a short-circuited winding. This design resembles a squirrel wheel in appearance.
When alternating current is supplied to the stator winding, according to the laws of physics, an alternating magnetic field appears. Electromagnetic induction occurs on a closed conductor placed inside this field, which leads to the appearance of a current, and this, in turn, causes the rotor to rotate. Due to the fact that the stator has several leads, connecting different numbers of them leads to a change in the fan rotation speed.
Structural elements of the system
A special element of the hood is the check valve. It can be electric, with a motor opening when starting, or mechanical, triggered by the pressure of the air flow. Its job is to pass air in one direction and prevent it from passing in the opposite direction. In addition to the electric motor for the hood and the valve, the device includes:
- frame;
- power unit;
- control board;
- control unit panel;
- motor holder housing;
- backlight lamps;
- filters.
The body itself is made of sheet steel and is powder coated to prevent rust. The power supply is designed to start the electric motor and provide the required voltage to the control board and backlight lamps. The motor holder is used to reduce the level of vibration and noise from its operation, as well as to securely fasten it. The filters have different designs, but in all cases a perforated aluminum mesh is used as the primary element. It effectively protects parts of the hood from contamination with grease. The control unit is made in the form of mechanical buttons or touch surfaces.
Complete set of hoods
The hood is actually a centrifugal fan, the functionality of which is based on a conventional asynchronous motor. The rotation speed of this single-phase electric motor is continuously controlled by different methods. Exhaust devices operate on the following principle: a fan inside a metal casing passes through filter elements and removes steam, soot and odors during cooking to the outside.
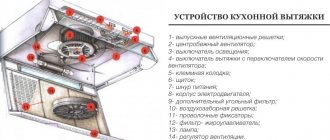
Hood details:
- centrifugal exhaust fan;
- exhaust ventilation grilles;
- switches and switches;
- filters and grease traps;
- air intake grille;
- regulators;
- lighting lamps.
The rotation speed of the hood fan may vary. The exhaust air mass enters the grease filter. If the device operates as a flow type, the air goes outside through a vent or shaft. If the device only filters the air, then it falls on a carbon filter that absorbs odors and is returned back into the room.
Centrifugal fan - the “heart” of the hood
Carbon filters are often installed immediately after the grease trap and secured to metal brackets. They are disposable, they are changed depending on the contamination and intensity of the hood. During cooking, fatty impurities accumulate on metal grease traps made of aluminum, so they are regularly washed and cleaned of grease and dirt. You can wash the hood grate with warm water and baking soda.
The control panel can be push-button, slider or touch. Both mechanical and electronic panels are carried out by one kitchen hood control unit. Exhaust devices are equipped with lighting devices (incandescent, halogen or LED lamps).
Care Tips
As a rule, there are no problems when caring for the outer surface of the exhaust device, moreover, when it is a built-in modification. Exposed components are treated with a sponge with a grease-dissolving agent and then wiped dry. If you do this systematically, and not from time to time, it will take a few minutes to care for the device.
Everything is clear with the outer surface, but the device also needs to take care of the internal components - the filtering devices. They need to be washed and replaced, otherwise the effectiveness of air purification will begin to decline.
Filter elements: cleaning and replacement
Hoods are equipped with two types of filters: grease (grease-absorbing) - protects from fat vapors and various debris, and carbon - absorbs odors. Grease-absorbing filter elements are made of metal or acrylic. Iron filters do not require replacement.
They are taken out, washed and cleaned by hand once a month or washed in the dishwasher every 2 months. The main thing is to correctly select the water temperature in the dishwasher. While temperature does not matter for stainless steel filter elements, aluminum filters become dark at elevated temperatures.
Acrylic filters change according to how intensively the hood is used. Their average service life is 3 months. Note that some modern models of hoods are equipped with sensors that will promptly warn about the need to replace the filter element. Filters that have served their purpose are taken out and thrown away; there is no need to wash and reinstall them, since such an element will no longer fulfill its purpose at the proper level.
Proper cleaning of the hood consists of several stages.
- Stop supplying current to the exhaust device.
- Disconnect the grease filter.
- Wash accessible parts of the device on which grease deposits have accumulated.
- If the device is not built-in, be sure to wash all accessible areas with a special product for stainless steel products. Never use cleaning products containing abrasive components or hard sponges - they will scratch the shell of the device.
- The keys on the control panel are wiped with a soft cloth soaked in detergent.
- Wipe all components until completely dry with a cloth.
- You can connect the device to the electrical network.
Constant and proper care of your kitchen hood makes it possible to obtain the effect for which you purchased it, and at the same time, will help to increase its service life. Expensive household appliances are, as a rule, not purchased for a year, because maintenance largely determines what their appearance will be like after a few years. And the reliable functioning of all components is guaranteed by the manufacturer.
To learn how to repair a kitchen hood yourself, see the following video.
Cleaning with folk remedies
The improvised remedies, also called folk remedies, are not so harmless to the skin of your hands - so you should wear rubber gloves. Protect your eyes from caustic liquids with a pungent odor - vinegar, ammonia. Keep the window open while working. During the chemical reaction, the treated grating can be placed in a plastic bag.
For the grease-absorbing filter, select flat dishes in size so that it is completely immersed in the cleaning composition. For example, a baby plastic bathtub, a flat tray, or a baking sheet for baking in the oven will do.
Ammonia
Dissolve 2 tablespoons of ammonia in 4 liters of warm water and soak the hood parts for an hour. When the surfaces are clean, finish washing by rinsing in clean water.
Soda
You will need a suitable container, hot water and a pack of baking soda.
To clean a steel or aluminum hood filter with soda:
- heat 5 liters of water to a boil and pour in a glass of cleaning product, adding gradually with a spoon;
- place the mesh in boiling water and leave for 10 minutes;
- after soaking, the fat is washed off under running warm water, removing remaining deposits with a brush;
- The mesh is wiped and left until completely dry.
Vinegar
An effective remedy is obtained from a solution of concentrated acetic acid in water in a ratio of 1:7. The surface is treated with a sponge generously moistened with the composition. After 10 minutes, wash off with plenty of warm water.
Citric acid
You can use acid in powder, having previously dissolved it in water, or take a lemon, cut it in half and rub it on the contaminated areas. As it is absorbed, the juice will dissolve the fat. Heavily greasy areas are wiped with lemon juice several times until completely clean.
Laundry soap
The soap is grated and soaked in hot water. When the shavings dissolve, a mesh is placed there. The cooling water is heated, then it will be possible to wash off the fat faster. When the dirt gets wet, all that remains is to rinse, dry and put the mesh in place.
Combined means
To be sure, dirt removers are combined.
The dry method of cleaning with soda and vinegar is faster, without boiling:
- powder is evenly scattered onto a grid laid on a flat surface;
- For convenience, acetic acid 70% is poured into a spray bottle and carefully, without lifting it high, sprinkled over the layer of soda;
- leave to interact for 20–30 minutes;
- washed with plenty of water and dried.
Another good remedy that will allow you to wash a greasy hood with improvised means:
- add half a glass of liquid soap, 2 tbsp. to a large container with 5-6 liters of hot water. dry citric acid and half a glass of baking soda;
- soak the filter, preferably entirely;
- after 3–4 hours, the mesh is washed with a brush, removing any remaining dirt.
Mustard powder
The powder is mixed with water in such a proportion to obtain a semi-liquid slurry. The grate is placed on a tray, rubbed and covered with film to prevent the mixture from drying out. After 15–20 minutes, wash in water using a sponge or brush.
Whiteness
Whiteness copes with dirt, but is somewhat worse than soda. In addition, the smell fills the entire room even after washing with detergents. If you decide to soak the grate with white, wear safety glasses.
Saline solution
Table salt is dissolved in hot water. To obtain the required concentration, 200 g of salt per 5-6 liters will be enough. Softening of old fat occurs actively only at high temperatures, so the container is heated or boiling water is added.
Kitchen hood device
First, before disassembling the hood, you need to learn a little about how it works. This equipment is sold in two types.
- Recirculation type - the principle of operation is that air is drawn out of the kitchen, passes through filters and returns again to the room. Otherwise they are called coal. The structure of such a device is quite simple; they contain carbon filters to purify the air.
- Exhaust (discharge) type - characterized by the fact that it draws exhaust air from the room, but it also draws in heat. The exhaust structure is connected to a ventilation shaft, or they are taken outside, where the polluted air from the room exits. These types of hoods are better than filter hoods. Instead of a filter, they have a grease trap.
In the modern world, hoods can operate in two modes at once
Tags: asynchronous, sconce, type, motor, house, , replacement, bell, like, capacitor, design, , magnet, installation, voltage, nominal, lighting, connection, rule, principle, check, wire, manufacturer, start, , work, size, regulator, repair, socket, row, light, lamp, LED, system, means, term, stabilizer, ten, type, current, filter, shield, electricity, electric motor, effect
How to keep working
- In order for your hood to work as long as possible, you should change and clean the filters in it on time. Modern models are equipped with special sensors (buzzer or light bulb) that indicate the need for replacement;
- To prevent overheating (breakage) of the engine, it is necessary to prevent operation of the device with gas burners operating without utensils;
- In addition, the minimum installation height of the working surface of the hood must be maintained - 70-75 cm above the gas stove, and 65-70 above the hob.
Support the project - share the material with your friends on social networks: