During electrical installation work, electrical wiring is sometimes performed in an open manner. The cable must be protected from thermal and mechanical influence. It is important to ensure aesthetics and create a neat appearance of electrical networks. For these purposes, a corrugated tube is used. In professional language, this material is “corrugation”.
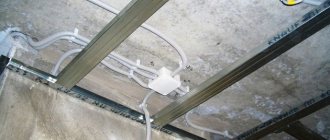
Corrugated wiring on the ceiling Source 5watt.ua
Errors and rules for cable installation
The most common mistakes made by electricians when laying cable networks stretched inside the corrugation are:
- Creating sharp corners.
It is necessary to lay the routes in such a way that the corner transitions are flexible. Sharp corners should not be allowed when turning.
- No special components are used to increase the length.
When you need to make an entire section of wiring longer, you need to use tees, transit boxes, and couplings.
- The corrugation is connected using electrical tape.
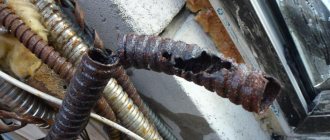
According to the PUE, it is unacceptable to connect 2 corrugated pipes with each other using insulating tape. There are connecting components for this. This applies to turns, corners, and the middle of a long section.
- One corrugation has been laid, into which several lines of power cables are stretched.
This is a very serious mistake made by electricians. According to the PUE, it is correct when each cable power line is pulled into a separate corrugated pipe. It is unacceptable to lay several conductors in a corrugated cable at once.
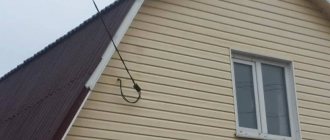
Wiring output Source arte.net.ua
Changeability of wiring
If you think that by laying all the wiring in the corrugation you can easily and simply change it if necessary in the future, then you are again mistaken.
Here we can talk about replacement only for cables on absolutely flat areas. For example, in a straight line from one junction box to another, or a descent from the junction box under the ceiling to the socket box below.
Once you take at least one turn at an angle of 90 degrees on the highway, replacing the wiring will turn into a complete torment. And if there are two turns, then simply forget about such a thing as turnover.
It doesn’t even matter that this will be a minimum distance of 2 to 2.5 meters. A high-quality cable is so rigid that even with a corrugation diameter of 20mm it will be practically impossible to do this.
You may need such force that the cable will pull itself out along with the corrugation from under the layer of plaster. Those who, instead of VVGng, use multi-core flexible wires of the PVS type and say that everything changes and stretches wonderfully, simply violate all current standards and rules.
Under no circumstances should you listen seriously to such advice.
Laying corrugated cable
The finished corrugated pipe is laid along the ceiling using special clips. The diameter of this part is selected taking into account the cross-section of the selected material. This option for attaching a corrugated pipe to the ceiling looks more aesthetically pleasing. For invisible, internal places, special metal brackets are mainly used. These parts are secured using electrical dowels.
To connect 2 corrugated pipes, couplings are used. They are cheap. In the case where in this section an integral cable line that does not have connections is stretched inside the corrugated protection, according to the PUE, those sections where the pipe is attached to the coupling are allowed to be sealed with a sealant. Otherwise, you need to choose other insulation methods that are considered the most reliable. When laying, do not bend the corrugated pipe too much. The acceptable parameter is printed by the manufacturer on the packaging box of the material.
Corrugation in section Source media2.24aul.ru
Why do you need corrugation?
Laying electrical cables and wires in corrugated areas is recommended for various reasons:
- When laid in flammable walls (wooden or frame), behind flammable finishing (lining, PVC boards), when attached to wooden floors - for fire safety reasons. In this case, non-combustible shells are chosen.
- When laying behind finishing materials - behind lining, plasterboard, PVC boards, etc. - for security reasons. To make it more difficult to damage the cable when trying to hang something on the wall. In this case, the most important indicator is the hardness of the shell.
Corrugated pipes for electrical wiring come in different colors. It's for a reason, colors have meaning. - When laying cables in a screed or under the floor, under finishing, corrugation is used for several purposes. Firstly, to protect against compression when pouring concrete. Secondly, to be able to change the cable if it is damaged without destroying the floor. Third, to protect against damage.
- When laying externally, the sheath is needed to protect the cable from atmospheric influences (ultraviolet) and mechanical damage. When laying open through the air, a corrugation with a wide temperature range (to withstand heat and frost) and durability are required. to ultraviolet. If the cable is suspended, reinforcement is also necessary to increase the load-bearing capacity.
- When laying underground, water resistance as well as rigidity are important.
When laying rigid corrugation on turns, it is better to use special couplings
In general, corrugation, even metal, is not the best protection against mechanical destruction. You can only hope that if you feel that the drill has failed, you will be able to stop in time. And in order to definitely not get into the electrical wiring, it is better to have an exact plan for its installation with measurements and reference to the corners. After all, not every wiring detector detects a corrugated cable, even under load. So, before pouring the screed, before finishing, don’t forget to take photographs, sketches and mark distances.
Laying cable lines in a protective corrugation: errors and misconceptions
When performing electrical installation work, regardless of the chosen method, there is a universal requirement regarding:
- soldering process;
- terminal installations;
- crimping wires at joints.
Access should be provided for inspection of contact sections of cable lines. Therefore, when installing a corrugated pipe with a cable, distribution boxes are installed for installing joints.
According to the PUE, it is necessary to separate the main cable line from the backup one. For this purpose, they use different corrugated pipes. This also applies to working and emergency lighting cores. Corrugations with such wires are necessarily separated geographically.
Plastic corrugation does not belong to the category of fireproof products. They can be laid inside a brick or concrete wall (they need to be tapped).
In any case, for example, when passing hidden wiring through wood (if the house is wooden), you need to use fireproof gaskets:
- plastered;
- cement;
- asbestos.
An example of correct wiring Source stroypomochnik.ru
The spacer layer will allow you to separate the corrugation from the wall surface by about 10 mm (less than that is not allowed according to the PUE). If you choose a plastic corrugated pipe for laying a line on a fireproof surface, you must ensure a distance from combustible places of no less than 10 cm.
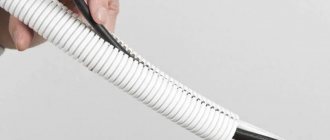
What is a corrugated pipe
Corrugated pipe is a flexible ribbed hose that is used to store live wire products inside. Lightweight cylindrical lengths withstand external loads well without losing their shape. They preserve cables both in open installation and in solid soil, concrete, etc.
Important! Corrugation of electrically conductive pipes is forced by the requirements of SNIP, which determine the required value of their load-bearing capacity. The standards indicate the external and internal diameters, wall thickness, width and height of the corrugated pipe ribs. Standards differ for different materials from which finned pipelines are made.
How to quickly pull a cable into a corrugated pipe?
To work you will need:
- strong, long rope (thread) from any material;
- a piece of fabric or rag;
- vacuum cleaner.
To pull the cable inside the corrugated pipe, take a rope or piece of fabric. Both elements are tied together in such a way that the rag is not squeezed. It is best to tie the fabric to the middle of the corrugated material.
Next, a vacuum cleaner is connected to one end. If the corrugated pipe is very thin, you can make an adapter from scrap materials. Now you can turn on the vacuum cleaner and bring a rag tied to a rope to the other edge. Due to the pressure of the vacuum cleaner, the fabric will enter the pipe. The thread is then unwound to ensure that it follows the rag. This must be done until the rag reaches the vacuum cleaner, passing through the entire corrugation.
At the next stage, the cable is threaded inside the corrugated pipe. To do this, its end is tied to a rope, then stretched along the entire length of the material.
This method is used at home to pull a cable through a corrugated pipe of small diameter.
Watch the process in the video:
Installation technology
We suggest you familiarize yourself with the basic requirements for installing wiring in corrugated pipes, common mistakes and simple ways to stretch cable ties through the corrugation.
Requirements and errors
When laying wiring in a corrugated pipe, ensure that the following conditions are met:
- the length of one section without transit elements (couplings, tees, splitters) should not exceed 25 m, the number of turns - up to four;
- A one-piece corrugated hose cannot be installed at an acute angle;
- avoid close proximity of two or more turns of the route;
- the rotation angle should be more than 90 degrees, the radius should preferably be larger;
- two corrugated pipes should be located at a distance of at least 200 mm from each other;
- do not connect pipes using electrical tape - it is advisable to use connecting accessories, placing them in the middle of the section, turns and corners;
- one corrugation – one cable network;
- power and low-current lines should be separated from each other (standards are prescribed in the PUE).
How to stretch a cable inside a corrugation
To pull the wiring through the corrugation, you need to use a stiff wire. It is much easier to thread through long lines. The cable is then attached to the end of the wire. If you plan to thread a group of wires, then they are combined into a strong bundle, wrapped with a tie or PVC tape along the entire length. The second option is better, since this product has the necessary smoothness to avoid additional obstacles. If the cable is single, then electrical tape is not needed.
When the harness is ready, you will need to connect it to the broach (wire) using one of the following methods:
- Wrap the bundle with wire and crimp with pliers. There should be several similar twists.
- Simply place the wire parallel to the bundle and wrap strong electrical tape tightly. This option can be used as an addition to the first.
- If you are laying a single cable, then make a hole in its insulation at a distance of 40-50 mm from the edge, and thread the wire through it.
Regardless of the method chosen, if a tourniquet is used, the edge should be carefully wrapped with electrical tape, creating a smooth cone.
The last stage is pulling the harness through the corrugation. Ideally, the procedure should be performed together with a friend: one person holds the broach, the other pushes the tourniquet. Without an extra pair of hands, proceed as follows:
- Attach the free edge of the wire to some stationary object.
- Hold the corrugated product with one hand, providing tension, and with the other, push the tourniquet inside. Do not apply too much force, otherwise the broach may come off the harness. If this happens, cut the corrugation in the area to which the cable was threaded, then repeat the procedure with connecting the wire and the bundle. However, it is not necessary to completely remove part of the corrugation - the joints can be connected with electrical tape. If increased protection from moisture or fire is required, then this option is inappropriate.
The main purpose of the corrugation is to protect cables and wires from mechanical damage, exposure to high and low temperatures, moisture, ultraviolet radiation, chemicals and other environmental factors.
No product can guarantee absolute wiring protection, so it is important to learn how to choose the right tubes based on your specific needs.
How to attach the corrugation to the ceiling?
To fasten corrugations with a cross-section from 16 to 25 mm, special clips are used. They come in 2 types:
- Open.
This type of clip looks like curved flat horns. The part holds the corrugated pipe due to its elasticity. On the side, the clips are equipped with couplings that allow you to connect them to each other. This makes installation and further maintenance of the electrical network easier.
Models with latches are used for corrugations with a diameter of more than 40 mm, as well as when installing cables along the ceiling.
- Closed.
This type of clip is similar to a simple clamp. The part presses the corrugated pipe to the surface to which it is attached. The process can be mechanized using a mounting gun. A clip of clips is placed there, then the electrician “shoots” the corrugation to the ceiling.
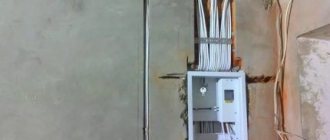
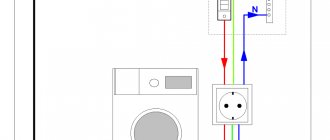
Electrical panel Source verchinskiy.ru
Increased cost of work
Let's figure out whether corrugated installation really leads to a significant increase in the cost of repairs.
For ease of installation of electrical wiring, many use round NYM cable, including VVGng with a round cross-section. At the same time, they tighten it into the corrugation d=16mm.
After which you need to prepare a 20mm*20mm groove. If you have a wall chaser, the width of the groove when installing the disks does not particularly affect labor costs.
Many people initially set the cutting depth to 25mm to make it easier to cut the middle of the furrow. The shallower the cutting depth, the harder the core chips.
Therefore, in order to lay the bare cable in the groove, you will still have to cut a strip approximately 20mm deep. Or work very hard with a hammer drill, which will ultimately lead to no less labor costs.
At the same time, do not forget one important nuance - gating in load-bearing walls in panel houses and hollow-core slabs is prohibited.
And where the cutout is not made in load-bearing walls, firstly, the integrity of the reinforcement should not be compromised, and secondly, the depth of the cutout should not exceed 20mm.
Therefore, when we talk about cutting a groove in a wall, in 90% of cases we mean cutting a groove in the plaster. The problem is that not everyone wants to apply 2.0-2.5 cm of mixture to the walls, just because of the wiring.
However, there is still an increase in cost when working with corrugation, and for many it can be critical. When working with this material you need:
- special fasteners and nails
Using a mounting gun, on average it takes 3 shots per 1 meter of corrugation.
- more junction boxes
If you use boxes with 4 separate inputs, then without corrugation you can place a much larger number of cables there. But when working with corrugation, there are only four!
Therefore, the total number of boxes, although not significant, will increase.
It was already said above that the gating itself does not increase costs so significantly, but if we talk about drilling through holes through the walls, then everything can change significantly.
If you drill one hole d=32mm, you can easily pass 4 bare cable lines through it. But for the same quantity, but already in a corrugation, you will need to drill at least 4 holes.
When working in an apartment with soft partitions, this point is not critical. But if you try this in a private house, or in a panel high-rise building with high-quality concrete walls, your labor costs will increase many times over.
For many electricians working alone, it can take a whole day of work just to punch through holes.
Therefore, yes, in some cases, depending on the working conditions and the specific object, the increase in the cost of laying cables in corrugated cables can be at least 30%. And for some, this is a significant difference in the total cost of repairs.
But can corrugation, on the contrary, help save a lot? Surprisingly yes.
Here is a very original use of it for securing a cable in a groove. Thanks to it, you can completely eliminate the cost of dowel clamps.
In this case, you can even use the remains of corrugated hoses, which are no longer needed anywhere.
Basic rules for installing ceiling wiring
Installation work is carried out on the basis of a pre-developed plan. During its preparation it is necessary:
- determine the location of the local network connection to electricity;
- highlight points of electricity consumption;
- select a location for installing protective equipment.
- draw up a diagram of laying a cable line from the connection point to electricity consumers.
At the preliminary stage, the brand, section of corrugation and cable are selected. For these purposes, there is a special table that makes selection easier.
Which corrugation to choose for wiring
Those who decide to carry out the work of laying cables in corrugation on their own need to know what types of corrugations exist and how to choose them. Since the main function of corrugation is protective, it is necessary to choose the right material: it must be of high quality
It is also important to correctly determine what type of corrugation is needed for a specific job with electrical wiring.
The material must be self-extinguishing, flexible and preferably waterproofing. If the gasket is made on wood, then by all rules the corrugation must be heat-resistant. Installing such a metal hose will have a fairly high cost.
Types of materials:
PVC. Polyvinyl chloride has the property of self-extinguishing, which significantly increases the level of protection. HDPE. Low density polyethylene has good flexibility. PVD. High-density polyethylene is used to lay hidden wiring
It is important that the materials in which the wiring is carried out are not subject to combustion. PP. A plastic type of corrugation is used to tighten the cable into the channels for electrical wires.
The use of polyamide is advisable when reliable waterproofing is required. There is also decorative corrugation on sale, but it should not be laid with electrical wires. The corrugated hose can be single-layer or double-layer. To make tightening the wires into the pipe easier, a special probe is placed in the corrugation.
Violations committed when pulling a cable line along the ceiling surface
To ensure an aesthetic appearance of the ceiling covering when stretching corrugated protection with a cable inside, you need to buy the material, laid in strands, not tightly twisted. When choosing products, the following mistakes are often made:
- Purchased orange or black type of corrugation.
A hazardous material was selected because it supports combustion. It is recommended to use only gray PVC corrugation.
- The corrugation is laid along the combustible base behind the suspended ceiling.
In case of short circuits, corrugated protection for the power line will not save it. It is necessary to install cable wiring in steel materials.
- More than one 90 degree rotation of the corrugation has been made.
Access for maintenance becomes more difficult. We must try to avoid such turns.
Installation of ceiling wiring in a house Source mos-elektrika.ru
Step by step laying
Below are step-by-step instructions for installing electrical wiring under drywall trim.
Step 1. Preparation
Assemble the metal profile, but do not rush to install the plasterboard sheets. Decide where to place the wiring: under the ceiling or along the walls. It all depends on the specific situation. If you have a suspended or suspended ceiling, it is better to hide the wires at the top and then lower them vertically to sockets, switches and other boxes.
If the ceiling in the house is made of concrete or wood, and only the walls are plasterboard, then the wiring should be placed in them, closer to the top. The distance from the ceiling must be at least 10 cm. Remember: when choosing places to install sockets and other equipment. Once you have your diagram on a piece of paper, transfer it to the wall. Calculate materials and proceed with installation.
Step 2. Installation of the box
Place distribution boxes. There should be one of these in every room of the house. Attach the component to the wall or ceiling using self-tapping screws.
Step 3. Laying the wires
Prepare the necessary materials and tools, and then proceed with installation. Secure the clips along the cable route. The distance between the fastening elements must be at least 30–40 cm. It is possible to use plastic clamps, which will speed up the work, but will increase the likelihood of damage to the corrugation due to the sharp ends of the profile.
Before pulling the corrugation through the metal frame, drill holes of a suitable diameter. You can buy a profile with holes already made. A similar method is used to connect the junction box and the points where sockets and switches will be installed. Mark on the drywall where the corresponding component will be, and then sew the sheet to the frame.
Step 4. Switching electrical installation products
All that remains is to install sockets and switches. They are usually called electric points. Using a drill, make holes in the places where they should be located. Install the socket boxes into the drywall. You need to make holes in the bottom to thread the wiring through. Pull out the cable and place the socket box in the groove. When everything is done, check the electrical circuit by supplying power to the apartment or house from the distribution panel.
Which cable option requires corrugated protection?
The choice of corrugation is either determined by existing standards, or is simply selected according to expediency:
- Open installation of electrical wiring indoors.
The method is used for laying material on concrete and brick surfaces. They are considered non-flammable. If the ceiling is wooden, you will need a special non-flammable substrate or use corrugation made of metal.
- Installation of electrical routes with a high probability of causing damage to cable lines.
- When laying cables and then pouring them with concrete, it is recommended to provide additional protection. For this purpose, corrugated material is used.
- If the surface is made of a combustible base, then installing a cable line from VVGNG without corrugated protection is allowed only when choosing an open method.
In this case, the wiring is performed on insulators, using plastic boxes or special plinths.
- If you plan to replace the cable later.
To facilitate the process of replacing the cable line, it is better to use corrugated material one size larger.
What materials?
Corrugation for cables and electrical wires is made of plastic and metal. Different materials are used, with different characteristics. They must be selected based on the tasks they must perform.
- Polypropylene (PPR). The color of this corrugation is usually blue, the material is self-extinguishing and does not support combustion. It is characterized by increased water resistance and can be used for laying cables outdoors or in rooms with high humidity.
- PVC (polyvinyl chloride). The color is gray pipes, self-extinguishing. PVC corrugation is not waterproof and can only be used in dry rooms. Black cable corrugation is most often made of HDPE, but it can also be made of polypropylene (PPR)
- HDPE (low density polyethylene). Color - orange, black, the material is flammable, but resistant to chemical influences and water. Area of application: laying in screeds and grooves in non-combustible walls, open laying on the street.
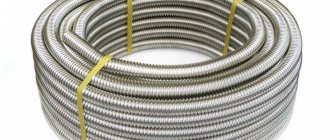
- Metal (stainless or galvanized steel). Non-flammable material, resistant to mechanical and chemical influences. Recommended for electrical wiring in flammable buildings (wooden, frame). Also good for outdoor installations.
If we talk about compliance with fire safety standards when installing gaskets in flammable walls, the ideal option is a metal pipe. It saves you from loads that may arise when the size of the building changes. Rodents cannot cope with it either. This is also the best option from a fire safety point of view: even if short-circuit currents occur and the circuit breaker does not operate, the probability of burning through a pipe with a wall thickness of 2 mm is very small. This means the fire will not start. If laying electrical cables in pipes does not appeal to you at all, then you can use metal cable ducts or corrugated stainless steel or galvanized steel.
The most common violations of the PUE requirements
The most serious mistake made at home during the installation of a power line is when the electrical network is laid without paying attention to the locations of various communication pipelines taking into account the perspective. This applies to the location of cable wiring, interior accessories located on the ceiling.
Other errors:
- laying telephone and television cables inside one corrugation along with a power cable line;
- the electrical wiring project involves calculating the load for each room without taking into account the simultaneous inclusion of electrical appliances;
- electrical wiring is calculated without reserve;
- a cable or corrugation of insufficient cross-section has been selected.
To create a reliable, safe cable line on the ceiling, it is better to avoid such mistakes.
Electrical installation with wiring along the ceiling Source profi220.ru
Mounting method
rule
By securing it in this way, you influence it mechanically in any way. If at first glance nothing seems to happen to it, then over time, this method of fastening can play a cruel joke on you.
Even without using ties, but using special expensive fasteners, you still make the cable sag under its own weight.
Such fasteners negatively affect its insulation. This is not a SIP, which was originally manufactured taking into account sagging under its own weight.
And this, in a few years, will certainly lead to false alarms of the differential protection.
As you can see, all the methods that are presented by installers as simple and fast do not really fit into the definition of “durable installation”.
Electrical wiring on the ceiling: pros and cons
Advantages of electrical wiring on the ceiling:
- Installation is simplified, since a screed has already been made on the ceiling surface of the room, suitable in terms of parameters for corrugated material.
- You can immediately lay the cable line, since there is no need to re-fill the ceiling.
This refers to a situation where the quality of the coating is at an acceptable level.
- The perspective is taken into account, since then suspended or plasterboard ceilings can be made.
Installation of electrical wiring in corrugated open method
External wiring of the corrugation is carried out in such a way that the main line is least susceptible to the negative influences of the atmosphere. On the facades of buildings and structures, they try to lay pipelines under roof overhangs, eaves and various architectural protrusions. If there is a door or window opening along the route, they are bypassed by the upper contour of the pipe. For external wiring, UV-resistant corrugation is used. The same requirements apply to plastic fasteners.
Cracking of corrugation from UV
On a wooden floor
Laying in the structure of wooden floors is complicated by the fact that it is carried out in a fire hazardous environment. Taking into account this feature, cable products whose shells do not propagate fire should be used for installation. The best according to this criterion are cables whose letter part of the brand is supplemented with the symbols “ng” - non-flammable.
The best results are obtained by using metal pipes, which also protect against mechanical damage. A blind metal tray is also acceptable.
The formation of a cable channel system is performed in the following sequence:
- First, pipe laying routes are formed. To pass through the logs, technological holes are made in them, which can be replaced with cuts
- Metal pipes of individual channels are installed according to the design, followed by fastening to the transverse beams. The main means of fastening pipes is perforated tape; self-tapping screws are used for fixation.
- If there is a large gap in the places where the beams pass through, it is sealed with polyurethane foam.
- Individual sections of pipes are connected to each other through junction boxes. An example of such a connection is shown in Figure 8.
- Regardless of the type of metal pipe, they must be grounded to form channels.
- Power cables are pulled into the formed tubular channels.
When cable ducts pass through wooden structures, the use of protective sleeves and short sections of pipes is not mandatory.
When using a system for underground laying of electrical cables, taking into account the high fire hazard of wooden structures, it is necessary to additionally treat them with fire retardant compounds.
An example of installing a junction box with grounding of pipes and foaming of mounting cuts in joists.
Laying cables in the floor has a number of advantages, but due to certain technological difficulties in implementation, it is advisable to use it in the process of new construction of city apartments. For wooden houses, this limitation shifts to the level of major repairs.
In the process of forming the wiring, it is advisable to provide a system of mounting boxes, and the pipes between the individual boxes should have a minimum number of turns. The process of forming electrical wiring using a gasket in the floor is not highly technologically complex; with the use of modern building materials, it can be performed without outside help with initial qualifications and without the use of special tools.
Wire pull: properties of corrugation
The corrugated pipe consists of successive rings of several sizes: wide and dense rings alternate with narrow and thinner ones. Along the pipe there is a comb with rectangular projections. Tight outer rings contribute to the reliability of the pipe if it is subjected to strong lateral loads.
You can choose the wiring yourself or with the help of a professional technician. To work with electrical engineering, pipes are made of polyvinyl chloride, polyethylene or propylene. The main property of corrugation is to protect the wire from ignition.
Corrugation properties:
- Has a low degree of flammability. If the wire catches fire, the corrugation has a self-extinguishing effect.
- The pipe protects the cable from possible mechanical damage.
- The pipe has insulating properties that provide residents with a safe stay in the room.
- With the help of a pipe you can withstand various mechanical influences.
HDPE pipes can withstand exposure temperatures from minus 25 to plus 90 degrees Celsius. To insert the cord into the pipe correctly, you need to select the correct pipe size. How long a pipe will last depends on the quality of the materials, correct wiring installation and careful use.
Attaching the cable channel to the wall
You can fasten the cable channel to the wall using dowel nails (if the walls are concrete or brick) or ordinary screws (if the walls are wooden). This is a more reliable way. The cable channel is mounted to plasterboard partitions or cladding using special butterfly dowels. If the cable passes through turns of partitions or arches, several parallel cuts are made on the walls of the casing in order to then bend it into the desired plane. The covers are also cut in the same way where it is necessary to bend the cable channel at an angle. Using a similar scheme, fastenings for cable channels are installed on walls and ceilings.
If the box is small, dowel nails or screws are screwed into the middle. If the width of the casing back is more than 50 mm, the fasteners must grip it along the edges.
To accurately fit the accessories, the cable channel begins to be laid from the entrance to the room and sequentially leads to all electrical points. After the box is installed, the cable is laid in it. Some enclosures have special partitions to separate the wires. This is especially convenient when information and power cables are placed in one box. The box is mounted, leaving a small gap between the wires. Do not lay the wires so that the box lid does not close. It is better to immediately take a larger cable channel. Having completed laying the cable, put a cover on the box: just insert it into the grooves and press until it clicks.