To some, a distribution box for electrical wiring will seem like a very insignificant element of a household electrical network. And really, what's the use of it? With the help of a switch we control lighting, we use sockets to power electrical appliances and equipment - these elements of the electrical network have a visible result. And the invisible, but very important result is that switches, sockets and lamps are connected to the general electrical network through distribution boxes. It is in them that the wires coming from the power source and going to the switching devices are connected.
History of appearance
As soon as the first node was installed, in which several wires of an extensive electrical network were connected, the need to protect it immediately arose. First of all, from accidental human touches to a bare wire, which could result in electric shock. Protection from external influences - mechanical, dust, dirt, water - was also required.
Even during the first steps of electrification, it was invented to protect the place where wires were twisted with a box. At first, improvised means were used for this purpose, for example, cans from canned food. Holes were made in them into which wires were inserted and twisted together. The most important thing was to carefully cut out the holes, make their edges smooth and not jagged, so that the insulation of the wires would not be damaged.
However, very soon, electrical evolution led to the mass production of the necessary factory distribution boxes by manufacturers. Although even now, almost a century later, somewhere there will be a craftsman who will connect wires in a tin can in a garage or shed.
Well, if you are building a house or doing major renovations in an apartment, be sure to start with electrical installation work. First of all, start installing distribution boxes; do not use any cans or improvised means, even in utility rooms. Go to the electrical goods market, boxes are sold there in abundance - all sizes, configurations and degrees of protection.
Why are they called differently?
The electrical connection box has received several names at once - distribution, junction, branch, switch.
It is like an electrical distribution point, which receives voltage from a power source, and then disperses along several electrical branches - to sockets, switches, and lighting fixtures. Because the voltage in the box is distributed in different directions, it is called distribution. Since several electrical branches extend from the box, a synonym has appeared - branch.
Another name comes from the way the wires are connected inside the box. For a long time, soldering was considered the most reliable method. At the junctions, the wires were twisted and then soldered, due to which electricians began to call the boxes unsoldered.
In an interesting way, another synonym arose - exclusion box. The word “disconnection” can only be heard among professional electricians, and they came up with it, as if combining two concepts - distribution and connection. That is, they distributed in the box which wire should go where, and then connected them according to the diagram.
Now there are so many modern connection options - all kinds of terminal blocks, welding, insulating connecting clamps, sleeve crimping, terminal blocks, self-clamping terminals. However, boxes are still often referred to as breakout boxes.
We explained all this to you so that when you go to choose materials in electrical goods stores and see different names in different places, know that they all mean the same junction box.
Is it always needed?
A completely logical question: is it possible to do without a junction box? Purely theoretically, yes.
Now imagine that from the input electrical panel, which is usually located at the entrance to a house or apartment, you will need to extend a separate line to each switch and socket. How much wire will you need then? And the grooves will have to be made wide and deep so that several wires can be laid in them. So from a purely economic point of view, installing distribution boxes is a rational and expedient solution.
Someone might object and say that it is much safer to lay a solid line from the electrical panel to the switch or outlet, and there will only be an extra connecting node in the box. There is only one answer to this - a correctly and competently executed connection of wires does not pose any danger.
Everyone can have their own opinion on this matter, however, today the option using distribution boxes is the most preferable.
Conclusions and useful video on the topic
Visual instructions for installing a junction box:
It is not possible to cover all existing design variations of distribution boxes in one review. But the design principle and installation features for all existing products are almost the same.
Therefore, the instructions given can be considered universal for installing many models of junction boxes.
Those interested in the selection and installation of junction boxes are encouraged to leave comments, ask questions and participate in discussions. The feedback form is located in the lower block.
Kinds
Boxes for connecting electrical wires come in different types and are classified according to many parameters.
By installation method
First of all, they are divided depending on the installation method:
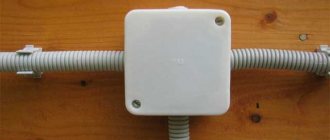
- A distribution box for open electrical wiring (otherwise known as “outdoor installation”) is mounted on wall surfaces. To install it, no preliminary preparation of the base is required. It is attached directly to the wall surface using various fasteners.
- The distribution box for hidden wiring (it is called “internal installation”) is mounted in a special recess in the wall, which is drilled during installation work. These junction boxes, in turn, differ depending on the material of the wall in which they will be mounted. If it is in a concrete or brick wall, then you need to use a special crown to make a recess to fit the dimensions of the box. Simply cut a corresponding hole in drywall or other sheet materials.
By material
Boxes vary depending on the material from which they are made. First of all, these must be materials that would provide the connected wires with maximum protection for the entire service life. In this regard, electrical wiring boxes are made of high quality plastic and metals, which are also coated with a protective layer of anti-corrosion paint or primer.
For the manufacture of metal boxes, tinned steel sheets or aluminum alloys, which are not subject to corrosion, are used. If a fire occurs, the metal case will serve as protection for the contents of the box for some time, during which time it will at least be possible to de-energize the electrical network. Metal boxes are most often used in general purpose buildings (garages, utility rooms, sheds).
A plastic junction box will protect electrical connections no less effectively. For their manufacture, polyamide, polypropylene or cast fluoroplastic are used; these materials are not subject to decomposition by active substances. These plastic boxes provide excellent insulation against electric shock. In addition to good insulating properties, they also have sufficient mechanical strength. A plastic junction box is resistant to aggressive chemical liquids and can be kept in a humid environment much longer than a metal one. If there is a danger of open fire, then plastic does not burn, but melts; in this, of course, it is inferior to metal.
By other parameters
Distribution boxes vary in size and the following criteria play a major role here:
- their purpose;
- number of inputs;
- protection class.
At a minimum, the box can have two inputs, that is, two wires will be connected in it. The maximum number of inputs in one distribution box is 16. Accordingly, the more inputs, the larger the box in size and depth.
Boxes vary in shape and can be round, square or rectangular. For outdoor installation, it makes no difference at all what shape you use the box. But for indoor installation it is better to take a round one, because if you have a concrete wall, then making a hole in it is much easier than drilling a square niche.
All of the above criteria add up to the price of the junction box. The price is also affected by the degree of protection of this element:
- IP 20, IP 30 – for use only in dry rooms, there is no protection from humidity;
- IP 44 - for use outdoors and in rooms with high levels of humidity; when installing outdoors, you must choose a place under a canopy or canopy, and also avoid direct exposure to dust and water jets;
- IP 55 - for use in places exposed to precipitation, that is, boxes with this degree of protection can be installed outdoors in any conditions, they are completely protected from dust and water jets;
- IP 67 – for use outdoors in any weather conditions, as well as on the ground and in the ground;
- IP 68 - boxes with this degree of protection can be used immersed in water; as a rule, the immersion depth is additionally indicated for each product on the packaging or case.
For household electrical networks, boxes with a degree of protection of IP 55 are most often used.
Wire connection methods
The PUE specifies five main methods for switching two wires:
- twist;
- welding;
- terminal blocks;
- soldering;
- crimping.
Twist
The fastest, simplest, but extremely unreliable switching method. To insulate the wires, use electrical tape, plastic caps or heat shrink tubing.
Twist with mounting caps
The connection made using special mounting caps will be much better and more stable. The products consist of two parts - an outer plastic, non-flammable, and an inner metal, conical shape with threads. The latter allows you to literally screw a cap onto the end of the wire, providing a large contact area and excellent electrical parameters. This method allows you to connect two or more wires without soldering.
To perform the operation, remove up to 20 mm of insulation and twist the wires together. Place a cap on the twist and twist several times. When choosing a cap, be guided by the number of wires to be twisted and their cross-section. This option saves space, allowing you to place the cable more compactly.
Soldering
A standard method of connecting wires using tin and solder. It is characterized by high reliability and durability, but takes much more time.
Welding wires
The first difficulty of the method is that an inverter-type welding machine is required. This option is considered even more reliable and of high quality, allowing you to turn two cores into one. It should be used only in extreme cases: when grounding a private house with a powerful load, connecting pumps or uninterruptible power supplies for operating gas boilers.
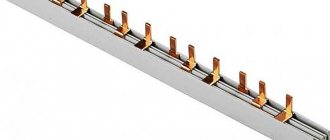
Terminal blocks
In accordance with the recommendations in the PUE, when connecting two wires made of different materials, you need to use special screw or spring type clamps. A simple method that requires a screwdriver. Be careful not to overtighten the clamp bolts.
Crimping
This method involves the use of press jaws and sleeves. The latter are selected depending on the cores being connected - aluminum sleeves are used for aluminum, copper sleeves are used for copper, etc. Please note that using pliers you will not be able to ensure a reliable and high-quality connection.
Installation rules
Before installing the junction box, read the requirements specified in the main regulatory document for electricians, PUE, as well as useful tips for installing junction boxes:
- The box should be installed at a distance of 10-30 cm below the ceiling level.
- The distribution box must always be accessible. There are cases when it was installed at the required distance from the ceiling, but then during new repairs and installation of stretch or suspended ceilings, the box turned out to be out of reach (that is, the ceiling level dropped). There is an option to leave a small hatch in the new ceiling for easy access to the box. But, most likely, it will not have a very attractive and aesthetic appearance. It is best to move it to an accessible place in advance before making new ceilings.
- With a hidden version of the electrical wiring, a recess is made in the wall for each distribution box according to its size and shape (round or square). The depth of the niche is made such that the box does not stick out from the wall, and the lid, when closed, is flush with the wall surface.
- External models of boxes are mounted on prepared, decorated walls.
- If a high-quality repair has been made to the room, then you would not want to spoil its appearance with an unsightly lid covering the junction box. In this case, either decorate the lid to match your interior design (stick wallpaper or paint it to match), or choose a box with a decorative lid in advance.
- If you covered the box with wallpaper, be sure to remember its location so that, if necessary, cut off the wallpaper in that place and gain access to the wire connections. It is best to keep an electrician's home journal, in which all the points of the boxes and the routes of the wires in the grooves will be drawn. This is also very convenient if you need to drill into a wall for a painting or photo frame. Knowing the schematic layout of the wiring, you will definitely not stumble upon it with an electric drill.
- You need to look into the distribution box not only when smoke is already pouring out of it. It is necessary to periodically inspect the connections for heating, as well as tighten the contacts.
Basic wiring diagrams
After studying and choosing a method for connecting wires in a junction box, read the information on connecting specific conductors.
How to connect sockets
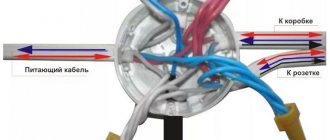
In most cases, sockets are connected in groups, for which a separate current-carrying line is used. Three cables with two or three conductors go inside the box. Brown usually indicates “phase”, blue - “zero”, yellow-green - “grounding”. There are alternatives to these colors with the following standard - red, blue and black respectively.
The wires need to be grouped by color, folded, pulled and cut to obtain equal lengths. Be sure to do this with a small margin of up to 10 cm to leave room for repeated distribution and switching. Next, perform switching using the selected method. If two wires are connected (without grounding), then the circuit remains the same, only simplified.
Connecting a single-key switch
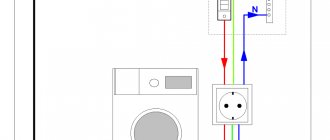
With switching the switch, things are more complicated. There will be three groups of wires with a different connection. One wire supplies voltage from a nearby box or electrical input panel, the other comes from the chandelier, and the third from the switch.
The phase wire must be fed to the switch connected to the chandelier. Make sure that voltage will only flow to the lighting fixture when the switch is in the closed position. The neutral and grounding wires of the chandelier are connected directly to the panel.
Connecting a two-gang switch
A cable consisting of three wires (without a ground wire, which is connected directly to the box) is laid to a switch with two keys. One wire goes to the common contact of the switch, the second to the first, and the third to the second key. Remember the color of the conductor connected to the common contact.
The phase wire must be connected to a common contact; neutral wires from the input panel and two lighting fixtures are connected directly. The phase wires from the lamps should be connected to the conductors on separate switch keys.
Finally, I would like to remind you to comply with basic electrical and fire safety rules. Never directly connect two conductors made of different metals, such as aluminum and copper. If such switching cannot be avoided, then use terminal boxes.
Make sure that the phase, neutral and ground wires are connected correctly. If you confuse “phase” and “ground”, you can cause a short circuit. Following the proverb “measure twice, cut once,” before hiding a built-in distribution box under decorative elements, make sure that all consumers connected through it are in working order.
Installation
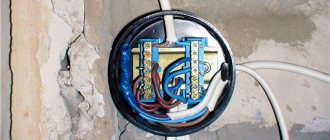
To install the box in the wall, you first need to prepare a hole. You will need a special tool, preferably a hammer drill with a special attachment called a crown. What is she? A ring with a pobedite or diamond cutting edge. In the center there is a drill designed for concrete; it centers the crown, and it then cuts out a round segment from the wall. Drilling is done to the required depth, then the cut segment is removed from the wall using a chisel and hammer (you can use a special spatula that is installed on a hammer drill). In a similar way, a deep niche is made for each installed element of the electrical network (sockets, switches).
Then from the hole it is necessary to punch grooves in which the wires or cables are laid. Their ends must be inserted into the box (it has several special holes for this) and left protruding 10-15 cm for installation of the connection.
Then the boxes are smeared into the niche using a solution of alabaster or building plaster. All that remains is to make all the necessary wiring connections and close the installed element with a lid. The wires are connected by welding, twisting and subsequent soldering, crimping with sleeves or terminal blocks.
Now you know almost everything about junction boxes. Always start your electrical repairs with them. Purchasing these electrical network elements is not a problem now; the main thing is to decide exactly which ones you need?