When renovating a room or building a new home, preference is increasingly given to suspended ceilings. In addition to the aesthetic component, it becomes possible to organize electrical and signal wiring on a load-bearing ceiling, without gating.
Regardless of whether the wiring is organized under a suspended ceiling, panel, or plasterboard, fire safety measures and the requirements of the Electrical Installation Rules must be observed. The fact that the electrical wiring on the ceiling is not visible does not give reason to perform the work carelessly.
Important! Unlike one mounted in the wall, the cable under the ceiling is open to air access. This means that if there is a fire, the fire will spread along its entire length in a short time.
The greatest danger is the fire of electrical wiring under a suspended ceiling or under wooden floors. You will not see the moment the fire starts, and its area in a matter of seconds will be equal to the size of the ceiling.
Basic requirements for organizing wiring in the inter-ceiling space
- The laying of any cable behind a suspended ceiling is organized using fixing devices.
In wooden structures, wiring is organized on hangers, without touching the surface.
Electrical installation rules generally require cable laying in wooden houses using steel pipes.
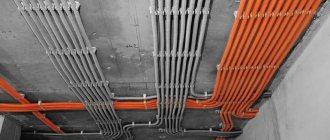
However, in practice, corrugation made from a material that does not support combustion is usually used.
- It is advisable to lay the wire in a corrugated area. But if you use high-quality double-insulated cables (each conductor coated + outer sheath), installation of electrical wiring on the ceiling can be organized without additional “hoses”. Again, it needs to be secured and not just sitting on the drywall.
Mounting clips and clamps are used for fixation. There is a large selection of such devices on sale; it makes no sense to make fasteners yourself.
Important! Fastening wiring to the ceiling using metal fittings is unacceptable; only dielectric materials are used.
- The geometry of the installation does not matter; the wiring under the suspended ceiling can be routed even diagonally.
The ceiling suspension points should be taken into account: for this, before laying the cable, it is necessary to mark the installation locations of suspended structures. The cable is laid at a distance of no closer than 10 cm from the fastener.
- Another point that is not mandatory from the point of view of the Electrical Installation Rules, but will help prevent the formation of various interference in signal wires (television, Internet, telephone). All cable crossings are made at right angles. If possible, it is necessary to create slack at the intersection points so that there is no direct contact between the cables.
If the power and signal cables are laid in parallel, the distance between them should be at least 30–40 cm. In this case, ferrite clamps are installed at the ends of the signal cable - noise absorbers.
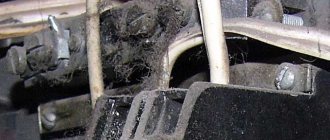
- Particular attention should be paid to junction boxes. Ceiling wiring (including boxes) will not be accessible for maintenance. If the cable connections are not made firmly, you have a potential source of heating and burning of the contacts. To restore functionality, you will have to dismantle the ceiling.
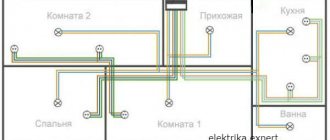
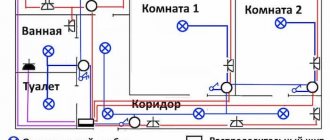
Next, we will consider several typical ceiling wiring diagrams for electrical cables.
Video on the topic
So, you decided to install suspended ceilings and the question arose about laying the electrical wiring. For this, there are the following standards prescribed in SP 31-110-2003 (clause 14.15) and in the PUE (clause 7.1.38) . Their full description is given below. I would also like to draw your attention to the unfamiliar term “impenetrable suspended ceiling”. Briefly it translates like this. All ceilings in residential and public buildings, from the point of view of laying cables, are impenetrable, including tiled ones. But walk-through ceilings should include suspended ceilings of industrial enterprises and special structures, above which there is a space equipped with special bridges, decks, and platforms for servicing cable structures.
As a result. Two options are optimal:
1. Laying the cable in a corrugated cable (for example, VVG cable);
2. Laying cable with index ng-LS without corrugation (for example VVGng-ls)
14.15 Electrical wiring in cavities above non-passable suspended ceilings and inside prefabricated partitions is considered hidden and should be carried out:
- behind suspended ceilings and in the voids of partitions made of non-combustible materials NG and flammability group G1, electrical wiring should be carried out with wires and/or cables in non-metallic pipes and non-metallic boxes that meet fire safety requirements, as well as cables with the index ng-LS (flame retardant , with low smoke and gas emissions);
— behind suspended ceilings and in the voids of partitions made using materials of flammability group G2, electrical wiring should be carried out with wires and/or cables in metal pipes and metal boxes with a degree of protection not lower than IP4X;
— behind suspended ceilings and in the voids of partitions made using materials of flammability group G3, electrical wiring should be carried out with cables in metal pipes and metal boxes with a degree of protection not lower than IP4X;
- behind suspended ceilings and in the voids of partitions made using materials of flammability group G4, electrical wiring should be carried out with wires and/or cables in metal pipes with localization ability, as well as in metal blind boxes with localization ability;
— electrical wiring must be replaceable.
Localization ability is the ability of a steel pipe to withstand a short circuit in the electrical wiring laid in it without burning through its walls - Table 14.1.
Table 14.1 - Wall thickness of a steel pipe, ensuring its localization ability
Stretch ceiling structures can be one-piece, continuous, that is, without lighting, or with an individual lighting system, including a chandelier, lamps distributed over a PVC sheet, or LED strips. In the second case, the lighting fixtures are connected to the network in such a way that the power cables do not visually harm the aesthetics of the finish. Wiring under a suspended ceiling is one way to power the lighting system secretly.
p, blockquote 2,0,0,0,0 —>
Installation of the lighting system begins after the preparation of the ceiling surface for the installation of the PVC shell is completed. The technical execution of this type of work is not difficult, but installation of electrical wiring, like any other type of electrical work, is a responsible operation, errors in the performance of which are fraught with serious consequences.
p, blockquote 3,0,0,0,0 —>
p, blockquote 4,0,0,0,0 —>
Residential electrical repair option
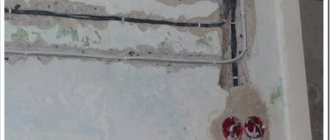
A typical problem when organizing electrical wiring repairs is replacing old aluminum lines with copper ones. Repairs are not always carried out in all rooms at the same time; it makes sense to change the wiring in the apartment in stages. Ceiling wiring provides this opportunity.
As a rule, main power lines in typical apartments run at a distance of 20–30 cm from the ceiling and are located horizontally. Let's say you are installing a suspended ceiling, but wall repairs are not included in your immediate plans. You can replace the main (supply) cables in the apartment along the ceiling. In this case, it will be enough to carefully groove the walls (from the distribution box upwards) to the level of the suspended ceiling. Repairing 10–15 cm² will not be too expensive, just glue a piece of wallpaper to this place.
Let the old line remain in the wall; we simply disconnect it in the junction boxes. And we connect the new ceiling copper cable to aluminum wires using contact blocks (to prevent electrochemical corrosion). When you get to the point of renovating this room, all that remains is to replace the consumer lines (outlets) with copper ones, and all the wiring in the apartment will comply with PUE standards.
This is a forced decision in the case when repairs to the ceiling and walls are carried out over time. If repairs are carried out in the entire room at once, distribution boxes are installed under the false ceiling.
Of course, when laying main electrical wiring along the ceiling, you need to take into account the future load: you may decide to place new connection points in the room. You can install an additional junction box, run the power cable there, and reserve it.
Another modernization option (possible if you arrange suspended ceilings in all rooms and corridors) is drilling through connecting channels between rooms.
In this case, the main cable is introduced from a room with a finished suspended ceiling (of course, from a distribution box) into the room where it is planned to install a false ceiling in the future. The ends of the cable are insulated with caps, leaving a reserve for wiring into the box. Perhaps this temporary solution is not very aesthetically pleasing, but taking into account future repairs, this method is acceptable. But when organizing a suspended ceiling, you will have a ready-made input for the electrical equipment of the room.
Features of electrical installation under a stretched PVC sheet
The wiring mounted under the vinyl ceiling lining is hidden from view, which is an undoubted advantage in terms of decorativeness. However, this factor also has a downside - the electrical wiring under the suspended ceiling after installation of the canvas becomes inaccessible for correction or routine repairs. In addition, there will be a PVC sheath in close proximity to the wires, the physical and artistic characteristics of which should not suffer from this. Therefore, the laying and connection of cables must be done efficiently, taking into account a number of rules and nuances:
- the suspended ceiling lighting system must be connected to a separate circuit breaker in the distribution board;
- for fire safety purposes, electrical wiring on the ceiling should be placed in protective covers or sleeves, which will protect it from possible flooding from above, and the vinyl film of the stretch ceiling from heating from the inside by hot wires;
- It is advisable to place distribution boxes of the lighting system in accessible places, not under the canvas;
- the pitch of the fastening clamps should prevent sagging of the wiring and its contact with the PVC sheath;
- the number of wire connections must be minimized, and the use of cables with dissimilar conductor materials must be eliminated;
- twisted wires must be replaced with soldered joints or terminal connections;
- The ceiling mounting baguette is not suitable for suspended ceilings with a lighting system, since the distance from the canvas to the ceiling surface when using it is minimal - up to 1 cm.
h2 3,0,0,0,0 —>
Organization of lighting (modernization of ceiling wiring)
Installing suspended ceilings allows you to organize room lighting in a new way. You can install spotlights instead of a chandelier, saving space in height. In this case, the supply cables must have vertical branches opposite the installation locations of the light points.
If you plan to drill holes in drywall, the wires should be temporarily lifted and then removed from the resulting holes for the light spots.
First, a plan for the placement of light sources is drawn, then their projection is marked on the load-bearing ceiling. When marking, novice craftsmen often turn the plan over to the ceiling (180°). The result is a mirror marking. Don't forget about it! The plan must lie on the floor (on the table), and the markings on the ceiling are transferred without a virtual spread.
Power cables (220 volts) must be attached to the main ceiling; they should not sag to the drywall. But the placement of low-voltage power supplies (the so-called drivers) is allowed directly on the suspended ceiling. For modern LED lamps this is a normal solution.
Installation of wiring for a suspended chandelier under a suspended ceiling will require the installation of a rigid mount. Hanging on a hook in this case is impossible - even slight vibrations of the lamp will deform the stretch ceiling.
A rigid plane (for example, moisture-resistant plywood) is attached to the load-bearing surface. It provides a hole for electrical wiring.
Before installing the stretch ceiling, the wire is fixed above the hole so that it can be easily brought out. The suspended ceiling is stretched, the location of the hole is measured, and a neat hole is made. The wire is brought out and the chandelier is screwed on.
Tip: Even if you install a light source with one power button, it makes sense to run a triple phase cable from the chandelier to the switch box. When you decide to install a three-key player with a multi-track lamp, you won’t have to redo the wiring - the “extra” wires will come in handy.
In general, when organizing wiring above a suspended ceiling, it always makes sense to leave several backup lines. Of course, this is only relevant in cases where there is access to the inter-ceiling space. For example, one edge of a suspended ceiling ends not at a vertical wall, but in a mezzanine niche.
By the way, quite often several mezzanines are placed in the corridors. By organizing access to the inter-ceiling space from both sides, you will provide unlimited possibilities for upgrading the wiring. Of course, we are not talking about stretch ceilings - only plasterboard or ceiling panels.
True, you will have to deviate somewhat from the rules: new wiring (necessarily corrugated) will be laid on a false ceiling.
Requirements for installing electrical wiring under a suspended ceiling
Any type of electrical installation work requires professional knowledge and skills. Experimentation, not supported by professionalism, is unacceptable when installing electrical equipment.
p, blockquote 6,0,0,0,0 —>
The work on laying wiring over a suspended ceiling begins with the design of the lighting of the PVC sheet, the development of a sketch of the layout of lamps (chandeliers, LED strips) on the surface of the decorative shell. Then, based on the design of the stretch ceiling and the purpose of the room, lighting fixtures are selected that correspond to the artistic design of the canvas and power requirements. The lighting system may consist of one or more types of devices.
p, blockquote 7,0,0,0,0 —>
p, blockquote 8,0,0,0,0 —>
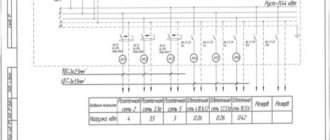
Knowing the number of lamps and the power consumed by each of them, the calculation of the total load on the wiring to determine the required cross-sectional area of the cables is performed by summing the powers.
p, blockquote 9,0,0,0,0 —>
On a sheet of paper, draw up a diagram of the location and connection of lamps, installation of switches and junction boxes.
p, blockquote 10,0,0,0,0 —>
Important! If the lighting system includes LED lighting fixtures, then it must be equipped with step-down transformers.
Then, depending on the material of the base, the method of attaching lamps and wiring to it is chosen.
p, blockquote 12,0,0,0,0 —>
When doing all of the above, you should be guided by the requirements for electrical wiring, including that installed under a suspended ceiling:
- safety;
- reliability;
- maximum availability for repairs.
p, blockquote 13,0,0,0,0 —>
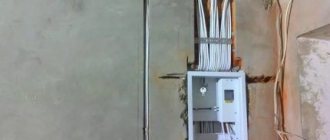
Organization of distribution boxes when laying wiring above a suspended ceiling
As mentioned earlier, when installing a solid suspended ceiling, access to the boxes is impossible. One solution is to install boxes below the ceiling. But then the entire effect of hidden wiring is lost.
If you foresee the need for periodic intervention in the box, you can install an inspection hatch in an inconspicuous place (for example, above a tall cabinet).
There are so-called “invisible hatches” that do not spoil the appearance too much.
Then it makes sense to bring the key lines into one junction box and place it above the hatch. This will complicate installation somewhat, but will provide easy access if necessary.
And yet, the most optimal way to organize distribution nodes (at least on main lines) is to move the boxes beyond the plane of the suspended ceiling. Therefore, nodal points are made in the corridor (hallway), where mezzanines can always be arranged. All boxes will be accessible, and at the same time, hidden from view.
Installation with already installed plasterboard sheets
There are times when the walls are already covered with plasterboard, but you need to add several sockets or a switch. There is no desire to dismantle the material. But what to do?
- Take a heavy nut and thread a thread through it;
- Make a round hole in the place where the socket will be;
- Lower the thread from the ceiling surface above the new groove made;
- Lower the nut, which serves as a weight, to the level of the hole;
- Secure the cable at the end of the thread using insulating tape;
- Pull the thread until the wire with electrical tape appears outside.
But in order not to waste time on this process, it is better to immediately calculate the required number of points for the electrical elements in order to make the holes in advance.
What should the cable, consumables and other materials be like?
For installation on the ceiling, cables are used that ensure correct installation, in accordance with GOST 31565-2012, section 5:
- VVGng(A)-LS is a low-flammable cable with a PVC base, fire safety rating category A and low smoke emission LS (low smoke).
- PPGng(A)-HF is a cable with a polyethylene base (PE) and characteristics similar to VVGng (A)-L.
- NYM is a German analogue of the previous cables, only in a round gray sheath.
VVGng-LS
PPGng(A)-HF
NYM
Consumables include a 6 mm mounting dowel, wood screws and metal screws, clips for corrugations, a metal or plastic bracket, a platform with a groove for a clamp, a flexible herringbone dowel for flat and round cables, a one- and two-sided clamping bar, clamp with dowel.
The importance of applying standards
To avoid danger when installing electrical wiring, you need to correctly calculate the cross-sectional area of the wires, because the resistance depends on it. The greater the resistance, the more the wires will heat up. An important role is played by the correct selection of cable materials, connection of wires, choice of installation location, and insulating materials. It is necessary to correctly calculate the load and select protective devices, do not forget about grounding.
An error can lead to a short circuit, and as a result, a fire occurs. To prevent this from happening, you need to use rules and regulations. If the building was erected without complying with them, the insurance company will not pay insurance in the event of an accident. Material losses can be quite significant, not counting human lives, the loss of which is irreparable.