You have to deal with replacing a switch or connecting an outlet quite often in everyday life, so everyone should have at least minimal skills in servicing the home electrical system.
We will try to figure out how to install electrical wiring with our own hands, focusing on the PUE standards and observing safety precautions. Also in this article we will look at the features of drawing up a project, the rules for introducing electricity into the house and the subtleties of reliable connection of wires.
What is required for home wiring?
First of all, you should understand the structure of the electrical network. It consists of electrical points connected to each other and to the power line by various kinds of cables and wires, protective devices and circuit breakers, and a grounding loop.
Do not confuse wires and cables. The first are conductors for internal wiring, which can be single- or multi-core, the second are made up of several wires united by a common protective sheath.
When installing electrical wiring yourself, you need a huge amount of knowledge and skills: from calculating the cross-section of the wire to the skills of twisting wires and installing wiring boxes
Cables can be installed in the ground, under water, in concrete structures; They are also used to install a home electrical network if connecting powerful devices or special protection is required.
The color of the wires is not random, it is determined by the PUE standards. Not everyone follows the recommendations for correct connection, but as a result, it greatly facilitates future repair work.
Wire strands are made of metals that conduct electricity well: copper and aluminum.
Copper is considered a more valuable material for a number of reasons:
- has a high current density;
- is characterized by wear resistance and fracture toughness;
- has less resistance to oxidation;
- does not compress like aluminum, so does not form gaps in joints.
For internal fixed wiring, it is recommended to use single-core copper wires, which are stronger and more reliable than multi-core analogues.
Twisting copper wire with aluminum is an unforgivable mistake. These materials have different characteristics, so contact between them will never be strong and safe. If necessary, you should use adapters - steel terminals
Types of cables and wires for electrical installation work:
- VVG (from 1.5 mm² to 10 mm²) and its analogue NYM are both multifunctional;
- PVA – for connecting lamps;
- PV1 – for electrical panels;
- PV3 (6 mm²) – for installation of SUP.
Varieties of VVG may also be useful: VVG-P (flat), VVGng(A) , VVGng(A)-LS , etc.
In addition to selecting wires or cables, it is important to understand grounding systems that ensure the safe use of electrical appliances. In a private house, installation of a grounding loop is required; in city apartments, the bathtub and household appliances are usually grounded.
There are several strict rules: for example, you cannot connect grounding wires to metal communications or carry out independent work in the electrical panel.
It is best to entrust the installation of RCDs and circuit breakers, as well as any installation work in the electrical panel, to qualified electricians with permits. They will be able to correctly determine the load and select a circuit breaker.
Types of electrical wiring
Before proceeding directly to the installation process, we should decide on the type of wiring that we will install in each room. There are two types: open and hidden wiring. Each of these types has its own advantages and disadvantages.
Any of them can be used in any room, only the price and labor costs required to complete the work differ. Therefore, let's take a closer look at the installation standards for each of these types.
Open wiring type
The open type of wiring involves installing conductors along the surface of walls, ceilings or floors. In this case, wires can be laid both on the surface and inside special protective elements, such as ducts or pipes. In some cases, they require lining special materials between the wire and the wall. But let's talk about everything in order.
Open wiring type
- To do this, first of all, let's decide on the surfaces on which installation will be carried out. These can be combustible, non-combustible and non-combustible surfaces. Regular wood can be classified as combustible. Fire-resistant wood is wood that has special fire-retardant impregnations. Fireproof surfaces include concrete, brick and other materials with similar properties.
Open wiring in special boxes
- Wires are also divided into combustible, non-combustible and non-combustible. You can determine this parameter by the wire marking.
- Another parameter that affects the installation method is the characteristics of the room itself. After all, you must agree that you cannot lay wires in a steam room or shower, just like in an ordinary room. Therefore, there are also such parameters as wet, damp, dusty, outdoor and dry rooms.
- As a result, it turns out that the laying method depends on what kind of wire and on what surface it is laid. In our article we will consider only the most common options. You can see how the house wiring should be done in each individual case in the table. 2.1.2 and 2.1.3 PUE.
Open wiring in a room made of fireproof materials
- If we have an ordinary apartment with walls made of concrete or brick, then there are several options for open wiring. Unprotected wires can be laid on insulators, rollers or strings. Can be laid in combustible boxes and trays with opening lids. Can be mounted in special shells made of fire-resistant or combustible materials directly on the surface of the walls of the ceiling or floor. In this case, we are usually talking about the use of plastic corrugation.
Open wiring in rooms made of combustible materials
- If wiring is installed for a private house made of wood, then everything is a little more complicated. In this case, if you use rollers, insulators or strings, then a fireproof material must be placed between the wire and the wall.
- If a box or pipe is used, it must be made of fireproof material. Usually it is metal. If this is not the case, then you will also need a lining of fireproof materials.
Note! Either tin or asbestos sheet is usually used as a lining. It must be laid in such a way that the edges protrude at least 1 cm from the edge of the wire.
Hidden wiring type
Hidden wiring is a conductor laid inside construction channels, or under a layer of plaster in special grooves - grooves. From an aesthetic point of view, this method seems more attractive, but from a financial point of view, this is not always the case.
Hidden wiring
- As in the case of open wiring, the tables become decisive when making a decision. 2.1.2 and 2.1.3 PUE. Therefore, the factors influencing the choice of wiring remain the same.
- Let's look at a few options. To begin with, as in the first case, let's take a brick or concrete wall. As the instructions say, we can even lay an unprotected wire if it is solidly hidden under a layer of plaster. To increase the maintainability of wiring, you can use installation in combustible pipes - corrugated pipes.
Hidden wiring in a room made of fireproof materials
Note! In damp and damp rooms, it is prohibited to use steel pipes, corrugations or boxes for installation. The same applies to cable products with a metal sheath.
- But if it is necessary to carry out installation in combustible or difficult-to-burn surfaces, then everything is much more complicated. The best option in this case is to use a fireproof sheath, in which the wire can be mounted directly into the wall, ceiling or floor.
Hidden wiring in rooms made of combustible materials
- But if the installation is carried out using combustible or difficult-to-burn materials, then in this case a lining of non-combustible materials is necessary. The shells themselves must be covered with a layer of plaster or other fireproof material on all sides.
Note! The thickness of the plaster layer in this case should be at least 10 mm. And the layer of fireproof material itself must be uniform over the entire surface of the wire sheath.
Recommendations for drawing up a wiring diagram
Drawing up a project for intra-apartment or intra-house wiring is a responsible and complex matter that requires qualifications. There are many principles and standards for installing wires, switches and sockets.
Here are just a few of them:
- It is better to divide the wiring into groups - sockets, lighting, etc., allocating separate lines for powerful electrical equipment;
- in the drawing it is necessary to indicate power points and installation locations of powerful energy consumers (oven, air conditioner, washing machine);
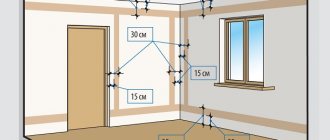
- location of sockets - from 0.3 m to 1 m from the floor;
- the optimal installation height for switches is 0.8-1 m from the floor;
- It’s better to have more sockets - no extension cords are required;
- a separate project - for a low-current system (to protect against interference, the wires are pulled separately from the power lines, with a distance of at least 0.5 m);
- bathroom switches lead to the corridor, etc.
It is very important to correctly lay the wiring itself - internal or external (open/closed type). We recommend that you familiarize yourself with the rules for designing electrical wiring in a private home.
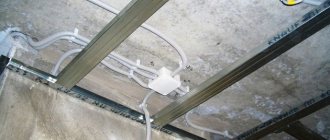
Electrical wiring installation diagram: wires should not intersect with various engineering systems, and should be laid only horizontally and vertically. The safest place to install lines is under the ceiling, from where the vertical lines go down to sockets and switches
The wiring diagram must be kept; it will definitely come in handy during repair work.
If you have doubts about your own experience or skills, it is better to contact specialists - qualified electricians. They are familiar with many small but important nuances that a simple layman cannot take into account due to his inexperience.
An experienced designer will competently draw up a wiring diagram, take into account the standards and requirements of the PUE, make calculations, select equipment of the appropriate rating and, in the end, take full responsibility. When designing and installing independently, the homeowner will have to be responsible for errors.
Installation of lamps
After the wiring is installed and the switches are installed, you can attach the lamp to the surface. There are several ways to do this. Recessed spotlights are the easiest to install - a round hole is cut in the drywall using a crown with a variable cutting blade diameter, after which the lamp is simply inserted inside. In this case, you need to hold the spring legs with your fingers, pressing them against the body of the lamp.
The recessed ceiling light is held in place by spring tabs
After the lamp has entered to a sufficient depth, the paws will press it into place. Of course, before this you need to connect the wires to the contacts. Spotlights come in different sizes. In everyday life, lamps marked R39, R50, R63 and R80 are most often used. These numbers and letters indicate the size of the bulbs, which corresponds to the diameter of the internal hole in millimeters.
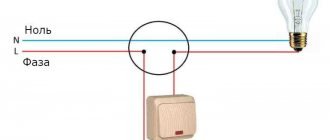
Safe connection of phase conductors to contacts in the socket
Spotlights can be mounted not only in the ceiling, but also in any hollow structures - partitions, cladding and volumetric figures. The spotlight is very easy to remove from the hole in the ceiling. Repairing it, replacing or changing the light bulb will not be difficult.
The main problem when changing a lamp (let's say you didn't like the color) is to make sure that the wires don't dive into the hole. It will be difficult to get them out of there without disassembling the structure. The phase wire is attached to the furthest contact in the socket, that is, not the one that contacts the thread, but the one that contacts the tip of the base. This is the safest thing.
Armstrong recessed ceiling luminaires are one of the fastest and most convenient ways to install lighting
Installing a recessed lamp on the Armstrong ceiling is not difficult at all. Due to the fact that the frame cells have the same dimensions as the lamp itself, all that remains is to insert it and connect the wires to the contacts.
Chandelier: 1 - terminal block; 2 - ceiling hook; 3 — fastening rod
An ordinary chandelier is attached in 2 ways : hung on a hook or screwed with dowel nails or screws. For this purpose, there are holes on the plate, which is located inside the decorative bowl covering the joint. If the chandelier is hung on a hook, special dowels are used, which have a hook instead of a regular screw. When the chandelier is quite massive, instead of dowels and nails, a metal anchor with a diameter of 8–10 mm is used, which can withstand a load of up to 80 kg. Before screwing in the hook, it must be wrapped in two layers of electrical tape.
Attaching a ceiling chandelier using a strip
There is an option when the ceiling is broken through to the channel running in the slab, and the hook is hung on a piece of steel rod. Its edges fit into the opening of the canal. Then the opening is sealed with plaster or gypsum glue.
Installation of a mounting box for a chandelier in a plasterboard ceiling
Connecting wires in the bowl of a ceiling lamp using twist caps
To place the chandelier in the center of the ceiling, a simple method is used - lines are drawn from one corner to another. At the point of their intersection there will be a center in which the lamp can be installed.
Wall lamps are attached using dowel nails or screws. When it is necessary to hang sconces on the wall, an additional beam or profile must be included in the design of the plasterboard frame. If there is none, the sconce should not be heavy (no more than 1 kg), and it is attached using butterfly dowels.
Types of ceiling hooks for hanging chandeliers
You can move a point from the floor to the ceiling like this: you need to take a wooden slate and, applying a level to it, make sure that it stands vertically, after which you can mark the point of the center of the room - this work is best done together: 1 - a slat for marking the point; 2 - vertical line; 3 - point of intersection of two diagonals
Is power consumption important?
In addition to design, it is necessary to take into account such a point as power consumption in the house.
In a multi-storey apartment building, they are usually standardized, but in a separate cottage, before approving the documents, you will need to know exactly what allocated power to request from the electricity supplier.
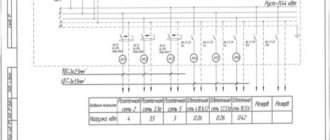
This table will help you determine the total power consumption. It shows average indicators for various household electrical appliances and power tools; more accurate data can be found in the equipment data sheets
It is a mistake to assume that the total power consumption is the sum of the individual powers. The simultaneous inclusion of all devices in the network actually does not occur, therefore, in calculations it is necessary to use such a value as the simultaneity coefficient.
For sockets, it is a maximum of 0.2, that is, no more than 20% of power points are usually used at the same time.
Interior lighting: types and features
Interior lighting refers to lighting systems that are installed indoors. In accordance with the functionality criterion, five types of interior lighting are distinguished:
- general - the entire space is illuminated;
- local - local directional light used to illuminate individual interior elements or areas;
- working - developed according to current standards and regulations, taking into account labor protection and safety requirements, the type of work performed;
- emergency - backup lighting systems that turn on when the main sources fail;
- decorative - lighting, which is necessary to create a certain atmosphere in the room and give the interior original features.
The type of lamps and characteristics for a particular space are selected taking into account the following factors:
- area and layout of the room, ceiling height;
- humidity, room temperature, dust level (for industrial premises);
- features of finishing materials, specifics of equipment, objects and materials located inside the premises;
- reflective and light-absorbing properties of surfaces.
Overhead, pendant, floor, and recessed lamps within one lighting system can be combined to achieve the proper level of illumination of the functional areas of the space.
The modern lighting market offers a large selection of high-tech light control systems. When developing a lighting project, you can choose remote options for lamp control, install devices with brightness adjustment, and motion sensors.
Rules for introducing electricity into the house
For private households, such an issue as introducing electricity into the house is important. Usually it is carried out using a self-supporting SIP wire.
If the power line support is located less than 25 m from the house, additional poles for support will not be required.
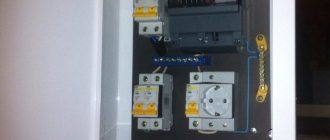
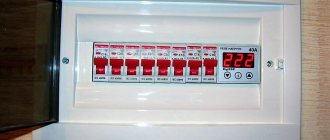
The wire usually extends to an electrical panel with an RCD, circuit breakers and a connection to the ground loop located in it. The transition to home cable (for example, VVGng) usually occurs in another panel - with metering devices
Input requirements:
- when the wire length is more than 25 m, additional supports are required (you can install a shield on the pole closest to the house, and bury the ground loop in the ground nearby);
- the height of the wire stretched between the supports is at least 2 m above the ground;
- if the wire crosses building structures, it is mounted in a protective pipe;
- the minimum distance from the ground for the building connection point is 2.75 m;
- if the wire from the control panel to the house is planned to be laid underground, then it must be placed in a protective sheath and then in a ditch at least 0.7 m deep.
It is clear that when choosing an underground installation, the entry directly into the building must be provided during the construction process.
Preparing the lighting fixture for installation
Before installing the lamp, you need to carefully check it for the level of build quality. If the bolted connections are weak, they must be tightened. Cartridges, contacts and connections to conductors must also be inspected and corrected if necessary. If chips, burnt parts, or debris are found, the part should be disassembled and replaced with a new and functional one. It is dangerous to use a product with defects.
It is recommended to purchase wall lighting and components for them only in professional stores. Otherwise, there is a risk of buying counterfeit products that will not meet the declared characteristics. To save energy, it is better to buy and install energy-saving lamps. These include fluorescent and LED devices.
Safety precautions when installing electrical wiring
To protect yourself and those who may happen to be nearby, the following rules must be observed during electrical installation work:
- Use only serviceable equipment – power tools, carriers, extension cords.
- Before starting work, be sure to turn off the power supply using automatic devices and RCDs. To avoid accidentally turning on the voltage on the site, you can hang a sign or warn your neighbors.
- For insurance, use testers and indicator screwdrivers.
- Make sure that the insulation on the tool handles is in order.
- Try not to work alone - you may always need help with work or medical assistance.
Separate rules apply to working with a hammer drill, wall chaser or powerful drill. In addition to protective clothing, gloves (with an insulated palm) and a mask (respirator) are required. Shoes should fit snugly and not slip.
Laying electrical wiring under the ceiling must be done only from a platform: chairs or tables are absolutely not suitable.
Every professional electrician is familiar with the rules of first aid in case of electric shock, but ordinary people, unfortunately, do not always act competently.
The main mistake people make when trying to help is trying to pull the victim away from the source of the injury. Under no circumstances should this be done. The first step is to relieve the voltage - turn off the switch
Ideally, in any room where electrical work is being done, you should have a fire extinguisher on hand. Dousing sparking or flaming wires with water is strictly prohibited.
Preparatory work
Installation work on installing lamps is carried out before wallpapering begins.
Most electrical installation work is carried out even before wallpapering and decorative plaster are laid. The master must do the following manipulations:
- Select a lighting device in advance. It is important to consider the microclimate of the room and its purpose. You should buy devices that are protected from moisture for the bathroom; ordinary lamps and chandeliers are suitable for the living room and bedroom. At the same stage, the types of lighting devices are selected. These can be incandescent, halogen, LED or fluorescent lamps.
- Select a location for installing the lighting device. It depends on the purpose of the lamp, its size, type of room, ability to connect to a power point and other indicators.
- Cut channels for laying cables to the installation site.
You should also make a calculation in advance of the number of lamps for the room. It depends on the area of the room, its purpose and other parameters.
Installation instructions for emergency power supplies
Emergency power supply is mandatory for industrial lighting and for devices that are planned to be operated in an open area. The regulations require that such luminaires be supplied with energy from separate independent sources. For example, leased lines can be connected to different transformers, and multiple transforming stations can be connected to a single distribution source.
It should also be noted that there is a need to separate working and evacuation lighting. Working light refers not only to a set of devices in production, but also to the communal infrastructure in ordinary residential buildings. Escape routes must have a separate supply line from the entry point that is independent of the operating panel. In critical areas, lighting installation is carried out together with the installation of protective frames that insure against accidental damage. This applies to both production premises and external lighting systems. If difficulties arise with the organization of separate power supply lines, then you can use autonomous power sources in the form of internal or external batteries, as well as generator sets (gasoline or diesel).
Stages of installation of interior lighting
- arrangement of openings, channels, cable routes in accordance with the design diagram;
- installation of junction boxes, fasteners, socket boxes;
- laying electrical conductive lines;
- installation of control and regulatory equipment;
- installation of lamps, switches, sockets;
- testing of all elements in operating and emergency modes.
Connecting wires inside the junction box
The most typical cross-section of the lighting wire is 1.5 mm2, which is a maximum load of 4 kW. Of course, it is unlikely that the lighting in the apartment will reach such an indicator, because it will be equal to 40 100 W light bulbs turned on at the same time. Don’t worry, you might turn on a lot of electric stoves.
Well, if you don’t want to pay extra money for a cable, you can calculate exactly what cross-section of wire will be needed in each individual case. It's simple. Let's say there is a lighting area that consists of 3 spotlights, each with a 60 W bulb. A wire with a core cross-section of 1.5 mm2 is suitable for the junction box. For 180 W this is a bit much. We take the total power of the lamps, which is exactly 180 W (60 + 60 + 60) - and divide it by 220.
If the number turns out to be less than 10, then you can safely install a wire with a TPG cross-section of 0.75 mm2 from the box to the lamps. When it is less than 15, the TPG cross-section is 1 mm2, and if it is more than 17, then a TPG of 1.5 or 2.5 mm2 is suitable. In this case, it turned out to be 0.8 - less than one. If there is a wire with a cross-section of 0.35 mm2, then that will do. The difference in price for cables with cross sections of 0.75 and 1.5 mm2 is at least 1.5 times, not to mention 0.35 mm2.
Once the thickness of the wire in various sections of the lighting network has been determined, it is necessary to decide which wire is needed. If there is no grounding in the apartment and it will not be installed in the future, then the three-wire wire disappears by itself. What remains is a two-wire one with phase and neutral conductors. Most lamps do not have a contact for a ground wire, so there is no need to be upset. A three-core wire will be useful if the apartment has grounding and fluorescent lamps with electronic ballast will be installed.
Remember that it is advisable to place separate boxes for lighting. In this case, there will be less confusion and it will look neater. Whether to use stranded or single-core wire is a personal choice. In some cases, for example, when laying lighting in a tight space on a suspended plasterboard ceiling, it is better to use a flexible wire such as PUGNP.