How to route wires correctly
The main provisions that are followed when installing electrical wiring in an apartment with your own hands:
- accessibility of all key elements (meter, distribution boxes, machines);
- the height from the floor to the switch is assumed to be 0.6-1.5 m, and it is installed so that the door does not interfere with access;
- the installation height of sockets is taken to be 0.5-0.8 m from the floor level to prevent water from entering during flooding;
- the distance from the outlet to the gas or electric stove, other communications must be at least 0.5 m;
- Electrical wiring is allowed only vertically or horizontally; a wiring diagram must be drawn up.
The standards recommend the following principle for calculating the optimal number of sockets: for every 6 m2 - 1 socket. You can deviate from this rule for the kitchen. Here you can increase the number of connection points.
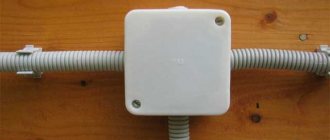
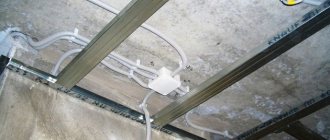
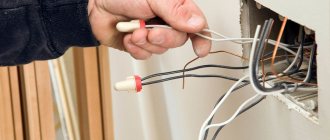
Electrical wiring in the apartment is carried out in such a way as to prevent contact of wires with metal elements of the building structure. If the channel is intended for laying several wiring lines with your own hands, leave a distance of at least 3 mm between them. It is best to protect each with a separate box or corrugated sleeve. The connection of individual parts is carried out in a distribution box. Open parts are carefully insulated. Do not connect copper and aluminum wires together.
- You can be sure that the electrical wiring in the apartment is carried out in compliance with all standards. So it's safe.
- The power of the devices is taken into account, therefore, you can use any equipment without fear.
2.4.29
The distances between bare wires on the support and in the span, according to the conditions of their approach in the span with the greatest sag up to 1.2 m, must be no less than:
with a vertical arrangement of wires and an arrangement of wires with a horizontal displacement of no more than 20 cm: 40 cm in regions I, II and III on ice, 60 cm in regions IV and special regions on ice;
with other wire locations in all areas on ice at wind speeds during ice: up to 18 m/s - 40 cm, more than 18 m/s - 60 cm.
If the maximum sag is more than 1.2 m, the indicated distances must be increased in proportion to the ratio of the largest sag to the sag equal to 1.2 m.
What are the advantages of the method
Open cable routing along walls is most often used not in houses and apartments, but in garden buildings in the country - a garage, a utility block, a bathhouse. Although if you try and choose the right materials, then even in private houses and modern apartments this option for installing electrical wiring will be a winner.
The advantages of open wiring are as follows:
- simpler and faster installation, which even a novice electrician can easily handle;
- fewer tools and materials will be required than when creating hidden electrical wiring;
- You can bring out a new group of wires from the panel or distribution box at any time (for example, if you want to install another socket);
- in some cases, this option has a positive effect on the interior of the room (for example, if you use porcelain rollers and insulators in the bathhouse);
- Repair and maintenance of the line can be carried out without disturbing the decorative finish of the walls.
At the same time, the disadvantages of installing open wiring with your own hands are an increased risk of fire, limited operating conditions and a shorter service life of the electrical network. Please also take into account that the route is more susceptible to mechanical damage than if it is laid in walls.
Do not lay open electrical wiring in the kitchen so that water and heat from the stove get onto the cable lines and sockets; also follow the recommendations described in the article on installing sockets in the kitchen https://samelectrik.ru/rozetki-na-kuxne.html.
In addition, read the rules for laying external electrical wiring on combustible substrates in the article: electrical wiring in a wooden house. In general, it is necessary to ensure a minimum probability of fire; for this you need to use a VVGng-LS cable, modern electrical installation products and installation tools that do not support combustion.
Open wiring in a private house
Pros and cons of external wiring
Therefore, the first and main advantage of external wiring in an apartment is the speed of its installation. For example, you can install exposed wiring in a one-room apartment with your own hands, without much experience, in a couple of days. A professional hired electrician can do it in five to six hours.
The second advantage is that for open wiring you do not need to groove the walls, make channels in them for laying wires and sockets for sockets, switches and junction boxes, and then, after installation, re-plaster, paint or wallpaper the walls.
The third plus is that open wiring is always available. You can repair the damaged area or add some new elements to the wiring at any time without much effort. For example, run another branch to a new lamp, install a new additional one, or move an old socket to another location. With hidden wiring, such a number will not work: you will have to drill into the walls.
But open wiring also has its disadvantages.
The first disadvantage is that exposed wiring is always visible, and it does not look harmonious in all interiors. Unless you are making an interior in country, retro, techno or steampunk style. In this case, exposed wiring can be a highlight.
The second disadvantage is that you must clearly take into account the technical standards of the room in which you are doing open wiring. For example, in the bathroom, kitchen and other rooms with high humidity, even for hidden wiring, you need to use additional wire protection and install devices (switches, sockets) with a protection class of at least IP-44, and for open wiring - at least IP-68. But they don’t always look beautiful and attractive.
2.5.114
In one span of overhead lines, no more than one connection is allowed for each wire and cable.
In the spans of intersection of overhead lines with streets (driveways), engineering structures listed in 2.5.231-2.5.268, 2.5.279, water spaces, one connection per wire (cable) is allowed:
for steel-aluminum wires with an aluminum cross-sectional area of 240 mm or more, regardless of the steel content;
for steel-aluminum wires with an A/C
1.49 for any cross-sectional area of aluminum;
for steel cables with a cross-sectional area of 120 mm or more;
when the phase is split into three steel-aluminum wires with an aluminum cross-sectional area of 150 mm or more.
It is not allowed to connect wires (cables) in the spans of intersection of overhead lines with each other on intersecting (upper) overhead lines, as well as in the spans of intersection of overhead lines with overhead and ground pipelines for the transport of flammable liquids and gases.
RULES FOR EXTERNAL LAYING
External wiring includes electrical wiring laid along the external walls of buildings, under canopies and between buildings on supports.
The external cable is laid in both open and hidden ways, taking into account the following requirements:
- Location of the external cable in a place inaccessible to human touch or its fencing;
- Excerpts of the recommended PUE distance from open wiring areas to the ground and building structures (from 0.5 to 2.75 m);
- A ban on external cable laying on top of the roofs of residential and public buildings, with the exception of entry points and branches to them.
The latter are laid through walls using special insulating pipes. The requirements for laying external cables in pipes, ducts and flexible hoses are no different from the rules for protecting open wiring; steel protective casings are not used outside buildings.
In any case, the accumulation or accidental entry of moisture into the protective pipes is avoided at the input areas.
The need for a protective casing depends on the resistance of the cable insulation to ultraviolet radiation; wiring type VVGng-LS needs it, SIP and its analogues intended for outdoor use do not.
Good protection from UV is provided by HDPE corrugations or metal electrical boxes; when using PVC corrugations, this indicator is specified separately. Cables laid on external walls made of wood require special attention; regardless of the type of insulation, they are covered with non-flammable materials.
Chipping of façade walls and hiding the cable inside the channels followed by plastering is considered the optimal method in terms of safety and aesthetics. But in practice it is rarely implemented due to labor intensity and financial costs; in most cases, external wiring is laid openly.
Mandatory requirements for cable installation include its fixation; the fastening step depends on the diameter of the corrugation (if any) and is selected from the tables. Completely open wires are fixed in increments of no more than 500 mm in vertical sections, 350 in horizontal sections and 100 in bend sections.
* * *
2014-2020 All rights reserved. The site materials are for informational purposes only and cannot be used as guidelines or regulatory documents.
2.3.52
In four-wire networks, four-core cables must be used. Laying neutral conductors separately from phase conductors is not permitted. It is allowed to use three-core power cables in an aluminum sheath with a voltage of up to 1 kV using their sheath as a neutral wire (fourth wire) in four-wire AC networks (lighting, power and mixed) with a solidly grounded neutral, with the exception of installations with an explosive atmosphere and installations in which, under normal operating conditions, the current in the neutral wire is more than 75% of the permissible long-term current of the phase wire.
The use of lead sheaths of three-core power cables for this purpose is allowed only in reconstructed city electrical networks of 220/127 and 380/220 V.
EXTERNAL ELECTRICAL WIRING
In another way, external electrical wiring is called street wiring. It is laid outside houses, along the walls of structures and buildings, as well as between them on special structures or supports.
Such wiring is necessary to supply voltage to lighting lamps, alarm systems, CCTV cameras and utility rooms (garage, workshop, shed, sauna, bathhouse, swimming pool).
All this must be taken into account at the stage of construction of buildings and structures.
External electrical wiring in a country house is no less important than internal wiring. In addition to the need to provide sufficient lighting in the area, at any time you may need to connect a power tool (drill, grinder, lawn mower, pump) in the yard. Don’t drag the carriers across the entire house and property; when planning the power supply, it is better to mark out places for installing 2-3 sockets.
The most important difference between external electrical wiring is that it is exposed to atmospheric factors - rain, snow, wind, sun rays. Therefore, it must be reliably protected from precipitation, from mechanical influences and accidental human contact with live parts.
General requirements for electrical wiring.
These requirements apply equally to both apartments and private houses:
1. All boxes, sockets and switches must be located in such places that they are always easily accessible.
2. All connections and branches are made only in boxes.
3. It is prohibited to install sockets in wet rooms (bathroom, sauna, bathhouse).
4. Grounding and grounding conductors are connected only by welding.
5. Grounding of stationary plates is carried out by separate conductors.
According to the PUE (Electrical Installation Rules), the following are also regulated:
- standards for the number of sockets per room;
- the distances at which sockets and switches should be placed in relation to the floor and communications;
- norms for laying wires (vertical and horizontal sections).
Tips and ways to hide wires in the workplace
In a home office, to make it look neat, the laces coming from the computer and router also need to be removed. A stationery clip will allow you to “run” the cord, which gets tangled under your feet, under the surface of the table - from its very edge. The clip is easy to fix on a wall or shelf, and several of these parts make a kind of separators for the inputs of different charges. If possible, the wires hanging near the back of the table are simply covered with a textile curtain. Some of them can be configured into a mini-hammock - the “head” of an extension cord can easily fit there, along with chargers that would get in the way on the table.
Some companies produce special wire separators - two or more cords are neatly laid inside a wooden, plastic, rubber or metal structure. A cool store-bought option for holding wires, it looks like two wire electrical towers. Pockets made from plastic bottles and clothing pockets look funny - the product is hung on an outlet in the wall, the charger is turned on, and the phone itself and its cord lie quietly in the pocket.
6.6.24
Plug sockets for portable electrical receivers with parts subject to protective grounding must be equipped with a protective contact for connecting a PE conductor. In this case, the design of the socket must exclude the possibility of using current-carrying contacts as contacts intended for protective grounding.
The connection between the grounding contacts of the plug and the socket must be established before the current-carrying contacts come into contact; the shutdown order should be reversed. The grounding contacts of socket outlets and plugs must be electrically connected to their housings if they are made of conductive materials.
Tags: automatic, sconce, plugs, generator, house, , grounding, cable, how, design, , power, voltage, neutral, crimping, transfer, rule, touch, wire, manufacturer, gasket, start, , size, relay, row , light, lamp, connection, connection wire, ten, current, triangle, , installation, shield
Ideas on how to hide the cable from a TV or home theater
Cables, cords from TV, set-top boxes, speakers are neatly hidden behind the shelf on which the TV is placed. If you decide to hang the screen on the wall, the wire is hidden in a box matched to the color of the wallpaper, and under it is placed a climbing plant, the tendrils and branches of which are allowed to curl around the box.
Many designers suggest not hiding the wires, but simply decorating them with colored ribbons, for decorating an apartment in the pop art style, indoor plants (climbing ones are optimal) - for eco-style, hollow driftwood boxes, wooden panels, if we are talking about classic interiors .
When you have to hang a bracket for a heavy TV, the design of the first one is chosen so as to fit all the sockets there. Sometimes a box is mounted on the wall where the TV screen will be placed, in which the cords from the speakers, DVD player, and other electronics will be hidden.
Cable protection requirements
The most stringent standard requirements apply to protection during underground installation. So, in the finished trench there should be a cushion of sand or granulated slag on which the slabs are placed. For models with voltages over 35 kV, the thickness of the plates must be at least 50 mm.
Lines of lower voltage may be protected not by slabs, but by baked clay bricks. But for this purpose it is strictly forbidden to use bricks with holes through which soil will enter when filling the trench. It is also prohibited to use sand-lime brick, since over time it loses its mechanical strength and cannot perform signaling functions. Since, in addition to protecting the cable sheath from damage, the brick must signal the location of the route section underneath it.
Since strong tension leads to a break when the temperature drops or when the soil moves, its location in the trench must be free. But you shouldn’t make too big waves either.
Rice. 4. Laying in the ground without tension
Difficulties in dismantling wiring
To accurately dismantle old electrical wiring, you need to know the layout of the channels. Unfortunately, it is almost impossible to find such a scheme, which presents an undoubted difficulty for carrying out such work. In addition, electrical wiring could be laid not only in the walls. The ceiling and the junction of the side and top panels were also often used for these purposes.
Dismantling electrical wiring requires significant labor costs and a large list of tools and materials. If you are not ready for such work, it is better to immediately delegate its implementation to a qualified electrician, who will carry out the dismantling more quickly and with much better quality than you. If you still decide to do all the operations yourself, remember the important rules:
- Do not groove in load-bearing walls, especially in the horizontal direction. This can significantly weaken the structure of the entire building.
- Don't get carried away with gating. If possible, new electrical wiring should be installed in old, existing channels.
- If there are not enough channels, make additional grooves with a depth of no more than 10 mm using a hammer drill or wall chaser, and use dowels to secure the wires in them.
- Any finishing work can be carried out only after checking the serviceability of the newly laid electrical network.
Carrying out installation work
Any electrical repair work requires opening the junction box. When checking the voltage, use a special indicator. If there is no voltage, this is evidence of incorrect connection or broken wires.
Before carrying out any electrical work, disconnect the plugs in the distribution panel. This will ensure safety and allow you to carry out any repair operations on the electrical route without the threat of electric shock.
Other fire and building codes must be taken into account:
- separation boxes, switches, meters and sockets must be installed in easily accessible places;
- GOST recommends installing sockets at a height of 60 cm, switches at a height of 90 cm;
- sockets cannot be installed near metal objects (pipes or radiators), the minimum distance from them should not be less than 0.5 m;
- the number of sockets in a living space is calculated based on the total area of the room - one socket per 6 m2, while the kitchen should not have less than 3 sockets;
- the bathroom is equipped with moisture-proof sockets;
- when choosing switches and sockets, it is better to choose products with a ceramic base and copper contacts;
- cables laid in a vertical position must retreat from window and door openings to a minimum “distance” of 100 mm.
It is necessary to say a few words about the geometry of laying electrical cables in the apartment.
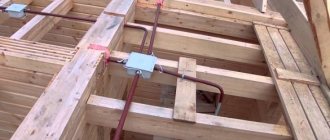
All wires must be laid exclusively vertically. and horizon. lines, with cable turns strictly at an angle of 90. This arrangement will eliminate the risk of damage to electrical wiring when hanging pictures or other decorative elements.
Is it possible to do without gating?
Grilling is a long and complex process, during which a large amount of dust is generated.
And if during a major renovation this is not too much of a problem, then in other cases not all apartment owners are ready to put up with such inconveniences.
Therefore, the question remains relevant: how to change the wiring in a panel house without gating? Replacement of electrical wiring can be done in an open way, when the wires are laid directly along the walls. This method will not disrupt the design of your apartment, since the wires can be camouflaged with special skirting boards or covered with plasterboard panels.
After marking the walls, indicating the installation of sockets, switches and lamps to which electrical wiring must be laid, the wires are laid in the baseboards and attached to the walls. A mandatory step in this method is to check the insulation resistance, and only after obtaining satisfactory results can voltage be applied.
Open wiring has its disadvantages:
- increased costs for the purchase of fastening and other materials;
- a slight reduction in the living space of the apartment due to the use of plasterboard panels.
Partial replacement of electrical wiring
The situation does not always require a complete replacement of the wiring. Often you can get by with repairing a separate section of the electrical network. Having determined the location of the wire deformation and de-energized the electrical wiring, you can begin repairs.
The faulty socket is removed from the socket box and the wires supplying it are disconnected.
Section 7. Electrical equipment of special installations
Chapter 7.1. Electrical installations of residential, public, administrative and domestic buildings Scope. Definitions General requirements. Electrical supply Input devices, distribution boards, distribution points, group panels Electrical wiring and cable lines Internal electrical equipment Electricity metering Protective safety measures Chapter 7.2. Electrical installations of entertainment enterprises, clubs and sports facilities Scope. Definitions General requirements. Power supply Electric lighting Power electrical equipment Laying cables and wires Protective safety measures Chapter 7.3. Electrical installations in explosive zones Scope of application Definitions Classification of explosive mixtures according to GOST 12.1.011-78 Classification and marking of explosion-proof electrical equipment according to GOST 12.2.020-76* Classification of explosive zones Selection of electrical equipment for explosive zones. General requirements Electrical machines Electrical apparatus and instruments Electrical lifting mechanisms Electrical lamps Switchgear, transformer and converter substations Electrical wiring, conductors and cable lines Grounding and grounding Lightning protection and protection against static electricity Appendix 1 Appendix 2 Appendix 3 Chapter 7.4. Electrical installations in fire hazardous areas Scope Definitions. General requirements Electrical machines Electrical apparatus and instruments Electrical lifting mechanisms Switchgear, transformer and converter substations Electrical lamps Electrical wiring, conductors, overhead and cable lines Chapter 7.5. Electrothermal installations Preface Scope of application Definitions General requirements Installations of direct, indirect and resistance arc furnaces Installations of induction and dielectric heating Installations of direct and indirect resistance furnaces Electron beam installations Ion and laser installations Chapter 7.6. Electric welding installations Preface Scope of application Definitions General requirements Requirements for premises for welding installations and welding stations Installations for electric welding (cutting, surfacing) by fusion Installations for electric welding using pressure Chapter 7.7. Peat electrical installations Scope. definitions Power supply Protection Substations Overhead power lines Cable lines Electric motors, switching devices Grounding Acceptance of electrical installations for operation Chapter 7.10. Electrolysis and electroplating plants Preface Scope Definitions. Composition of installations General requirements Installations for electrolysis of water and aqueous solutions Electrolysis installations for hydrogen production (hydrogen stations) Electrolysis installations for chlorine production Magnesium electrolysis installations Aluminum electrolysis installations Electrolytic refining installations for aluminum Electrolysis installations for ferroalloy production Electrolysis installations for nickel-cobalt production Electrolysis installations for copper Electroplating installations
Hiding wires in the wall
The most popular option is when the cable is hidden directly in the wall - the so-called “hidden wiring”. To do this, appropriate recesses are cut out in it, where electrical wires are placed, and the recesses are covered. It turns out dusty and takes quite a long time, but if the work is done efficiently, the dangerous parts are securely hidden - it will not be possible to see, much less damage them, without compromising the integrity of the wall.
Into a concrete/brick wall
It is advisable to install electrical wiring at the renovation stage, preferably during the planning of the premises. As long as the walls are bare, there is no decor on them, damage will be minimal
It is important to know that “pulling” the cable diagonally, which is sometimes done in order to save money, is unacceptable - hidden electrical wiring is laid only vertically-horizontally. This will allow you to quickly repair it in the event of an accident, minimizing the risk of electrical damage. The minimum distance from the ceiling to hidden wires is 15-18 cm
The minimum distance from the ceiling to hidden wires is 15-18 cm.
To begin with, a wiring diagram is drawn up, marking is done using the construction or laser method. To make grooves, take a hammer drill, grinder or wall chaser. The parts are attached to the brick or concrete wall with dowel clamps. After the cable is laid, the grooves are primed, covered with plaster, and the wall is leveled.
Into a plasterboard wall
Installing electrical wiring under drywall is much easier than installing into concrete. Here you should also lay the cable along a clear route so that multiple screws do not damage it. To begin with, a frame is “assembled” from aluminum profiles and drywall. The cord must be laid in a special corrugated pipe, which has a fire safety certificate. When there is already a plasterboard wall and it is necessary to lay a cable in it, then a layout diagram of the electrical equipment is drawn up. The cords here are pulled horizontally, vertically, including through holes in the metal profiles supporting the drywall.