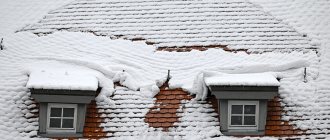
In the winter and spring, we all face the problem of ice on the roofs of our houses.
Due to the fact that the temperature at this time of year very often passes through zero (in both directions), such changes lead to the formation of pieces of ice and icicles.
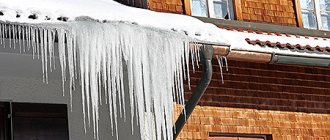
In addition to the fact that roof elements suffer and deteriorate as a result, the entire perimeter of the house turns into a potential minefield.
You don't know where and when someone might fly from above. And it’s good if this block falls on a parked car, and not on your head.
Not only private owners, but also city services face the same problem. For example, in Moscow alone, the total length of the entire roof is greater than the length of the equator!
The main places where ice accumulates are:
- valley
- drainpipes
- gutter
- drip
This problem can and should be solved preventively in the summer. You can't really climb on the roof in winter.
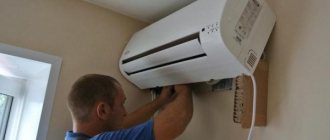
Anti-icing systems for roofs and gutters, made on the basis of a heating cable, help with this.
What does this all look like in general? The cable is spread along the drain and the edges of the roof, the “cold” ends from it are fed into junction boxes on the walls. Temperature, humidity and precipitation sensors are placed along the perimeter and on the roof.
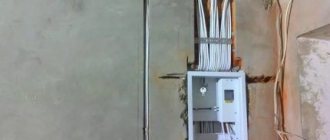
The cables from them are also fed into a common box under the canopy. And from there all the wiring goes down to the control panel with automation.
Although the pleasure is not cheap (from 100,000 rubles for a small private house), it is effective.
Heat the roof or gutter?
How to select materials and install everything correctly, without overpaying for unnecessary things? Here everything will depend on the thermal insulation of your roof.
If everything is fine with it, warm air from inside the house simply will not be able to get out, the roof will not heat up, which means there will simply be nothing for icicles to form from.
In this case, ice will only appear at outside temperatures not lower than -5C.
Mistake #1
In this situation, there is no need to heat the roof itself, but it is enough to get by with heating only the drainage system.
Thermal insulation and energy efficiency, as they say, rule.
But if the roof’s thermal insulation is of poor quality, the snow begins to melt even at relatively low air temperatures (-10C).
In this situation, water will flow towards the bottom edge and gutters.
It will freeze there, turning into pieces of ice. Here you will already need to lay a cable for complex heating:
- the roof itself
- gutters
- gutters
Life time
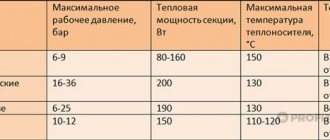
The service life of the cable depends on the operating conditions and the materials from which it is made.
You can bring the service life of products from different manufacturers to a common denominator:
- Resistive - in a screed it lasts up to 50 years, in other conditions - on average 15;
- Self-regulating - “lives” up to 20 years.
Particular attention should be paid to the choice of manufacturer.
Cable selection
Mistake #2
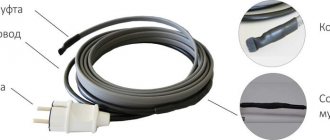
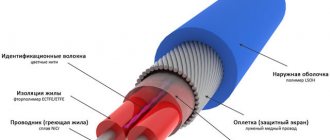
Please note that a completely different heating cable is used here, different from what is laid in heated floors inside the house.
Its shell is made of a special heat-resistant, light-stabilized PVC plastic compound. This material is not afraid of exposure to ultraviolet radiation and harsh climatic conditions.
There are two types of such cable:
- self-regulating
- resistive
For an ordinary home, the second option is quite suitable. It has constant power and, in addition to being inexpensive, is more reliable than a self-regulating one.
How much cable do you need - footage and power?
How to calculate the required cable footage? To do this, multiply the total length of the gutter and drain pipe by two (when installing two heating lines).
Then calculate the height of the cable on the roof and add the distance from the end of the roof to the bottom of the gutter.
Taking into account the recommended laying step of 10-15 cm, you will get the length of the heating section and the entire anti-icing system.
Mistake #3
Do not forget that excess cable is the same disadvantage as lack of length.
What power cable should I choose? With a gutter width of up to 15 cm, it will be enough to lay one thread with a power of 30-40 W/m.
Mistake #4
If you use cable less than 30W/m you will face serious problems. The system simply will not cope with its tasks at certain temperatures and heavy precipitation.
If no other power is found, use more threads.
For gutters wider than 15cm, you will need to lay two strands of cable. The power is the same - 30-40W/m.
Let's look at the entire cycle of installing a roof heating system and connecting automation for a house with a roof that has poor thermal insulation. That is, when it is necessary to de-ice not only the gutters, but also the roof itself.
Expert advice
Some useful tips:
- The cable can be laid both inside and outside the pipe. Typically, pipes with a diameter greater than 40 mm are tied with a self-regulating cable from the outside. If the pipe diameter is smaller, using an internal resistive one is suitable;
- It would be a good idea to ask the manufacturer for a hygiene certificate (especially important when heating pipes with drinking water);
- A new cable with food-grade braid may emit a pungent odor at the beginning of use - this is not scary;
- Before purchasing, check your energy consumption level
- If an open installation is planned, it is desirable to have UV/protection. For internal installation, a waterproof shell is required.
Installation of a roof anti-icing system - materials
To install the anti-ice system you will need the following materials:
- three-wire power cable 220V – VVG
- panel for control equipment
- automation (full equipment will be given below in the diagrams)
- cable KVVG
This is the control cable that will connect the sensors.
- sensors – precipitation, humidity, temperature
- protective junction boxes
They must have a degree of protection IP55.
- mounting tape for fastening the heating cable
- galvanized rope or chain
- mounting clips
- resistive heating cable itself
Where does installation begin? First of all, measure the cable on the ground along the mounting tape. Choose the distance between the tapes from 30 to 50cm.
The descent into the drain is immediately measured and the cable is installed.
Defining zones for installation
Heating cables cost a significant amount of money, so they are installed only in areas where snow accumulation and ice formation are most likely.
On the roof it is located on the eaves overhang. If the roof has a steep slope, then the cable is placed like a snake between the edge of the eaves and the snow retainer. In addition to the cornice, the following heating zones are distinguished :
- valleys;
- drainpipes;
- drainage funnels;
- gutter;
- connections, droppers.
How to secure cable to roof and gutter
After this, screw the fastening clips or tape onto the roof.
To prevent leaks, do not forget to treat the entry points of the screws with sealant.
The step between the top and bottom rows of clips is 60cm.
Mistake #5
To install the heating cable on the roof, use only specialized fasteners.
Forget about the cable ties that are often used to run cables along the walls of the house.
For certain types of roofing, special petals with latches are produced. You don't even have to make holes with them.
There is also a fastening method using self-adhesive sealing tape on an aluminum base.
According to the manufacturer, the tape has a high level of adhesion, is heat-resistant and durable. But still, the majority prefer through cable fastening, considering it more pragmatic and reliable.
Before installing the heating cable, be sure to check its resistance and integrity of the wires with a multimeter.
Resistance data must be indicated in the product passport.
If everything is in order, lay the cable in waves according to the fixed clips on the roof slope.
After which, the cold end is inserted into the installation box under the ridge.
Sections for drainage are also called. Both between the working conductors and with the protective conductor.
Between the grounding protective conductor and the working conductors, the insulation should reach several megohms.
This check is no longer carried out with a multimeter, but with a megger.
Be sure to write down all the data in your passport so that you have something to compare with later. Suddenly, in a few years you will need to find the reason for the system's inoperability.
After all checks, the gutter is thoroughly cleaned of dirt and debris.
A mounting tape is secured inside it. Most often this is done on rivets.
But there is also a rivetless fastening.
It is best to use a combined option. Every 1.0-1.5 m you rivet the tape, and in the middle of these sections you place plastic spacers that simply push the cable apart.
The horizontal section of the cable is laid in the gutter, and the vertical section is lowered down the drain using a cable.
Please note that if you have pets at home, they love to chew on such a cable, provocatively peeking out of the pipe.
Mistake #6
In this situation, you cannot release it outside, and it is better to hide the noose inside.
The cable of the vertical section of the cable is suspended on a hook.
This cable is required for pipe heights over 4 m. By the way, when laying cables in the valley, a support cable is also often used.
It absorbs all mechanical load, protecting the shell from damage.
Instead of a cable, you can use a chain in the drain. It must be galvanized so that it does not rust from constant contact with water.
The cable is simply put on individual links through special spacers.
The last link from above is suspended on a spacer rod or pin.
The pin itself should not just lie across the hole in the drain, it is advisable to secure it.
For example, for the same mounting tape.
Mistake #7
Do not skimp and do not lower the cable into the pipe without such a chain or cable.
They perform a protective function. If the system fails, ice very quickly sticks to the cable in the drain, increasing its weight several times.
And so that it does not break from such a load, an additional load-bearing element is required.
After installation, all cold ends of the cables are inserted into the installation box.
The whole process is repeated on all roof slopes.
If you have an extension without gutters (garage), the cable is also placed on it, but in such a way that its loops hang down a few centimeters (5-8cm).
This is the so-called “drip loop” scheme.
Why does ice accumulate?
The reasons for the appearance of ice relate to external and internal factors:
- Frequent temperature changes. This leads to the fact that a layer of snow that was already lying could melt, after the temperature dropped, it froze and was covered by the next one.
- Failure to comply with the roof slope angle. It must be calculated in accordance with the climatic characteristics of a particular territory.
- Uncleaned drain channels. In the autumn, the gutters could be filled with leaves. It clogs the holes, which prevents water from flowing out.
- Insufficient insulation of the attic space.
- Availability of attic space. When the attic is used as a living space, steam is released and this also leads to an increase in the temperature of the flooring. This causes the snow to melt and the water to freeze in the cold.
- Irregular roof cleaning.
What are the dangers of icing of gutters?
The heating system for gutters is usually installed together with the heating of some areas of the roof. A device of this type faces the following tasks:
- Removing icicles and frozen deposits on the roof.
- Preventing roof decking from rotting due to moisture accumulation.
- Clearing holes from blockages to allow fluid to pass through.
- Prevent sudden temperature changes that can damage some materials.
- Reducing the weight of the overlying sediment layer to reduce the load.
- Extending the service life of the deck and the entire rafter system.
- Automation of roof cleaning.
Usually installed together with roof heating
Installation and connection of automatic roof heating systems
Let's move on to connecting the automation. To control the entire roof and gutter anti-icing system, you will need the following components:
- modular input circuit breaker + RCD with leakage current of 30 mA
Or they can be replaced with one diffautomatic circuit breaker with the same current.
- modular starter with normally open contacts
- 3 position switch
To switch the system to manual and automatic modes.
- thermostat or weather station
The brains of the entire system.
- automatic switches for heating sections
- humidity, temperature, precipitation sensors
Service
Maintenance of the system comes down to monitoring its operation, periodically checking all sensors and visually inspecting its integrity.
Modern gutter heaters are equipped with special thermostats with LED bulbs. If the light is on, it means heating is in progress; if it turns off, the required temperature has been reached. If heating does not occur, look for the cause of the malfunction. The main reasons are listed in the previous paragraph.
A simple roof heating connection diagram
The simplest scheme consists of a single thermostat for one zone.
It is used for heating small areas.
Roughly speaking, we connected one temperature sensor and unscrewed the knob of the regulator (RT 330 or another) to the desired temperature, for example, zero degrees Celsius.
It turns out that when this temperature occurs, the anti-icing system will start on its own and melt the ice.
The scheme is simple, but has its drawbacks. This system will not understand whether it is snowing outside the window or not.
This means that very often it will be useless to heat your roof, burning extra kilowatts to nothing. This method, although cheap, is not very economical.
Therefore, let's look at a more rational option, using a full-fledged programmable weather station and a combination of all sensors.
Shielding
The screen is a protective shell made of aluminum or copper foil. It serves as an additional source of heat distribution, but its main function is to prevent electric shock to a person carrying out repair work.
The design of a shielded conductor is more complex, and therefore the price is higher.
Most often there is a cheap unshielded option on the market. For its safe operation, a residual current device (RCD) is required.