Installing an air conditioner requires experience in such work, as well as theoretical training. In most cases, malfunctions in the operation of this system occur due to non-compliance with installation and connection rules.
Self-installation of air conditioning
Before installing an air conditioner, you should know the sequence of steps:
- Selecting a location for installation.
- Hang the indoor unit and then the outdoor unit.
- Laying communications.
- Setting up the correct operation of the system.
What you need to install an air conditioner yourself
In order to do all the work yourself, you will need a set of tools. For installation you will need:
- High power hammer drill. With its help, through holes are made that allow pipes and cables to be routed to connect the outdoor and indoor units.
- Pipe cutter It is useful for cutting copper pipes. You will also need a file, which can be used to remove burrs on pipes.
- A pipe bender or spring to give pipes the required shape.
- Drill and drill bits of different diameters.
- Flaring machine and calibrator.
- A wall chaser, which is useful when laying a groove in a wall. It can be replaced with a hammer or sledgehammer, but this will make the work much more difficult and time-consuming.
- Screwdrivers, hexagons, level, hammer and other tools that may come in handy along the way.
- Building level.
What may be useful for installing an air conditioner
In addition to tools, you will also need materials:
- Copper seamless pipes, which are necessary for the refrigeration and air conditioning system. Typically, the length of the pipe is equal to the length of the route in the wall plus 30-40 cm. The diameter will depend on the requirements of the air conditioner manufacturer.
- Electrical cable - its quantity is usually indicated in the instructions for the device, but it is better to take it with a reserve.
- Drainage pipe - this will require a special one or a polypropylene water pipe. Its length should be 80 cm longer than the track.
- Pipe insulation - a rubber sleeve is best suited.
- Plastic box - it will be needed to hide the route in the wall.
- Fasteners for the outdoor unit - usually ready-made corners and brackets are purchased.
- Bolts, fasteners.
Connecting freon pipes
We move on to the stage of connecting communications.
Connect the flared tubes to the indoor unit of the air conditioner using adjustable wrenches.
If you have a torque wrench, it is better to use it.
Here are the recommended tightening torques for freon tubes of various diameters:
- 1/4 – 16-20Nm
- 3/8 – 35-45Nm
- 1/2 – 45-55Nm
Next, take the interconnect cable and twist it all into a single unit with the freon line using reinforced tape or vinyl tape.
Do not forget to stretch the insulation of the required diameter onto the copper tubes.
To prevent dirt from accidentally getting inside the tube, wrap its ends with electrical tape.
Error No. 8 Under no circumstances should the thermal insulation of the tubes be left unprotected.
Otherwise, from the street under the influence of UV rays, within several seasons it all turns into dust.
If your thermoflex is lightfast and not afraid of the sun, then think about the birds. Crows peck very well and take away such material for their nests.
Error No. 9 Also, do not leave any area indoors without insulation. Especially the junction points.
Condensation will gradually form here and eventually a neat trickle of water will appear on your wallpaper.
The line itself, wrapped with tape, is hidden inside the room in a plastic box.
However, if you have a short area and there are old wallpapers left, then instead of using a box, the highway can be covered with them. The result will be an almost invisible picture.
Next, pass the line through the through hole to the outside.
How to install air conditioning in an apartment yourself
First you need to decide on the installation location and its method. Air conditioners are installed in apartments, the external and internal units of which are connected by a pipe containing wires and freon.
Important! It is better to install an air conditioner yourself in the spring or summer.
To properly install the air conditioner yourself, you should first study the instructions. It lists the necessary materials that will be required during the work process. It is better to purchase them in advance.
The sequence of actions will also be indicated there; in almost all cases they are identical:
- The locations of the block, route and all other devices are marked on the wall.
Route for system devices
- It is necessary to mark the locations of the wiring in the wall. This can be done using a special device.
- Next, the plate of the indoor unit is attached. It should be horizontal (a building level will help to level it). Then the plate itself is applied and the places for drilling holes are marked. After that, they are drilled and fasteners are inserted there.
- Then the plate is put in place and carefully secured.
- The outdoor unit is installed using the same scheme.
- The evenness of the installation is checked and everything is carefully secured.
- Using a puncher, a through hole is made through which communications will pass.
After these steps, a route is laid in the wall.
Important! The number of fasteners should be equal to the number of holes in the block. Otherwise, the structure may not support its weight.
How to install an external unit
All work begins with the installation of the condenser; suitable brackets are selected that will support the weight of the air conditioner. It is better to attach them to the wall itself, and not to the insulation or cladding of the room.
Mounting the system on the facade of a high-rise building
To protect the system from adverse environmental influences, it is covered with a visor.
The drainage pipe from the external unit must be discharged into the sewer.
How to install the indoor unit
The distance between two units should be proportional to the power of the system. The smaller it is, the better the system works.
It is for this reason that the indoor unit is installed on the same wall as the outdoor unit. If this cannot be done, then the closest location is selected.
It is important to consider that:
- Air conditioners cannot be installed above the bed.
- The distance to the ceiling must be at least 10 cm.
- Do not place above windows or radiators, or in an unventilated area.
- The air conditioner should not be placed close to furniture.
You should ensure free access to the device, this will improve its performance and allow it to be cleaned in a timely manner.
Installation of the indoor unit is almost the same as the external one. First you should choose a location, then attach the brackets, and the evaporator on them. The only difference is that before installing the indoor unit, you need to drill a hole for the freon tube.
After installing the entire system, the two units are connected and the air conditioner is connected to the network.
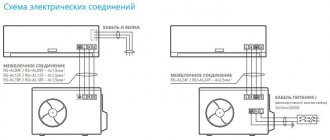
Second way
Using a separate cable for the air conditioner, it is easy to achieve stable and reliable operation of the equipment. This method of connecting climate control equipment is recommended by experts. It has a number of significant advantages.
When laying an individual line for an air conditioner, there is no need to connect to the existing electrical network. This allows you to place the system modules in any convenient place, and also refuse to calculate the total load on the wire. The user can install more powerful equipment.
Separate protection is always used to protect against network overload and voltage surges. In the event of a short circuit or failure of the air conditioner, the rest of the household appliances in the apartment or private house will operate normally.
A number of requirements have been established for a separate electrical line to be laid:
- Availability of AZO or RCD;
- Use only copper conductors with a suitable cross-sectional size;
- Selection of cable for the installed line, taking into account the manufacturer’s requirements;
- Availability of mandatory grounding.
To ensure the proper level of protection and maintain the integrity of the walls, the wires are placed in a protective corrugation and then secured with clamps. It is permissible to use a special plastic box fixed to the wall surface with screws or glue.
Any electrical circuit for an air conditioner requires the use of a cable with suitable characteristics. The most in demand are products marked VVG. To protect them, polyvinyl chloride insulation is used. Wiring formed using such a cable can last at least 30 years.
If hidden installation is planned, choose VVG-P. A flat cable fits better inside a prepared groove. For cable ducts or corrugations, it is preferable to use non-flammable VVG-NG, designed specifically for such operating conditions.
How to connect blocks
The air conditioner units must be connected by copper pipes (2 pieces) and cable. They can be laid on the wall and hidden in a special box, or in a groove. In this case, you will need to make a groove. But first you need to drill a hole in the wall, which is made after installing the fasteners. Then the connection of blocks begins, for this you will need:
- Pipes with larger and smaller diameters on which thermal insulation is applied.
- They are then pushed through the hole in the wall and bent using a pipe bender.
- Special tips are put on both sides of the pipes to protect them.
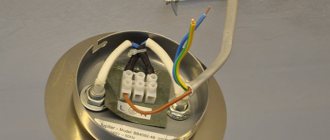
- The wire is also inserted into the hole and connected according to the instructions. Each block has terminal blocks to which the wires will be connected, according to their colors.
- Then a drain pipe is connected to a specific outlet of the indoor unit. Its second end is led out onto the street.
- The drainage must be carefully fixed to prevent it from sagging.
Connecting system blocks
If installation of a plastic box is required, then all communications should be tied into a bundle. This can be done using zip ties or metallic tape.
Flaring of copper tubes
We move on to the stage of preparing the tubes.
Error No. 5 You can cut them only with a special pipe cutter, no hacksaws or grinders!
When making a cut, it is necessary to hold the end of the copper pipe strictly downward in order to prevent any chips from getting inside.
The ends are processed with a rimmer.
Use the rimmer carefully to avoid scratching the skirt. The quality of rolling is one of the most important aspects in installing an air conditioner.
Flaring is carried out using a special tool with an eccentric. Don't forget to put the connecting nut on the tube before this step!
The width of the flare should be such that the connection eventually fits freely and unhindered into the nut.
The height of installation of the tube in the rolling clamp is strictly regulated.
The simplest and most proven old-fashioned way to determine the quality of rolling, at least at the initial stage, is to see your reflection in the “skirt”.
Flaring of the pipes of the outdoor unit will have to be done outdoors on weight. Otherwise, the line simply will not fit through the hole.
Error No. 7 Please note - if the installation does not take place on a hot, warm day, then when bringing copper pipes home from the street, close their ends and be sure to wait time for the copper to reach room temperature.
If you bring them in cold and open, then due to the dew point effect, condensation will form inside the tube, which, on a poorly evacuated air conditioner, can lead to dire consequences.
How to connect an air conditioner to the mains
At the final stage of installation, the copper pipes and air conditioner drainage are connected to the electrical network according to the diagram. With the latter, things are much simpler; there is an outlet at the bottom of the indoor unit, and that’s where the drainage is inserted.
After this, you need to connect the copper pipes. You need to start work with the indoor unit. There are two ports on its side wall, one with large fittings and the other with small ones. You can start with anyone.
The whole work process is as follows:
- You need to remove the nuts from the copper pipe connection points.
- Then the plugs are removed and the edges are checked for evenness.
- Union nuts are put on the pipes. It is important not to confuse the direction of the thread.
- The edges of the pipes are flared and clamped in the holder.
- The roller is installed and the screw is tightened.
- Rolling should be completed after the cylinder stops descending.
- The flared edge is guided to the outlet of the indoor unit and connected using a union nut.
- The external unit is connected in the same way.
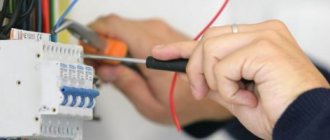
Connecting the air conditioner to the power supply yourself
The electrical circuit for connecting an air conditioner at home can only be single-phase. This can be done through an outlet or using a wire connected to the electrical panel.
Using a socket
First you need to lay the cable from the evaporator to the outdoor module. For this:
- A wire is laid to connect the blocks.
- A line is drawn to the electrical panel. This includes a cable and a circuit breaker for overload protection.
- If the devices have average power, then they can be connected without such a line. This is done directly into the outlet.
Important! The air conditioner can operate at different powers, so the circuit breaker should be installed on the connection line and near the outlet.
How to choose a socket
It must meet the following requirements:
- Have reliable grounding.
- Comply with the air conditioner manufacturer's specifications.
- All wires must be copper.
- The socket must be connected to the panel via a circuit breaker.
Socket for air conditioning system
Using a separate cable
This method is considered the most reliable and safe, especially if you install a shutdown protection device that will protect the system from voltage surges.
Requirements for this connection:
- Mandatory presence of a device or circuit breaker.
- All components must be copper.
- The diameter of the wires must correspond to the size specified by the manufacturer.
- A separate ground must be created for the entire line.
Then all cables are laid, and the operation of all components of the system is checked.
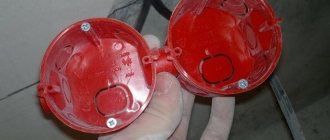
Connecting the air conditioning system
- the connection point is connected directly to the junction box. In this situation, they do without a socket and plug. But with this connection method, it should be taken into account that the electrical wiring used must withstand the load during the simultaneous operation of all household devices connected to it. The distribution panel is additionally equipped with a system that controls automatic shutdown in case of overload;
- If an air conditioning device is installed during general repair work, a closed structure is most often used during installation. A special channel is installed in the wall. It houses the cable. One end is connected to the distribution panel, and the other is secured to the outlet terminal. At the final stage, the channel is sealed. At the same time, the interior of the room does not deteriorate. The wiring is not influenced by external negative factors;
- Installation of the socket under the air conditioner can be done in an open way. This method is used if the repairs have already been completed and residents do not want to further damage the wall. One of the ends of the wiring is connected to the junction box. A socket is connected to the other end. The cable is located on the surface of the wall covering. It is placed in a decorative box.
Height from air conditioner to ceiling
The most optimal height at which to hang an air conditioner is considered to be 10 cm from the ceiling. This will ensure the correct flow of cool air passes through the top. In this case, there will be enough space for air circulation. However, for more powerful air conditioners, this distance can be increased by 5-10 cm.
The distance is calculated from the baseboard
A few words about wires
We recommend choosing stranded copper wires. If the air conditioner is low-power, 1.5 mm2 will be enough. For devices with a power of up to 5 kW, it is better to choose a cable with a cross-section of 2.5 mm2. More powerful devices are usually connected with wires with a cross-section of 4 mm2.
Most often, experienced craftsmen use non-flammable cable type VVG NG in conventional polymer insulation. It is inexpensive, yet highly reliable and can work properly for up to 20-30 years. This is an excellent option if the optimal combination of price and quality is important.
A flat type of cable can be used for laying in the groove, but this is often not necessary. Especially if the wire is laid in a groove and will be hidden under a layer of plaster. But, in any case, we recommend purchasing a non-flammable cable marked NG.
How to install a mobile air conditioner
A mobile air conditioner is much easier to install than any other. But here, too, some work skills will be required. The following set of tools is also required:
- Dense plastic (thickness 10-12 mm). It will be needed to create a barrier between the cool air in the room and the warm air outside.
- Saw for plastic.
- Masking tape or tape used to secure the sheet.
- Polyurethane foam or any sealant that will ensure water and air tightness.
Mobile device installation option
It is best to place the mobile air conditioner near a window, while avoiding breaks in the air outlet hose. The installation sequence is as follows:
- All necessary measurements and the diameter of the air vent are taken.
- A hole is cut for it. It should be 3-4 cm smaller than the pipe itself. This will help secure it tightly.
- The plexiglass is being sealed. This can be done using adhesive tape, sealant or foam.
- You need to open the window frame and fix the plexiglass insert there. This can be done using the same tape or sealant.
- After this, you can install the monoblock itself. To do this, select a place for its installation, insert a drainage hose into the air vent, and insert it into the exhaust hole of the monoblock. The other end of the hose goes outside.
- After 2-3 hours you can turn on the air conditioner.
Drainage
Please note that the drainage hose must be located below the freon line.
Connect the air conditioner drain hoses.
For extensions, many use a regular metal-plastic pipe d-16mm. The factory drain tube is flared and metal-plastic is inserted into it, sealing the connection at the top with electrical tape.
However, over time, a fungus may form inside the metal-plastic material, which will not allow the water to drain away quickly enough.
Therefore, other installers use only corrugated pipes as drainage.
In addition, it is the corrugated drainage that allows you to connect directly to the bath without additional connections.
Installing an air conditioner without a vacuum pump
If the length of the route is less than 5 meters, then the air conditioner can be installed without a vacuum pump. To do this you will need:
- Unscrew all plugs on the ports.
- Next, take a hex key, which is selected according to the size of the lower port.
- Next, the key is inserted into the port and rotated 90 degrees. At this time, freon comes out, which, together with air and freon, creates excess pressure.
- There is a spool on the port, which is compressed for a while. At this time, a mixture of gases emerges, which removes air and argon.
- Next, we repeat the previous steps. If the route is 4 meters, then this will be enough, if 3, then it should be repeated again.
- A plug is screwed onto the outlet with the spool.
- Using a hexagon, the lower and upper ports are opened, into which freon is admitted.
- The system is ready for use.
Checking pressure and sealing
Before pumping freon, be sure to check the drainage. To do this, having removed the filter, pour clean water onto the evaporator of the indoor unit, as if simulating the formation of condensation.
If the drainage is done correctly, the water will flow freely through the tube and will not overflow over the edge of the inner pan.
It is also advisable to check the pressure in the system before opening the freon line ports. The manufacturer, as a rule, fills 5 meters of refrigerant along the route, and reports this on the nameplate of the outdoor unit.
However, there are also half-empty copies (they save freon).
Next, the tightness of all connections is checked. Superprofessionals do this with nitrogen at a pressure of 38 bar at a reasonable price. But are you ready to pay money for such quality?
In the standard version, after disconnecting the vacuum pump, simply release a certain amount of refrigerant into the line (5-7 bar) and remember the pressure value.
Wait 20 minutes and check if the readings have changed. If the result is positive, using hexagons, the service taps of the air conditioner are fully opened and all the freon is released into the line.
Next, apply voltage to the air conditioner and test it in all modes. When cooling, measure the surface temperature of the evaporator with a pyrometer, or preferably a contact thermometer.
After reaching the operating mode, it should be at least +6C. If the temperature is higher, additional freon charging may be required.
In this case, a complete refill of the system is used more, rather than just refilling it, due to the complexity of the process.
If all installation stages are completed without any comments, you can enjoy the coolness and assume that your air conditioner is installed correctly.
Installing air conditioning on high floors
Installation of air conditioning on the top floors of the house can be done on the roof. The distance between the blocks will be approximately 15-20 meters. This can be done using a crane and a sliding ladder.
If this option is not suitable, then the system can be installed on a balcony or under a canopy. In this case, the following points must be taken into account:
- The walls where the system is installed must be strong and able to withstand heavy weight.
- Installation should not be carried out on aerated concrete walls.
- Do not attach the system to a ventilated facade, as this will lead to noise and vibration.
- Everything should be installed smoothly and without distortions.
- The distance between the external unit and the wall must be at least 10 cm.
- You should not install the air conditioner on a glassed-in balcony, as this will impair its performance.
- Be sure to install a canopy over the external unit, which will preserve the integrity of the system.
Safety
Read also: Secrets of soundproofing walls in an apartment: we use modern materials and technologies (25+ Photos & Videos) + Reviews
Damaged air conditioner
The electrical connection diagram must comply with the “Electrical Installation Rules”, since the air conditioner is a high-power device. Before you buy a device, you need to calculate the power of your electrical devices and compare all the restrictions. Otherwise, this may lead to emergency situations.
Requirements for installing air conditioners
In order for the air conditioner to bring maximum benefit, you must follow some rules:
- Choose exactly the model that matches the parameters of the room (size, availability of equipment, etc.).
- Correct installation.
- Compliance with the rules of operation and prevention.
The air conditioner has two blocks, each of which is assigned certain functions. The outer one is the condenser, and the inner one is the evaporator. They are connected using wires and tubes in which freon operates.
It is very important to choose the right location to install the system. In this case, you should take into account the weight of the block, free access to it, etc.
The air conditioner should be installed closer to the window
The outdoor unit must be located on a strong wall that can support a weight of more than 60 kg. Installation should not be carried out on aerated concrete. The external unit must be protected from environmental influences. This can be done with the help of fences and canopies.
When installing the indoor unit, please consider:
- The distance from the external to the internal unit should be minimal. This will ensure higher efficiency.
- The evaporator must not be obscured by curtains, furniture, etc.
- There must be a distance of at least 3 meters between the furniture and the indoor unit.
- The system cannot be installed above batteries.
- Provide free access.
- The distance from the block to the ceiling must be at least 10 cm.
It is necessary to ensure tightness and reliability of the air conditioner mounting. If a line is used to connect the blocks, then vacuumization of the connections will be required.
Do you need permitting documents?
Many people believe that after purchasing a device you can immediately install it anywhere, but this is not true. Unauthorized installation of an air conditioner is illegal and is punishable by administrative punishment in the form of a fine of 5-10 basic units. After paying the fine, the person will have to dismantle the device. To avoid such problems, you need to familiarize yourself with how to coordinate work and what documents will be needed for this.
The installation must be approved so that:
- do not spoil the aesthetic appearance of the facade of a multi-storey building;
- do not damage the building;
- the condensate released during operation of the device did not fall on the walls of neighbors or on the heads of passers-by who walk under the windows.
To obtain permission to install, you will need the following documents:
- a certified copy of the passport for the apartment where the device will be installed;
- a floor plan showing the location of the device;
- a document that confirms the right to property;
- document to confirm the identity of the owner of the apartment.
After submitting the listed documents, a person can receive:
- Coordination. The apartment owner can install the air conditioner according to the plan he has developed.
- Partial agreement. In this case, the device installation technology is redesigned and another location for its installation is selected.
- Refusal. This answer is obtained only if there is a possibility of the wall collapsing due to severe loads.
How to hide an air conditioner in the interior
Typically, an air conditioner is installed during renovation, so it is better to choose an option that will seamlessly fit into the interior. If this fails, you can try:
- Paint the air conditioner the same color as the wall.
- Place it above the front door.
- Purchase a built-in split system that can be hidden in a suspended ceiling.
- A floor-standing air conditioner can be hidden in decorative panels.
- Place the air conditioner in a shelf or cabinet where free air circulation will be ensured.
- You can make a niche for the block.
In this case, everyone decides which option will be more convenient. In any case, you should not heavily block the passage to the fan, as this can lead to overheating and rapid failure.
You can hide the air conditioner under the ceiling
During the hot season, air conditioning is a must. It is very important to install it correctly, otherwise the entire system will not be able to function and will quickly fail. If you do the installation yourself, you should follow all the rules, and before doing so, study the manufacturer’s installation instructions. This will help you get all the work done quickly and easily.
Do I need permission?
People often ask whether permission is needed to install a split system, and is it possible to install it without approval from the authorities? Based on practice, permission to install an air conditioner is not required. An exception may be cases when it is necessary to coordinate the installation of climate control equipment with the authorities in buildings that are architectural monuments or have historical or aesthetic value. In other cases, approval is not required for the installation of climate control equipment.