Nowadays, many people, during home renovations, lay network cables (twisted pair) along the walls. So that in the future they will have the Internet through an outlet built into the wall. This is due to the fact that a large number of our population prefer to access the World Wide Web via cable rather than wireless technologies. I consider this method more reliable and stable. Therefore, in today’s article we decided to show you how to connect an RG 45 Internet socket with a twisted pair cable.
What types of internet sockets are there?
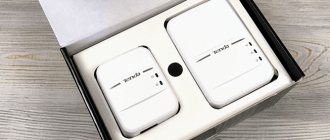
Internet socket rj 45 can be found in two different versions:
- Outdoor. This type of socket is installed on the wall. These sockets are used when the network cable runs along the wall.
- Internal. These sockets are installed in the wall. If your twisted pair wire is hidden in the wall, then for convenience and beauty use an internal socket.
Both options can be easily disassembled into several parts. One half of the case performs a protective function, the second half is designed for mounting on or into a wall. There is also an internal part, it is needed to connect the socket to the wire. It is equipped with thin contacts, with their help, with a slight pressure, the insulation of the twisted pair is cut and a reliable contact appears.
You can find single and double RG-45 sockets on sale. Internet sockets, depending on the manufacturer, will differ visually and in quality, but functionally they are all the same.
Areas of application
Computer sockets are usually installed in office premises.
In addition to purely home use, network sockets are traditionally installed in a number of facilities:
- offices, classrooms and premises with server equipment located on them;
- Internet centers and library sites;
- IT stores and repair shops;
- secret laboratories and other premises with limited access.
For modern offices, in addition to installing routers, it is mandatory to have RJ-45 sockets, which allow you to connect the station PC to the Internet and your own local networks.
In the premises of highly secret organizations, building network sockets into the walls is the only way to safely access the Internet, since any radiating systems are prohibited there. This precaution is due to the fact that sensitive information can be intercepted through wireless transmission.
We connect the RG-45 internet wall socket
When you open the lid, you will see a diagram for connecting the Internet outlet. At least, conscientious manufacturers and more expensive options definitely have it.
First, you need to vertically attach the case to the wall so that the network cable comes in from the top and the RG-45 connector is plugged in from the bottom. Although this condition is optional, if it is more convenient and beautiful for you to position the body horizontally, then do so.
We connect the RG 45 socket with the wire:
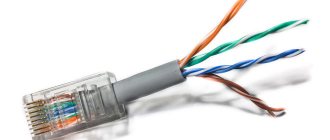
- Once you have installed the chassis, grab the edge of the twisted pair cable and cut off 4-6 cm of protective insulation. Be careful not to damage the wires.
- Twisted wires in pairs, untwist and align. Next, take one core at a time and insert it with force into the slot, adhering to the color scheme of the connection. If you can’t do this with your hands, then take a knife or screwdriver to help. Place one core into the slot and press it with a knife. The core should drop a few millimeters into the slot. In the photo below you see an example.
- After inserting all the wires into the slots, bite off the excess length of each wire.
- Done, close the lid.
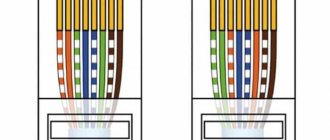
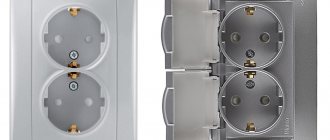
Two options for connecting any RG45 internet socket
As you can see, connecting the external socket rj 45 turned out to be quite easy. This procedure can be performed by anyone, spending 10-15 minutes. If you don't succeed the first time, don't despair, try again.
Conclusions and useful video on the topic
Similar instructions can be used for connecting and installing any types of Internet outlets:
They may differ in the location of contact groups and the set of interfaces, the mounting method, but this does not change the essence of the matter at all:
Connecting single or modular Internet sockets with your own hands is possible for any home craftsman, not to mention IT engineers. The main thing is to “guess” the color pinout of the cores the first time and get a high-quality data transmission signal via twisted pair.
Have you repeatedly performed electrical installation work and can supplement the information in our article with practical recommendations? Or did you install such an outlet with your own hands and encounter an interesting point that we did not mention here? Please share your tips with our readers - leave comments below this article.
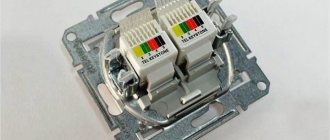
Let's see how to connect an internal Internet socket RG-45
Before you start connecting the Internet outlet, you need to disassemble it correctly so that you have normal access to the contacts. This is perhaps the most important task. In the future, you will connect the Internet cable to these contacts. Different manufacturers have done the disassembly and assembly methods differently.
Legrand internet socket
- To connect the Legrand internet outlet, you must first remove the front cover.
- Further inside you will see a white impeller; it must be turned in the direction the arrow points to.
- After turning, the front panel is removed. On this panel you will see a color scheme of where to connect which wire.
- Now you can thread the wires into the hole on the plate and start connecting. See photos and video below.
You may be interested in an article on how to change the external and internal IP addresses of a computer. You can see more details by following the link.
Lezard Internet socket
If you buy a Lezard socket, then you will need to disassemble it in a different way.
- To remove the front panel you will need to remove several screws.
- Then use a screwdriver to release the latches so that the inside can be pulled out.
- After this, you will have in your hands a small box with a lid on top. We pry off the lid with a screwdriver and open it.
- Done, start inserting each wire into the slot, one color at a time.
- The last thing to do is close the lid, assemble the entire internet outlet and mount it into the wall.
Disassembling sockets from different manufacturers differs, but the principle is the same for all. Whatever company you choose, you can handle the disassembly, the main thing is not to make a mistake in the color scheme. Otherwise, you will not only have to spend a lot of time, but also disassemble and reassemble in a new way.
Using the example of two Internet sockets from different companies, we showed you how to properly connect an Internet socket. But if you don’t know how to connect computers into a local network, you can look at us.
Crimp the network cable yourself
After installing the RG-45 outlet, you will need a patch cord to connect the Internet to the computer from it. It’s good if your computer is located a meter from the outlet, then you can simply buy a ready-made patch cord. But if the distance is 5 meters or more, buying such a length will be problematic.
Therefore, we recommend that you crimp the patch cord yourself; our article will help you with this: the procedure for crimping a twisted pair cable, all the diagrams. You can also watch on our website detailed instructions with a video on how to crimp a twisted pair cable yourself with and without a tool.
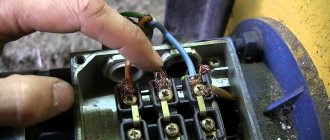
Connecting to the router and crimping the connector
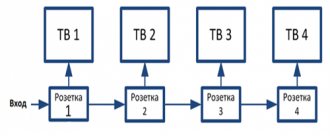
After installing the Internet outlet itself, all that remains is to correctly connect the cable to the router in the communication panel.
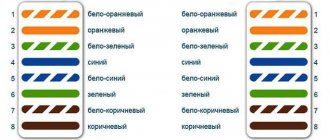
Remove the insulation from the other end of the cable by 2-3cm. The wires are fluffed up and inserted in a certain order, according to the TIA-568B standard, or simply “B”.
The arrangement of colors is considered from left to right:
- white- orange
- orange
- white- green
- blue
- white- blue
- green
- white- brown
- brown
Standard “A” is sometimes used if you need to connect one computer to another. Here you crimp one end of the cable according to standard “B”, and the other according to “A”. In general, if both ends of the cable are crimped to the same standard (AA or BB), then this is called a patch cord. And if they are swapped (AB or BA), then it’s a cross.
Again, there is no need to strip the veins. Just insert them into the connector until it stops.
After which all this is pressed in with a special crimper. Some people do this with a thin screwdriver or a knife blade, although this can easily damage the connector.
The cat5E and cat6 cables in the RJ45 connector are crimped according to the same principle. Another “fork” is not required here. Cables differ in data transfer speed; cat6 has a higher speed.
Common mistakes made when connecting RG45 sockets
When someone connects for the first time, it is possible to make a mistake. As a result, there will be nothing to work. Below we present the most common mistakes that many make.
- If you decide to install according to the “ B ” color scheme, then do not forget that the purchased network cable is usually crimped according to the “ A ” scheme. This scheme is the most common in our country.
- When cutting the protective sheath of the cable, be careful not to damage any of the wires. There are often cases when the core does not seem to have been cut, but is damaged, and when installing the socket into the wall, the damaged core breaks.
- There is a possibility of purchasing a defective internet socket. No one is immune from this. We recommend purchasing from trusted companies; the seller will advise you at your request.
- The wire was inserted poorly into the slots. Many simply don’t keep up. Therefore, do not be afraid to use force; the wire should fit well into the gap.