The self-regulating heating cable can be cut into pieces of the required length - this makes it most convenient for self-installation of heating systems. Coupling of a heating cable is the process of terminating a piece of cable and making a heating section from it for subsequent installation.
The heating section consists of a direct piece of heating cable connected to a power wire, at the end of which there may be a Euro-plug (for a section connected directly to an outlet), or the power wire is connected to a distribution box. In this case, a plug is not required. The connection is made using heat-shrinkable tubes and copper sleeves, which are sold separately in the form of TKT-type kits. The end part is also coupled with tubes to ensure the tightness of the section.
Heating cables have different structures, overall dimensions and characteristics - with braid, without braid, cable in a pipe. Depending on the cable type, there are several options for termination kits:
| Kits for coupling cables with braid - contain tubes with an adhesive layer to insulate the connection point and three sleeves for connecting current-carrying conductors and the grounding braid to the supply wire. These are TKT/3M, TKT/3K kits (a kit with a ready-made end sleeve) for cables with dimensions of 11x6mm or more. | ||
| Kits for coupling cables without braiding - contain tubes with an adhesive layer to insulate the connection point and two sleeves for connecting the current-carrying conductors to the supply wire. These sets are TKT/2M, TKT/2K (a set with a ready-made end sleeve) for cables from 10x5.5 and more. | ||
| Kits for coupling cables inside pipes contain heat-shrinkable tubes of reduced diameter, since the cable inside the pipe has smaller dimensions. Also, the tubes have a shrinkage factor of at least 4 for better crimping and insulation of the end part immersed in water. This TKT/VT kit is for cable with dimensions 9.5x5. | ||
| Kits for termination of cables placed inside junction boxes. They have special sleeves for connecting directly to the box terminals. This is a TKT/PROM kit, which comes for cables from 10x5.5 or more. |
How the electrical cable works
The self-regulating cable is an electric heater in the form of a tape.
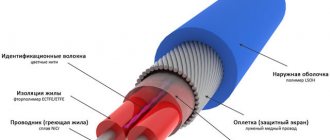
A cross-section of the heating cable consists of:
- metal heating conductor.
- conductors insulated with insulating PVC.
- internal insulation is made using fluoroplastic.
- screens made of copper mesh in which the conductors are located.
- The insulation on the outside consists of thermal insulation PVC material.
The insulating material resists the effects of water, is resistant to elevated temperatures, and is not affected by the harmful environment of wastewater. The materials have Sanpin approval for use in food water supply systems, so cables are allowed to be laid in cold water systems.
How to install a self-regulating heating cable inside a water pipe
The heating cable operates without human control. The system will automatically stop working if the ambient temperature exceeds the set values. Self-regulation protects the system from overheating, saving electricity consumption.
The advantages of a heating cable include:
- Reliable and safe operation.
- Simplicity of installation and operation.
- Energy savings due to automatic temperature control.
The main disadvantage is the cable's volatility. Some sections of the water supply must be equipped with additional sockets.
Characteristics
- All installation or repair work must be carried out strictly in accordance with the established requirements based on EN IEC 60079-14 for areas with a possible explosion hazard, or private rules and requirements.
- It is imperative that all power supplies be completely disconnected from the supply system.
- Reliable and high-quality installation of the heating cable termination is carried out only through the use of all components and elements.
- The heating cable termination can allow the necessary devices to be connected even in environments with conditions that have a negative impact.
- Heating cable terminations are available in a variety of ratings to withstand a variety of system heating temperatures.
- Before use or installation work, all criteria and parameters of the equipment should be calculated.
- End couplings may vary in type.
- It cannot have a rigid structure in order to have the necessary elasticity.
- The coupling is not equipped with any contacts for clamping, oil seals with seals, or cuffs, with the help of which reliable and accurate isolation of the system is carried out.
- The heating cable termination must be connected and secured by a short period of heating.
Household repair No. 1
Choose reliable craftsmen without intermediaries and save up to 40%!
Post a task and find out prices
Installing a heating cable is a fairly common procedure. This element is used for heating water pipes, roofing, eaves and other elements where freezing of water is unacceptable in the cold season.
- 3 ways to connect a heating cable to the network when heating a water supply
A distinctive feature of a self-regulating water cable is its ability to determine the required heating intensity depending on the temperature of the object itself and the environment. There is such a tendency - the lower the temperature of the first, the more the wire heats up.
Heating cable device
This element contains two cores made of copper, as well as the most important part - the heating matrix. All its parts are individually connected in parallel to the electrical circuit. This allows the matrix to serve as a heating and regulating element.
Externally, the design of the heating cable for water supply is wrapped in a thermal protective layer. Below it is a shielding braid. It promotes reliable protection of the self-regulating cable from the effects of external electromagnetic fields. Grounding is also connected to the braid. The upper sheath of the cable protects the entire structure from mechanical damage.
Operating principle of the heating cable
It is not difficult to understand how this element works. This is due to the fact that its principle is based on the rather simple function of a conductor of electrical energy. When a certain section of the pipe is heated, the current resistance increases. Therefore, a lot of power is consumed.
The section of wire that is placed in a cold temperature has less resistance. The matrix transfers more electrical energy here, causing the cable itself to heat up more. In the area where the temperature is higher, the resistance is higher. Therefore, less current is supplied to the heating element. Consequently, heating of the water supply does not occur in this place.
The self-regulating cable turns on when water inside the pipes begins to freeze. The heating power in this case is maximum. As the pipe temperature increases, it decreases. The heating cable itself does not stop working. Its power simply becomes minimal.
Cable installation
Connecting this heating element with your own hands can be done in one of the following ways:
In the first option, the connection method is divided into:
- linear - produced along a water pipe
- turns - in this case, the self-regulating cable is wound in a spiral around the pipes
Regardless of the chosen installation option for the heating element, insulation of the water supply system is a mandatory procedure. Otherwise, heating will be directed not at the pipes, but at increasing the ambient temperature.
- What is a heating cable?
The thickness of the insulating layer, as a rule, varies in the range from 2 to 5 cm. This depends on the installation conditions of the pipes:
- for underground water pipes, a smaller amount of heating layer can be used
- for above-ground structures - the insulation layer must be large
Moisture-resistant materials can be used as a heating layer. It can be polystyrene foam or polyethylene foam. You can create a protective layer to prevent damage to the heating element from pipes of larger diameter.
Options for connecting a self-regulating cable for heating water pipes with your own hands
The first method of installing a heating wire is one of the simplest. It involves placing the cable along the water pipes. In this case, the wire stretches along one of the walls of the pipe, attaching it to it with fiberglass adhesive tape after about 30 cm. You can use plastic clamps to mount the heating element yourself. But in this case, it is worth making sure that they can withstand the maximum temperature of the cable.
The second method of placing a heating element with your own hands is winding in a spiral. This method is good because it allows for maximum contact between the pipes and the cable. But at the same time, the consumption of the latter increases significantly.
To calculate how much heating wire is required in this case, it is necessary to multiply the length of the water pipe to be heated and the correction factor. The last value makes it possible to understand how many meters of wire are required to wind one meter of pipes. Taking into account the spiral pitch and pipe diameter, the correction factor can be from 1.1 to 1.5. You can clearly see this dependence in the table below.
Diameter of water pipe, mm
Number of meters of heating cable per meter of water pipe
Cable preparation and cutting
First of all, use a knife to cut off the outer insulation from the self-regulating cable. The length of the cut depends on the brand and section.
Usually it is about 7cm.
The cut must be made carefully so as not to damage the grounding braid. Next, this braid needs to be unwoven.
The most convenient way to do this is with a thin screwdriver or an awl.
After unbraiding, the fibers are twisted into one braid.
We get to the inner thermoplastic shell. Make a cut at a distance of 4cm from the edge and remove the middle layer of insulation.
Hidden under it is the so-called matrix with copper conductors on the sides.
You cut through the matrix, heat this area with a hairdryer and pull the sheath off the cores.
When making a cut, do not damage the veins themselves. They are quite thin.
You can extract the veins in another way. Use side cutters to bite the corners of the matrix, and use pliers to forcefully pull out each vein.
Then remove the matrix and remaining insulation from the copper.
Next, put connecting sleeves on the ends of the cores and crimp them with a crimper on one side.
Mistake #3
Do not crimp sleeves with regular pliers.
They will never create normal contact at such a critical junction.
Mistake #4
Also note that it is recommended to install the sleeves in a “ladder” pattern, and not at the same level.
First of all, this applies to moments when you do not use insulated sleeves, but ordinary bare GML.
Otherwise, with sufficiently dense shrinkage, this place will be the most likely source of insulation breakdown. Sometimes one sleeve can even push through another.
After crimping, insert small heat shrink tubes onto each core.
The tube should creep and overlap the sleeve by a few millimeters. Heat it with a hairdryer and reliably isolate this area.
Be sure to allow time for the connection to cool down. After that, insert a wide heat tube onto the inner thermoplastic shell and heat it until the glue comes out.
It should equally cover both the section of the inner shell and the individual veins.
While this insulation has not cooled down, move the cores apart and use thin-nose pliers to flatten the middle for a few seconds.
You will get 100% reliable tightness and no moisture will get inside.
Let's move on to the power cable and plug. Remove the outer insulation from it.
Mistake #5
In this case, you cannot leave all three wires the same length.
The grounding conductor must be longer than all the others.
Pull the largest outer sleeve through the cable, and stretch small heat shrinks onto the working cores.
Then you insert the stripped wires into the sleeve on the heating cable and crimp them with a crimper.
Mistake #6
In this case, stranded wires do not need to be twisted before inserting them into the sleeve.
Otherwise, during crimping, some of the veins will crush themselves. This is the most common mistake when working with similar tips and sleeves.
People often ask, is it possible to simply solder the wires together without using any press pliers? Yes, you can. But this is provided that you have enough experience and skill in this matter.
Crimping of tips and sleeves is less prone to errors due to the influence of the human factor and almost always creates 100% reliable contact (provided the sleeve size is correctly selected).
Slide the heat shrink onto the sleeve and warm everything up with a hairdryer. There should be glue coming out from both ends of the tubes.
As a result, you will get a connection in which each working core:
- sealed from each other
- sealed from braid
Give the connection time to cool and proceed to grounding.
Types of cables for heating pipes
A properly selected heating system is the key to long-term protection against freezing of any type of pipeline. Therefore, before settling on a specific product, let's take a closer look at the range offered by the market.
Cable products available for sale are divided into 2 types depending on the type of installation - intended for placement outside and inside the pipe.
Using a heat cable with automatic thermoregulation to warm up and prevent pipes from freezing
Let's take a closer look at the second option, which in turn is divided into 2 types depending on the purpose of the pipeline:
- for food purposes;
- for household needs and other tasks.
In the first case, the cable has a protective coating made of a food-grade polymer that does not affect the composition and quality of water, for example, polyolefin, fluoropolymer.
In the second case, there are no strict requirements for the type of coating, but such a system cannot be used to heat food pipelines.
Another difference between the cables is the operating principle. They are:
- resistive;
- self-regulating.
In the first case, we are talking about a single or two-core product. The manufacturer, as a rule, immediately produces a ready-made system for installation, which has a certain length.
The cable is often equipped with a plug for connecting to the network. The resistive system additionally includes a thermostat and a temperature sensor.
And in the case of a self-regulating product, additional sensors and regulators are not needed. In it, a semiconducting matrix is responsible for the heating level, capable of turning the system on and off automatically when certain temperature values are reached.
Heating cable with a matrix of semiconductors. On its two sides there are two parallel conductors, independent of each other. What allows you to divide such a cable into pieces of the required length
TOP 5 best manufacturers of warm cable
Leading manufacturers of heating cables are:
- The Swedish company Thermo Industri AB produces cables for heating domestic and main pipelines. Automatic equipment is used to manufacture systems, which improves product quality and reduces product costs. The manufacturer offers thermal regulators and additional devices that ensure reliable operation of pipe heaters.
- Eltrace products are produced by a company with French roots. The company specializes in the production of heating elements with automatic temperature control. The Tubes-heat product series is offered for domestic use. The Traceco range is suitable for installation on industrial pipelines. But the products can also be used in the private sector.
- Thermon products are manufactured by an American company. The equipment is characterized by ease of installation and reduced energy consumption. The company offers products with self-temperature regulation.
- The Danish company Devi offers resistance-type heaters, as well as self-regulating equipment. The company has been specializing in the production of heating elements for over 50 years. The products are of high quality and ease of installation.
- The Russian manufacturer Teplolux (SST) produces heating elements for pipes and floors. The products are distinguished by a reduced price and high quality manufacturing.
If non-standard pipe routing is used on the site. Then the owner will need to create a heating circuit himself or contact a company. When arranging an electric heating circuit, you should remember safety and provide for the installation of protective elements that eliminate the risk of electric shock.
Heating cable review and test, don't miss the video:
How to connect a heating cable to the network:
Helpful2Not Helpful
How to properly connect two different parts of a self-regulating heating cable?
Heating cables are allowed to be connected according to certain rules. Given the right conditions, a customized system will work properly for many years.
To connect two different wires, follow this algorithm:
- Cut the top insulating layer of the cable. Remove the inner insulation.
- The semiconductor part will need to be heated. For this you will need a hairdryer. After this it will become soft. Expose thin wire strands.
- Repeat the first two steps for the other cable.
- Use the compression or soldering method to connect two different wires.
- To insulate the veins, use heat-resistant plastic tubing.
Main technical characteristics when choosing
The choice of the maximum length of the self-regulating cable depends on the size of the heated area and the diameter of the pipes. They also take into account the maximum temperature the soil freezes to. How much electricity a heating cable consumes depends on its power and the temperature it heats up to. The power of the heating cable is selected depending on the diameter of the pipe. Products with a power of 10 W/m are used for pipes up to 2.5 cm in diameter. Pipes with a diameter of 2.5-4 cm are heated with 16 W/m models. Models with 24 W/m are designed for pipes with a diameter of 4-6 cm. When purchasing a cable, consider:
- product power;
- temperature class;
- type of external insulation;
- equipped with protective braiding;
- manufacturer.
Products from foreign companies Devi, Nelson, Raychem and Ensto are very popular. The products of the Russian company SST (Teplolux) have also proven themselves.
Which cable to choose?
The primary purpose of the heating cable is to prevent the water in the pipe from freezing. And this can only be achieved with sufficient power.
Which one should you choose in your case? In domestic conditions, a water pipe with a maximum diameter of 32 mm is usually heated.
For such a pipe, a cable with a power of 16 W/m is sufficient. For larger pipes from 50 to 110mm, choose a power of 24W/m.
If you are extreme and do not insulate the pipe at all, then such a water supply system will have to be wrapped with a cable of at least 32 W/m.
If the required power is not available, you will need to wind two cables at once.
Operating principle
The principle of operation of the device is the use of the properties of the matrix of the heating self-regulating cable. Two parallel conductors are enclosed in a plate. This is a conductive polymer that changes its electrical resistance in direct proportion to changes in ambient temperature. In some models, the conductors are connected by spiral matrix threads instead of a plate. To understand how self-regulating heating cables work, we need to consider several types of heating.
Example with heated floors
A comfortable heating temperature for the floor covering is 36-380C. To select the length and power of the SNK, a special thermal calculation technique is used. As long as Samreg is turned on, a stable, comfortable temperature will be established in the room. The only drawback of such warm floors is the lack of ability to adjust the heating level.
Self-regulating heating cable for heated floors
Plumbing example
SNK heats the water pipe at a certain level. When the air temperature begins to drop, the resistance of the matrix simultaneously drops, which causes an increase in the current flowing in the copper conductors of the samreg. As a result, the degree of heating of the conductors increases. As the temperature rises, the process occurs in the reverse order.
Example with roof heating
It is well known what a danger posed by accumulated masses of snow on the roofs of houses and hanging icicles. The self-regulating roof heating system is a SNK laid in a special way. The shape of the samreg layout depends on the roof configuration.
The roof heating level is constantly adjusted by a self-regulating cable. This ensures the gradual melting of the snow cover and its drainage in the form of melt water.
Important! With this method of heating the roof, two goals are achieved. Snow precipitation does not accumulate on the roof and does not create the risk of snow falling on people, while at the same time the roof of the house is not subject to excessive snow load
Nuances of installation work
When the wire is securely fastened inside or outside, it is important to take care of the insulation of the end of the conductor. Experts recommend using heat shrink tubing. This product will perfectly protect the conductors from moisture, which will reduce the risk of short circuits and repair work. We must not forget that the heating part must be connected to the “cold” part.
Connecting wires Source termodar-64.ru
Tips and recommendations from experienced craftsmen:
- If you use two methods of laying wires inside and outside the pipe at once, you can increase the rate of water heating several times, but this will require additional installation costs.
- Heating water pipes with a self-regulating heating cable will allow you to ignore warm sections and direct the current to cold places. It is allowed to be cut, so there will be no problems in installation even in hard-to-reach places. The cable length does not affect heat transfer.
- Resistive wire is half the price, but its service life is much shorter. If a regular two-core cable was installed, you should prepare for the fact that in 5-6 years it will have to be replaced.
- The braid on the wire serves to ground it. You can skip this stage of work, but it is better to become familiar with grounding methods.
Features of thermal insulation
The final stage of work should be thermal insulation of the pipeline in order to retain heat. Special cylinders, cut on one side, will act as a heat insulator. Such cylinders are made from various materials - mineral wool, expanded polystyrene or foam plastic. You must choose one or another option depending on your financial capabilities, and then, having purchased it, wrap the pipeline with it. Typically, a thermal insulation layer is necessary not only to retain heat, but also to additionally protect the cable from mechanical damage (if we are talking about an external installation). As for the thickness of the heat insulator, it should be at least 2 centimeters (for pipes with a diameter of ? inches), 3 centimeters (if the diameter is 1 inch), 5 centimeters (if 2 inches) or 6.5 centimeters (for products of all other diameters).
Pipe mounting with valve
What if you have a more complex case? For example, are there fasteners and valves on the water supply section?
There are certain nuances here. First, prepare the pipe itself by gluing the tape.
At the fastening points, the clamps will have to be temporarily removed.
In this case, the wire itself must pass through the lower attachment point of the clamp.
What to do with the tap?
Mistake #10
If the cable is pulled here in a straight line or even in a spiral, then if it is necessary to replace the valve, it will no longer be possible to do this without cutting the cable.
Therefore, a reserve must be made in the form of a loop.
After this, simply fold this loop around the valve and tighten it with a tie.
Thermal insulation is stretched over everything.
Installation of heating cable inside the water supply
Let's now look at the installation process inside the pipe. In what case should you choose this option?
For example, when you bought a house with a ready-made water supply system, laid incorrectly or with insufficient thermal insulation.
Or you need to remodel a country house for year-round use, and access to possible places where pipes freeze is difficult.
In order not to dig up the ground and not break the structures through which the water supply passes, the only way out is to “push” the heating cable inside. How it's done?
For this work you will need a special oil seal and tee. Select it based on the size of your pipe.
It is best not to use a tee at a right angle of 90 degrees.
This angle is considered extreme for heating cables and shortens their service life.
Place the gland kit through the cable, and then begin to push the wire into the pipe.
Double-check that the end is securely coupled so as not to damage the wires when cornering.
The most important thing in this work is accuracy. A small dent or scratch from a burr on the tee can damage the outer casing. And this will definitely sooner or later lead to failure of the heating.
And this will definitely sooner or later lead to failure of the heating.
As soon as the cable has reached the end of the tube, screw the gland into the tee and tighten it.
If you do not have enough space to install the junction box in which the wires will be connected, you can place it directly on the pipe itself through an L-shaped corner.
Before applying voltage, professionals must check the cable insulation with a megometer.
And of course, the connection in the switchboard must be made through an RCD or a differential circuit breaker.
You don't want you or your children to get electrocuted in the bathroom at the most inopportune moment.
https://youtube.com/watch?v=9xdcjUmU09M%3F
Resistive cable connection
Let's look at how to connect a heating cable to a power cable, which is supplemented with a ground wire.
- The first layer of insulation is removed according to the already known scheme. Under it there is a protective screen, which must be carefully cut lengthwise, bent and twisted into a separate core.
- It is necessary to strip the heating conductors, after which sleeves are put on the three resulting wires, which must be crimped at the base.
- A heat shrink tube is mounted on each wire.
- Two pieces of thermal insulating tubes of large diameter and different lengths are put on the power cable, similarly to the method described above. After this, the outer insulation is removed from it, and the ends of each of the three cores are released separately.
- The stripped wires are inserted into the sleeves. The ground wire (usually yellow-green insulation) is connected to the core into which the braid is twisted. The second end of each sleeve is crimped with a crimper.
- The tubes, previously placed on each core, are moved and processed with a hairdryer. After which the same operation must be done with the tubes that are put on the main wire. First smaller, then larger.
Now it is clear whether it is possible to connect the heating cable to each other and how to do it.
It is worth remembering that if you do not have the appropriate skills and abilities, then it is unsafe to carry out the described procedure yourself; it is better to turn to professionals who are guaranteed to do the job at the highest level.
Laying methods
Laying the heating cable is done in two ways. The external method is to wind it around a pipe or lay it along it. Internal - run the wire inside the pipe to prevent the water supply from freezing. The heating cable connection is made according to the connection diagram.
Linear installation
When installing the heating cable in a linear manner, fixation is done using plastic or fiberglass holders. They are installed at intervals of 0.3 m from each other. Metal fastenings are not used. If the pipes are in the ground, then the location of the wire is made with a slight offset. It cannot be laid flat at the bottom or at the top.
Spiral installation
For medium and large diameter pipes, spiral installation is used. The wire is wound onto the pipe in turns at regular intervals. The turn interval is reduced if any section of the pipe freezes heavily. Although such installation requires a large consumption of material, it ensures maximum contact between the pipe and the wire.
Internal installation
Installing a heating cable for a water supply system internally is only suitable for short pipes with a diameter above 0.4 cm. The wire will interfere with the passage of water if it is installed in a pipe of a smaller diameter. It will also be difficult to install into a long water pipe. In vertical pipes, the wire is pulled through using a tee and a sealing coupling.
Insulating the free end of the wire
After connecting the heating cable to the supply cable, the second end remains without insulation. It must be placed in the coupling. To do this, a small longitudinal cut is made, approximately 1 cm, separating the two wires from each other, after which one core is cut off to form a “ladder”.
This cutting method will reliably protect the two wires from accidental connection and short circuit, which will lead to burnout of the heating cable.
Take two pieces of heat-shrinkable tube: the smaller one is about five centimeters long, the larger one is 7-8 cm. The first one is put on the insulated part of the wire by 3.5 cm and heated with a hairdryer until the cable is tightly compressed.
The free part of the tube is clamped with a crimper or pliers. After this, a second larger tube is put on, and the procedure is repeated to securely seal the heating cable.
Connecting to the network is an alternative method
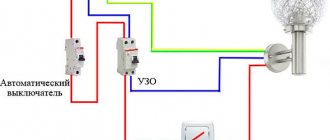
We took this cable:
The heating conductor (3) and the conductors (1 and 2), through which current flows, cannot be short-circuited
- This is what the end looks like.
- Cleaned it up.
- Using this terminal block I connected it to the wire.
The opposite side must be insulated. It is prohibited to bridge the conductors. And we must ensure that they do not bridge in any environment. You can buy a special plug for this. They cost around 300 rubles apiece. But you can do everything yourself using improvised means, such as heat-shrink tubing and a heat gun.
- Thermal gun.
- Heat-shrink tubing.
- End of insulated cable.
The plug is made as follows. We put on the heat shrink tube. We warm it up with a hairdryer. Afterwards we fill the entire structure with a heat gun.
The same procedure can be done with the terminal block to which the cable power is connected. You can also wrap everything with electrical tape just in case. If operating conditions are harsh.
Connecting parts of self-regulating heating wire
If there are two or more pieces of wire of the same type, the problem arises of how to connect the heating cable to each other. To do this, you will need a set of heat-shrinkable tubes of different diameters, crimp sleeves and tools. The work is carried out in several stages:
- The outer insulation is cut in a circle, and then lengthwise to a length of 4.5-5 cm from the edge. Then it is carefully removed.
- Below it is a second insulating layer, which is also carefully removed.
- The heating matrix is cut lengthwise to separate the two power wires. It is necessary to cut without reaching 0.5 cm to the base.
- The next step in connecting the heating cable to each other is to put heat-shrinkable tubing on both wires. For convenience, their lengths should differ by 1.5-2 cm.
- The tubes are heated with a hair dryer to ensure a tight fit to the wires.
- The ends of the cable are carefully stripped of insulation to a length of 1 cm.
- Sleeves are put on them, which are crimped with a crimper at the base. After this, heat-shrinkable tubes are put on them.
The main “body” of the heater is prepared, and it’s time to consider how to connect the heating cable to the plug.
- 2 pieces of heat-shrinkable tubing of large diameter, but of different lengths, are put on the wire, which is taken so that after installation the smaller one completely covers the connected wires, and the larger one exceeds it by about 2 cm on each side.
- The wire is stripped of insulation to a length of approximately 4 cm, divided into cores, each of which is stripped to 1 cm.
- The stripped ends are inserted into the sleeves of the second piece of wire and crimped from the second end.
- Pieces of heat-shrinkable tubing that are pre-attached to the wires are moved to close the sleeve and heated with a hairdryer.
- Afterwards, the procedure of closing the tubes is repeated twice more to ensure absolutely reliable insulation.
Instructions for connecting heating
In fact, figuring out how to install a heating cable with your own hands is not difficult. This element can be installed on both plastic and cast iron water pipes. First, preparatory work is carried out. In addition, you need to purchase all the necessary tools and materials.
First, the heating cable is installed; the connection diagram is often indicated by the manufacturer in the documentation included with the heating element. The next stage of installation of such a system is the installation of a casing for protection. The last step is to connect the cable to the network and check its operation. In addition, you can install the heating cable inside the pipe. This will increase its effectiveness.
Preparatory work
You need to immediately purchase all the tools and materials necessary for installation, incl.
- connecting sleeves;
- pliers;
- roulette;
- crimper;
- construction hair dryer;
- mounting knife and tape;
- wire cutters;
- heat shrink tubes.
After this, the end seal should be carried out. The free end, which will not be connected to the network, must be freed from the protective insulation and cut off with a step. After this, it is necessary to insulate its heat-shrinkable tube. Some systems are already prepared for installation.
This option is more convenient, so it is recommended for people who want to install a heating cable correctly, but do not have experience in carrying out such work.
Fastening the cable system
The simplest arrangement option is rectilinear. In this case, the cable is fixed parallel to the pipe. This mounting option is suitable for heating pipes located indoors, which will additionally be covered with a layer of insulation. In this case, only a small part of the pipe is exposed to thermal effects, but this will be enough to prevent ice from forming inside it.
Using the table, you can quickly select the pitch length for laying the cable through the pipe.
In this case, several cables are located on the pipe at once. This option is recommended if the pipe, even with the additional installation of a heat-insulating layer, will be exposed to elevated temperatures in winter. Due to this arrangement of heating elements, more uniform heating is achieved.
For fixation, use metal tape. When installed in a straight line, it is fixed with tape along its entire length. When laying the heating element using the winding method, the pipe is wrapped around the pipe in increments of at least 30 cm for fixation.
Often a self-regulating heating cable is installed in a wound manner. In this case, the conductor is wrapped around the pipe at a pitch of 20-50 cm. This method provides good heating of the pipe, but leads to an increase in the consumption of the element.
Attaching the protective cover
After the self-regulating cable is installed, you can begin to form the insulating layer. It is necessary not only to prevent heat loss, but also to protect the heater from mechanical damage.
If the instructions supplied with the heating system indicate the need to install one or another insulation, you need to follow it.
If there are no manufacturer's recommendations, you can use rolled insulation rubber, mineral wool or foam rubber. The entire pipe is wrapped with the selected insulation. The material can be secured with tape or twine. Additionally, it is advisable to treat the insulation with mastic or other waterproofing compound.
Connection to the mains supply
Connecting the cable to the network is carried out with special elements that must be purchased in advance.
First, the free end of the heater must be freed from insulation. The insulating screen should be twisted into a bundle and the conductor cores should be stripped. The cores and power cable are connected. Heat shrink is fixed over the joint.
Testing and commissioning
The heater must have a separate line. After this, you need to turn on the system and wait until the element heats up. If no faults are found, then the installation was completed correctly.
Installing the Thermostat
To save energy and more efficient operation of the heated floor, you should use a thermostat. It must be installed before laying the heating elements. It is mounted in a convenient place, at least 30 cm away from the floor. You need to make a niche in the wall to install the box and draw a groove to the base of the floor, in which the corrugation or pipe is placed. The corrugation should pass another 0.5–1 m along the base of the floor; connecting wires from the heating elements are placed in it.
A good place to mount the thermostat
The ends of the cable must be led to the thermostat in such a way that the couplings remain in the screed.
Step-by-step instructions for installing a heating cable in a pipe
Before purchasing a cable, you need to determine its quantity. The size of the product is equal to the length of the pipe for which the cable is selected
Along with it, it is important to buy additional materials used in the installation process. These include a set of couplings, an oil seal and a section of wire with a Euro plug
Important! It is necessary to pay special attention to the quality and reliability of the cable. It is better to give preference to the option with a metal braid inside. The water pipe requires a top layer of food-grade insulation
To correctly enter the cable, you will need a tee
The water pipe requires a top layer of insulation made from food-grade material. To correctly enter the cable, you will need a tee.
For the self-regulating cable to function, a power supply is required, so a separate line is allocated for it. And, despite the presence of double insulation on the heating wire, it is necessary to include an RCD and a circuit breaker in the connection diagram, protecting this line in case of accidental damage to the shell.
Preparing for installation
Self-regulating cable systems fail not only from constant switching on and off. This mainly happens due to improper splicing with the power cable and poor-quality termination, which leads to a short circuit.
Kit for coupling the heating cable during installation inside the pipe
It is necessary to carry out insulation according to all the rules, using proven consumables. Poor quality couplings may occur. Also, a lot depends on the professionalism of the master himself.
To prepare the heating wire for installation work, you need:
- Perform end seal.
- Place the pass-through kit on the cable.
- Splice the supply wire with a plug with a self-regulating section.
Connection to the power grid
After all the installation work has been completed, there is only one step left - connecting to the electrical network. For this, experts recommend using a separate line
It is important to take care in advance and equip this line with a 10 mA RCD, which will protect against current leakage in case of accidental damage to the wire. The RCD will simply de-energize the line, preventing electric shock to the owner of the object
Note! The connection process is simple - you need to plug the Euro plug located at the end of the power wire, which is connected to the heating wire, into the socket. Temperature control is carried out automatically
Is it possible to use a self-regulating cable for heated floors?
The main function of a self-regulating heating cable is to reduce the supply of electricity when the required heating degree is reached, without affecting the quality and uniformity of surface heating. This feature allows the model to be successfully used in the construction of heated floors in any room, from living rooms to bathrooms and toilets.
In addition, if you have heated floors with a self-regulating cable, you can rearrange the furniture in the apartment, since it has the ability to regulate the heating level, unlike resistive cables. That is, it is permissible to reduce heating under heavy furniture. It is impossible to change the heat supply of a resistive wire; overheating of the surface may occur, which will lead to failure of the system.
It is worth noting the simplicity of constructing a self-regulating floor, since this electrical cord can be cut anywhere and the end sealed with your own hands. At the same time, all connections, if installed correctly, can last for more than one year.
Naturally, like any self-regulating electric floor, it must be connected to power while observing all standard protection methods. That is, the system must have a circuit breaker and an RCD, the current leakage of which is no more than 30 mA. The Samreg cable must have a screen and a power of 30 - 40 W. At the same time, the laying step of the heating element is 15 - 20 cm.
Previously, the use of this function was not possible due to the small size of the film. Today, infrared film with 30% self-regulating ability is produced in Korea.
Types and varieties
The genus of basil is extensive, the boundaries of the genus are quite vague, and there is no certainty about many. There are approximately 120 to 200 species in the genus.
In the garden you can most often find:
- Basil foliage (Thalictrum aquilegiifolium) - up to 120 cm. It is he in the title photo. The leaves are large, openwork, bluish-green. It got its name because the leaves are shaped like the leaves of a columbine. The flowers are lilac, white (modern varieties also have flowers of various shades of burgundy, wine, lilac, dark red, violet, pink), collected in a loose panicle, appear on the plant in June and last until the end of August.
- Delavay's Basil (Thalictrum delavayi) - up to 150 cm. The flowers are double, lilac-lilac, or pink. The foliage is openwork. Blooms in late summer, from mid-July to mid-August. A very beautiful, graceful plant.
- Yellow cornflower (Thalictrum flavum) – from 60 to 110 cm. The leaves are entire, bluish-gray in color. The flowers are yellow, collected in thyroid-paniculate inflorescences. Flowering in June-July.
- Hybrid cornflower (Thalictrum hybridum) – up to 250 cm. The stem can be leafy or defoliated. The inflorescences are large, of various colors. Flowering - in July. These are garden forms of the plant.
- Threaded cornflower (Thalictrum filamentosum) is a short, up to 25 cm, delicate ground cover plant with beautiful foliage, native to the Far East. The flowers are white, openwork. Flowering is early, from mid-May for 3 weeks. Does not require replanting and retains its decorative appearance for 20 years, excellent for planting in tree trunks.
- Spreading-flowered cornflower (Thalictrum diffusiflorum) - height 70-90 cm. The flowers are relatively large - about 2 cm in diameter, collected in loose inflorescences.
Delavay's Basil - Thalictrum delavayi
Yellow Basil - Thalictrum flavumglaucum
Threaded Basil Thalictrum filamentosum
Spreading flower - Thalictrum diffusiflorum
Black Shoking variety with expressive, almost black stems.
Below are a few more common varieties:
Thalictrum Thundercloud - quite compact, expressive dark stems, very light pink flowers.
Below in the photo is a modern variety of Delaway's basilisk with double flowers - Hewitt's Double.
Thalictrum Delavayi Hewitt's Double
The “Elin” variety is one of the longest-lasting varieties. Blooms from early July to late September.
Thalictrum 'Elin'
Sometimes you can find mention of the magnificent basil, but this species does not exist.
Grounding braid
If the cable is laid through a plastic pipe without any metal valves or clamps, then many do not even connect the grounding conductor.
With the ground not connected, the heating cable works without problems. The braid in this case performs only the function of additional mechanical protection.
There are even inexpensive self-regulating cables that do not have a braid in their design initially.
Mistake #7
If the pipe is metal or the heating is built into the water supply, then in no case can such heating be used without grounding.
As we said earlier, the ground wire on the power cable should be the longest. This is necessary so that the connecting sleeves are not located at the same level.
In this case, the coupling will be too thick. You put a shrink sleeve on the grounding, and insert the core itself into another sleeve.
From the reverse side, insert a braid twisted into it.
Mistake #8
At the same time, do not leave a large reserve and unnecessary rings, which will subsequently prevent the topmost heat shrink from “shrunk” tightly.
Crimp the joint with a crimper. The heat shrink on top acts as mechanical protection.
Sealing the connection is not so important here. At the very end, move the outer coupling and isolate all three sleeves and the connection itself.
Mistake #9
The most important thing here is to heat the coupling starting from the middle, gradually moving the hair dryer to the edges, and not vice versa.
There should be no air gaps or bubbles formed inside. And drops of glue should appear at the ends of the heat tube.
To ensure that the coupling sticks securely and fits like a glove, it is recommended to lightly sand the areas on the outer sheath of the cable before installing it.
Additionally, while the coupling is still hot, you can press it along the edges with pliers.
But this is provided that your cable is not round.
Installation of connecting and end couplings of the heating (heating) cable.
1.1. Installation of the coupling
1.1.1. Cut and remove the sheath from the heating cable (see Fig. 1).
1.1.2. Unravel the shielding braid and twist it into a “bundle”. Cut with a knife and remove the insulation from the heating cores, leaving 30 mm (see Fig. 2).
1.1.3. Cut with a knife and remove the semiconducting matrix. Shorten one core by 15 mm. Place heat-shrinkable tubes T2 3.0/1.5 onto the stripped cores and heat-shrink them using an air heat gun with hot air (see Fig. 3). Shrinkage temperature 200°C.
1.1.4. Strip the installation wire PVA 3×1.5 according to Fig. 4.
1.1.5. Place heat-shrinkable tubes T-2 6.0/3.0 30 mm long onto the core (length 45 mm) of the heating tape insulated with a heat-shrinkable tube and the insulated core (length 45 mm) of the installation wire. Place a heat-shrinkable tube CFM 19/6 100 mm long onto the heating tape, and a heat-shrinkable tube CFM 19/6 140 mm long onto the installation wire.
1.1.6. Insert the strands of the installation wire and heating tape into the copper tubes M 4×0.75×10 (see Fig. 5). Crimp using a hand crimper (see Fig. 6).
1.1.7. Push heat-shrinkable tubes T2 6.0/3.0, 30 mm long, over the connection points of the cores and heat-shrink them using an air heat gun with hot air (see Fig. 7). Shrinkage temperature 200°C.
1.1.8. Slide a 100 mm long heat-shrinkable tube CFM 19/6 over the resulting connection (lead the grounding wire and shielding braid outside the heat-shrinkable tube, as shown in Fig. 8). Heat shrink it using an air heat gun with hot air. Shrinkage temperature 250°C. Connect the grounding wire to the shielding braid using a copper tube M 5 × 0.5 × 5 and crimp it with a hand crimper.
1.1.9. Slide a 140 mm long heat-shrinkable tube CFM 19/6 onto the resulting connection and heat-shrink it using an air heat gun with hot air. Shrinkage temperature 250°C. The final view of the coupling is shown in Fig. 9.
1.2. Installation of the heating cable end sleeve.
1.2.1. Cut and remove the sheath from the end of the heating cable (see Fig. 10).
1 2.2. Trim the shielding braid, leaving no more than 5 mm (see Fig. 11).
1.2.3. Cut the end of the tape with a step and put on a heat-shrinkable tube CFM 10/3 30 mm long (see Fig. 12).
1.2.4. Heat shrink the CFM 10/3 heat-shrinkable tube using an air heat gun with hot air and immediately crimp the free end of the tube with pliers (see Fig. 13). Shrinkage temperature 250°C.
1.2.5. Place the 80 mm long heat-shrinkable tube CFM 19/6 over the outer sheath of the cable (see Fig. 14).
Heat shrink it using an air heat gun with hot air and immediately crimp the free end of the tube with pliers (see Fig. 15). Shrinkage temperature 250°C.
1.2.6. The final view of the connecting and end couplings (see Figure 16.)
Read further:
Connection diagram for self-regulating heating cable
DIY self-regulating heating cable installation
Sealing the ends of the heating cable
Connecting the heating cable for pipes
What is dry cable stripping?
V-MT kit
- Description
- Characteristics
- Reviews
- Ask a Question
- Availability
V-MT kit
Main technical characteristics of the kit for electric heating tapes V-MT:
Where can I buy a V-MT kit at competitive prices?
The V-MT kit from the domestic manufacturer Gamma can be purchased from our company AWACS LLC at very competitive prices. To do this, you need to call the phone numbers listed on the website or send an application by email. Our specialists will provide free advice on all issues related to the purchase and use of products of this brand. Depending on the region of the country, the conditions for delivery of goods are determined. Delivery of goods will be completely free within the city. If desired, the buyer can pick up the order himself, since our company offers the possibility of self-pickup, the warehouse and office are located in one place. You can use bank transfer to pay for your order. We always have the best price!
V-MT cable kit contains:
1. Connecting seal V-MT red color L=32mm – 1 pc. 2. End seal V-MT red color L=41mm – 1 pc. 3. Seal GSMZ25 color red L=11.5mm – 1 pc. 4. Silicone tube TSM 3/5 L=150mm – 2 pcs. 5. Heat-shrinkable tube with an adhesive layer SPL 11.0/1.6 L=35mm – 1 pc. 6. Heat-shrinkable tube PBF 4.8/1.5 (color yellow-green) L=220mm – 1 pc. 7. Pin end NShvi 4.0-12 L=15mm – 3 pcs. 8. Heat-shrinkable tube with adhesive layer SPL 18.0/4.5 L=80mm – 1 pc. 9. Silicone adhesive sealant (10 ml) – 1 pc. 10. Instructions for use (combined with the passport) – 1 pc.
About the manufacturer of the V-MT kit
GAMMA LLC is a well-known Russian company that is part of the Group. SST Group of Companies occupies a leading position in the production of electric heating systems based on heating cables for domestic and industrial use. Thanks to the use of the latest scientific and technical achievements, innovative products and the strictest multi-stage control system, the products of SST Group in their operational and consumer properties are superior to analogues from foreign manufacturers. The company produces a wide range of self-regulating heating cables, including those with a linear power of up to 95 W per linear meter and withstand temperatures up to 240 °C. To implement any technical solution, a specially developed line of junction boxes, temperature control equipment, termination kits and connections. Products manufactured by SST Group of Companies are certified by Rostekhnadzor, JSC Gazprom and European centers VDE, SGS, Demko, NANIO CCVE, for compliance with the requirements of international standards ISO 9001:2008 and GOST R 9001-2008 and the International Electrotechnical Commission for use in explosive environments IEC Ex.
The most common areas of application of CCT products:
• Protection of pipes from freezing • Heating of ramps, steps and open areas • Maintaining process temperature on pipelines • Heating of the surface of tanks and containers • Protection against freezing of water pipes • Heating of roofs and gutters • Electric heated floors
Our company’s engineers will advise you on choosing a heating cable to solve your problem and help you select all the necessary components for installing a competent, complete heating system at your facility. At your request, we will draw up design documentation, install or supervise the installation of the heating cable and issue a warranty for the work performed.
Resistive: pros and cons
Resistive cable has a simpler design and lower price. There are three types:
- single-core;
- two-wire;
- zonal.
During installation, it requires care and precision, since failure of one of the sections requires replacement of the entire circuit. A distinctive feature of a resistive cable is that it provides stable, uniform heating along the entire length of the route.
Available in the form of coils and sections with a given length and power of wire. If the factory product is shortened, the resistance of the conductor can increase, and thereby increase its heating temperature. This is fraught with melting of the insulation and failure of the heating system.
Many manufacturers of resistive cables accompany their products with detailed installation instructions and complete them with the following materials:
- disc with video materials;
- corrugated pipe for installing a temperature sensor;
- mounting tape.
Single-core
This conductor is simple in design. The simplest conductor in design. Consists of several elements:
- metal wire (heating core);
- insulation made of polymer alloys or magnesium oxide;
- copper braid acting as a screen;
- external insulation.
The maximum heating temperature for conductors of this type is 60–65°C.
Two-core
A two-core cable consists of several elements. A two-core cable differs from a single-core cable in the number of conductive wires and the method of connection. It is a more powerful conductor, consisting of several elements:
- two heating cores, each of which is in fluoroplastic insulation;
- one drainage core without insulation (laid on top of the first two);
- a foil shield covering all three cores;
- external heat-resistant insulation.
Single-core and two-core resistive cables are called “series” because the conductive elements in them are located evenly along the entire length of the wire. The following companies offer the most reliable products:
- Norwegian NEXANS;
- Finnish ENSTO;
- DEVI (Denmark);
- Spanish CEILHIT;
- Ukrainian "EXON";
- Russian "SST".
Zonal
The zones make up a system of heating elements. A zone resistive cable is otherwise called “parallel”.
It differs from the two previous types of resistive type conductors in its design solution. Consists of two conductive wires. At a certain distance (100–150 cm) “contact windows” are provided in the core insulation. A spiral made of an alloy with high resistivity is laid on top of the cores. The spiral at its bending points (contact windows) is alternately closed with each of the two cores. In this case, parallel heating zones are formed, the maximum length of which can be 200 cm.
The zones form a system of heating elements - resistors and are independent, independent from others, sections of the heating system.
Advantages of zone cable:
- guarantees power stability, regardless of ambient temperature;
- allows you to design systems of any length without losing heating power.
How to choose the right heating system
Such systems differ primarily in the type of heating element. Options using cable or film heaters are possible. The second method has much in common with the “warm floor” system
The important difference is that the film should be located inside the roofing pie, because it is not designed for heavy loads and is poorly adapted to mechanical damage. But the cable, on the contrary, may be on the surface of the roofing material
But the wire can also be laid inside. This is usually used when installing a heating system for flat roofs, and also during the construction of high-rise buildings. Only cable is used to heat gutters and pipes.
The cable is used for external roof heatingSource domsireni.ru
Characteristics of different types of heating elements:
Self-regulating wire
This is a matrix with polymer insulation and two wire cores inside. This also includes a metal braid and an additional layer of insulating material. If it gets warmer outside, then the number of conductive paths inside the matrix decreases and, as a result, the temperature of the heater decreases. This type of heater has many advantages. Firstly, cable installation is quick and does not require much experience. Secondly, the matrix itself is resistant to overlaps and spot heating, thanks to the temperature self-regulation system. Thirdly, such a cable can be used in combination with absolutely any roofing materials. An important advantage is that the system selects the optimal temperature and thereby prevents the consumption of excess electricity. It is possible to install such heaters without the use of weather sensors, and you can also heat gutters using a self-regulating cable.
Self-regulating wire is the easiest to install on the roof Source raychemfutokabel.hu
Resistive wire
Heating occurs due to the resistance of the conductor. Such a cable can be two-core or single-core. The insulation is made of a polymer layer, and on higher quality models a nichrome core is used
When installing such a cable, you need to pay attention to the fact that both the beginning and the end of each wire must necessarily converge at one point. There is one rather serious disadvantage of such a heating system: in the event of a single point damage, the entire anti-icing complex fails.
Installation is inconvenient because the resistive cable cannot be cut. This method is suitable for heating large roof areas.
The resistive system is more complex; it is better to entrust it to an experienced technician. Source teploobogrev.ru
Film heater
It is a flexible film with cores made of carbon conductor. Such material heats its entire surface, since conductive strips are located frequently over the entire area of the heater. It is very convenient to transport and store, because this film is sold in small rolls. This material is attached only under the roofing, so it can only be used in case of roof reconstruction or during the construction process. The installation of such a heater should be entrusted to specialists. If local damage occurs, the heating system does not fail, but loses efficiency. During the repair process, it is always possible to replace the damaged section of the film heater. I would like to note that the film is very safe, it does not spontaneously ignite. Uniform heating of the surface provides good energy savings.
The film heater is mounted on the inside of the roofSource liquidsystems.ru
When choosing materials, you should pay attention to their cost. It is most expensive to use a film heater
A self-regulating cable costs a little less, and the most budget option is a resistive wire. But I would like to note that roof heating using a self-regulating cable is more economical and will provide good benefits in the future. Also note that installation of an anti-icing system on the roof surface is possible only with snow guards. Otherwise, the entire network will simply be torn down during heavy snowfall. Various improvements and options make the entire complex more expensive, but the choice is always yours. Remember that you should order a heating system for your roof based on the characteristics of your roof.
The heating system is selected based on the type and characteristics of the roof. Source ms.decorexpro.com