As a rule, consumers are connected to power sources (transformer and distribution substations) using cable lines (CL). This is due to the fact that this method has many advantages over overhead lines (OL). But, if there is an accident on the cable line, then finding the location of the cable damage without special instruments is almost impossible. Today we will look at several ways to localize an emergency section of a cable route laid in the ground.
Causes and types of damage to cable lines
There are many factors that negatively affect the integrity of power cables, the most common of which include the following:
- Ground movement can be caused by a failure of water supply, sewer or heating networks, as well as seasonal phenomena, for example, spring thawing.
- Exceeding the permissible operating standards for cable lines, which can lead to thermal overload of the line caused by an increase in current load.
- Formation of a high level of electric current in the cable line from a transit short circuit.
- Mechanical damage during excavation work without taking into account the passage of underground communications and the depth of the route.
- Errors when laying cable lines. As an example, we can cite violations of the technology for connecting cores with cable couplings.
- Manufacturing defects.
Note that when cable routes are laid open, some of the above causes of damage are extremely rare. In particular, the likelihood of the influence of soil movement and mechanical impacts due to excavation work is reduced. In addition, damage zones of open cable lines, in most cases, can be detected by visual inspection, without the use of special methods.
Having dealt with the reasons, let’s move on to the types of damage, since this directly determines the method by which the emergency section of the cable line will be localized.
Most often, repair teams have to deal with the following types of faults:
- A defect caused by a complete or partial break of a cable line. Most often, the cause of the accident is excavation work without determining the passage of cable routes. Somewhat less frequently, the cause of this damage can be a short circuit in the couplings.
- In power cables (more than 1 kV), breakdown of one of the conductors to ground (single-phase short circuit) is often encountered. Leakage current, as a rule, is caused by a decrease in the quality of insulation during operation of the cable line.
- Interphase damage, as well as types of metal short circuits, can occur in any lines; the cause of damage is the same as in the previous paragraph.
- Routine cable testing, which involves high voltage levels, shows low insulation reliability and leads to breakdown. Under certain circumstances, such a line can continue to operate, but due to its low level of reliability, an accident can occur at any time.
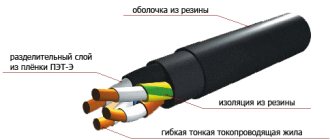
Installation of VSSK coupling for 10 pairs
Cable preparation (cable TPPepZ 10*2*0.5).
We clean and degrease the cable sheath from both ends to 250 mm.
Repairing cable shield
It is necessary to insert the base of the screen connector under the cable sheath, between the screen and the belt insulation of the cable until it stops against the edge of the sheath. Lightly tap the shell so that the teeth engage the shell. Place the cover on the base screw and tighten both parts with one nut.
On cables with an outer diameter of less than 20 mm, a 25 mm long sheath cut must be made on the side diametrically opposite to the screen connector.
We put the screen bus on the screws of the connectors and secure it with the second nut.
Cable splicing
We evenly distribute single-core connectors around the circumference of the splice so that the diameter of the splice is the same. We use Scotchlock UY2 type connectors.
Filling the cable core with compound
Apply one turn of mastic to the cable sheath behind the screen connector. Wrap the plastic sheet evenly around the mastic ring so that the line on the sheet passes under the bottom of the joint. We wrap the ends tightly with 88T tape.
8882-A Sealing gel, package 90 ml. Designed for pouring by gravity or under pressure into cable splices for the purpose of sealing them on cables with polyethylene insulation, not filled or filled with hydrophobe, without its prior removal. 8882 is a two-part, urethane-free compound. It reliably seals the filled cable and is compatible with plastic used in telephone connectors. Compatible with polycarbonates, copper and fillers. Does not contain isocyanates. The sealant material is polybutadiene.
Let's break the packaging bridge between the components of the compound and mix them. Fill the container obtained from the plastic wrap to the level where the compound completely covers the connectors and conductors.
Unfold the corners of the plastic wrap and roll the bag into a tube from the edge down towards the splice. We wrap the edges of the plastic wrapper to the mastic with 88T tape. Wrap the joint, extending beyond the edges of the mastic, with two layers of elastic EZ vinyl tape with a 50% overlap of turns.
We wrap the entire joint with force, stepping beyond the edges of the mastic, with three layers of elastic EZ tape with a 50% overlap of turns. When winding, we step 2 cm beyond the edges of the mastic. Let's secure the end of the EZ elastic vinyl tape from unwinding using 88T tape.
Mounting the coupling housing
Slide the coupling halves onto the sprout. We wrap one layer of mastic around the central joint and the joints with the cable.
To protect the mastic, wrap the mastic tightly with two layers of 88T vinyl tape, overlapping the turns and extending 20mm beyond the edges of the mastic on each edge. We start winding with a smaller diameter.
Installation of heat shrink tubes.
Ready.
We take measurements of the installed section of the cable line.
Whether the process of localizing cable damage underground will become prohibitively expensive or not depends equally on the professionalism of the repair team, and the capabilities of the pulse locator and the quality of its performance. In this case, the proverb: “The miser pays twice” becomes especially relevant.
Briefly about cable line repair
Repair work on cable lines is usually classified into planned and emergency. As for the volume of such work, for the former it is, as a rule, capital, for the latter it is current.
During major works, planned replacement of cable lines, laying of new routes, etc. are carried out. If necessary, repairs and/or upgrades of related equipment are also performed. The latter include ventilation systems and lighting for cable tunnels, as well as pumps for pumping out groundwater. Considering the specifics of planned work, localization of defective areas is not required during their implementation.
The situation is completely different during emergency repairs. In order not to dig up the entire route, you should accurately determine the location of the wire break, insulation breakdown, etc. For this purpose, various methods are used, for which special equipment is used. This will be discussed in detail below.
Preparing the cable for fault detection
All methods for indicating the location of cable line damage work successfully only when the resistance between the damaged wires is zero . The presence of an insulation resistance of hundreds of Ohms already makes it impossible to measure the distance to the fault or use the acoustic search method. In the event of a break in the cores without a short circuit between them, the task becomes even more difficult.
Therefore, as strange as it may sound, the damage must be developed to such an extent that it is complete. A multimeter connected between the damaged wires should show zero. And between the broken wires you need to create a contact connection.
Burning settings are used for this . They work like this: a high voltage (about 4 - 10 kV) is supplied to the cable between the damaged conductors. As a result, an insulation breakdown occurs, current flows through the fault site, and the voltage at the output of the installation automatically decreases. In this case, the current supplied by the burning installation automatically (or manually) increases. At the site of damage, the insulation melts, the metal heats up and melts. The process is continued until the current reaches its maximum value.
Burning installation control panel
In case of damage in epoxy cable joints or in case of insulation breakdown at high voltages (greater than the operating voltage of the line), burning is difficult. After cooling, the melted insulation again fills the interphase gap.
Old-fashioned methods
Of course, previously, to detect wiring in the wall, they did without instruments, but they safely found the entire power line under wallpaper, tiles and plaster. How did our grandfathers and great-grandfathers do it?
We present to your attention the three simplest options that will allow you to find the wiring yourself:
- If a major renovation is planned. You tear off the wallpaper and inspect the wall in the Khrushchev building (or in the house). Typically, the grooves for hidden electrical wiring are slightly different in color from other areas of the surface, and the putty will be rougher to the touch.
- Take an ordinary radio receiver, tune it to 100 kHz and bring it to the required zone. In the place where the current passes, the receiver will begin to make more noise.
- An alternative to the radio is to use a microphone on the radio. Turn on the microphone and carefully move it along the surface. There is a noise or crackling sound - you have managed to find the approximate location of the route.
We draw your attention to the fact that methods that use a microphone and a receiver have a fairly high error of 15 cm. That is why, relying on the signals of these devices, it is better to play it safe and retreat a little more so as not to receive an electric shock! Lifehack with an indicator screwdriver
Lifehack with an indicator screwdriver
That's all the instructions for using devices to detect hidden electrical wiring in the wall. We hope that now you know exactly how to find the wire and power cable under the plaster in the house without anyone’s help!
Related materials:
- How to find a junction box in a wall
- How to replace electrical wiring in a house
- Network surge protection device