When supplying electricity to a building, the power cable can be laid along poles or laid in the ground. The second method is more reliable, especially in dacha cooperatives. There is often no security there other than a barrier, and the wires are easy to steal. Therefore, it is better to lay them in the ground, calculating the depth of the trench for the cable.
Cable laying on a personal plot
Which cables to use
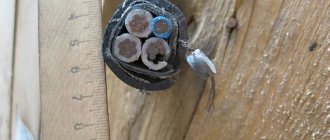
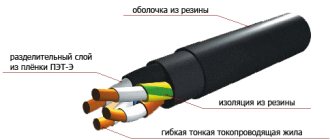
If we talk about GOST, it says that it is necessary to lay armored cables in the ground, covered with a waterproofing layer on top. That is, if the allocated power is sufficiently large, it is advisable to make the underground entry into the house from the pole with an armored cable. This is AVBbShv (armored with aluminum conductors and armor made of two galvanized steel strips, covered with a protective layer on top) or VBBbShv (the same, but with copper conductors), PvBShv - also armored, but with cross-linked polyethylene insulation and the same steel strips as armor. AAShp, AAShv, AAB2l, AAP2lShv, ASShl, etc. are suitable. These types of cable products are used in lands with normal acidity.
It is better not to use cables not intended for underground installation.
Laying cables in soil with increased chemical activity - salt marshes, swamps, large amounts of construction waste, slag - requires lead armor or an aluminum sheath. In this case, you can use AABl, AAShv, AAB2l, ASB, AAPl, ASpl, AAP2l, AAShp, AVBbShv, AVBbShp, APvBbShv and others.
If you need to connect a small dacha with no electrical appliances, a bathhouse, a barn or other outbuildings (pig sty, chicken coop, etc.), you can use a regular PVC-sheathed cable, since it is quite durable and definitely airtight. NYM, SIP are often used to install lighting on the site; VVG is enough for several years. But these products are not intended for installation underground and they quickly fail.
More serious cables are, of course, more expensive, but they last much longer. If we take into account the labor intensity of installation, it is more advisable to use special cables, and these are AAShv, AAShp, AAP2l, AVVG, AABL, APsVG, ASB, AAPL, APvVG, APVG, ASPL, etc.
An armored cable has three sheaths, a regular cable has one
In the regions of the Far North, special products with increased frost resistance - PvKShp - are used for underground installation.
Bend radius calculation
Great attention should be paid to the bends of the trench. Right angles are not allowed due to the high risk of cable damage. The bending radius depends on the diameter of the cable and its material, measured in relation to the diameter to the length of the bending curve:
- paper insulated and aluminum sheathed cables require the highest value - bending curve = 25 diameters;
- cables with paper insulation and lead sheath bend a little better - bending curve = 15 diameters;
- armored cables with PVC insulation - bending curve = 10 diameters;
- unarmored cables with PVC insulation - bending curve = 6 diameters.
Basic rules and technology
First you need to develop a cable route. It is clear that when laying in a straight line, less of it will be required. But, unfortunately, this is not always possible. When laying a route, it is advisable to avoid:
- Walking near large trees. It is advisable to lay the route at a distance of at least a meter from large trees. If the tree is located directly on the road, it is advisable to go around it along an arc or a trajectory close to it. In principle, the optimal distance is 1.5 m. If such an arc does not fit into the site, you can dig small trenches on both sides of the tree, drive a metal pipe into the ground between them, and pull the cable into it.
If there are more plants, they must be bypassed - It is highly advisable to bypass areas with increased traffic: parking areas, access areas for sewage disposal vehicles, pedestrian paths, etc. Such zones can be bypassed along the perimeter.
- If areas with increased load cannot be bypassed, cases are used to improve protection. Cases are also needed at intersections with drainage trays, at intersections of water supply lines, gas pipelines and other communications. If there are sections of the route with a ditch depth of less than 50 cm or in places where it was not possible to remove solid objects (old foundation, large stones, etc.), it is worth laying a protective cover everywhere.
- If the route of underground cable laying runs along the foundation, it must be at a distance of at least 60 cm from it. Laying the cable in the ground closer to the foundation is prohibited - movements of the soil or building can damage the power line.
- It is advisable to avoid crossing with other cables. If it is impossible to bypass the intersection, both cables must be in a case. They must protrude beyond the intersection by at least 1 meter in both directions, and the cables must be at a distance of at least 15 cm one above the other.
If you couldn’t avoid all the difficult places, don’t worry. In these areas, you can lay the cable not in the ground, but in a corrugated pipe, HDPE pipe or metal pipe. They are called cases. When using several pieces of metal pipes in a row, they must be welded. This is done so that they do not damage the shell at the junction points.
The procedure and technology for laying cables in the ground
They dig a trench along the intended route. Its depth is 70-80 cm, the width when laying one cable is 20-30 cm, when laying two or more, the distance between the threads laid at the bottom of the trench must be at least 10 cm. Use these criteria to decide. After the trench has been dug, you must:
- Remove all hard and sharp objects, roots, stones, etc. They can damage the insulation and may cause the line to fail.
- Level the bottom and compact it a little. It is not necessary to bring it to level, but there should not be any sudden changes.
- Pour a 10 cm layer of sand and level it. You can use cheap sand from a quarry, but it must be sifted to prevent foreign objects from getting in - stones, pieces of glass, etc. Compact the sand too. You can just crush it with your feet. There should be no obvious humps or depressions.
- Check the integrity of the insulation, if there is damage somewhere, repair it. Cases (pieces of pipes) are first put on the cable and dragged to places of increased load.
- Next, the actual laying of the cable in the ground begins - it is laid in a trench with sand. You can’t pull it - it should lie in light waves. Cases are placed in the right places along the route.
The waves will allow the line not to break during frost heaving or other soil movements - It is advisable to check the laid cable - damage may occur during installation. If you have a megometer, great, use it to check the integrity of the shell. If there is no such device, you can ring the wires for a break with a conventional multimeter or tester. It is also necessary to check them for ground. If it “grounds” somewhere, the insulation has been damaged. It is necessary to look for damage and repair it.
- If all the parameters are normal, sketch out a plan for the route, preferably to scale, with reference to landmarks. Set the distances from reliable objects to the route (from the corner of the house, the edge of the plot, etc.). Laying the cable in the ground is also inconvenient because if repairs are necessary, it is difficult to gain access. If you have a plan with dimensions, everything will be much easier.
- After this, fill the laid cable with sand. It is also sifted and a layer is poured - about 10 cm, compacted. There is no need to tamp down too much; you can compact it with your feet.
- Next, a layer of 15-20 cm of previously excavated soil is poured. When backfilling, remove stones and other foreign objects. The layer is also leveled and compacted.
- Lay down warning tape. This is a bright polymer tape with the inscription “be careful with the cable!” During excavation work, it can save underground electrical wiring from damage.
The warning tape will warn of possible excavation work - Afterwards, they continue to fill the ditch with soil, pouring it slightly above ground level, since after some time the rock will compact and settle.
And the last stage is checking the electrical parameters before connecting to the load. This completes the laying of the cable in the ground. Once again, the entire procedure can be seen in the video.
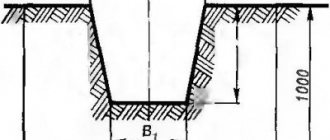
Trench requirements
The technology for constructing trenches and installing lines is described in the “Rules for the construction of electrical installations” (PUE). The designation of the trenches corresponds to the number of laid cables.
The trench should not lie at a depth of less than 70 cm, width - 20 cm along the bottom (these are the minimum parameters for installing one cable with a voltage of 10 kV according to the requirements of the PUE). The width of the trench along the upper edge is regulated by SNiP and PUE.
When choosing a location for a trench, you should take into account the composition of the soil and the distance to groundwater. It is recommended to avoid places with moving soil, since in this case it is necessary to provide a significant supply of cable (to avoid breaks).
When choosing the route and method of installing lines, you should take into account all adjacent buildings, structures and utility networks, the distance between them (according to SNiP3.01.01-85 standards). Coordination of the work project (WPP) with the owners of the premises is necessary if the cable is to be inserted into the building.
Nuances and features
Laying cables in the ground is a labor-intensive process. It takes a lot to dig a trench, and then carrying the cable is also not easy. Burying is a little easier, but also not the most pleasant experience. If after a couple of years the insulation becomes leaky, you will have to repeat everything again, which will not make anyone happy. It’s clear that it’s better to do everything once and more reliably. The fact is that you can lay the cable in a trench without a protective sheath. This will not contradict the norm. And if you install a high-quality armored cable, it will last a long time.
For greater reliability, it is advisable to lay the cable in double-walled special corrugation or asbestos-cement pipes
But if you are laying a regular VVG or NYM, for greater reliability, it is better to lay it in a double-walled corrugated hose DKS along its entire length. In the right places, you additionally put on cases made of stiffer pipes or the same booster tube but of a larger diameter. Asbestos-cement or plastic thick-walled pipes are also often used. When laying the cable in this way in the ground, the risk of its premature failure is much lower - most of the loads fall on the pipes, and not on the protective sheath and conductors.
Laying the cable in the ground in plastic or asbestos-cement pipes or corrugated hoses has one more advantage: there is a high probability that, if necessary, it can be replaced by simply tightening it in place of the old one. The new one is tied to the old one, the old one is pulled out, and the new one “crawls” in its place. But this is not always possible: over time, both the pipe and the corrugated hose can collapse - the effects of ice and soil loads contribute to the destruction of the protective shells.
This is what a cable not intended for laying in the ground may look like after a few years.
From all this it follows that although laying cables in paper insulation does not contradict the standards, it is better to use plastic insulation - PVC or cross-linked polyethylene. Paper, even with special impregnations, deteriorates much faster than polymers, which brings the replacement period closer. Laying cables in the ground still requires significant effort and labor, so it is better to lay more durable materials.
How to join two pieces
It is more reliable to lay the cable in the ground in whole pieces - without connections. If one piece of the required length cannot be found, to connect, bring both parts to the surface, place a sealed mounting box and connect the conductors in it. It’s not worth making couplings without experience and special equipment, or burying them underground - they will quickly fail and will have to be dug up and remade. And a serviceable connection is always convenient - you can reconnect the contacts if you need to.
This is what a normally made coupling looks like
How to enter the house
When entering a house, bathhouse, outbuilding, passing the cable under the foundation is unacceptable. Even if it is a shallow strip foundation. In general, when pouring the tape to enter the cable into the house, mortgages are embedded in it. This is a piece of pipe that protrudes a few centimeters beyond the foundation. The cable is inserted into it.
The cross-section of this embed should be 4 times larger than the cable cross-section. And to prevent living creatures from getting into the remaining gap, after laying the mortgage is sealed. To seal, you can use the old-fashioned method - a rag soaked in cement milk, or fill everything with polyurethane foam.
Entry of underground power cable through the foundation
If a mortgage was not made during construction, you will have to drill a hole in the foundation, insert and seal a pipe. Further, all the technology is the same.
If you do not provide a mortgage in the wall or foundation, drill a hole
A pipe is inserted into the hole made, it is foamed, and a cable is threaded through it.
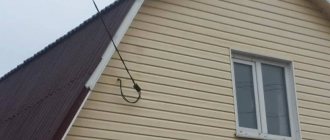
Another option: raise the cable in a metal pipe to a certain height along the wall of the house. They usually raise it to the level where the introductory cabinet hangs. At this height, install a mortgage in the wall (the same metal pipe with the same parameters and rules) and lead the cable into the house through it. This method is suitable if your foundation is a monolithic slab or you simply don’t want to disturb the solidity of the tape.
How to introduce an underground cable into a house through a wall
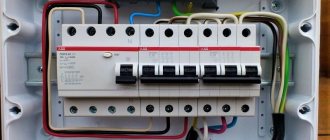
When using an armored cable, the armor must be grounded. To do this, a wire in a sheath is welded/soldered to the armor, it is in the shield. If this is not done, when the phase breaks through, it will most likely end up on the armor. If someone touches the armor, at best they will receive an electrical injury, at worst they may die. If the protective metal shell is grounded (or rather, zeroed), the breakdown will trigger the machine, which will turn off the power until the causes are identified and eliminated.
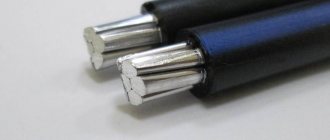
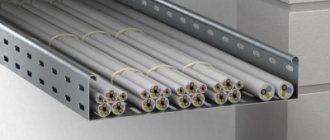
If there are several cables
If several cables are laid underground at the same time, the distance between them should be at least 10 cm. If you decide to lay them in pipes or corrugated hoses, a separate one for each.
If there are several cables, they are placed each in its own sheath or simply placed in parallel at a distance of 10-15 cm from one another
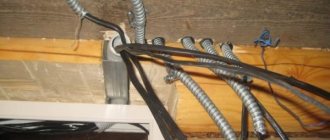
How to tighten into a corrugation or pipe
There are two types of corrugations for underground cable laying - with and without a probe. It's easier to take with a probe. This is a thin wire to which the wiring is tied to tighten it inside. The wire is pulled out and the cable is tightened in its place. It's simple.
Cable laying in the ground: corrugated HDPE pipe with a probe for easier pulling
If the pipe or corrugation does not have a probe, problems may arise. If the cable is stiff enough, you can simply tuck it inside. This is usually not difficult, but can take quite a lot of time.
This trick will not work with a soft conductor - it will twist and cling to the walls. But in this case, too, there is a way out. First, string or thin rope is threaded into the pipe. A cable is tied to it and pulled inside.
How to thread the twine? Using a vacuum cleaner. Fix one edge of the twine well, and lay the rest in an unfolded form, but without lumps or loops, in the pipe. On the other side, connect the vacuum cleaner, close the second inlet. By creating a rarefied atmosphere, the string flies out from the other side.
sand cushion
There is an appropriate rule according to which the cable should not be laid directly at the bottom of the trench. Firstly, after the bucket is used, it is not perfectly smooth. Secondly, there may be stones and rock corners at the bottom, which can easily damage the cable. A ten-centimeter sand cushion copes well with this problem. The material is carefully poured to the bottom and leveled. In extreme cases, in the absence of sand, you can use ordinary soil, cleared of any solid formations.
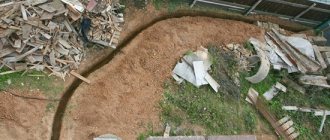
Laying cables under the road
If the route is located in such a way that it must be built under a road, you will have to obtain permission from the organization that owns this road. This point is mandatory in populated areas, since there may be other communications under the road and they can be damaged by unauthorized work. If we are talking about a dacha and a holiday village, then it must be agreed with the administration of the village.
A puncture under the road is made using special equipment
The rules for laying cables under the road do not change - trench depth is 70-80 cm, sand cushion and backfill, laying in an asbestos-cement pipe or double-wall corrugated DCS is desirable. In general, there are no differences, all the rules and regulations are the same.
Difficulties may arise if it is necessary to lay cables under asphalt. If it’s a solid road, you’re unlikely to be allowed to destroy the surface, and if they do, restoring the asphalt is an expensive proposition. In this case, there is also a way out - there is special equipment that is used to make a puncture under the road. The service is also not cheap, but it costs much less than the cost of asphalt restoration.
Estimate
List of works:
- obtaining permission to carry out land works;
- soil preparation, trench digging;
- preparation and laying of cables;
- creating a pillow (if necessary);
- installation of couplings (if they are used in operation);
- preparing holes for cables;
- introducing wires into the building;
- wiring test;
- creation of additional layers to strengthen and extend service life;
- backfilling of soil;
- final soil compaction using heavy equipment;
- payment for tracer services.
The specific cost of work is always individual and depends on many factors.
The importance of size
Underground installation is a popular method of wiring electrical networks . It has a simple circuit, high practicality and safety. But the main thing is that the wires are always underground, which also protects them from vandalism.
It is first necessary to calculate the dimensions of the trenches that will be used for laying wires. This stage should be taken responsibly, because the normal operation of the entire system depends on it.
Width, depth, length depends on the type and size of wire used. If the hole is small and narrow, this may negatively affect the operation of the power transmission network.
How to get it into the pipe
Try to insert strong and rigid cables into the pipe. This operation takes a long time, but is quite possible. But if the cable is soft, pulling it into the pipe will be impossible. The cable will begin to twist and stick into the walls.
To deal with a soft cable, you must first insert a thin cable through the pipe. A cable is attached to it, and the cable is pulled into the pipe. Some types of corrugated pipe are already on sale equipped with a wire probe for pulling the cable.
If you need to put a case on an already laid cable (when creating a crossing point), the pipe is cut to length. Then, after putting the protection on the cable, the halves are secured with electrical tape or plastic ties.
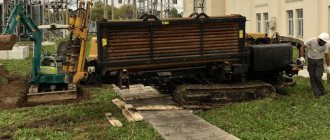
Installation of rolling devices
The cable drum is installed on a special jack with a central axis and raised a short distance above ground level. Further along the entire length of the trench there are rollers that reduce the friction force when pulling the cable. Also, due to the small width of the trench, rollers can be placed next to it. There are several types of rollers: straight, angular, guides, for coming off the drum. Each has its place in the system depending on its configuration.
Such systems are used when laying cables of large cross-sections. They have a huge mass, and without special devices it will be impossible to move them even a few meters.
Rolling process
The cable drum unwinds a little, and a cable clings to the end of the cable. It, in turn, can be hooked up to a winch, a service vehicle or a tractor. Afterwards, the cable begins to unwind at low speed (up to 2 km/h). Workers must ensure that the end moves strictly along the rollers, adjusting its direction as it moves. To avoid unhooking the cable each time when approaching guide rollers with closed edges, it must be passed through them in advance. The same must be done with pipes, tunnels and other closed systems.
It is not always possible to carry out work using technical means and cable rollers along the entire length of the trench. In this case, the crew unwinds the cable manually, loading it on the shoulder. In this case, the distance between people should be such that the load on each person does not exceed 30 kg, and the cable does not sag to the ground.