Laying cables in a trench
The technology for laying cable lines in earthen trenches is aimed at performing the operation in compliance with the standards determined by safety requirements and operational characteristics of the product. It is assumed that laying the cable in the trench will be carried out in several stages:
- digging a trench;
- rolling and laying;
- protection from damage;
- backfilling the trench.
Preparatory work
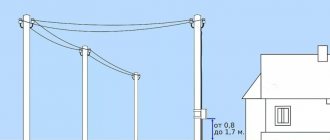
The main condition when digging a trench is to organize the route in such a way that in curved sections, cable bending does not lead to damage to the insulating layer. Mostly, the operation is carried out mechanized, with the exception of areas where communications are laid, where manual labor is used. The depth is determined by the type of product and the voltage level. (Fig. 1) It is permissible to lay a power cable in a trench 0.8 m deep, provided that its voltage does not exceed 10 kV. If the route crosses a street or square, then the depression reaches 1.1 m.
Rice. 1 Trench dimensions Attention! The bottom of the trench is covered with a 0.1 m layer of sand
A prerequisite for the procedure for laying products with a voltage of more than 1 kV is the installation of a protective covering made of concrete slabs or red bricks laid on a sand bed. The width of the trench depends on the cross-section of the cables and their number. The distance between them should be at least 100mm, as they need cooling.
Cable rolling
When the preparatory work is completed, the direct laying of the cable in the trench begins, by rolling it out from a drum mounted on jacks. (Fig. 2) It is advisable to install drums on mobile mechanisms; when performing operations in hard-to-reach places, rollers are used.
Fig. 2. Rolling out the cable Laying is carried out with a snake with a margin of up to 3%, this is caused by a possible displacement of the soil, which will lead to tension on the cable and its mechanical damage. It is important that when the route turns, there is no excessive bending of the product.
An important aspect is compliance with the temperature regime; if it does not meet the required parameters, then the laying of the high-voltage cable in the trench is carried out with heating and in a strictly limited time:
- 0 - 10°C - 60 minutes;
- -10 - 20 °C - 40 minutes;
- More than - 20°C - 30 minutes.
Attention! If it is impossible to complete installation within the specified time frame, then it is necessary to ensure constant heating of the product.
Cable protection requirements
An important step is to protect the product from mechanical damage. It is necessary to make a sand layer at the bottom of the trench, and lay a layer of brick on top of it. When the trench is dug mechanically and the width of the cutter is less than 250mm, it is necessary to lay brick along the entire route, then fill it with soil and compact it. It is important to maintain a distance between power and control cables, which should not exceed 0.1 m. Protection at intersections with communications consists of separation by layers of earth. If separation of cables by slabs is provided, then the thickness of the earthen layer is 0.15 m. Note that in this case, the communication cable is laid in the trench above the power products.
Information from SNiP, PUE, GOST
Before introducing you to the range of fireproof bricks, we suggest that you study the information provided in the regulatory documents:
Clause 4.2.108. PUE (Electrical Installation Rules). This paragraph specifies the requirements for materials used to seal holes in walls intended for laying communication lines. In particular, their fire resistance must be no lower than the fire resistance of the wall itself and not less than 45 minutes.
Clause 3.7. SNiP 3.05.06–85 Electrical devices. According to this paragraph, when performing construction and installation work, the responsibility for compliance with the requirements of the Fire Safety Rules and GOST 12.1.004–76 lies with the contractor who carries out the specified work. After the building is put into operation, ensuring fire safety is the direct responsibility of the customer.
Clause 3.18. SNiP 3.05.06–85 Electrical devices. In accordance with this section, when sealing the gaps between the partition and the box (pipe, opening) with fireproof materials, it is necessary to ensure fire resistance not lower than that of the building structure (wall). The same requirement also applies to sealing gaps between cables and wires that are laid in boxes, pipes, and openings).
Building materials made on the basis of polyurethane foam fully comply with the requirements listed above and are the optimal solution to ensure the fire safety of the building. Under the influence of temperature and open fire, the brick increases in volume and clogs the technological openings in the walls, thereby blocking the passage of smoke and flame into neighboring rooms.
The importance of size
Underground installation is a popular method of wiring electrical networks . It has a simple circuit, high practicality and safety. But the main thing is that the wires are always underground, which also protects them from vandalism.
It is first necessary to calculate the dimensions of the trenches that will be used for laying wires. This stage should be taken responsibly, because the normal operation of the entire system depends on it.
Width, depth, length depends on the type and size of wire used. If the hole is small and narrow, this may negatively affect the operation of the power transmission network.
Nuances and recommendations
Before starting installation work, it is recommended to study the following nuances and recommendations:
It is worth checking whether the route intersects with utility networks. All necessary data can be obtained after studying the geological basis of the route being laid;
- It is important that there are no communication networks at the installation site, otherwise they can be damaged during the digging process;
- Do not forget that the depth depends on the type of terrain in which it will pass;
- If the installation is planned under a highway, then the depth must be at least 1.25 meters;
- If the cable is installed under the lawn, you can dig a hole up to 90 cm deep.
During digging, it is worth taking into account important conditions; it is advisable that no utility lines run underground, otherwise they can be damaged. When calculating the dimensions of the pit, it is necessary to take into account the size of the wires, their number, the use of a protective sheath, the type of terrain, and the type of soil.
How to calculate the volume of a trench with slopes?
Excavations in loose soils have beveled walls. The volume of soil in a trench with slopes is calculated using the formula: the area of the trapezoid (cross section in the shape of a trapezoid) is multiplied by the length of the ditch.
V = (a + b) /2 ∙ h ∙ L
, Where:
- V—volume;
- a is the width of the ditch along the bottom;
- b is the width of the ditch at the top;
- h is the depth of the excavation;
- L - length.
Calculating the volume of a trench with slopes and height differences is somewhat more difficult. The calculation looks like half the sum of the areas of two trapezoids (the cross-sectional area of the beginning and end of the excavation) multiplied by the length of the trench.
V = (F1+ F2) /2 ∙ L, or V = ((a + b) /2 ∙ h1+ (a + b) /2 ∙ h2 ) /2 ∙ L
, Where:
- F1 is the cross-sectional area at the beginning of the recess;
- F2 is the cross-sectional area at the end;
- a is the width of the trench along the bottom,
- b - width along the upper cut,
- h1 is the depth of the excavation at the beginning,
- h2 is the depth of the recess at the end.
Generating a photo report
Quite often, the head offices of organizations carrying out work on laying cable networks are located in large cities. While the work itself is carried out thousands of kilometers from the locations of the main management. But reports are mandatory, and in addition to work schedules, foremen and foremen take regular photos of the cable in the trench, thereby presenting the very fact of the work.
Photo report is a well-known concept in construction. Sometimes, not having the opportunity to be directly at the work site, many managers instruct their employees to send to the head office, along with acts for hidden work and a selection of accompanying documentation, including passports for cables and pipes, as well as certificates of conformity, a selection of detailed photo reports. This may be necessary to ensure that the work is completed correctly and that there are no defects.
Calculation of embankment volume
Example 3. Find the volume of an embankment 50 m long, if its width at the top is 10 m, the steepness of the slopes is 1:1, the height of the embankment at the beginning is 2 m, and at the end - 4 m (Fig. 12). The width of the base of the embankment will be:
- at the beginning 10+2*(1*2)=14 m,
- at the end: 10+2*(1*4)=18 m,
and cross-sectional area:
at the beginning: (10+14)/2*2=24 sq. m,
at the end: (10+18)/2*4=56 sq. m.
The average cross-sectional area of the embankment will be:
and volume: 40*50=2000 cubic meters. m.
The pits can have different shapes in plan. The volume of the pits is obtained if the average area of the pit is multiplied by its depth.
How much mortar is needed for 1m2 of brickwork
As the Russian folk proverb says: “Measure seven times, cut once.” This principle will never become obsolete. Every builder knows that before starting any work, you need to carefully calculate, study and draw up a plan. What is it for? One of the reasons is to find out the required amount of consumable material, calculate how much it will cost, and purchase everything you need. If you are planning to build a house, you may be interested in the question, what is the consumption of mortar per 1 m 2 of brickwork? After all, you need to buy in advance all the components for the mixture, such as sand, cement and other consumables. Please note that the quality of the finished wall is influenced by the following factors: the quality of the material and the quality of the mortar. If the wall is built incorrectly, cold bridges may occur. Therefore, it is important to prepare the solution correctly and apply the right amount. After reading this information, you will find out the consumption of mortar for laying bricks.
A little about the factors affecting consumption
Mortar is the connecting link between bricks. Without it, it is impossible to build a wall. It must be of high quality, properly prepared and have the appropriate consistency. One of the important points that must be taken into account when calculating is its type of composition. The most common are 4 types of solution:
- Cement-sand mixture. It consists of cement, sand and water. This composition can be called the most durable if you strictly adhere to the application technology. Otherwise, there is a danger that it will crack.
- Limestone mixture. There is no cement in its composition; it is replaced by quicklime. The mixture is quite flexible and easy to work with. But there is one drawback - rain will easily wash it out. That is why it is used only for interior work.
- Mixed solution. The composition of this mixture is combined, and combines materials from the first two types. The result is a high-quality solution that is superior to the first two.
- Composition with plasticizer. Sand of 2 mm fraction and cement are additionally mixed with a polymer additive, which increases its plasticity.
These are the most popular mixtures used in construction. But, you should know that they are not the only ones that affect consumption. An important factor is the brick itself. Its size, format, ability to absorb water and the presence of voids directly determine how much mortar will be in 1 m2 of brickwork. In general, the consumption per 1 m 3 of brick is 0.2–0.25 m 3. It all comes down to the fact that the thickness of the wall plays a role, be it half a brick, one, one and a half or two. The greater the thickness, the greater the consumption. The same goes for the shape of the brick. For example, if it is large, then the flow rate is reduced, if it has holes, then the flow rate increases significantly. How is the mortar for bricklaying calculated?
Solution consumption per 1 m3
To find out the amount of mortar per 1 m 3 of brickwork, consider the following data. Ordinary brick has dimensions 250×120×65. There are certain standards that show how much mortar is needed per 1 m 3 of brickwork:
- 0.189 m 3 when built in half a brick (120 mm);
- 0.221 m 3 when built in one (250 mm);
- 0.234 m 3 during construction of one and a half (380 mm);
- 0.240 m 3 when built in two, (510 mm);
- 0.245 m 3 when built in two and a half, (640 mm).
It turns out that for 1 standard brick there is 0.0006305 m 3 of mortar. If we convert this into liters, then for 1 m2 with a thickness of 12 cm, there are 75 liters of the finished mixture, and when the thickness is 1.5 bricks (380 mm), the consumption increases to 115 liters.
If we talk about thickened products (modulated), then with their dimensions 250x120x88, the consumption is as follows:
- 0.160 m 3 of composition, when working in half a brick (120 mm);
- 0.20 m 3 of composition, when working alone, (250 mm);
- 0.216 m 3 of composition, when working at one and a half, (380 mm);
- 0.222 m 3 of composition, when working in two, (510 mm);
- 0.227 m 3 of composition, when working at two and a half, (640 mm).
Based on these data, it is clear how the size of the material affects the consumption of the mortar per cube of brickwork. There is a certain pattern: the larger the area, the less composition is required. Knowing this data, you can prepare the required amount of mixture for masonry. All you have to do is calculate the total footage and multiply it by the consumption per 1 m 3. Now you are prepared and can purchase materials for work. Below is a table that will help you find out the consumption of cement and additives to obtain the ideal consistency of the composition.
The procedure for laying cable lines in a trench
The technology for laying cables in a trench involves several alternating processes:
- A sand cushion with a layer thickness of 100 millimeters is placed along the bottom of the trench. Can use fine soil, without stones, debris and slag
- Pipes with cables enclosed in them are laid on sand.
- Connecting couplings are installed.
- The cable is backfilled. Earth or sand is used as the top layer.
If the project involves protecting the cable by laying ordinary bricks or asbestos-cement slabs, it is necessary to apply powder over the cable with a layer thickness of 100 millimeters.
Using warning tape in a trench requires certain actions. Laying warning tape over the cable with the inscription “Caution cable!”, apply powder to a height of 300 millimeters. The tape should be red and located 400 millimeters from the bottom of the trench mark.
Depth and width
When laying underground, trenches are made along the entire route without breaks. It is first necessary to calculate the depth and width of the hole.
At what depth should the cable be located? The standard depth is considered to be 70-90 cm . If you can’t bury yourself to this level, you can reduce it, but it’s better to lay the wires in pipes or in a protective sheath.
Corrugated hose or special pipes can be used as a shell, the outer surface of which is made of polypropylene with a rigid structure, and the inner area is made of soft polyethylene.
As stated above, depth depends on the type of terrain . In areas with lawns, its indicator can be standard - no more than 90 cm. But in areas under road surfaces, it is better to dig deeper so that the road does not fail in the future.
On normal soil, the depth should be at least 0.7 meters. If unfavorable conditions are observed, for example, the soil is loamy or highly unstable, then the depth can reach up to 1.3 meters.
In addition to depth, it is worth calculating the width correctly. For one cable it should be within 25-30 cm. If two or more lines are laid, then there should be a distance of 10 cm between them. There should be a distance of at least 15 cm from the cables to the wall.
When calculating trench depth, it is recommended to take into account power indicators. All parameters are shown in the table below:
| Power | Depth indicator |
| At entrances to structures, if there is an intersection with underground structures | 50 cm |
| 20-35 kV | 70 cm |
| From 35 to 110 kV, at all street intersections, on driveways, installation in areas with arable soil | 1 meter |
| From 110 kV and more (oil-filled lines) | 1.5 meters |
Standards for cable routes
Let's start with the fact that to install a cable in the ground, you need to dig a trench under it. If according to the project it is of short length, then this work is carried out manually. The terrain is also taken into account. In some conditions, you simply cannot do without shovels. Basically, trench digging is done with special equipment. The laying itself must be carried out over a bedding of sand, and the cable is covered on top with clean soil without pebbles, debris and slag. The main requirement at this stage is to reduce the risk of mechanical damage to a minimum.
Why are our conditions attractive?
Don’t know where to buy stove bricks in Krasnoyarsk? Take advantage of our company's offers. We guarantee the delivery of any batches of products in the shortest possible time. Extensive trading floors and our own transport with good carrying capacity allow us to fulfill even large-scale orders without violating contractual obligations.
You can leave a request by phone or place an online order on the company’s official website. Our consultants have qualified knowledge and extensive experience. They will help you make the right choice. They will calculate the exact amount of material for your construction work. They will tell you in detail about the quality features of the material and the most effective ways of laying it.
The cost of building bricks in Krasnoyarsk is quite realistic and without extra charges. We sell products directly without intermediaries. The price of the material is quite affordable for different categories of buyers. A democratic discount system has been developed for regular customers. The warehouse always has the necessary supplies.
Current
Changes in the Methodology for Determining the Estimated Cost of Construction
Explanation of the Ministry of Construction of Russia upon request regarding the Methodology for determining the costs of performing the functions of a technical customer
Analysis of systemic problems of the construction complex and the state pricing model
50 shades of estimate
Methodological problems of determining the estimated cost using the example of telecommunication systems of buildings and structures in the context of the pricing reform of 2022
New methodology for determining overhead costs and estimated profit
TIM, pricing and the future of the profession
Non-serial machines - what does the methodology compensate for the contractor?
The XII All-Russian Conference “Russian Construction Complex” was held in the Northern capital
Operation of construction equipment is the most complex type of cost in the cost structure
What is this
Soot is one of the physicochemical states of carbon. It has pronounced amorphous properties:
- does not form a crystalline structure;
- does not harden;
- there is no specific melting point.
Soot is familiar to many as a product formed during the combustion of organic substances. Lack of oxygen causes thermal decomposition of hydrocarbons with the release of pure carbon. As it settles on surrounding surfaces, it forms a black coating – soot.
Properties
Amorphous carbon, as a construction element, has a number of consumer properties:
- is not destroyed by exposure to ultraviolet solar radiation;
- has an absolutely black color tone;
- reacts with most organic and inorganic solvents, including water, forming stable suspensions;
- does not affect the physical and chemical properties of cement, improves the characteristics of mixtures based on it;
- does not fade, is not washed out by water from the frozen solution.
Receipt
According to the production method, there are three main types of amorphous carbon:
- Duct. It is formed during the combustion of pure natural gas or with oil additives during “oxygen starvation” in burner furnaces. The mixture is fed through slot burners. Unreacted carbon is deposited on the cooled internal surfaces of the firebox.
- Stove. It is released as a product of incomplete combustion of a mixture of hydrocarbons in a torch formed by a special burner. Solid particles are captured at the outlet by filters.
- Thermal. This substance is released during the temperature reaction of the decomposition of natural gas into a.
Decorative clips
Structurally, these products are similar to mounting clamps with studs. Thanks to their decorative shape, such clips allow you not only to secure the wire, but also to give the room the desired style, as well as to beautifully disguise the wires on the wall. An example of the use of such clamps is shown in the photo below.
Another example of decorative cable clips is shown in the following photo. These self-adhesive universal clips are attached with double-sided tape and are designed to secure the cables of phone chargers and computer peripherals. Velcro clips are convenient to place on any smooth surface.
An overview of this type of product is provided in the video:
Plate for closing the cable PZK 240x480x16 with the inscription “CAUTION CABLE”
0)window.scrollBy(0,-100);">
By submitting data, you agree to the privacy policy.
0)window.scrollBy(0,-100);">
By submitting data, you agree to the privacy policy.
Ways to receive orders
Pickup in Moscow - more details.
— Moscow, Novokhokhlovskaya str., 91, building 10
.
— Moscow, Malomoskovskaya st., 22, building 1
— Mon-Fri from
8.00
to
20.00
;
Sat-Sun from 8:00
to
18:00
. — There is no minimum order amount.
Payment:
- cash upon receipt. — by bank card through the terminal. — bank transfer according to the issued invoice (payment is credited within 24 hours)
Delivery in Moscow - more details.
— The minimum order amount is 1000 rubles. — 300 rubles within the Moscow Ring Road. — Mon-Sun from 10:00 to 18:00.
Payment:
- cash upon receipt. — bank transfer according to the issued invoice (payment is credited within 24 hours)
Pickup in the Moscow region - more details.
Order and buy in the cities of the Moscow region:
Delivery in the Moscow region - more details.
— The minimum order amount is 1000 rubles. — 500 rubles up to 10 km. from MKAD. — 40 rubles per 1 km. from the Moscow Ring Road + 300 rubles within the Moscow Ring Road, depending on the order amount. — Mon-Sun from 10.00 to 18.00.
Payment:
- cash upon receipt. — bank transfer according to the issued invoice (payment is credited within 24 hours)
Delivery to cities of the Moscow region by Courier Service - more details.
— The minimum order amount is 1000 rubles. — Delivery to the Courier Service terminal in Moscow — Free. — All courier services are paid by the buyer. — Prepayment of the order by bank transfer against the account, payment for Courier Service services upon receipt.
