An integral part of the installation of hidden wiring are grooves. These are special channels (trenches) made on ceilings and walls; electrical cables are laid in them. After completing the installation work, the recesses in the walls must be sealed using a hardening, non-flammable mixture.
Different materials behave differently when chipped. The most difficulties arise when making grooves in concrete walls; in this case, wall chasers and hammer drills are used. If we are talking about a brick wall, you can do without gouging with a trench; the cables are attached to the wall with dowels.
If it is necessary to pre-place the wiring in a metal casing, horizontal gouging of the channels is carried out using a grinder or chisel. Brick walls, if they split, do so at the seam. This is due to the fact that cement mortar is more pliable and softer than brick.
- The depth of vertical trenches should not exceed 1/3 of the wall thickness.
- The recesses are carried out strictly horizontally or strictly vertically; tilts are permissible only if there are uneven slabs of the house.
- The depth of horizontal grooves should not be more than 1/6 of the thickness of the ceiling.
Expert opinion
Viktor Pavlovich Strebizh, lighting and electrical expert
Any questions ask me, I will help!
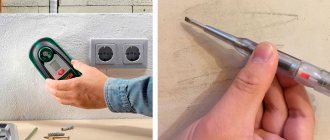
2 Locator Designed to locate hidden or exposed live cables in order to eliminate its break without damaging the insulation in conductive communications. If there is something you don’t understand, write to me!
How to find and repair a broken wire in the wall with your own hands
A cable break in hidden electrical wiring is a nuisance that does not happen too often, but it forces you to spend a lot of time, nerves and effort searching for and eliminating it. It will also have a significant impact on your pocket, because you need to find a damaged area in the wall, get to it, repair it and repair it again. For this work you will have to pay a specialist a significant amount. You can save money if you can handle troubleshooting yourself. From this material you will learn how to find a broken wire in the wall and what needs to be done to fix the problem.
Blitz tips
- Professional electricians do not recommend connecting aluminum and copper wires together. This is due to many reasons, the most important of which is the different resistance of metals. In addition, when interacting with each other, copper and aluminum oxidize very quickly, which causes heating of the wires and significantly worsens the contact. In addition, their rigidity is different, which significantly complicates the work.
- You can, if necessary, combine certain methods of connecting wires. In particular, twisting goes well with soldering or welding. The result is a very reliable and permanent contact that will last for a long time.
How to splice or connect two electrical wires or cables
Often in everyday life, many are faced with a problem: how to extend or restore a broken electrical cable or wire, in cases:
- When you drilled or cut a wall or floor with a grinder, and at the same time accidentally cut an electrical wire or cable laid in the wall and not visible to the eye. In this case, as a rule, sparks are visible at the site of damage and the Machine turns off or knocks out the plugs. In addition, sockets and lighting that were connected after the damaged section of electrical wiring stop working.
- It often happens that one or two wires break off in the wiring box for a socket or switch, and the remaining length is not enough to connect them.
- And sometimes necessary to move the outlet a little higher or closer to the places where electrical appliances are connected.
How to connect a twisted pair cable - 4 ways
13 February 2022 16:06
The ability to extend a network cable yourself will come in handy if you need to lengthen or repair the cord, but you are reluctant to contact a professional.
We talk about ways to connect twisted pair cables and give simple instructions.
Method #1: Twisting the conductors
This method consists of connecting conductors that have the same purpose by twisting and further insulating the cores. This approach is used when it is necessary to distribute cords in junction boxes, as well as when connecting sockets or switches. It is also used when you need to connect a broken electrical circuit.
The wires are connected using the same technology: a four- or eight-core cord is disassembled into conductors, and then identical cores are connected to each other.
It is worth noting that such a connection may result in signal attenuation. However, this method is suitable as a temporary solution, since the wire will still work.
What you will need for twisting:
- stripper;
- braid removal tool;
- tin solder about 0.3-0.5 mm;
- matches;
- heat shrinkage 1.5 mm before heating, after - 0.75 mm;
- insulating tape.
Now let's do the actual twisting:
- We strip both cables of the outer insulation: you need to remove 3-4 cm of the sheath.
- We disassemble the conductors and clean them. We twist wires of the same color together.
- We even out the ends.
- We wrap it with solder.
- We heat the twisted ends with fire and insulate them with heat shrink.
- We install electrical tape.
Searching for electrical wiring for preventive purposes
Usually, electricians or residents start looking for cables running through the apartment when there are problems with the light.
Read also: Hairstyles Master Class Video
Meanwhile, you should take care of this in other situations:
- Before the planned redevelopment of the apartment. For any manipulations that even affect non-load-bearing structures (for example, when dismantling a partition or moving a doorway), it is important to take into account the location of electrical communications.
- Before installing sconces, hanging pictures or other wall accessories. To carry out such work, it is important to know where the cable is located so as not to stumble upon it when drilling holes or driving nails.
- When purchasing a home. Immediately after purchasing an apartment, it is advisable to draw up a plan for the electrical networks located along the walls and ceiling. On the diagram it is also worth noting the locations of sockets, switches, and junction boxes. Such markings will help when performing major/cosmetic repairs of the apartment, as well as when arranging furniture.
To search for an electrical route, you can use homemade or professional devices, which were described above.
Every homeowner should know the location of the power supply route.
In most cases, owners resort to searching for a diagram of the location of electrical communications in the house when problems have already arisen.
Meanwhile, you should think about this in other cases:
- Before remodeling your home
During the reconstruction of a room, when changing its configuration, it is necessary to take into account the location of the electrical network so as not to cut off the power to the apartment or house.
- When installing lamps, hanging pictures, shelves or suspended ceilings
When carrying out any wall work, you need to know where the wiring runs so as not to damage it with a nail or drill through it.
Wiring damage often occurs during the installation of suspended ceilings. The corners at which the ceiling is attached are attached to the wall with self-tapping screws, and often these fasteners end up on the electrical wire line.
- After purchasing a home
Every owner must have a circuit diagram. Therefore, it should be drawn up immediately after purchasing a new premises. The plan must indicate the routes of electrical communications and the location of switches, sockets and junction boxes. In the future, the diagram will be useful when arranging furniture and during repairs.
Requirements for external wiring in the apartment
First of all, it is necessary to draw up an electrical diagram of lines and elements: sockets, switches and boxes. When drawing up a project, you need to consider the following points:
- Wiring lines must be located vertically or horizontally relative to the planes of the room. Other options are prohibited by safety regulations.
- According to standards, they should lie at a distance of 15-20 cm from corners, window and door openings. Distance from floor level: sockets at least 20 cm, and switches - 60 cm.
- Do not lay cables near batteries, heaters and other elements of heat radiation. The insulating layer becomes unusable due to constant temperature and the risk of an emergency increases to a critical state.
- It is also prohibited to install electrical components under pipes where condensate accumulates.
- For rooms with high humidity, electrical wiring elements must have double or triple insulation.
- Connections and wire assemblies should only be located in junction boxes.
- In advance, on the diagram, place the distribution box in an easily accessible place.
If the system is not laid through pipes or protective panels, then special brackets are used, sold in specialized stores. They are necessary to prevent the wires from sagging under their own weight. The distance between horizontal type wiring brackets is every 30-40 cm, and for vertical ones - 60 cm.
Laying open electrical networks as original decor and getting rid of old wiring problems
Repair of hidden damaged electrical wiring is often accompanied by construction and restoration work that requires considerable effort: removing finishing materials, chipping walls, further sealing them, plastering the wall surface, covering it with decorative materials. This is reasonable when repair work to restore wiring is combined with major repairs.
But if the room does not require major repairs, then in some situations it would be more rational to lay new electrical wiring on the surface of the wall.
When laying a new electrical wire, you can provide for the allocation of special lines to different rooms or devices. Also in the distribution board you can install separate circuit breakers for powerful electrical appliances: refrigerator, washing machine, boiler, microwave oven, air conditioner, etc.
It will also be convenient to allocate socket and lighting groups room by room.
Finding the exact location
After approximately determining the area of damage, it is necessary to resort to a more precise determination of the location of the break. For this purpose, various methods are used that allow you to quickly detect a broken cable.
The most effective way is to clean the wall
There is no faster and more reliable way to find a broken wire than removing finishing materials from the wall and opening channels with wires.
This method makes it possible to visually analyze all the grooves for the presence of damaged surfaces and detect a blackened or additionally treated with putty break point.
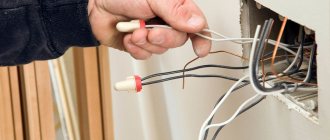
The plaster in the area where the wire is broken should be removed very carefully using a hammer and chisel. After opening the groove, it will become clear how many and which conductors are damaged: copper or aluminum.
In the event of an upcoming major overhaul, it would be more advisable to call an electrician with special equipment, after which decorative and restorative treatment of the walls will definitely be required.
Turn on logic
If the house does not have a plan for the electrical circuit route, then it is possible to restore it using logical deductions.
How to detect a break
To fix the problem, you first need to determine where exactly the wire is broken. If you made one hole, then you won’t have to search for long, but sometimes many holes are made before discovering a breakdown and then you will have to suffer. You can find a break in the wall using a special indicator. The voltage in the socket is checked; if the indicator lights up, then the phase is working, but zero is missing. Otherwise, the phase will not light up. To determine the location of the break, you can use the so-called “poke method”. An indicator screwdriver is inserted into each hole until the sensor indicates that there is a phase.
Instructions for finding the break point
If a malfunction is detected, it is necessary to immediately take measures to determine the cause of the damage and search for the approximate location of the electrical network defect.
First of all, you need to check which rooms have problems with the supply of electrical current.
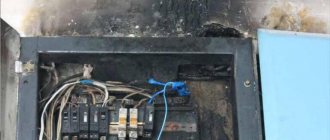
Melted switches or sockets indicate that damage to the wiring occurred in the adjacent sections of the electrical network
Then you should find out whether the cable break affected lighting fixtures or sockets by checking them with a tester. Depending on the answers to the last question, you should follow the instructions below.
In this case, the malfunction may be caused by a faulty phase or neutral cable.
Broken phase wire
First of all, you need to determine which machine the damaged socket is connected to. Having identified the power source to which the faulty cable is connected, it is necessary to turn off the electricity and disconnect all wires from the panel: “zero”, “phase”, “ground” (if any).
In order to find the power source of the outlet, you need to switch the machine, while simultaneously checking with the indicator the presence or absence of a phase
Then you need to arm yourself with a multimeter, with which you should sequentially check all connections adjacent to the damaged object, starting from the cable in the panel.
In this way, you can identify the affected area: usually between two sockets there are two, and in the presence of “ground”, three wires. If in this area it is possible to identify only one vein (for example, a zero), we can safely assume that the break is located here.
Distribution boxes are often inaccessible because they are hidden under a layer of finishing materials. If you have access to such devices, it is advisable to open them, since damage to the cores often occurs in them.
If no malfunctions are found, you should check the non-functioning wires with an indicator, starting with the twists, and also inspect the terminal block and disassembled twists.
A wiring option is possible that does not require installation of a junction box. In this case, the cables run unhindered from one outlet to another, with two wires entering each outlet box, making up 4 cores. In this case, to identify the defect, it is necessary to remove the devices located at the beginning and end of the faulty section, and then examine all the wires with a multimeter.
Damage to the neutral wire
The search for a broken neutral wire is practically no different from the work on detecting a broken “phase”, but it has certain features.
You can find out about a break in the neutral wire at the contacts of the socket by bringing an indicator screwdriver to this place: it will glow in the “phase”, but will show the absence of a “zero”. In this case, it is useless to use a multimeter to check the voltage, since this device will show an arbitrary value from 0 to 220 V.
It is important to observe strict safety precautions: due to the existing phase, there is still a danger of electric shock even if the socket is not working.
It is quite difficult to understand the intricacy of wires placed inside the wall. To identify a faulty cable, it is often necessary to check the integrity of each network element
If a three-core cable is used to distribute electricity, a “grounding” conductor can be used as a last resort to transmit “zero”. However, in this case, the “ground” function will be absent from the socket: this is generally undesirable and unacceptable if we are talking about high-power household appliances, for example, a washing machine.
Sequence of work
- Creation of a project diagram that indicates the location of all electrical points. It is discussed in detail with the client, the cost is calculated, and a contract is signed.
- Grooving – making the necessary holes for laying cables and equipping electrical points.
- Wiring.
- Sealing the grooves.
- Connecting new lines with dismantling old wiring.
- Arrangement of a distribution board, installation of automatic machines, switches, connection of lines.
- Installation of switches, sockets, after finishing work.
The price of work does not include and is paid separately:
- connecting electrical equipment - stoves, household appliances, lighting fixtures, etc.;
- cost of materials - boxes, machines, sockets, etc.
Properties of aluminum wires
But we propose to start our conversation with a quick analysis of the properties of aluminum wire. This will allow you to identify problem areas and understand possible problems during its installation.
- Let's start with the advantages of aluminum wire. The main one is the price, which is an order of magnitude lower than that of its main competitor - copper.
- Another advantage of this material is its lightness. This has led to its widespread use in power lines, where weight is very important.
- Well, the last advantage is its resistance to corrosion. Aluminum is almost instantly coated with a persistent oxide film, which prevents further oxidation. At the same time, this film also has negative aspects - it is a very poor conductor of electric current.
Preparatory steps before replacing wiring
It is necessary to begin any actions to replace the wiring only when you have bare walls: you have taken out all the furniture and things, cleared the walls of wallpaper, finishing materials, etc. When the apartment and the walls are ready, we find traces on the wall from the covered grooves in which the electrical cable was laid. The apartment wiring is designed in such a way that the meter branches off into several distribution boxes, which are distributed in different parts of the apartment. In an ordinary apartment, as a rule, there are two such boxes. From the junction boxes the cable goes to sockets and lighting.
How to hide TV wires behind furniture
The owner of an apartment or house wants there to be as few wires as possible, or rather, so that they are not visible. To quickly hide cables, you can buy special furniture that already has technological holes for the antenna or cable wire.
Most often, such furniture includes TV stands. They are equipped with a hole where all wires can be easily and quickly removed. And discreetly connect them to the nearest outlet. The same cabinets can have pull-out shelves for TV set-top boxes, DVD players and other equipment.
Where to look for a broken wire
If the light in the house flickers, disappears completely, sparks, smoke, the circuit breaker on the panel trips, or there is no current in some or all sockets, you should check whether the circuit breaker has been knocked out or the fuses have blown. If nothing happened to the meter, and everything is fine with your neighbors’ electricity, it means that your power supply circuit has opened.
The cause of the breakdown may be a break, loss of contact at the terminal connections, violation of the insulation protection of the wire and its malfunction. To prevent this from happening, wires from electrical equipment must not be bent, tied, twisted, or crushed with heavy objects.
The wire can be damaged in any area:
- in the conductor adhesion zone,
- in places where wires are connected to the contacts of switches, sockets, electrical panels;
- in the space between these devices and the box.
Signs of a cable break
Damage to electrical networks can be suspected if the electrical current supply partially disappears. A broken wire may be indicated by a lack of voltage in outlets located in a certain area, or by lighting not working in a separate room.
Sometimes wiring problems can also be accompanied by smoke or sparking in the cable. The cause of sparking can be not only a break, but also melting of the insulation as a result of illiterate selection of wires and cables.
Wire defects include breaks and breaks in the cord cores, as well as damage to the cable insulating sheath
Damage occurs on various sections of the network: the power supply may be disrupted at the point where the cable connects to the socket or switch; in the area between these devices and the box or lighting fixture.
How to extend an Internet cable with your own hands
For such a simple process as connecting a cable, it is not necessary to resort to the help of a specialist; you can do everything at home with your own hands. The easiest way is to twist the wires together. Just take two wires, strip the top layer of braid and twist them together according to the colors. We talked in more detail about the color scheme of Internet cables in this article. Then wrap electrical tape around the connected wires for better insulation and a more aesthetic appearance.
This method has a huge advantage over other types of connection: it does not require any skills or additional devices. You don't even need to crimp the cable. However, it is worth noting that with such a connection, signal loss is very likely: the quality of data transmission is greatly reduced. It is not recommended to use this method for very long lines, because such an unreliable connection can become critical for throughput. For the first time - a quick and easy way.
A more advanced version of twisting is the use of the so-called Scotchlock. Scotchlock is a very small cap for wires. The wires are simply inserted into it and the mechanism is snapped into place using pliers. Unlike simple twisting, this method holds the wires more securely, preventing them from coming apart. The pros and cons are absolutely identical to the conventional cable connection. Low stability, signal loss and undemanding tools.
Features of conductor connection methods
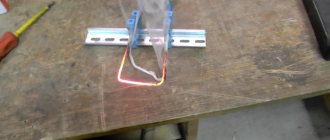
A reliable connection method is welding . It uses a voltage of 12-36 V from a welding inverter or a homemade transformer. One wire (ground) is connected to the twisted wires, and the other to the carbon electrode. When the electrode touches the top of the twist, an arc occurs. It melts the wires and a metal ball appears at the end of the twist.
The result of connecting wires by welding
While reliable, welding also has a number of disadvantages :
- you will need equipment: a welding machine or a homemade transformer, a carbon electrode;
- difficulties with connecting aluminum conductors: aluminum is welded only in an environment of inert gases that prevent it from oxidizing.
The second most reliable permanent connection is soldering . But soldering aluminum is just as difficult as welding - you need special solder and flux. In air, this metal is covered with a film of oxides that appears instantly. Therefore, the principle of aluminum soldering is to dissolve the oxide and treat the wire in a flux environment.
There will also be difficulties when soldering old stranded wires. Each of their veins is covered with oxide, so before soldering you have to carefully scrape it off with a knife from all sides. It is better to tin it with solder fat; the use of rosin is ineffective.
Before soldering, the wires are thoroughly cleaned of oxides, dirt and soot. They are then twisted together and the resulting joint is tinned.
Soldering has a disadvantage - the connection is difficult to disassemble.
For crimp , connecting sleeves are used. These are thin-walled tubes of various diameters for connecting conductors of corresponding sections. The sleeves are made of copper or anodized (tinned), the latter are universal and connect copper and aluminum conductors.
The wire is inserted into the sleeve from one side to the middle, then pressed with special pliers or a press. Then another wire is inserted on the other side and pressed in as well. PVC tubes or heat shrink are first placed on the wires to insulate the connection. But fully insulated connection sleeves are also available.
Crimping twists with sleeves
The disadvantage of this method is that it requires a special crimping tool; pliers are not suitable for this.
The use of nylon terminals of the ZVI brand also poses difficulties when connecting aluminum conductors. Aluminum is a soft metal, and the connection in the terminal is made by pressing the wire against the brass surface with the end of a screw. The tightening force must be commensurate with the plasticity of the conductor, otherwise it can be cut. Flexible conductors are connected to the FVI only after tinning or termination with a sleeve tip (sleeve). But even in this case, you can’t push too hard.
ZVI terminals and their application
There is an opinion that if the conductors are twisted together and a wire connection is installed on top of the twist, the connection is reliable. But the terminal block screws, on the contrary, loosen the twist and worsen the contact. Therefore, the use of connections using nylon terminal blocks is functionally limited: you can temporarily connect or repair equipment with their help. Although in modern lamps the connection is made only through the ZVI.
There is only one advantage of the method: it is cheap.
WAGO self-clamping terminals are considered the most versatile means for making contact connections. No shortcomings have yet been discovered. The connection occurs through a spring-loaded contact into which the conductor is inserted. The terminal contains a lubricant that protects the wires from oxidation. If necessary, the connection can be disassembled.
WAGO terminal
Another way to connect wires is with PPE caps (insulated connecting clamp). The cap is screwed onto the twist, tightening it and at the same time insulating it. Lubricant is also placed inside it.
PPE caps
If WAGO terminals are selected according to the cross-section of the wires being connected, then PPE and ZVI are selected according to the diameter of the twist. And since the twists come in different cross-sections, depending on the number of wires in them, installation work requires a set of terminals of different calibers.
Source: electric-tolk.ru
How to eliminate broken phase and neutral wires
After finding the point of the electrical wire break and determining the type of damage (phase or zero), you should proceed to repairing the break.
In accordance with the rules for electrical installations, it is strictly prohibited to connect wires by twisting when laying an electrical wire. When connecting wiring conductors in the wall, this rule must be strictly followed!
It is best to replace a broken wire all the way from the junction box to the place where it is attached, if this is appropriate in each individual case.
If the damaged conductors are short, they can be connected using terminal blocks. But then for this block it is necessary to install a distribution box.
To repair a faulty phase wire, you must perform the following manipulations:
- First you need to de-energize the phase wire.
- Clean the surface, remove plaster or other finishing materials from the wall section, freeing up an area for work within a radius of at least 15 cm from the point of failure.
- Disconnect the damaged core from the network without damaging the insulation on other cables.
- If the wire is copper , then the connection must be made using soldering, which will ensure the contact of the wire that an undamaged wire has. To do this, you need to take an additional part of the same material from which the jumper is made.
- First, a polyvinyl chloride or heat-shrinkable tube must be placed on the core of the damaged cable. The ends of the jumper are connected to the ends of the damaged wire, then the connections are soldered.
- The repaired area should be firmly fixed with insulating tape, after which a tube covered with a wire is carefully pushed onto it. This will maintain the tightness of the fastener.
- The soldering area can be covered with plaster; installing an additional distribution box is not required. To heat the soldering iron in the absence of voltage, you can connect it through an extension cord from neighbors or from a distribution panel in the entrance.
Aluminum wires are quite difficult to solder, so for this process you should take a special flux for soldering aluminum and the appropriate solder.
Sometimes it is more advisable to use a mechanical method to connect a broken aluminum wire.
First, 15 mm of insulation is removed from the ends of the wire to further form rings from the exposed wires. An insert with a cross-section similar to that of electrical wiring or slightly larger is prepared from aluminum wire. With the help of a washer, the grower assembles the connection: a grower is put on the screw, then a regular washer, followed by a ring of wires, again a simple washer and the nut finishes. The connection is covered with electrical tape and closed with a tube of insulating material.
This connection guarantees excellent wiring operation provided the permissible load is not exceeded.
Also, a reliable connection method is the WAGO terminal, after installation of which you need to wrap it with electrical tape and cover it with sealant.
The cables can also be connected using a junction box. To do this, it is necessary to remove the insulation from the damaged wire, then branch its ends in different directions. After this, you need to punch a hole in the wall according to the size of the distribution box, using a hammer drill with a special wide crown.
The box is inserted into the opening, after which it is securely fixed with alabaster. The wires are carefully inserted into it, while the damaged wires must be connected by color and wrapped with electrical tape. After all manipulations, the box with the repaired wires should be closed with a lid.
If the wires are placed in special tubes, then the broken wires should be pulled out, and new cables should be placed in their place using a pulling device.
If the neutral wire malfunctions, first it is disconnected from the bus, attaching the phase conductor. All subsequent repair operations coincide with the process described above.
After repairing the wiring, all channels are carefully sealed with plaster.
You can connect voltage to the restored wiring only when the material is completely dry.
The main reasons leading to electrical wiring breakdowns
With proper selection of a high-quality cable and compliance with installation technology, the wiring lasts quite a long time without causing any problems to the owners.
But in fact, there is often a disruption in the operation of electrical networks, which is provoked by the following reasons:
- Using the wire for a long time
In old buildings, aluminum wires were usually installed, which tend to quickly deteriorate, and any other wires age over time, the plastic insulation becomes inelastic, brittle, and breaks. Leakage currents begin in the cracks, which in the absence of an RCD cannot be immediately detected, conductivity decreases, resistance increases, and a short circuit may even occur and the electric current will completely stop.
- Cable damage during repair
To drive a nail or drill a hole in a wall, you need to know the route of the installed electrical networks. Otherwise, you can get caught in the wire, causing it to break and sometimes even short circuit. Sometimes only a section of the cable is affected, which leads to complete destruction of the core after a certain time.
- Poor quality wiring or electrical installation performed with errors
A bad cable wears out faster. When voltage fluctuations occur, weak wires will overheat, and damaged areas may ignite if the network is overloaded.
- Excessive load on one cable
If one tee or extension cord contains several devices with high power consumption, this can cause overheating, melting of the insulation and breakage of the electrical wiring.
Regardless of the reason, if the wires break down, you should immediately find the location of the break and urgently fix the problem.
Laying open electrical networks
Repair work associated with a break in a hidden wiring usually requires complex construction and repair work: dismantling the finish, gating the walls, followed by sealing and covering a section of the wall with decorative materials.
Eliminating a broken hidden wire often requires dismantling the finishing, so it is advisable to combine such work with a major renovation of the premises
Since immediate implementation of such manipulations is not always possible, in some cases it can be recommended to lay a new wire along the surface of the wall, covering it in a special box or tube.
You will become familiar with a detailed description of the rules and technology for laying an open electrical network by reading our recommended article.