When installing an electrical input into a house, each of us thinks about how it is better to do it - overhead or underground?
Installation of air SIP is always much faster and several times cheaper.
However, situations arise when it is more advisable to run the power cable into the house underground.
Firstly, it is more reliable. And secondly, it does not spoil the facade of the building or the appearance of the surrounding area.
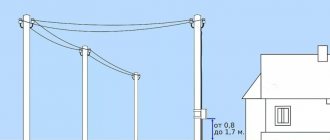
Often these two methods are combined. Initially, an input is made to a special pipe stand from a support.
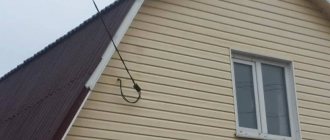
And from this distribution cabinet the cable is laid in the ground and brought into the house. When the support is located not far from the building, some SIP wires are mounted directly on the facade.
But we will turn specifically to the underground input. Let's look at what difficulties you will encounter when laying cables in the ground and place special emphasis on common mistakes when performing this work, which ultimately, sooner or later, lead to failure of the cable line.
Which cable to lay
Cable installation in the ground can be done in two ways:
- without any protection (using armored KL grades)
- in pipes or special corrugation
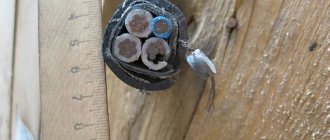
Let's look at the first method first. Here, as a rule, a cable with tape armor is used - VBBbShv or AVBbShv.
It is not at all necessary to use armor of the type AABL, AAShV, where there is a one-piece cast protective shell made of aluminum. It could just be ribbons overlapping each other.
In this case, armor protects not so much from external influences (someone started digging where they shouldn’t), but from deformation and traction forces during soil heaving.
Mistake #1
Never bury ordinary grades of home wiring cable in the ground without protection.
The same applies to the SIP wire. It cannot be laid in the ground, even in pipes.
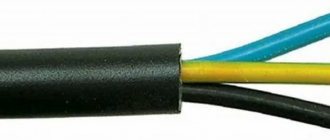
Select the cable cross-section according to the connected load, but not less than 10mm2 for copper or 16mm2 for aluminum.
You can often find videos on YouTube where copper CLs with 6mm2 conductors or 10mm2 aluminum are used. This is explained by the supposedly small number of electrical appliances in the house or country house.
In terms of load, this may be enough for you, but in terms of compliance with the requirements for the minimum cross-section of the PEN conductor, you will have a violation. For single-phase power supply, the cable must be three-wire, for three-phase power supply, it must be five-wire.
How to choose the right section and brand of SIP
So what kind of cable should be used to bring electricity into the house? Many people resort to using SIP cable; it is allowed in many electrical industries and even in high voltage lines up to 35 kW.
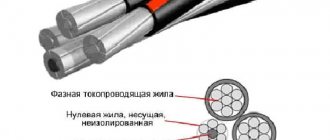
This cable has its own design feature - phase wires, most often in the amount of three, wrap around the fourth - zero. Therefore, the appearance of SIP resembles a rope twisted into a spiral. High-quality LDPE or XLPE polyethylene is used to insulate conductors. These types of materials have high resistance and a long service life, which allows them to be used even with sudden temperature changes.
The core, which is located in the middle and has zero potential, is made of aluminum alloy. Sometimes the zero does not have its own insulation, which is required for phase conductors.
The SIP cable has one serious drawback - due to the presence of insulation, the cable is insufficiently cooled, so the current loads allowed are lower than those of uninsulated conductors. When choosing SIP, you should pay attention to insulation:
- With insulation made of thermoplastic polyethylene, temperature loads of up to 70 degrees are allowed. Suitable for this parameter: SIP-1, SIP-1A, SIP-4, SIPn-4.
- When choosing cross-linked polyethylene as an insulating material, temperature loads of up to 90 degrees are allowed. Overload mode indicators and short circuit current parameters also increase. Such performance characteristics have: SIP-2, SIP-2A, SIPs-4, SIP-3, PEV and PEVG.
The SIP cross-section is also determined by power consumption, the formula is presented above.
Digging a trench for cables - distances and dimensions
The selected cable should be carefully laid in the trench. What size should it be, what distances should be maintained when excavating it?
Mistake #2
Firstly, this trench cannot be dug close to the foundation of the house.
It is necessary to maintain a certain distance of 60cm.
After laying in the ground, the cable should not fall on the line of action of the foundation force, directed at 45 degrees from the base.
Standardized clearances from plants and trees on your site are also required. Here are the minimum dimensions for underground cable laying from nearby utilities, structures and obstacles.
What dimensions should this trench have? Here you can focus on the standard project A5-92 “Laying cables with voltage up to 35 kV in trenches” -.
The cable depth is 0.7 m. Please note that this is the distance from the surface to the top of the cable itself.
Mistake #3
Taking into account the fact that there will be a sand cushion of 10-15 cm underneath, the total depth of the trench should be at least 900 mm.
Not 0.8m, as many recommend, but 90cm, and certainly not 0.7m.
Where did all these numbers even come from? Why can’t you just bury the cable in your yard to the depth of a spade bayonet? Why such torment?
You are not doing the installation in a public place on a city street or at a construction site where heavy vehicles will drive.
The most important reason for such a depth is to ensure optimal temperature conditions for the cable.
By laying it as close to the surface of the earth as possible, you will lose the main advantage of underground installation - the lack of influence of ambient temperature and weather conditions.
The upper layers of the soil warm up much more, and moisture after good rains simply will not reach the cable sheath if it lies at 70 cm. The same cannot be said about 30-40cm.
The second aspect of such a depth of laying is pressure. The deeper the cable lies, the more evenly the pressure from above is distributed on it.
Especially under external influences - a car driving along the KL highway, something heavy was placed on top, etc.
Mistake #4
If your entrance to the house runs from a support across the road, then here you need to bury the cable to an even greater depth - 1000 mm.
The minimum trench width is calculated by the formula = cable diameter + 100mm on each side for a sand bed.
By the way, so that such labor-intensive work on digging a trench does not go to waste, some additionally lay a grounding loop in it. Just don’t forget about the minimum margins of 300-350mm.
Well, in the case of protecting the cable with a pipe, the circuit is not a hindrance at all. After all, it is not necessary that it be in the shape of a triangle or square.
And if the geometry of the site and the location of the input allow, the same trench is adapted for simultaneous installation:
- input cable
- cable to video intercom
- street lighting
- power supply for sliding gate automation
Subscriber branch: concept, principle of operation
On each street there are main power lines, the voltage through which comes from the nearest transformer substation. A higher potential difference of 6 or 10 kV arrives at the transformer. But this information is solely for general development, since the main line voltage is 380 V, and between the phase and the neutral wire - 220 V.
To lay a cable from a pole to a separate consumer - a private house, it is necessary to install a subscriber branch from the main line. A subscriber branch is the supply of electricity to an individual consumer. With this procedure, you must correctly calculate the wire through which the electricity will be supplied.
Backfilling the trench with sand
Mistake #5
The bottom layer of the trench must be filled with sand; do not skip this step.
Otherwise, sharp pebbles and other foreign elements in the ground will damage the insulation after some time.
Mistake #6
The sand must be compacted. Do not lay the cable on a loose base.
What to do if you don’t have sand in stock and don’t want to order it? In this case, sift the excavated soil.
The fraction of individual elements after sifting should be no more than 5 mm.
Is it possible to do without this sand pillow or its equivalent? Why is it even needed? No you can not.
In addition to protecting the insulation from sharp objects, it plays another important role. The layer of sand under and above the cable is practically not subject to heaving.
It can be easily compacted, as a result of which there is no subsidence of the soil in the trench. No drawdown - no voids.
Namely, they lead to local overheating of the cable. The result is a situation where, in the place where a shallow hole is formed, the cable heats up significantly more than in the same area, but a couple of meters away.
Due to the temperature difference, the cable begins to “pull”. Under significant loads, the PVC insulation bursts and subsequently begins to actively suck moisture through these microcracks.
Well, don’t forget about the drainage properties of sand. Even if water reaches a depth of 0.7 m, it will pass through the sand without stopping near the cable line itself.
Safety precautions
When installing the cable, observe the following rules:
- The cable drum is unloaded using lifting equipment.
- When rolling it, measures are taken to prevent the protruding parts from catching the fitters’ clothes.
- The drum is moved only on a horizontal surface; it is prohibited to stand in its path.
- When rolling, the reels do not approach the trench closer than 1 m.
- The cable is unwound using canvas gloves.
- The conductor is carried on the shoulder facing the direction of the trench; all workers should be on one side of him.
- The maximum permissible load per worker is 35 kg.
- If, when digging a trench, they come across communications that are not indicated on the plan, the work is suspended and they begin to search for the owner or operating organization.
In places where the route turns, it is prohibited to stand inside the corner, support the cable or pull it by hand. Special rollers are installed here.
Only a certified installer has the right to test cable insulation using a megohmmeter. This is due to the fact that during operation this device generates voltage up to 2500 V. After checking, you need to discharge the cable to the ground or short-circuit its wires.
Correct cable routing
The cable itself is laid in a “snake” trench.
SNiP 3.05.06-85 stipulates that cables in trenches should be laid with a margin of 1-2%. This reserve is precisely provided by the snake.
Just don't go overboard with the bends.
Mistake #7
But making a reserve in the form of rings is not allowed.
Why are these extra bends needed at all? As it turns out, not for emergency repairs at all. If the CL is laid in a perfectly flat straight line, then the temperature deformations that accompany the operation of the CL will sooner or later damage the input.
Mistake #8
Before and after installation, do not forget to test the insulation of the cable cores with a megometer.
Read how to do this correctly in a separate article.
A small layer of sand is again poured on top of the laid cable.
What is an input device cabinet
The input device can be briefly classified as all switching and other power control devices that are installed directly at the main line input. For ease of installation of such devices, special cabinets are used, which have special fastenings.
In the input device cabinets the following can be located:
- circuit breakers;
- switches;
- circuit breakers;
- counters.
- measuring instruments.
Laying warning tape or bricks
To protect against a person with a shovel, as well as to mark the route, signal tape is used.
Mistake #9
Make no mistake, it should be laid at a distance of 250mm from the cable line itself, and not from the surface of the earth.
That is, when excavating, you must first hit the tape with the bayonet of a shovel, but not reach the shell. When mechanized trench digging, after detection of the warning tape, only manual excavation of the soil is allowed.
If you don’t have tape, use any available materials at home in the country.
The main thing is to lay something that will warn and “scream” - there’s a cable underneath me! Don't dig!
It is also recommended to protect the cable with bricks or asbestos-cement slabs.
Mistake #10
They must protrude at least 50mm beyond the boundary of the cable sheath in cross section.
By the way, the same applies to the tape.
Especially if several cables lie in one trench at the same time.
Mistake #11
You can’t just lay one narrow strip in the middle.
It should protrude beyond the outermost cable in the row. One is missing, use two, three, etc.
Bricks should be used as protection when it comes to the input from a substation or transformer substation to a multi-storey building, factory or other large facility.
Mistake #12
In this case, it is prohibited to use silicate or perforated bricks.
In private construction, with underground entry into a small cottage, no one will complicate their life and increase the cost of repairs by laying red bricks. Therefore, in our case, one tape will be enough.
How does electricity enter the house?
When introducing electricity into a private house, use one of the previously presented methods (laying a cable through the air on a cable or in the ground). When supplying electricity to a house, you must strictly follow the basic rule - the input cable should not have transits. The panel in which the consumer circuit will be presented should be located near the input cable for easier installation.
The conductor cannot be installed indoors directly through a hole in the wall. The hole must have additional protection; usually a metal pipe is used for this. The diameter of the pipe should be taken with a reserve, and the free space between the cable and the walls of the pipe should be sealed with cement mortar.
Perfectly buried cable
After all the above work, you finally fill the trench with earth. To summarize the above, we can derive the formula for a perfectly buried cable. Here's what we get:
- trench depth 900mm
- sand cushion at the bottom 100-150mm
- the cable itself
- sand cushion over cable 100-150mm
- Red brick
- soil layer 200-250mm without coarse rocks
- warning tape
- residual soil layer
Each layer after laying is compacted manually or mechanically.
As a result, you get a technologically correct and “permanently” laid cable.
Laying cables in the ground in pipes
All of the above concerns the laying of armored cables. However, due to their high cost, the method most often used is to lay the usual marks in the ground without any armor VVG, AVVG and the like.
Here protection in the form of pipes is used:
- metal
- HDPE
- double-wall corrugated (DKC 121950 or Promsleeve)
The latter can contain both electrical cables and network and telecommunication cables.
Mistake #13
Polypropylene and sewer pipes are strictly prohibited, as well as metal hoses.
For 0.4 kV power cables, a red or black corrugated pipe is used. For low current – blue.
Such corrugation in its properties is much better than asbestos pipes, which were widely used previously.
Pipes are divided according to the degree of compression resistance. And they are able to withstand pressures of several hundred kN.
By wearing special rubber seals, sections of such corrugated tubes can be connected to each other with couplings.
Connection protection degree – IP67!
The cable fill factor in the pipe and corrugation should be 1.4. What does this mean?
Mistake #14
The diameter of the corrugation or pipe should be such that the cable in it occupies no more than 40% of the total space.
Please note that not all HDPE pipes are equally useful for underground installation of cable lines. The vast majority of them are pipes for cold water supply with an operating temperature of up to 40C.
And some cables in normal modes at maximum loads heat up to 90C! Here are the corresponding letters and documents about the ban on HDPE pipes from Rosseti and Rosstandart.
Letters on the use of HDPE pipes
True, this applies primarily to high-voltage cable lines, so for your private house, in principle, little changes, you can use it.
In what cases are pipes still used? For example, in those when it is not physically possible to meet certain requirements and standards for minimum distances:
- when laying in close proximity to or through trees
- approaching or crossing with pipelines or other electrical networks
In such cramped conditions, a reduction in distance is allowed, but with the obligatory use of pipes. They protect:
- from mechanical influences and shocks
- from stray currents
- from aggressive soils
- from rodents
If the route is long (tens of meters), it is best to tighten the cable into the pipe using a special broach with a cable stocking.
And to put this broach inside, use a vacuum cleaner and a strong rope. The rope will be more fun to tighten if you attach a piece of cork or a plastic bag to its end.
Mistake #15
When joining metal sections of pipe, do not use welding under any circumstances if the cable is already pulled inside.
In this case, it is better to use threaded connections, or tighten the input into an initially straight section, and then bend it with a pipe bender.
Advantages and vulnerabilities of underground electrification
Supplying electricity underground
Introducing an electrical cable into a house underground instead of overhead lines has a number of advantages:
- does not spoil the architecture and design of the site;
- does not experience atmospheric influences;
- high fire safety.
In addition, eyeliner made in this way is protected from theft and vandalism. This is especially important if the building remains unattended for a long time.
Underground installation of electrical cables has some disadvantages:
- may be subject to mechanical stress during the process of swelling and subsidence of the soil;
- the influence of groundwater, soil freezing, pressure from the roots of large trees;
- Insects and rodents can damage the wiring;
- it is susceptible to aging and corrosion.
The durability of electrical wiring depends on the composition of the soil and its saturation with water, thermal fluctuations and vibration processes.