Not only qualified electricians should have knowledge of the basics of installing electrical equipment. It is better for home owners to familiarize themselves with the basic provisions for assembling and operating an electric box that controls the supply of energy to all consumers in the apartment.
Knowing how and in what sequence the electrical panel is switched off, even the owner of an apartment or house who is far from electrical work will be able to quickly respond to a problem in the system - call an electrician or solve the problem on his own.
Purpose of the electrical panel
Externally, products in which protective and accounting equipment are installed look different. This can be a compact plastic box with tinted glass installed in the hallway, or a large metal panel mounted into the wall on the landing.
We are talking about an electrical panel, which is necessarily present in residential buildings, office buildings, in production - wherever power lines are laid.
Electrical panels, depending on the installation location and purpose, can be distribution, group, accounting and distribution. For example, a box with a counter is called an accounting and distribution box, and a box in the hallway in which only machines are located is called a group box
Possible installation locations are specified in the regulatory documentation, but largely depend on the purpose of the shield. For example, for private houses, one of the electrical panels, with an electric meter and an input device, is usually installed on the street, on a pole or facade.
Shield functions:
- receiving electricity from the central main line - a power line connected to the house;
- energy distribution among consumer groups or individual lines;
- protection of the electrical network from high loads and short circuits;
- accounting for quality and stabilization of electricity;
- protection of power grid users from electric shock.
Simply put, the uninterrupted transmission of electricity to the house, the safety of all residents, and the safety of property will depend on the correct assembly of the electrical panel.
Regulatory documents and rules for shields
All diagrams and apartment panels must be assembled in accordance with regulatory documents and not contradict the instructions and rules prescribed there. First of all, this is, of course, the PUE, but there are two more documents that are worth paying close attention to:
- ⚡
GOST 32395-2013 Distribution panels for residential buildings. General technical conditions. () - ⚡
Code of rules for design and construction SP 31-110-2003 “Design and installation of electrical installations of residential and public buildings” ()
Requirements from the rules for apartment panels
Notes and requirements from the above GOST that you should pay attention to when assembling and choosing an apartment panel:
Next article:
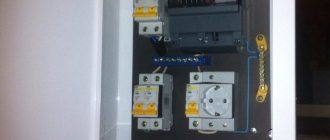
What it is like to connect circuit breakers with wires can be found in the photo. We have already talked about how to assemble a switchboard with your own hands!
Modern shields have a modular design. A modern electrical panel has a durable casing and is locked, so children will not get in unless you leave the key in a visible place.
The electrical circuit is created in several stages.
The rating is selected depending on the power of the consumer.
Assembly and connection diagram To create an electrical panel diagram, you need to determine the type of power supply system in the house, divide electricity consumers into several groups, and based on this data, create a diagram using GOST. Thus, you can protect yourself from additional expenses in case of installing additional machines. If you turn everything on at the same time, then, of course, the input circuit breaker will trip and turn off the entire apartment. T 12.2 Assembly diagrams for a group apartment panel
Electrical panel diagram in an apartment with an RCD in separate groups
Scheme No. 5
This scheme is already more advanced. It can be used both in small apartments and in apartments with a total wiring length exceeding 400m. There is no input RCD here, since a load switch is sufficient (do not forget about the circuit breaker in the floor panel with a meter).
The rated current of the input device was selected based on the permitted power for apartments with a single-phase load equal to 11 kW and the demand factor for luxury apartments - 0.8.
There is protection against current leakage on individual groups of sockets and split systems (air conditioners). Moreover, one RCD protective device is located on combined groups, each of which in turn is protected from overloads by automatic circuit breakers.
It is especially worth noting that each individual RCD needs its own busbar for zero. Otherwise, they will all trigger synchronously in the event of a leak in any group of cables. And in order to find damaged wiring, you will have to physically disconnect the neutral wires from the busbars.
It is advisable to protect lighting lines from leaks if you use wall lamps with metal casings and periodically wipe them or change light bulbs without turning off the voltage. In most cases, you can get by with simple automatic machines.
The same circuit, but with a voltage relay:
Scheme No. 6
Electrical panel project
Scheme for assembling and connecting the electrical panel in the apartment: Using the connection diagram, you can begin installing the electrical panel. If it is planned to install consumers with a power of up to 2.5 kW, then it is desirable to install separate protection.
Next, we move on to dividing all connection points into several groups.
One machine serves the lighting group, the second - sockets, and the third - the washing machine.
A single-phase network branch goes to outbuildings. Similar RCDs are installed on entire groups of consumers.
See also: Corrugated pipe for a bath
New articles by email
Here, using an example, I will tell you how to read the electrical diagram of a panel, give several examples, and at the end of the article I will give a link to download 19 electrical circuits of the panels. You will also need the diagram when accepting work as an electrician. This is approximately what a properly organized cable entry into an electrical panel looks like: power supply on the left, residential network lines on the right. Installation of an electrical panel in an apartment If you are assembling a panel or moving it, then first of all you need to decide on the installation location.
They break the circuit if an overcurrent or short circuit is detected, protecting the wiring and connected equipment from damage. In order not to make a mistake when purchasing a switchboard housing based on the number of modules, you need to draw up a wiring diagram.
It is very important to decide in advance on the number of machines and select an electrical panel of appropriate dimensions. TN-C is an old type of power supply, the wiring in the apartment includes a two-core copper or aluminum cable, the cable in the switchboard combines zero and ground. Below are group cables feeding certain groups, indicating the cable brand and its cross-section depending on the load. Each of these machines is responsible for a specific part of the circuit. The RCD is turned on as follows: the phase is connected to the inputs of the machines, and the neutral wire is connected to the neutral common wire.
The principle is the same as that of a water supply system - one riser per entrance, from which there are branches to each user. Is this necessary? Option 3 As I wrote above, all groups of sockets must have protection against current leakage, that is, they must be protected using an RCD. Electrical wiring diagram in the apartment
Selecting the shield body
As already described above, distribution boards come in surface-mounted and built-in types. If your wiring is hidden, then it is better to choose a structure recessed into the wall. The external shield can be mounted both inside the building and outside.
The issue of choosing the housing of such an electrical device is very important. First of all, you need to decide on its material. Plastic is not durable, but is lightweight, which makes installation easier. Metal stands out for its reliability and durability.
The optimal solution would be to purchase a case with removable walls - they facilitate the process of removing and moving DIN rails. As for the dimensions, it is advisable to have some reserve.
Buy power cable VVGnglsElectrical wiring diagram in the garage - features of design and installation with your own hands. 120 photos of wiring examples and video instructions for replacing wiring in the garage
Which wire to use for grounding: calculation of parameters, marking and purpose of various types of wires (video instructions + 150 photos)
Differences in assembling three and single-phase shields
What is the difference between assembling a 3-phase shield, in order to ensure the above tasks, from assembling a single-phase one? It is clear that single-phase is an order of magnitude simpler than three-phase.
There is only a single phase, zero and protective ground. In 3-phase, the same zero, protective grounding and already 3 phases come to your shield.
On the one hand, this gives you the opportunity to connect a much larger load and receive more power from the energy transmission organization for connection. But on the other hand, this always incurs high costs, plus the need for competent distribution of this very load.
You cannot (at least it will not be correct) connect all the devices in the house to one phase, and keep the other two as a reserve. This threatens the load imbalance between phases.
As a result, the voltage on one of them will be low, and on the other two it will jump by several units or even tens of volts. Of course, you can protect yourself from this by installing the appropriate devices (for example, phase switches), but your neighbors will suffer due to an illiterately assembled 3-phase panel.
And not through your own fault or the fault of the energy supply organization, but precisely because of you.
Therefore, the main task and difference of a three-phase shield is the need to distribute the load as evenly as possible across all phases.
There are many options for assembling and completing three-phase panels. We will not consider the simplest ones with a minimum amount of introductory equipment.
We will choose ones that are more complex in configuration, but at the same time quite versatile. Due to the sharp increase in the number of electrical appliances in our apartments and houses, they have recently become increasingly popular.
RCD and single-pole circuit breakers
Assembly advantages:
- economically
- a small shield is required (from 54 to 72 modules)
Flaws:
- not clear grouping of lines
- impossibility of simply making changes in load redistribution across phases
- presence of zero tires
This is one of the simplest and most common options for assembling and designing three-phase panels. This is explained, of course, by its cheapness in relation to others.
However, this method does not allow making significant changes to the switchboard in the future. This is primarily due to the distribution of load across phases.
The one who initially designs the shield, based on certain considerations and technical conditions, divides the load accordingly into phases. As it seems to him, maintaining uniformity.
However, this is all preliminary division. Since no one knows the real consumption. And only over time, through measurements, can you see the actual picture. And it may differ significantly from the previously designed one.
And in order to somehow equalize the loads, we have to redo almost half of the entire panel. Leave it as is, and you will definitely encounter problems in the future:
- voltage imbalance
- heating of the zero bus with possible burnout of the zero
- overloaded machines and the consequences of this
There is an even more simplified version of this configuration method.
Types and sizes of electrical panels
We will talk about cabinets/drawers and their varieties. Depending on the type of installation, electrical panels are available for outdoor and indoor installations. The box for outdoor installation is attached to the wall with dowels. If the walls are flammable, an insulating material that does not conduct current is placed underneath. When mounted, the external electrical panel protrudes above the wall surface by about 12-18 cm. This must be taken into account when choosing its installation location: for ease of maintenance, the panel is mounted so that all its parts are approximately at eye level. This is convenient when working, but can pose a risk of injury (sharp corners) if the location for the cabinet is poorly chosen. The best option is behind the door or closer to the corner: so that there is no possibility of hitting your head.
Electrical panel housing for outdoor installation
A panel for hidden installation requires the presence of a niche: it is installed and walled up. The door is flush with the wall surface; it may protrude a few millimeters, depending on the installation and design of the particular cabinet.
The cases are metal, powder-coated, and plastic. Doors are solid or with transparent plastic inserts. Various sizes - elongated, wide, square. In principle, you can find a suitable option for any niche or conditions.
One piece of advice: if possible, choose a larger cabinet: it’s easier to work in, this is especially important if you’re assembling an electrical panel with your own hands for the first time
Complete set and installation of a mounted distribution panel
When choosing a building, they often operate on such a concept as the number of seats. This refers to how many single-pole circuit breakers (12 mm thick) can be installed in a given housing. You have a diagram with all the devices listed on it. You count them taking into account the fact that bipolar ones have double width, add about 20% for the development of the network (suddenly you buy another device and there is nowhere to connect, or during installation you decide to make two from one group, etc.). And for such a number of “seating” places, look for a shield with a suitable geometry.
Assembling the device
Let's look at the instructions for assembling the electrical panel. It includes the following steps:
Preparatory. Includes preparation of necessary tools and materials. You will need a set of screwdrivers, a multimeter, a knife and circuit elements.
Direct assembly of the shield. Includes installation of the housing, pulling cables, stripping wires, fastening DIN rails, circuit breakers and other devices, mounting busbars, as well as connecting all elements to each other.
We draw up a diagram of the distribution board
To assemble a single-phase panel with your own hands, you need a diagram. When compiling it, it is necessary to take into account the specifics of electricity consumption by the building:
- power consumed by each individual group;
- total design power;
- number of consumer groups;
- location of the electricity consumption meter.
The diagram should be drawn up in such a way that it is understandable and convenient. It is necessary to indicate the ratings of the devices, the cross-sectional area of the cable, and the wiring to consumers. An example can be found on the Internet.
The assembly diagram for a three-phase panel is in many ways similar to the diagram for a single-phase network voltage. The difference lies in the use of a different method of distributing consumers - each group is connected to its own phase. An important nuance is the need to maintain a load balance between all phases.
Nuances of commissioning work
After the panel device is installed, it is necessary to turn off all devices with which it is equipped. Next steps:
- load all sockets;
- Apply voltage, check its presence at the input, correct phase and zero;
- check the RCD and automatic circuit breakers one by one;
- estimate the voltage at the input and output of the machines;
- check the behavior of the shield when connecting high power equipment;
- check sockets and switches.
Option 4
In this version of the circuit, there is a 100-300 mA fire protection RCD at the input, and then some groups are protected by individual 10-30 mA RCDs. To prevent simultaneous operation of the input and group devices, it is recommended to install a selective RCD at the input. It has a time delay for operation and is designated on the case by the Latin letter “S”.
In this diagram, you must not get confused with connecting the neutral working conductors. Zeros after different RCDs cannot be combined with each other, otherwise the devices will immediately turn off. Therefore, after each RCD you need to install your own neutral bus if several groups are connected to it, or the neutral working conductor must be immediately connected to the RCD if it protects one group. This is exactly what is shown in the diagram below.