How nice it is to have a house with a garden! After all, in the morning, throwing on a robe, you can go out into your yard and take a breath of fresh air. It’s also nice to drink a cup of tea or aromatic coffee while enjoying the view of the beautiful garden, or sit comfortably in a chair on the terrace while reading the morning newspaper. In the evening, as soon as the shadows begin to lurk in different corners of the garden, you can add light fairy lighting using lamps, which will help create a relaxed, calm and romantic atmosphere. Today Dekorin will tell you how to make an original garden lamp with your own hands using scrap materials, and will also show 49 photos with various options.
Types of street lamps
A street lamp must easily cope with and withstand weather conditions such as heavy rain, wind, snowfall, hail, high and low temperatures, and various types of physical impacts.
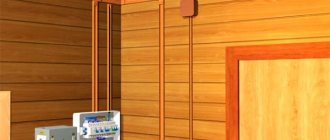
One of the most popular types of lamps for street lighting are wall-mounted devices that are installed near doors, in gazebos, and on buildings near paths. Such lighting is good because the lamp takes up practically no space, and its location does not in any way interfere with movement around the yard.
Wall lantern made from cans, an original solution
Thanks to the lampshade, the light is perfectly diffused and well illuminates a fairly large area, and by placing several of these lamps on the porch, you can easily organize an evening dinner outside or immerse yourself in your favorite book.
Floor lamps
Outdoor floor lamp made of wire and LED garland
Ground lamps for cottages and homes have quite a wide range of possibilities. Using such lighting, you can illuminate the facade of the building, highlight the main objects in the yard, divide the area into zones, create various glow effects, etc.
Pendant lighting fixtures
Pendant lighting fixtures are usually used under various covers, such as a gazebo or porch. They have a structure similar to a regular chandelier, can accommodate several light bulbs, and serve as the main source of light in your area.
Glass bottle pendant lights
Materials for production
We will consider the question of how to make a street lamp of the following type:
You can find similar options in regular stores, but their cost is always quite high, so you should think about assembling them yourself. Plus we will tell you how it can be forged without special skills.
So, the street lamp assembly diagram looks like this:
Look carefully at all sizes to avoid mistakes.
To assemble the structure we will need:
- Side walls (4 pieces).
- Top cover.
- Bottom.
- Decorative finishing, but here you can take the initiative yourself. For example, you can use any paint that you like best.
During assembly, it is necessary to use cold welding, since this is how you can easily connect all the structural elements together. All materials must be prepared initially; you can even try to assemble everything without welding.
As a rule, many people try to use ordinary welding. Of course, if you can do everything with it and not damage the glass, try. Cold in this regard is considered simpler and safer.
Master classes
Well, the last thing I would like to provide you with is visual video instructions on how to make a street lamp from metal, wood and even a glass jar. You can watch all the simplest master classes below:
That's all I wanted to tell you about how to make a street lamp with your own hands. We hope you found our instructions interesting and helped you in assembling your own garden lamp!
It will be useful to read:
Today, almost any hardware store is able to offer a beautiful and high-quality street lamp for every taste and budget, which can perfectly decorate the design of a country house. Nevertheless, the cost of high-quality products is not always able to satisfy the buyer, and purchasing a cheap option is doubtful. Based on this, many home owners prefer to assemble the necessary element with their own hands, thereby killing two birds with one stone - it comes out inexpensively and the quality is high (after all, you are doing it for yourself).
In this article we will talk about the features of self-production and assembly of lamps for a private home. The material will also present photos of ready-made solutions from masters as examples.
Light sources for street lamps
As a light source, you can use incandescent lamps, halogen lamps, LED lamps and strips. Their characteristics:
- Incandescent light bulbs provide bright light but consume a lot of electricity.
- Halogen lamps are quite economical, they have a fairly long service life and bright light. But they get very hot and are sensitive to temperature changes.
- LEDs. The most optimal and modern option. LED lamps have the same advantages: economical, reliable, safe, and have the longest service life. LEDs are not cheap, but the fairly high price is compensated by quality and service life.
Lanterns in the garden are not only illumination, but they can create an atmosphere of celebration, magic, mystery or romance. A little imagination, modern materials and technologies will help create unusual lighting on the site.
Creative fountain lighting
To achieve the most beautiful and colorful fountain lighting, professional designers recommend using both above-water and underwater lighting.
Creative lighting for a country fountain
Use solar-powered lamps as general lighting to highlight the contours of the fountain. They are not only able to illuminate the structure with a pleasant soft light, but will also save you significant energy costs.
In order to illuminate the jets in the fountain, you can use lamps made of fiber optics. To change the illumination zone of the fountain, you will need to install mobile underwater lamps that can move chaotically across the entire area of the water.
Fountain jet illumination
If you plan to use surface floodlights, it is best to install them on a rotating platform. Then the lighting area of the fountain can be changed without any problems.
The most creative way to achieve unusual lighting is to install an underwater lamp. It is best to place it near the water supply nozzle, then the spraying streams of the fountain will look very unusual and fascinating.
Underwater fountain lighting
Features of connecting the flashlight to the network
When you make lanterns for a summer cottage, you need to pay due attention to the wiring connection procedure. To connect the lamp to the network, we need:
- electric cable VVG;
- terminal blocks for fixing connections;
- metal hose or corrugated pipe for protection.
For homemade devices, a cable with two cores 1.5 mm thick is most often used. It is better to immediately purchase a bay where the length of the wire will be equal to 100 meters. And the diameter of the corrugated pipe should be from 18 to 25 mm. It will be needed to protect the cable from rodents or damage when digging in the soil.
The holes in the terminal blocks should have a diameter of 2.5 to 4 mm and consist of one or two strips, it all depends on the number of connections and lampshades. The pads must be selected based on the current strength from 5 to 10 A.
Installation involves the following steps:
- we dig a trench for laying the cable with a depth of about 80 cm and a distance from the ditch to the house of a maximum of 60 cm;
- When installing floor lamps, you first need to install metal knives and then pull the cable through them one by one. Where it is placed in the trench, we place it in a corrugated sleeve. After passing through all the devices, the cable is cut so that the length of its tail is a maximum of 15 cm;
- we prepare the second piece of wire and also pass it through the pipe and at the top of the device we connect the two cables with terminals;
- if the lights are placed on a wall or facade, you need to reliably insulate the junction boxes. It is best to connect the wires in the boxes with clamping nuts; you can also use pliers, but then each connection must be soldered. Wrap the twisted areas with electrical tape;
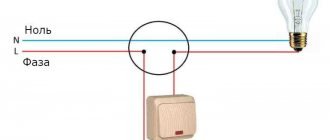
- installing the electrical circuit. Since it has two wires, one “zero” and the other “phase”, you need to make sure that the switch can open the phase wire. Then, in the off position when changing a burnt-out lamp, there will be no risk of electric shock. The phase wire is determined using a special indicator;
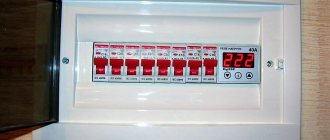
- A simple socket will also work as a connection point, then you can turn off the power to the entire system quickly by just pulling out the plug. The cables can also be connected directly to the terminals on the switchboard, which is equipped with an automatic fuse that cuts off the voltage in case of an emergency;
- when installing the switch, you need to check whether its specified power corresponds to the load in this network;
- Before digging a trench, make sure all lights are working and reinforce the posts by tamping around the clay or small crushed stone. If the soil is light, then it is better to fill the supports for the devices with concrete.
Selection of street lamps for a country house
A lamppost and a lantern are all you need to illuminate city streets. For a private area, there is a wide variety of lamps, thanks to which you can realize the most imaginative design.
The choice depends on the type of backlight: direct, local or contour.
In the first case, the entire space is illuminated without emphasizing any details. Local lighting has exactly the opposite role - it illuminates individual elements of the site, be it the wall of a gazebo or the crown of a tree. And, for example, garden lanterns along paths or a fence are contour lighting. The differentiation criterion is related to the purpose of the device. The light source can be installed for safety (functional purposes) and beauty (decorative purposes). Functional lighting is used only at night, while decorative lighting can be turned on during the day.
And finally, the types of lamps are determined by the design and installation method:
- Wall lamps (suitable for any purpose).
- Floor lamps (lighting fences or paths).
- Ground lanterns (can be built into the path).
- Waterproof (decorate bodies of water).
- Light sources of various shapes (spherical lamps without support).
So, with your own hands and the necessary palette of lanterns, you can create an incredible atmosphere in your yard and garden, inspired by the masters of architectural illumination.
Assortment for choosing a model
A street lamp has its own responsibilities, it:
- plays the role of a decorative element, without at the same time depriving the area of its harmonious appearance;
- provides sufficient lighting so that owners feel comfortable on the premises even in the dark.
If a classic street structure almost always has a leg with a device on it, then you can choose a model for a homemade lamp that will serve as a decoration for the area from several types of lamps.
- Ground lamps-pedestals. These devices, installed directly on the ground, are often located along the perimeter of pedestrian paths. Other suitable places are beautiful flower beds, swings, gazebos or other recreation areas. Such ground structures are usually made either round or square.
- Wall lanterns. Such lamps are the optimal solution for illuminating the entrance to a house, veranda, or at the gate. Wall lighting comes in a variety of shapes, but the most popular are those in a retro style. Quite unexpected “raw materials” are often chosen as materials for them.
- Suspended structures. These are the most undemanding devices that can be attached to roofs, on verandas or directly to tree branches. The most popular, simple option is a long chain on which the lampshade is attached.
- Floor lamps. They are attached to the ground, and the appearance is often no different from a home device. This is a stand that ends in a round lamp. There are also more original models, when the shapes, sizes and number of shades are far from the usual classic floor lamp.
Features of connecting the lamp to the network
When you make street lighting in your dacha with your own hands, you should pay due attention to the wiring connection procedure. To connect the flashlight to the network, you will need:
- Electrical cable VVG.
- Terminal blocks for fixing connections.
- Corrugated pipe or metal hose for protection.
Useful tips for choosing components:
- For devices made by hand, a cable with two cores 1.5 mm thick is most often used.
- It is better to immediately buy a bay where the wire length will be 100 m.
- The diameter of the corrugated pipe should be approximately 18-25 mm. It will be needed to protect the cable from rodents and damage during digging.
- The diameter of the hole in the terminal blocks should be 2.5-4.4, consist of one or two strips - everything will depend on the number of connections and lampshades.
- Pads should be selected based on a current strength of 5-10 A.
Installation work
Installation involves the following steps:
- Dig a trench for laying the cable, the depth of which is 80 cm, and the distance from the house to the ditch is a maximum of 60 cm.
- When installing floor lamps, you first need to place metal knives, then pull the cable through them one by one. Where it is located in the trench, place it in a corrugated sleeve. After passing through all devices, the cable should be cut so that the length of its tail is no more than 15 cm.
- Prepare a second piece of wire and also pass it through the pipe; connect the two cables with terminals on top of the device.
- If the lamps are located on the facade or wall, you need to reliably insulate the communication boxes. It is advisable to make sure that the wires in the boxes are connected with clamping nuts. Wrap the twisted areas with electrical tape.
- Install the electrical circuit. Since it has two wires, one “phase” and the other “zero”, it is necessary to ensure that the switch can open the phase wire. Then, in the off position when changing a burnt-out lamp, the risk of electric shock will be eliminated. The phase wire is determined using a special indicator.
- A simple outlet is also suitable as a connection point - in this case, you can turn off the power to the entire system by simply pulling out the plug. The cables can also be connected directly to the terminals on the panel, equipped with an automatic fuse, which cuts off the voltage in an emergency.
sky lattern
There is also a very interesting option that we have not yet considered - how to make a Sky Lantern with your own hands
Now this topic is in great demand, and a large number of meetings are held where such sky lanterns are released into the sky.
These are such interesting paper structures stretched over a bamboo frame. Believe me, it is not difficult to build such a product.
You will need to go through the following steps:
An ideal dome can be made from rice paper, but it is very expensive. Therefore, it can be replaced with an ordinary garbage bag.
Take two of these bags, preferably as large as possible, and cut off the bottom of one of the bags. After this we glue the packages. The dome is ready.
Next you need to make the frame. Find a special ring. Take a wire with a diameter of no more than 2 mm and attach them to the ring with a cross. You can also stick them with tape.
The lantern is ready! Now decide what will burn inside it and launch it successfully! Don't forget to make a wish!
Types of street lamps
Street lamps that you plan to install on the territory of a country house or cottage must perform the following functions:
- illuminate the local area so that residents are not afraid to move around it at night;
- fit into the overall design concept of the yard and home.
Lamps for outdoor dachas are divided into the following types:
- wall lanterns. They are best suited as lighting fixtures at the entrance to the house and on the platform in front of it. As an option - lighting next to the gate or wicket. They can be different in shape and design; most often they choose “antique”;
- floor lamps - they are installed directly on the ground or on the veranda. A classic floor lamp is a flat stand with a round ball at the top, but there are more modernized models that differ from each other in height, shape and number of shades;
- ground lamps - they are mounted directly into the ground, and they can serve as illumination for green spaces, as well as illuminate pedestrian alleys in a summer cottage. In addition, they complement swings, summer pavilions and other buildings on the site well. Lanterns of this type most often have a rectangular or round shape;
- hanging lanterns - they are attached on verandas to ceiling beams or even to trees, if this does not impede the connection to the network. As a rule, they are a long and strong chain that ends in a lampshade.
In the photo you can see some types of country lamps, which can be purchased ready-made, or you can make them yourself.
We decorate the garden and yard with handmade lamps - 7 photos
In this section, you will find 7 photos of other (not discussed above) options for making garden and street lamps with your own hands.
Assemble the body
1. Cut out the glass for the three walls and the door (Fig. 2 and “Detailed view”). Cover the glass on both sides with masking tape. Apply glue to the tenons of the two body crossbars (C). Assemble the crossbars and two posts (B) by inserting a piece of glass into the tongues (Fig. 5). Align the crossbars with the tenon shoulders on the posts.
2 Apply glue to two more crossbars, add glass, a front post and glue these parts to the previously assembled back wall (photo P). In the same way, assemble the remaining crossbars, glass and front pillar. Make sure the bottom and cover (A) fit easily onto the studs of the posts.
3. Assemble the door by gluing the posts (D) to the crossbars (E) and inserting the glass into place.
4. Finish all parts with 220 sandpaper.
5. Glue the lid and bottom to the body.
6. Drill holes in the tenons (photo E) and insert round dowels into them. Apply a clear coat (we used a nitro varnish in an aerosol can, spraying it three times).
Link by topic: DIY decorative lantern-candlestick with stained glass
Making glass lanterns
It is difficult to imagine a dacha without family and friendly feasts. After such events, a lot of glass containers of various sizes, shapes and colors remain. Do not rush to throw away these containers; they can be used to make original and beautiful garden lanterns.
There are the following options for making glass lamps:
- Single lights. For work, dark glass bottles are used. They are filled up to half with colored pebbles and turns of wire. A small light bulb in a socket is inserted into the neck. All cracks and contacts are filled with sealant. Immediately after it hardens, the flashlight can be used for its intended purpose.
- Chandeliers. Several identical bottles are prepared, their necks are plugged with stoppers made of any waterproof material. After this, a circle or square is cut out of a plastic or metal plate. Holes for necks and electrical wires are drilled in the base. Bottles are inserted into the holes, an LED lamp is connected, and a chain or cable is attached to hang the created chandelier.
- Volumetric lamps. To make them you will need three-liter jars. Since they are absolutely transparent, they need to be decorated. This is done using stained glass paints, adhesive films or strips of copper foil. The lamp socket is attached directly to the plastic or iron cover. After this, it is put on the neck or rolled up with a special key.
A good visual effect is achieved by combining or alternating glass vessels in one product or along a path.
What can be used to make lamps
There are a lot of options; it’s important not to limit your imagination and take into account the design of the site. The most commonly used solutions are:
- Steel products or blanks. This can be either a ready-made container with slots or holes, or forged products or options assembled on your own using rivets or welding.
- Lamps made of wooden slats or natural materials - twigs, branches, etc. They are good for their ease of processing and accessibility.
The simplest lamps are often made from wood. - Aluminum and copper also work well, but finding suitable containers or blanks can be difficult. Metals are easy to work with and are not afraid of heat.
- Plastic is good for its durability, weather resistance and availability. You can select containers of the appropriate size without much difficulty, but only lamps that do not heat up very much can be installed in such lamps.
- Glass containers are a convenient solution that protects the light bulb well and at the same time looks stylish. The main thing is to choose options of the appropriate size and shape.
You can experiment with different materials, since it is impossible to determine the quality of light before production.
Street lighting installation methods
Three main methods of installing street lighting have become widespread:
- laying a cable line (CL) in a trench;
- tension of the overhead line (OL) along lighting supports;
- combined type - cable-overhead line (OCL).
Installation purely by an overhead line is extremely rare. The rules establish that the output of the supply line from the power source, entry into the building and intersection points are carried out by a cable line. In this case, the line is considered a cable-overhead line.
The cost of overhead lines is significantly less than cable lines. And if there is damage, you can find its location by inspecting the line.
At the same time, when installing overhead lines, it is worth taking into account the expanded security zone and its low resistance to weather conditions, especially during thunderstorms. Laying a line using the “open” method is not safe for humans and animals and has a negative impact on the environment.
Today, installation of street lighting in populated areas (city, town) is permitted exclusively by cable line, because:
- not a large security zone (1 m);
- high stability and protection from adverse weather conditions;
- many installation methods depending on external conditions (in pipes, trays, tunnels, supports, channels, etc.);
- The closedness of the cable line from outsiders allows it to be laid in places with heavy traffic or crowds of people.
The disadvantages of this method include:
- difficulty in finding the location of damage;
- the influence of soil subsidence on the performance characteristics of cable lines;
- the possibility of mechanical damage from special equipment (during unauthorized work in the security zone).
Installation of street lighting
It is important to know that all installation work is carried out exclusively by qualified personnel who have access to work in electrical installations. Installation work begins only after receiving a building permit
Installation of street lighting with a cable line involves laying the cable in a trench. To protect it, choose an armored cable. This method is carried out in the following sequence:
- According to the design documentation, flags or pegs are installed at the installation sites of lighting supports. The route starts from the street lighting cabinet (SHUNO).
- Special equipment is used to dig a trench 0.8 m deep. At intersections of roads and squares - 1 m.
The width of the trench depends on the number of cable lines being laid. For laying one cable, the trench width is 0.2 m; for two or more cables, the distance between cables is 0.1 m (clause 2.3.84 PUE 7).
- The bottom of the trench is covered with sand to a height of 0.1 - 0.15 m.
- To protect the cable line from mechanical damage, a polyethylene (HDPE) pipe is laid. For armored cable - at intersections with roads, parking lots, squares; for cross-linked polyethylene cable - along the entire length of the route.
- A cable line is laid in the trench. In a pipe this is done by using a cable to pull it out. At the places where the supports are installed, the ends of the cable in the pipe are brought out for their connection. Subsequently, they are inserted into a distribution box installed in the technological window of the lighting support.
- Cover with a layer of fine earth free of slag, stones and construction waste (clause 2.3.82 PUE 7). The thickness of the earth layer is 0.2 m.
- Clay bricks are laid in one layer. In areas of passage under asphalt roads, laying bricks is not necessary.
- Laying mesh or film of blue or yellow color, or warning tape at a depth of approximately 0.3 m. The tape is not laid at intersections with utility lines.
Laying a cable line for street lighting
Installation of street lighting poles is carried out in the following sequence:
- Compact the sand layer.
- In the place where the support is installed, a square (1m x 1m) hole with a depth of 1.2m is dug.
- A metal structure (mortgage) is installed in the hole, through the center of which a pipe with cable lines is led out.
- The hole is filled with cement mortar.
- After the cement has hardened, the lighting support structure is attached to the embed.
Installation of street lighting poles
Installation of street lighting by overhead line. A special set of linear fittings is mounted on the supports, onto which the overhead line (SIP) is suspended. At the next stage, the lamps are connected to the overhead line.
Sectional view of SIP wire
The connection point of the line from the control cabinet to the lighting support and the rise to it is carried out by cable.
Connecting the lamp to the overhead line
Material selection
Most often, summer residents prefer to make lamps from plastic, but this decision can hardly be called successful, because plastic is not very durable, often breaking and breaking. It is more correct and reliable to make a street lamp from metal, for example, bronze, copper or brass.
A hand-made copper lantern will perfectly complement a retro-style exterior. However, the main disadvantage of copper is that the material oxidizes over time, acquiring an unattractive greenish tint. As for bronze, it darkens, so such a lamp will have to be constantly cleaned.
Considering all of the above, brass remains the best material, satisfying the requirements both in appearance and in strength characteristics.
What can you make your own lamp from?
Very often, homemade street lamps are made of plastic , but this solution is not the best, since the plastic product is easily damaged and broken. It is best to make a metal lantern with your own hands:
- brass;
- copper;
- bronze
It is worth noting that the steel model will be maximally resistant to precipitation and other external influences, but its appearance leaves much to be desired.
But copper lamps will harmoniously complement the retro-style exterior, but do not forget that over time, copper on the street oxidizes and acquires an unsightly greenish tint. A bronze lamp tends to darken, so it will have to be cleaned regularly.
The most optimal material for a lamp is brass, which is durable and visually attractive.
Making street lamps
Most often, home craftsmen initially take on simple street lanterns. Usually small wall lamps, such as sconces, are made (they just need much less metal), and less often - pompous street lamps on a massive vertical leg.
However, street or wall lamps, which are simple at first glance - with 4 or more sides of shades, require particularly labor-intensive design. Here you will have to work hard on an unusual frame, observing the correct geometry of the individual parts
They must be well fitted to protect the internal electrical components - this is especially important for installation in outdoor conditions, where rain, snow and wind are not uncommon
For effective ventilation and heat removal from the hot lamp, slots are provided in the housing at the top and bottom. They need to be equipped with protective visors to help remove moisture. Then you should carefully weld all the elements at the desired angle, providing grooves for the glass partitions, install them on the base, and glaze them.
Street lamp
When installing a forged chandelier (sconce) or street lights in your home, you can be sure that there are no exactly the same ones anywhere else. It is impossible to create two absolutely identical models; each is unique in its own way. The warmth that the craftsman brings into the product with his own hands makes the light of such lamps even more pleasant, cozy, and fabulous. Treat yourself to such a purchase or make it yourself.
Installation and connection
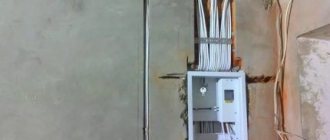
To connect lamps, a cable is usually used, which is buried in the ground. Procedure:
- dig a trench from the walls of the house (near the panel or entry point) to the place where the lantern is installed;
- The cable, prepared for underground installation, is pulled into a corrugated tube. It will protect it from external influences and contact with moisture;
- lay the wire and dig a trench. The cable exit from the ground is made right under the lamp, so as not to create the possibility of accidental damage;
- connect the lamp socket;
- the second end of the cable is connected to the starting device - a switch, a circuit breaker on the panel or a power supply (if low-voltage lamps are used).
The method of installing a street lamp depends on its design and other features. As a rule, installing lamps does not pose any special problems - either mounting on a supporting structure, wall or bracket, or hanging installation is used. The main task is to ensure that the capabilities of the power supply match the needs of the luminaires so that unwanted and dangerous overloads do not occur.
Possible difficulties and errors
Technically, making the lantern itself for landscape lighting does not seem difficult; for this it is permissible to use both new parts from the store and those that can be found in any household. To do this you just need to use your imagination.
Difficulties with landscape lighting are caused by power supply schemes, choice of power and number of lighting devices. All 220 V power lines are classified as dangerous, the calculation and installation of which can only be carried out by specialists.
The main mistakes that users make when installing landscape lighting:
- The power, type and number of lamps are incorrectly selected. The installation does not perform its lighting functions or is energy-consuming to operate.
- Violation of underground cable laying standards.
- The cable characteristics do not correspond to the connection power of lighting devices.
- There is no protective grounding and no automatic safety system in the electrical network.
- The connection of lighting devices is made using twists without the use of terminal blocks.
- The cable is laid in the ground without metal hoses.
- The incandescent lamp is hermetically sealed in the lamp; there is no ventilation to cool it.
Making a homemade lantern
To make a lantern using metal raw materials with your own hands, you will have to prepare the following tools:
- drill;
- drills;
- screws and so on.
Very often, do-it-yourself lanterns are made from scrap materials, for example:
- wood chips;
- glass and tin jars;
- clay;
- plastic bottles and cups that serve as lampshades for the garland;
- PVC pipes;
- cardboard drink bags;
- old kitchen utensils;
- unused building materials.
Such products will be especially original, and making them with your own hands will not be difficult. However, they will be fragile and have a short service life.
Recent Entries
Chainsaw or electric saw - what to choose for the garden? 4 mistakes when growing tomatoes in pots that almost all housewives make Secrets of growing seedlings from the Japanese, who are very sensitive to the soil
When making a lamp for a dacha with their own hands, many do not hesitate to use their imagination to the maximum. Modifications can be quite varied. Below we will look at the manufacturing features of some options.
DIY glass bottle lantern
It is very easy to make a lampshade based on a glass bottle or jar with your own hands, while transparent glass will allow light to easily pass through the walls and create wonderful special effects. To work you will need:
- bottle or jar;
- pliers;
- cartridge;
- insulating tape;
- knife for stripping insulation;
- indicator;
- decorative elements.
The work flow is as follows:
- install the electrical wiring, connect the wires in the socket and screw the light bulb into it;
- We take a bottle with a narrow neck, preferably an original shape and color, and put small beads, transparent balls that reflect color, or ground glass on its bottom;
- we wrap a thin colored wire around our finger so that it takes on a spiral shape, and also put it in the bottle;
- lower the socket with the light bulb into the lampshade and fix it with silicone.
DIY forged lantern
A forged lamp for a summer cottage is a more reliable and durable option. To make it you will need:
- steel rods;
- corner;
- stripes;
- welding machine.
The manufacturing work will look like this:
- from 4 steel frames we make a body in the form of a rectangle or trapezoid;
- We cover the outside of the frame with bars. They are made from steel rods;
- cover the body from above with an iron cap;
- We make a bracket from a square-shaped steel bar that will serve as a fastening to the wall;
- the lower curls are made of thin steel strips;
- the ends of the curls are welded and connected by interceptions.
Forged version
Sometimes, looking at a photo of a street lamp made by yourself, it’s hard to believe that it was made by hand. Let's consider just this option. Let's take a corner, steel rods, strips and a welding machine for them.
Let's get started:
- We decorate four steel frames with a rectangular shape or trapezoid as a base.
- We weld gratings from the rods and cover the body with them.
- We cover it all with a cap-lampshade made of iron.
- A square steel bar will act as a bracket.
- Using narrow steel strips we form curled patterns. We attach them to the bottom, weld the ends and connect them with interceptions.
Types of street lamps
Street lamps that you plan to install on the territory of a country house or cottage must perform the following functions:
- illuminate the local area so that residents are not afraid to move around it at night;
- fit into the overall design concept of the yard and home.
Lamps for outdoor dachas are divided into the following types:
- wall lanterns. They are best suited as lighting fixtures at the entrance to the house and on the platform in front of it. As an option - lighting next to the gate or wicket. They can be different in shape and design; most often they choose “antique”;
- floor lamps - they are installed directly on the ground or on the veranda. A classic floor lamp is a flat stand with a round ball at the top, but there are more modernized models that differ from each other in height, shape and number of shades;
- ground lamps - they are mounted directly into the ground, and they can serve as illumination for green spaces, as well as illuminate pedestrian alleys in a summer cottage. In addition, they complement swings, summer pavilions and other buildings on the site well. Lanterns of this type most often have a rectangular or round shape;
- hanging lanterns - they are attached on verandas to ceiling beams or even to trees, if this does not impede the connection to the network. As a rule, they are a long and strong chain that ends in a lampshade.
In the photo you can see some types of country lamps, which can be purchased ready-made, or you can make them yourself.
Mini flashlight keychain
Very convenient, portable, bright, able to work uninterrupted for several hours. It will help you open the door on a dark train, and will save you in any force majeure situation with a sudden blackout.
Schemes and drawings of how to make a flashlight with your own hands of varying complexity, this is the easiest way, so a verbal description is enough. Suitable for a beginner master.
For this we need:
- Light-emitting diode;
- Three tablet batteries;
- Heat-shrink tubing;
- Stationery needle;
- Soldering iron;
- Lighter;
- Tweezers;
- Pliers.
Find a minus on a 1-watt LED and solder it to the minus on the battery. The size of the battery must match the circumference of the LED.
Bend the terminal with the soldered tablet and place the LED on the pad. We apply two more tablets to the resulting structure and check our flashlight for functionality. If it is shining, then the scheme is working and we are on the right track, we can continue training.
Place the heat-shrink tube onto the product, leaving a free terminal, and heat it with a lighter to seal the structure.
Solder a stationery needle to the free contact and bite off the top cap with pliers.
Make a ring from the remainder of the needle, the end of which will be directed towards the positive terminal of the top tablet. Place a small ring on the curved part; it will later serve as an attachment to the key.
To turn it on, just press the body and the mini flashlight keychain will shine.