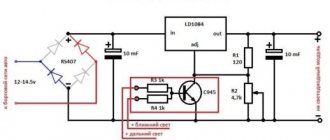
Schematic diagram of the attachment for the ability to measure high voltages (many thousands of volts) using a multimeter. In some cases, it is necessary to measure very high voltages (tens of kilovolts). For such purposes, there are special devices - “kilovoltmeters”.
It makes sense to buy a special kilovoltmeter only when you need to measure “kilovolts” quite often. In everyday amateur radio practice, such measurements have to be carried out extremely rarely.
And in this case, you can get by with a simple multimeter. But the upper limit of voltage measurement for a standard multimeter usually does not exceed 2000V.
In order for a multimeter to be able to measure significantly higher voltages, it must be supplemented with an attachment in the form of a high-resistance and high-voltage voltage divider.
How to measure high voltage with a multimeter
The main difficulty in measuring high voltage with a multimeter is creating a divider circuit.
Typically, certified household devices provide the ability to measure voltages up to 1-2 thousand volts. And this is justified, because working with higher potentials is dangerous to health, and the need for such manipulations at home is extremely unlikely.
In what cases can measuring high voltages be useful?
If we exclude situations of gaining new experience, self-development, etc., then the most likely reasons are the following:
- Checking the performance of specific power units, for example: High voltage at the TDKS anode (nowadays the use of picture tubes in TVs is very rare);
- Filament voltage in transformers for microwave ovens;
- And so on.
In the last two cases, you should use only special kilo-ohmmeters that correspond to the permissible measurement parameters.
In everyday life, special accuracy is not important, and the current strength of step-up transformers is often small.
Therefore, the use of a divider for one-time measurements is more than justified.
How to make a divisor
The basic principle of construction is the creation of a shoulder from two resistances, the nominal values of which are correlated multiples.
For example: 20 MOhm and 2 kOhm. The ratio is 1:10,000.
The circuit diagram of the divider can be presented as follows.
Rice. 1. Schematic diagram of the divider
In this case, the voltage U2 will be calculated as U·R2/(R1+R2).
That is, with a ratio of R1:R2 as 1:1000, it turns out U1 = U·1/(1000+1) = U/1001.
At a ratio of 1:10000 – U/10001 and so on.
In this case, the unit at the end can simply be neglected, since the resistors themselves may have deviations in their nominal values, and this will have little effect on the measurement errors at such potentials.
Thus, it is enough to assemble a divider from available resistances that will correlate with the desired coefficient.
Resistors do not have to be in one copy. You can assemble them in series or in parallel, but then you should definitely calculate the final nominal value, and for additional confidence, measure the resistance after assembly.
One of the divider options with sequential assembly
Rice. 2. One of the divider options with sequential assembly
The higher the accuracy of the resistors, the better. But even a tolerance of 1-3% is not a problem here.
Security measures
Working with high voltages is always dangerous.
To prevent overheating of resistors, you should use models designed to work with high voltages (for example, 30-40 kV, KEV or MLT-2 models) and with a high heat dissipation coefficient (2W and above, and preferably 8W).
All connections from component elements should be made in such a way as to prevent the occurrence of breakdown current. For example, place the resistors in series without intersecting or overlapping in a plane, place them in a glass flask or inside another material with high electrical density (polystyrene, plexiglass, textolite, etc.).
No less caution should be exercised during the measurement process itself:
- The device under test must be disconnected when connecting the divider and measuring device.
- Please note that charge can accumulate in picture tubes (at the anode).
- After measurements, the device under test should be de-energized again.
How to take measurements
The divider is connected to the measured section of the circuit. In the example above, these are contacts X1 and X2.
The measuring device is connected with one probe to the COM contact (aka X2). And the second - to terminal V (at the division point).
The resulting numerical result is multiplied by the divisor coefficient (it will depend on the denominations used and is calculated individually).
Author: RadioRadar
Checking electrical circuit parameters
When testing electrical circuits, you can test many of their parameters. This includes current, network voltage, and signal frequency. But to determine serviceability, you only need to ring the circuit for integrity and check the insulation resistance. Both can be done with a multimeter.
In order to know how to test electrical wiring with a multimeter, you need to correctly configure the measuring device and correctly perform the measurement steps. To check the integrity of the wire you need:
In the same way, wires in a car and cables of various electronic devices are tested.
In addition to checking integrity, wires are tested for insulation resistance. This can also be done with a multimeter:
What kind of lighting do you prefer?
Built-in Chandelier
- The probes remain in the same holes as when checking integrity;
- The measurement mode selected is the same - resistance test;
- The measurement limit must be selected as large as 20 or 200 megaohms;
- Touch the probes to opposite conductors of the cable: phase and neutral or phase and screen. In a car, this is ground and signal wire;
- The screen should remain displaying infinity; if there is any value instead, it means there is a short circuit somewhere. Changing values indicate interference in the network.
After this, you need to find the ends of the wire and connect the multimeter probes to them. The resistance of this wire will be displayed on the device screen. It should be in the range from 1 to 10 kOhm.
Method No. 3 – Modern tracking
Well, the last, most convenient and effective option that allows you to check the voltage in the outlet is to use a special control relay. This type of automation is a kind of surge protection device in the network. By installing it at home, you can not only measure the required parameter, but also protect a separate electrical appliance from surges in the network.
The disadvantage of the latter method is that it is not advisable to buy a separate relay for each socket. Therefore, we recommend installing this type of protection and control on the most valuable electrical appliances, for example, an electric stove or refrigerator.
Now you know how to check the voltage in an outlet with a multimeter and an indicator screwdriver. If anything was unclear, please comment or watch the video examples provided!
Expert opinion
It-Technology, Electrical power and electronics specialist
Ask questions to the “Specialist for modernization of energy generation systems”
Checking the current A multimeter can also be used to determine the amount of AC current consumed, for example, for a household appliance. Ask, I'm in touch!
Probe - also known as an indicator screwdriver
This tool, despite its simplicity, has many capabilities and is capable of solving most everyday problems - you just need to choose the right model and use it correctly.
There are several types of probes, differing markedly in functionality:
1. Non-powered indicator screwdrivers with neon light or LCD indicator. This is the simplest and most inexpensive type of indicator screwdrivers, but their functionality is limited.
Using such a probe you can only determine the phase wire. To do this, touch the conductor or terminal being tested with the tip, pressing your finger against the contact on the handle.
If there is 220 V on the conductor, the light will light up. But the probe cannot do anything else without power - neither find the neutral wire, nor check its integrity, nor even determine the presence of voltage below 60-70 V.
2. Indicator screwdrivers with their own battery power and field-effect transistor circuit. Outwardly, they may be very similar to those discussed earlier, but distinguishing them is quite simple: firstly, in models with a transparent case, button batteries are visible inside.
Secondly, if you touch the tip and the contact on the body at the same time, the indicator will light up.
Thirdly, some models are equipped with a switch, which also indicates the presence of autonomous power supply.
This is a more functional tool with which you can perform many tasks:
3. Highly sensitive, non-contact probes that do not require contact with a wire to determine phase or ground.
They are characterized by maximum safety, since access to exposed wires is not required to work with them. Also, using non-contact probes, you can usually search for hidden wiring, and not necessarily under voltage - they can work as a metal detector.
Expert opinion
It-Technology, Electrical power and electronics specialist
Ask questions to the “Specialist for modernization of energy generation systems”
How to use a multimeter: understandable for everyone - Construction Blog Therefore, it is necessary to measure the rated voltage in the sockets in order to understand the wisdom of connecting a new device to the system. Ask, I'm in touch!
TI chips with built-in shunt for current measurement
Texas Instruments 's extensive product portfolio now includes current meters with a built-in shunt. We present two types of such microcircuits, each of which is designed to solve different specific problems. Using a built-in shunt, the INA250 and INA260 ICs allow bidirectional load current sensing from the power rail or ground rail.
Integration of a precision resistor for current control into the microcircuits provides high measurement accuracy comparable to calibrated ones and minimal dependence of characteristics on temperature fluctuations. In addition, both chips use an optimized 4-point current sense shunt connection (Kelvin circuit).
INA250
The INA250 is a current-sensing amplifier with an output voltage proportional to the current being measured. The precision built-in resistor shunt allows you to measure current with high accuracy at common-mode voltage, which can vary from 0 to 36 V, regardless of the value of the supply voltage of the microcircuit.
The INA250 family is available with four output voltage scales: 200 mV/A, 500 mV/A, 800 mV/A and 2 V/A. All microcircuits are designed for a rated current of up to 15 A (10 A at a maximum temperature of 125°C). The unipolar supply voltage for the INA250 is 2.7...36 V, and the maximum current consumption reaches 300 μA. The microcircuit operates in an extended temperature range of -40...125°C and is available in a 16-pin TSSOP package.
Main characteristics of INA250
- Built-in precision shunt resistor Shunt resistance: 2mOhm
- Permissible error of shunt resistance: 0.1% (max);
- rated measured current: up to 15 A at temperatures -40…85°C;
- temperature coefficient: 10 ppm/°C in the range 0…125°C.
- Gain Accuracy (Shunt and Amplifier): 0.3% (max);
- INA250A1: 200 mV/A;
INA260
The INA260 IC is designed to monitor current, power and voltage using a built-in high precision shunt resistor. This integrated monitor's digital output provides I²C and SMBus™ compatibility.
The microcircuit provides high accuracy of current and power measurements in combination with the ability to detect excess current in the mode of common-mode voltages, the level of which can vary from 0 to 36 V regardless of the supply voltage. The INA260 can set up to 16 addresses to operate multiple chips on a single I²C bus. The digital interface allows programming of critical current levels, conversion times, and analog-to-digital converter (DAC) averaging. To make the meter easier to use, the internal multiplier provides direct readings of current in amperes and power in watts.
The INA260 integrated meter, housed in a 16-pin TSSOP package, operates from a power supply with a voltage of 2.7...5.5 V with an average current consumption of 310 μA in the operating temperature range of -40...125°C.
Key Features of INA260
- Integrated high precision shunt resistor shunt resistance: 2mOhm;
- equivalent error: no more than 0.1%;
- rated current: up to 15 A at temperatures -40…85°C;
- temperature coefficient: 10 ppm/°C (0…125°C).
- system gain error: 0.15% (max);
Application of Ohm's law
The basic law of electrical engineering, also known as Ohm's law, states: I=U/R
where I is the current in amperes, U is the voltage in volts, R is the resistance in ohms. This formula tells us that if we insert a shunt (R) into the gap of the measured load (where the current needs to be measured) and substitute the voltage (U) measured on the shunt into the formula, from the two values R and U we will find out the I we need - the flowing current.
Example: we expect a current of 20-30 A, or maybe more, from the consumption of the screwdriver motor. We have a wire shunt with a resistance of 0.035 Ohm. The shunt is connected to the plus or minus gap, it doesn’t matter - the effective current is the same in all sections of the circuit. A voltmeter is also connected parallel to the shunt - by its reading you can judge the current consumed by the load. With almost complete braking of the motor shaft, my voltmeter showed about 0.9 V. Substituting the values we know into the formula I = 0.9/0.035 = 25.7 A, this is the current consumed by the motor.
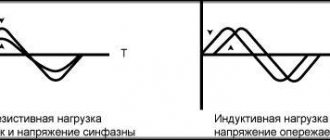
Please note: When measuring pulsating and dynamically changing currents, a digital voltmeter is not very suitable, since its controller takes readings very slowly. A pointer voltmeter is more suitable for this purpose.
By selecting a shunt of the required resistance, you can measure any constant or pulsating currents, even up to 300 A or more. Although I doubt you will need such measurements. Conventional resistors are not suitable as a shunt for high currents, since they have low power dissipation. You can calculate the approximate power dissipation of a shunt by multiplying the expected current in amperes by the drop across it in volts. For the above example, this is 25.7 * 0.9 = 23.13 W, wirewound resistors have this power.
Calculator for calculating current by resistance and voltage on a shunt
Shunt voltage, V
Shunt resistance,
Ohm
Current, A
Power dissipation on the shunt,
W